May 13, 2009 at 11:56 AM Post #10,501 of 27,306
Quote:

Originally Posted by komi /img/forum/go_quote.gif
No problem!

Is Public Domain now, i just want to protect somehow to dont go on eBay for sale ...

Regards !


Up it goes!
beerchug.gif


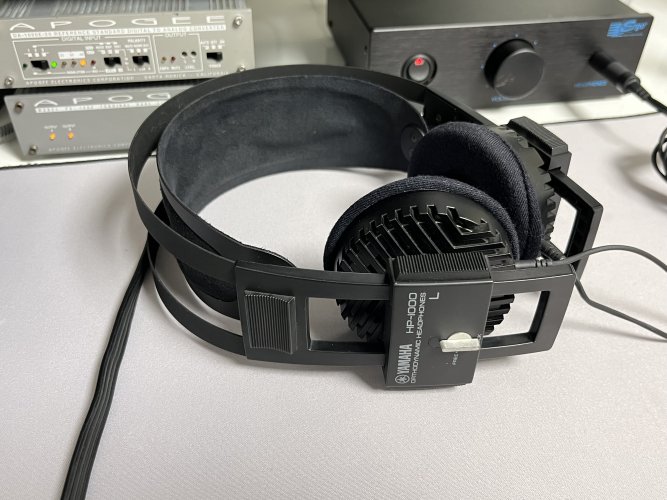
( http://wiki.faust3d.com/wiki//index....le=Yamaha_HP-1 )
 
May 13, 2009 at 12:07 PM Post #10,502 of 27,306
Thanks Komi!!

Btw, this is very interesting, the HP-1x and HP-2x notation. This goes to prove that Yamaha had different model notations within the HP-1 and HP-2 family (whether it was purely for colour or something else we are yet to see)

Another interesting point is if you look at the parts list, the HP-10 is listed to use a diaphragm, with a note saying "except for USA and Canadian models", which MIGHT mean....differently tuned drivers for different markets.
 
May 13, 2009 at 12:09 PM Post #10,503 of 27,306
Quote:

Originally Posted by Kabeer /img/forum/go_quote.gif
Another interesting point is if you look at the parts list, the HP-10 is listed to use a diaphragm, with a note saying "except for USA and Canadian models", which MIGHT mean....differently tuned drivers for different markets.


As I already commented on....
regular_smile .gif

Intriguing, anyway. From the parts list, it appears to be for color only.
There is also a comment on replacing the damper felt, as it affects the sound quality.
 
May 13, 2009 at 3:57 PM Post #10,505 of 27,306
Quote:

Originally Posted by iQEM /img/forum/go_quote.gif
that's what i've been talking about last week...it's look like this the 2nd listing that he made, i remember thw open bid was U$ 99,99 for that NOS T20v1...
biggrin.gif


Well obviously the original asking price did not express the true value of this rare item to the customer.

Often, people don't buy an item because it doesn't cost enough. I'm completely serious. Just ask TAG what they did for poor old Heuer Watches.

Quote:

Originally Posted by iQEM /img/forum/go_quote.gif
btw, one of my SFI solder pad/pin had been broken or should i say fell off...any idea to make them fix ? i dont want to buy another set to replace 1pc of driver...maybe i'm gonna open them up like on this posts here and see what i can do to fix it...


If there's not even a nub of metal sticking out, you'll have to replace the whole ring.

If that's the case, and you're very lucky, I might have a ring from a disassembled / nonworking SFI driver laying around. And i might not.
 
May 13, 2009 at 5:08 PM Post #10,506 of 27,306
Yay! Thanks for the scan, Komi! Fascinating that there are different part numbers for the two world markets. It's what we've suspected but didn't know until now.

Quote:

Originally Posted by DefectiveAudioComponent /img/forum/go_quote.gif
Speaking of the HP1A / HP2A, apparently there is a service manual for it. (At least, there is a web site selling it.)


Maybe one of us will have to buy it, just to see.
 
May 14, 2009 at 5:08 AM Post #10,510 of 27,306
Quote:

Originally Posted by wualta /img/forum/go_quote.gif
Yay! Thanks for the scan, Komi! Fascinating that there are different part numbers for the two world markets. It's what we've suspected but didn't know until now.


Maybe one of us will have to buy it, just to see.


No problemos guys, No need for "Thanx" !

Who ever is involved in this hobby is welcome to have all i got .. Well, not all .. LoL

One more thing. As yall see, manual is printed on 04. 1975. and all pictures shows square holes on the driver ...
Is this mean - first models come with square holes and later they switch to round holes ?

Second thing i notice is:
In mine particular model there is 2 pieces in every layer of felt ... also there is 4 pieces in every can ...

3 pieces are identical like 1/4 of the circle, 4th piece is smaller and this smaller piece also got 2 layers, - but one layer is fully covering holes on the can, another is smaller - covering about a half os holes ...

Is this mean, this particlulat piece of felt - and size of felt is maybe a piece for tuning a cans ?

Also, i was thinking to get some thicker felt and to cut on laser in shape needed to perfectly fit inside cans ... and, to dont use tack for sealing driver to driver cover, - but to use some rubber ring ...


By the way, i do the dump mod, and i am really pleased with sound diference ...

... and - i am not going for recabling - when i open cans and after inspecting a drivers a see thru the holes to difraghm is nice shimy silver aluminum colored piece, like NEW ..

i dont thing there is any problem with cord, speacialt cuz all is sealed ...


Regards !
 
May 14, 2009 at 7:29 AM Post #10,511 of 27,306
Quote:

Originally Posted by ericj /img/forum/go_quote.gif
If there's not even a nub of metal sticking out, you'll have to replace the whole ring.

If that's the case, and you're very lucky, I might have a ring from a disassembled / nonworking SFI driver laying around. And i might not.


wow, yes please i want it if you not using em Eric...maybe i need more than 1 ring now cos the upper ring had been fell off too (too much bending it i guess), last night i've tried to stick metal plate but even it work well but it's unstable and easily loosen up...
redface.gif


btw who's the guy that grab this one ?
http://cgi.ebay.com/ws/eBayISAPI.dll...m=180345733720
 
May 14, 2009 at 3:33 PM Post #10,512 of 27,306
May 14, 2009 at 3:40 PM Post #10,513 of 27,306
Well, not quite my way, but a bit diferent !

First of all, i got me some material ... 3mm. felt, thin felt with one sticky side and, some thinck alumium foil [but still flexibile] !

Then i cut parts on shapes and sizes i need !
1. There is one thin sticky felt circle sized on 55mm. like a driver, for the bottom of the cup, to cover a bottom of the cup and prevent sound leak on cup and overhead band joint !
2. 4 pieces of 3 mm. thick felt cut on sizes to cover a holes on the bottom edge of the cup! 3 pieces 41x7 mm. and one 26x7 mm.
3. One sticky felt circle sized on 50mm in diametar to be next to the driver.
4. One alumium folia circle sized on 50 mm. to stick on 50 mm felt. I decide to use thin gold anodized aluminum **** cuz is more flexibile then postcard paper like i found on some another topic, and wont go bad after some time.
5. One sponge circle sized on driver size - 55 mm. and about 10 mm. thick.
6. 4 pieces of sticky felt sized on cup cover soze and cut on 4 pieces to fit in between screw holes.

Parts.jpg


There is pic of all parts in some order how to put inside the cup.

Order.jpg


One more pic of parts sorted in order under driver !

Order1.jpg


Then, i got me some small sticky rubber circles to cover 3 top holes on driver for better high freq.

Driver.jpg


First thing first, covering the bottom with sticky felt. Is really thin felt and stick really good - feels like decal !

Sticky.jpg


Covering the bottom of the cup and cup-headband joint.

Step1.jpg


Then - placing new thick felt parts on place between screw holes - covering a holes on the bottom of cup.

Step2.jpg


Then i stick 4 pieces of sticky felt on the adge of the cup in between screw holes to overlap a bit thick felt, and fold down sticking to same, to keep thick felt in place and tight to cup wall. BUT to dont overlap all te way down - to i dont close holes on the bottom.

Step3.jpg


Next step is to place sponge in cup ... fits really good - and tight.

Step4.jpg


Then, stick small felt circle to same size [50 mm.] aluminum cirle, and place over sponge to felt face up.

Step5.jpg


Finaly - i put driver over all parts.
This is how finished cup looks after placing cover back

Step6.jpg


I use advice to dont remove old Earpads, and a just unstick places where screw holes are, and after screwing down a cover, HPs looks like they was never open ...

After fiew hours of listening, i am really happy with sound quality compared to stock headphones !

Maybe will try in the future some diferent way - bot for now i am happy ...


Regards !
 
May 14, 2009 at 3:59 PM Post #10,514 of 27,306
Quote:

Originally Posted by komi /img/forum/go_quote.gif
There is pic of all parts in some order how to put inside the cup.

Order.jpg


Hi Komi,
This all looks good. But one thing I do not understand. What is the purpose of that gold Aluminium disc?? To me it looks like its acting like a big reflector and therefore boosting treble a lot, and making all the layers below it useless?

Also the layer you glued to the very bottom of the cup, over the cup joint, is that dense felt or not dense? (since if it isnt that dense, it would only serve a minimal purpose, thin and v.dense would be best there).
And the layer you glued over the vents, if the sticky area is solid, and wont let air through....you have effectively sealed your cup, and there is nowhere for the backwave to escape? or am i mistaken , and it is breathable?

Also, your mod guide is very neat and with beautiful photos. But for people who wish to copy it, can you also describe the change in sound, what is better now? (and what , if anything is worse?).
 
May 14, 2009 at 5:19 PM Post #10,515 of 27,306
Quote:

Originally Posted by komi /img/forum/go_quote.gif
Who ever is involved in this hobby is welcome to have all i got .. Well, not all ..


Good thing you added that qualifier!


Quote:

Originally Posted by komi
Is this mean - first models come with square holes and later they switch to round holes ?


Yep, that's what we figure. No explanations from Yamaha, of course. The square holes only show up in the earliest brochures that we've seen.

I suspect a different supplier of magnets-- could be Yamaha decided to make their own. Or there could be another reason.


Quote:

Originally Posted by komi
In mine particular model there is 2 pieces in every layer of felt ... also there is 4 pieces in every can ...Is this mean, this particlulat piece of felt - and size of felt is maybe a piece for tuning a cans ?


Those strips of felt are for vent damping-- they keep the backwave escaping from the vents from being too dangerous and keep the driver from seeing a sealed cup, which, unless the cup was large, would kill the bass.

Usually there are two strips of felt per cup circumference segment, and yes, sometimes they're not exactly the same length. As long as the vents are covered by at least one layer, they should be fine. As an experiment, you can remove all the felt and listen for the effect on the bass. Some of us have taken to using tiny dots of glue to make certain those strips cover those vents, 'cuz we likes our bassin'.


Quote:

Originally Posted by komi
Also, i was thinking to dont use tack for sealing driver to driver cover, - but to use some rubber ring ...


Not a bad idea, but a gasket only works if it's held against the seal's surface with pressure. I wouldn't trust that orange foam to supply the pressure, and besides, you don't want to do anything to stress those screw threads.


Quote:

Originally Posted by komi
By the way, i do the dump mod, and i am really pleased with sound diference ...


Glad to hear it. You are now officially a member of Team Ortho.

EDIT: I just now saw your mod with the photos. Good work! I hope the cup closes easily. Like I said, you don't want to stress the threads and you don't want to open a gap between the baffle and the cup.

The aluminum foil is what we call a reflex disc. It intensifies the damping ability of the layer in front of it and also reflects some treble to flatten out the response in phones like the HP-1 and YH-1. Depending on the density of your first felt disc (the one right next to the magnet), the amount of treble boost could vary from subtle to considerable. Ortho 'phones have a fairly sudden rolloff in their treble response (some call it Ortho Droop), and a reflex disc can help. Even so, the response will drop again beyond 10kHz (at least to my ears), but that's another matter.

If the disc of felt right next to the driver has an adhesive backing, that backing is acting as the reflex disc. I don't know how much the foil is helping in that case, but what could it hoit?

If you've got a good balanced sound that's not too bright and not too dark, then you've got it.

Oh, and I really like that thin stick-on felt on the bottom of the cup. The felt layer is too thin to do much, but by covering the ball joint you've sealed a big leak and probably quieted the noise the joint makes as well. Plus it looks good.

.
 

Users who are viewing this thread

Back
Top