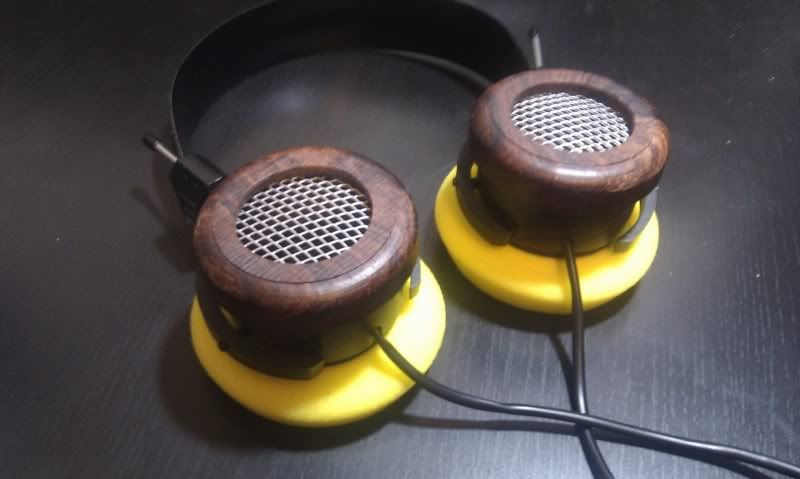
SR60-Mod
Mar 7, 2011 at 3:57 PM Post #2,011 of 5,004
 
Here is a question for those who have made their own shells. How have you sanded the rings and finished them once cut out. I have had problems all along with my Mahogany, but even worse with the Padauk I cut yesterday that even after repeated sanding of the sides, I can't get the grain to show like it should/how I want it to. The front face (flat portion) is no problem, it comes out looking great. However the sides of the ring are another story.
 
I started out rotating the ring in some 120 grit to smooth down the inherent rings from the hole saw. Then have moved to 400 grit trying to follow the grain (which isn't easy on a ring), then to 600 grit to finish. But I always get some fuzziness in the wood and a lack of nice stand out grain, something that I see Bill's Coco cups or Al's dont seem to be lacking. I have even tried a thin coat of lacquer before sanding to try to seal things, but that really hasn't worked.
 
Any suggestions how to get a great finish like you others are getting would be hugely apprecaited. I am really getting discouraged.


I cut the shells, using three hole saws to get my double walls.  I then bring my shells to my grinder/sander combo, a Sears stand-alone I bought at a garage sale.  I sand the shells till they're smooth.  I don't do anything special in that regard.  I then wipe away the extra sawdust and apply a clear coat of high-gloss lacquer.  I'm a brush guy.  I've tried sprays but brushing just feels more organic, if that makes any sense.  I put the first coat on, let it dry, then put on a second coat.  Brushing lets you put on thicker coats.  You have to gauge it, though.  It's not really a workable coat unless it has that "wet" look but if you put it on too wet, you get runs.  Even then, runs aren't the end of the world.  You just have to let the lacquer thoroughly draw, then sand it down smooth.  If you do this, make sure you wait until you've got hard lacquer; otherwise, you get rubbery residue, which is not going to shine.  When that happens, you end up having to sand it off and start over.  Essentially, the drip is nature's way of telling you to slow down, cowboy.  With sprays you can put little microcoats on, but you end up having to spray a lot to get very far.  With brushing, I have found I get a good coat after I've laid down a minimum of five good layers.  At about seven, you're looking at glass and it's terrific.
 
There are different schools of thought when it comes to lacquer.  Some are totally against it out of the concern that it makes the wood more brittle.  It closes the little microgaps, sealing and smoothing them over.  On the other hand, that's on the outside and nobody ever accused wood shells of being sponges or straws.  I like to at least give the wood a single coat because it protects the wood and brings out the grain finish.  Even after sanding, I don't really know what the wood really looks like until I've applied the lacquer.  It makes a huge difference in appearance, as big a difference as sanding.  That said, I usually don't touch the inside of the wood, even if that leaves an archaeologist's trail of artifacts showing splotches of runaway stain or lacquer (I only use stain with the cheaper, light-colored woods).  Nobody is going to look inside the shells, once the grills are applied.  I personally think the rough appearance of interior wood is helpful in diffusing sound refractions and avoiding spikes and standing waves.
 
 
Mar 7, 2011 at 4:02 PM Post #2,012 of 5,004


Quote:
Al, I am using a 2.5" outer. That gives me plenty to sand off. My problem is the more I sand, the worse looking things get. I start with some defined grain after cutting, but even starting with a rough grit (~120 or so) and working down to 600 (cleaning with denatured alcohol in between) things look fuzzier and my grain is less well defined. I need to have some good looking grain before I lacquer, otherwise I will just be coating bad looking wood with more and more coats of laquer.


Hi Sharkz,
 
yeah I can totally feel your pain.  What I found is that sometimes certain woods need even more massaging than the 2.5 inch hole saw can give (since you want them to fit in the prongs and still be rigid enough to handle the extremes).  Try it out with some cheaper wood and go up just a touch beyond 2.5.
 
Additionally I found that the lacquer actually acts as a catalyst to bring up grain and shine.  I usually go overboard with anywhere from 8-10 coats.  Sometimes the wood does not look like anything special but as the lacquer gets time to lock the wood chemically speaking I've had some amazing results.  I just pull sand and wipe with a lint free cloth.  I have to give you credit because the way in which you treat and handle your shells sounds fantastic.  Hopefully a little more material can help you get past the ugly phase you describe.
 
One more thing, I know it sounds completely stupid but investigate using coarser sandpaper.  Start with 100 and then move to 150 or 200.  Then laquer and pull sand.  Maybe it will keep your grain/finish you are hopeing for while still staying smooth since the lacquer will fill in some of the gaps that sanding missed.
 
Just a thought... I wish I could be more helpful than that.  My experience with mohogany and panduk is limited.
 
Best of luck!
Al


Mar 7, 2011 at 4:26 PM Post #2,013 of 5,004
 
my word you are a saint sir! i'll have to think of something to send you as my gratitude. :) 


Not a problem.  I know what it's like to kill a driver and I know the sadness that comes from an unexpected disaster.  In fact, you never quite outrun life's potential for setbacks.  Working on bloodwood, I was initially impressed with its sharp, clean look but when I started cutting it, I had to throw several shells away because of chips.  Sometimes, I'd get all the way to the end of the process and then chipped the shell I'd just finished.  It was infuriating.  
 
When that happens, there are two ways you can look at it.  You can see it as the gods suggesting you do something else, sort of like your own personal Adjustment Bureau.  On the other hand, you can see it as a test.  You want something really terrific and you're only going to get it if you have the patience and persistence to hang in there.  I can't tell you how many mistakes I've made along the way.  Quite often, I'll think I have a problem solved only to realize that there was more to it than I'd thought.  All I can tell you is that the ball is always in your court.  Life is the ultimate teacher, if you're willing to pay the tuition.  
 
And on that note, I hasten to add that I just got some East Indian Rosewood, which is brownish as compared to cocobolo, which is reddish.  East Indian Rosewood occupies a place, up there with cocobolo, as the best successor to Brazilian rosewood.  There's an active debate as to which is better, but all three are highly sought after.  Some people think that the East Indian rosewood  and cocobolo are better than the current Brazilian rosewood, because BR depends on a dwindling supply of domestic supplies (pre-CITES) and legally-available stumpwood.  The differences may be exaggerated, though, as the tone quality of the wood seems to have as much to do with growth rings and grain patterns that come from certain environmental conditions - like climate, rainfall, elevation, et cetera.  Some woods just look good, without actually imparting much in terms of the sound you're shooting for.  Some sound terrific, regardless of how they look.


I cut these EIR shells today.  The sawdust was dark and oily, like chocolate.  At one point, the heat generated by the center cut produced a boiling, oozing oil spill coming out of the size of the wood, something you don't see (or expect) every day.  But these shells sanded surprisingly well.  I haven't lacquered them up yet.  Just testing them out, I was blown away by the quality of the sound.  They're definitely worth their place in that inner circle of best wood choices.


I'm chasing the mailman so I may not have these lacquered up just yet, but it's encouraging to know that, besides cocobolo, there's another Brazilian rosewood substitute that deserves mention in the same sentence.
 
Mar 7, 2011 at 4:34 PM Post #2,015 of 5,004
Had a play today making a couple sets of cups for my sr80i here's the cups I made from cocobolo, also did a set from zebra and planning on doing another cocobolo set as I have the wood spare as well as pieces for the end of the headland mounting rod.

IMAG0030.jpg


Can't help but feel the rest of the set up needs some work aesthetically now, have also quarter reverse nodded and punched out a few of the inner holes, could do with a recable and I'm very tempted to replace literal all the existing plastic part with wood but I'm not too confident of its structural integrity if I do.

Apologies about the odd English in places I'm on my phone and its correcting things wrong and then not allowing me to change them.
 
Mar 7, 2011 at 4:43 PM Post #2,016 of 5,004
Thanks for the advice Bill and Al.
 
Bill, what grit sandpaper do you have on your machine? Just curious because I have a Delta benchtop I use (1 inch belt and 4 inch disc on the other side) and I never feel I have enough control with that. Also, which direction do you sand in (ie just lay them flat and rotate so the side wall is parallel to the ground or what)?
 
Might need to try one with the pure machine finish.
 
Mar 7, 2011 at 5:29 PM Post #2,017 of 5,004
Has anyone tried experimenting with different amounts of dynamat/damping on the driver?
 
I recently went from a blob of bluetack a similar size to the ones grado use, to a much larger amount covering the whole driver (excluding the holes). If anything I think it sounded better with the more modest amount and actually had more bass.
 
Any thoughts?
 
Also, and comparisons of bluetack/dynamat or other materials? I'd imagine that if dynamat was a good damping material then you would need a greater quantity of bluetack for the same effect....
 
Mar 7, 2011 at 5:32 PM Post #2,018 of 5,004
I think I read that Dynamat only needs to be applied to approximately 25% of the surface you want to damp. But then, the stuff is aimed mainly at reducing vibrations in cars etc.
 
Mar 7, 2011 at 5:39 PM Post #2,019 of 5,004
I was thinking of doing a re-cable and I started wondering.. What temp are people soldering at on the drivers and with what solder?
 
Mar 7, 2011 at 6:49 PM Post #2,021 of 5,004
I tried using a strip of felt to line the interior wall of my stock plastic shells. Seemed to make things a bit muffled. I took it out pretty quickly. But it could be because I didn't tape or glue the felt down. Also from the Fostex mod thread, I gather that it makes a difference what type / thickness of felt is used. Mine was some craft felt made from recycled polyester.
 
I also tried bluetack + a small amount of felt on the back of the magnet. This was an improvement over stock.
 
Right now I've done away with the felt entirely and am using Dynamat on the magnet plate and the plastic shells. (It's not exactly Dynamat, but a similar thing called B-Quiet Ultimate that I found  here up in Canada.) Haven't tried adding it to the rest of the driver's rear chamber surface yet, but I plan to.
 
 
Mar 7, 2011 at 8:11 PM Post #2,022 of 5,004
I use 18w iron with flux cored solder (old stuff not lead-free, I prefer it).
 
Even 18w is way hot enough for this. A 12 or 15w would do the job fine also. Just get in and out, don't hold your iron there for unnecessarily long
 
Make sure to the tin the wires, and also to tin the actual soldering iron's tip before you try to heat up the original solder.
 
Quote:
I was thinking of doing a re-cable and I started wondering.. What temp are people soldering at on the drivers and with what solder?


Mar 7, 2011 at 8:39 PM Post #2,023 of 5,004
Hi,
 
Just thought I'd throw this out there....
 
In my experience by FAR the biggest changes (improvements) to the sound of my grado sr80s comes from playing with the headband/pads. It's really amazing how much their sound signature changes between a tight pinched headband, a really loose one, the cups far forward on the ears, aligned with the middle of the ears etc.... I mean the sound changes from bassy/middy and very intense (when tight) to really airy and bass light with a much larger soundstage (when loose).
 
In my experience the best configuration seems to be a headband which is really loose (ie stretched to make the cups wide apart), but bent quite a lot right by the cups so as to tilt them (so they arent flat, but angled, to follow the contour of the head).
 
Squashing my pads (bowls) flat for a while also really seems to improve the sound (and comfort!)...
 
Just thought, that as it seems to me, that these effects can be much more drastic to the sound signature than the usual mods...
 
How do people wear their grados/how do they think they sound best? I'm curious.
 
Mar 7, 2011 at 8:42 PM Post #2,024 of 5,004
NEW TOYS


I need some screws, those tight little machine screws that look like they belong on a watch.  


This is the slip-on version, or at least some basic prototype of what I'd like it to be.


Here is a more complete version, but again, without the machine screws, it's just hardware in my hand.


Users who are viewing this thread

Back
Top