SR60-Mod
Mar 7, 2011 at 10:35 PM Post #2,028 of 5,004
Bill....Just put those metal shells in a mailer and send them right here to me for some testing and modding experiments and I promise I'll get them right back to ya in say a ...year, two years.
They look fantastic and I'd love to buy a pair from you ahead of anything else we got cooking down your way-metal is what I'd love to check out... sweet!!!!!
 
Mar 7, 2011 at 10:49 PM Post #2,029 of 5,004
Got my Padauk shells cut and 2 coats of lacquer in. They are looking good so far. They are a little thicker than I wanted (2.5" OD with a 1.5" hole), but seem to be working out well. Figure in about 3 days they will be usable. Want to get a ton of lacquer on them and make them all shiny like. Also cut two Purpleheart shells, but I have a feeling they are going to be tough to finish. Lots of weird streaking in the wood when sanding due to their oiliness. Looks like it will be a challenge.


Mar 7, 2011 at 11:22 PM Post #2,030 of 5,004


Nice job. im jealous.
Quote:
NEW TOYS


I need some screws, those tight little machine screws that look like they belong on a watch.  


This is the slip-on version, or at least some basic prototype of what I'd like it to be.


Here is a more complete version, but again, without the machine screws, it's just hardware in my hand.


Mar 7, 2011 at 11:30 PM Post #2,031 of 5,004


Bill When I had a set made for me I watched the guy use a piece of wax that he held up to it while in was spinning on the lathe. Not sure how you could do it without a lathe but look into it, the results were fantastic.
 
Quote:
 

Not a problem.  I know what it's like to kill a driver and I know the sadness that comes from an unexpected disaster.  In fact, you never quite outrun life's potential for setbacks.  Working on bloodwood, I was initially impressed with its sharp, clean look but when I started cutting it, I had to throw several shells away because of chips.  Sometimes, I'd get all the way to the end of the process and then chipped the shell I'd just finished.  It was infuriating.  
 
When that happens, there are two ways you can look at it.  You can see it as the gods suggesting you do something else, sort of like your own personal Adjustment Bureau.  On the other hand, you can see it as a test.  You want something really terrific and you're only going to get it if you have the patience and persistence to hang in there.  I can't tell you how many mistakes I've made along the way.  Quite often, I'll think I have a problem solved only to realize that there was more to it than I'd thought.  All I can tell you is that the ball is always in your court.  Life is the ultimate teacher, if you're willing to pay the tuition.  
 
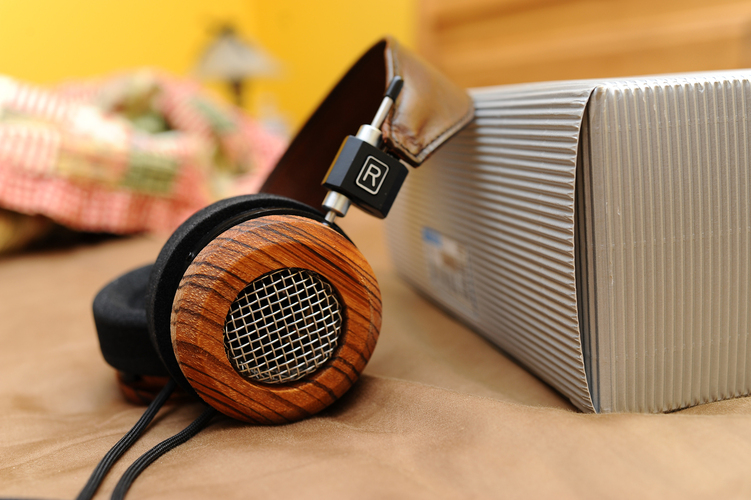
And on that note, I hasten to add that I just got some East Indian Rosewood, which is brownish as compared to cocobolo, which is reddish.  East Indian Rosewood occupies a place, up there with cocobolo, as the best successor to Brazilian rosewood.  There's an active debate as to which is better, but all three are highly sought after.  Some people think that the East Indian rosewood  and cocobolo are better than the current Brazilian rosewood, because BR depends on a dwindling supply of domestic supplies (pre-CITES) and legally-available stumpwood.  The differences may be exaggerated, though, as the tone quality of the wood seems to have as much to do with growth rings and grain patterns that come from certain environmental conditions - like climate, rainfall, elevation, et cetera.  Some woods just look good, without actually imparting much in terms of the sound you're shooting for.  Some sound terrific, regardless of how they look.


I cut these EIR shells today.  The sawdust was dark and oily, like chocolate.  At one point, the heat generated by the center cut produced a boiling, oozing oil spill coming out of the size of the wood, something you don't see (or expect) every day.  But these shells sanded surprisingly well.  I haven't lacquered them up yet.  Just testing them out, I was blown away by the quality of the sound.  They're definitely worth their place in that inner circle of best wood choices.


I'm chasing the mailman so I may not have these lacquered up just yet, but it's encouraging to know that, besides cocobolo, there's another Brazilian rosewood substitute that deserves mention in the same sentence.


Mar 7, 2011 at 11:39 PM Post #2,032 of 5,004


Bill When I had a set made for me I watched the guy use a piece of wax that he held up to it while in was spinning on the lathe. Not sure how you could do it without a lathe but look into it, the results were fantastic.


First of all, those look great, I love the little stepped beveling on the top of it and around the bottom.

If you made this with 325s what are you doing with the aluminum? It's not complete trash like plastic becomes after getting some wood or metal on it.

 
Mar 7, 2011 at 11:48 PM Post #2,033 of 5,004

bill didnt make those, a local kid did them for me about a year ago. He is hard to get in touch with to do small jobs like headphone cups. He did another set for me that was the first he ever did and the walls were to thin and they split when I put the plastic cup in them. These were the second set he had made. I tried to get him to setup an account here but he didnt seem interested.
Quote:
Quote:


Bill When I had a set made for me I watched the guy use a piece of wax that he held up to it while in was spinning on the lathe. Not sure how you could do it without a lathe but look into it, the results were fantastic.


First of all, those look great, I love the little stepped beveling on the top of it and around the bottom.

If you made this with 325s what are you doing with the aluminum? It's not complete trash like plastic becomes after getting some wood or metal on it.


Mar 8, 2011 at 12:07 AM Post #2,035 of 5,004
He probably used this stuff or something similar http://www.woodturnerscatalog.com/store/Finishing___Waxes___Woodturners_Wax_Stick___wood_wax_stick?partnerid=googlebase
 
Mar 8, 2011 at 1:44 AM Post #2,036 of 5,004


[size=small]Hello gang, emboldened by Bilavideos recent basket mod I chose to follow suite. However instead of drilling additional holes in the basket as Bill did, I chose to simply enlarge the existing holes (from the stock .116” diameter to .193” by “hand” drilling using successively larger drill bits). [/size]
[size=small] [/size]
 
Before mod:
 
[size=small][/size]
 
After Mod:
 
[size=small][/size]
 
Mar 8, 2011 at 10:21 AM Post #2,038 of 5,004
I am just back from Exotic Woods, with a piece of black and white ebony.  Should be fun to punish the drill press with!
 
Mar 8, 2011 at 11:07 AM Post #2,039 of 5,004


Quote:
I am just back from Exotic Woods, with a piece of black and white ebony.  Should be fun to punish the drill press with!


 I hear that, I punished the drill press I was using with Purpleheart last night. I also have some purple finger tips. I am assuming some of the woods oils stained them. It was a whole lot harder than the Padauk or Mahogany I have been using though. The Padauk has been finishing nicely, however I feel like Purpleheart is going to be a whole new learning experience.
 
Does anyone who has done a recable remember which wire is which? I know there were threads around talking about it, but after looking around for a while, I can't find them. I just want to have an idea when I get this done tonight. There is a red dot on each driver which I am assuming denotes the positive lead, but I want to be sure.


Mar 8, 2011 at 11:17 AM Post #2,040 of 5,004
Quote:
I am just back from Exotic Woods, with a piece of black and white ebony.  Should be fun to punish the drill press with!


White ebony isnt that an oxymoron
confused_face(1).gif

 
And Bill that big hole mod looks outrageous...how's it sound?
 
Seems like a good idea with a couple holes, but all of them
basshead.gif


Users who are viewing this thread

Back
Top