You should think carefully what you want to achieve .........wow great info.
All I wont. Is dolby sound. Sound like it coming from 7 feet way.
And not in my head sound like atm.
Well get about 6 inch out off head
Can you point me to a speaker..
Smallest will doo. Thank
Cant wait till everyone start getting theres... see what we all can do too this puppy. Lol
You are using an out of date browser. It may not display this or other websites correctly.
You should upgrade or use an alternative browser.
You should upgrade or use an alternative browser.
Smyth Research Realiser A16
audiohobbit
500+ Head-Fier
Probably. I don't know about problems with direct bass in the A16. Maybe I'll try it when I have time. My Test PRIRs of my speakers have horrible room modes in the bass, so that would be a good candidate.but now I suspect he confused direct bass with the SVS bass function (issue 5 in your list?).
Rene Lou
Head-Fier
- Joined
- Jan 21, 2014
- Posts
- 50
- Likes
- 65
Hi Kelvin, just follow very carefully the procedure I have described here: https://www.head-fi.org/threads/smyth-research-realiser-a16.807459/page-488#post-15313315When I press back, is will go to the page where you can select cal or spk etc. And nth is saved, and end up with only 2 speaker saved ( last 2)
As sander99 explained, in step 36 you have to press ENTER instead of pressing BACK. There is a difference if you press ENTER or BACK:
- pressing ENTER saves the measured speakers and creates a new PRIR file for them
- pressing BACK will allow you to not save the measured speakers (yet), but select another set of speakers and save all the speakers later (at step 36)
- in summary in all steps 1....36, you will press ENTER just once (at the end) - otherwise you will end up with multiple files
- do not leave the PRIR measurement (SPK) App (do not press BACK in step 36 instead of ENTER), otherwise you will lose all not saved PRIR data and will have to start from the beginning
So as I had explained we select first the speakers L + R in the Speaker select menu:
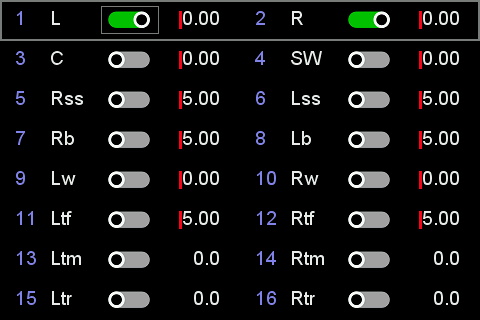
Then press BACK, go to SPK and press ENTER, your screen will look like this:
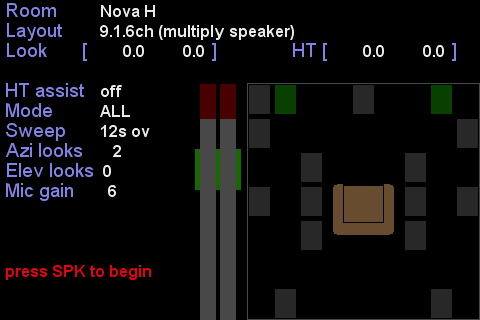
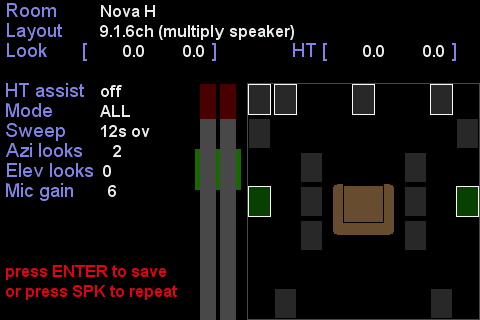
You will see that the two speakers L + R are green, all the other speakers are grey. press SPK button to begin with the measurement. When all the sweeps for looking center, left and right have finished, the screen will look like this:
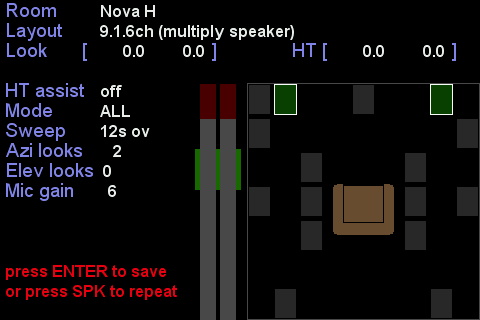
You will see white lines around the L + R speakers (that means for these speakers there is measured PRIR data). Press BACK, and select the next two speakers (C + SW) in Speaker select like this:
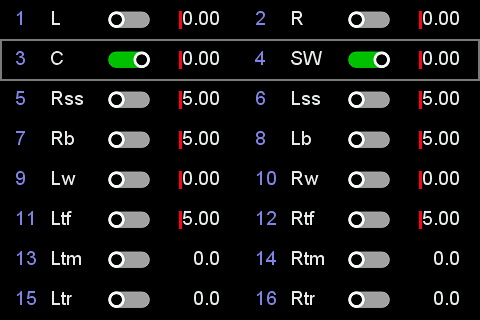
press BACK again, go to SPK, press ENTER and the screen will look like this:
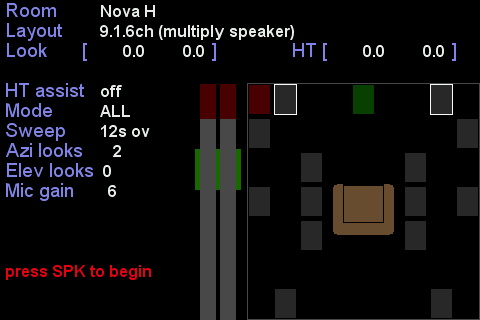
The two measured speakers (L+R) still have a white line around them, but now speakers C and SW are in color (green and red), all the others are grey. Press SPK to measure the next two speakers (after connecting the output connector to the next output, as described in my 1.......36 step description, I will not repeat those here). After the measurement has been done, the screen looks like this:
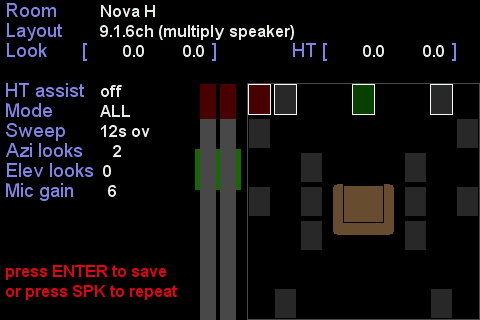
You will see four speakers with white lines around them. Press BACK again, select the next two speakers in Speaker select like this:
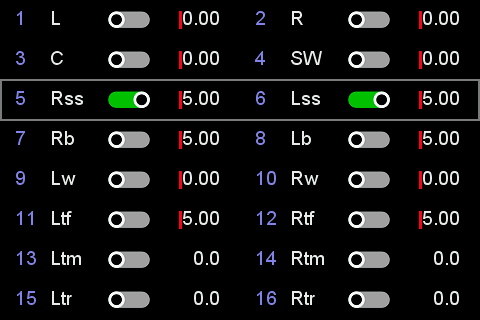
Press BACK, go to SPK, press ENTER and the screen will look like this:
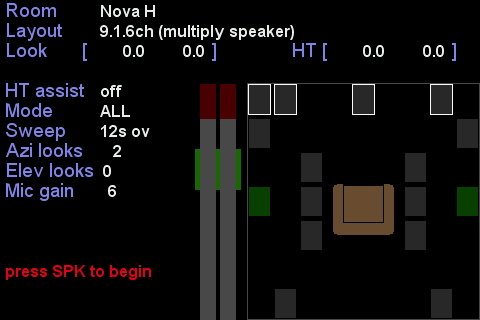
Four speakers do have white lines around them and the Lss and Rss will be measured next (these are green now) - after reconnecting to the next output and pressing SPK and do the measurement, it will look like this:
:
..... just follow all the steps (1...36). When all speakers have been measured it will look similar like this (all speakers do have a white line around them):
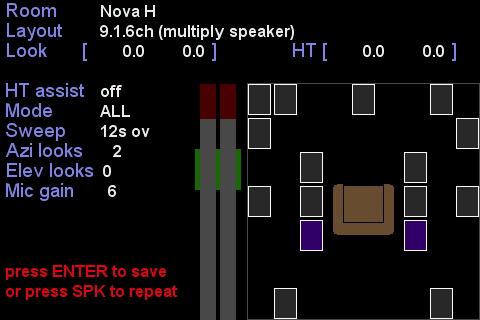
Now press ENTER (instead of BACK) to save your 9.1.6ch PRIR file.
Suggestion: You can try this first as 'dry run' without even microphones or amplifiers/speakers connected to the A16 - to train this procedure with the A16. The resulting PRIR file will be of no use of course then, but you will get more familiar with the A16.
Last edited:
Wow thank youYou should think carefully what you want to achieve with it in relation to the cost. The room acoustics are also very important for getting a very good result.
Not all properties of the speaker are important for the measurement. But neutral frequency response is important. (Frequency range in the low end not.)
Maybe an idea is to buy an old used speaker (or pair) of reasonable quality to practise the measurement process.
And with the result you can try - I also am planning to do this - how much the virtual system can be improved with a few tricks like reducing reverberation time and using a generic virtual subwoofer (because for the sub it is less or maybe even not at all critical to be personalised to you), or direct bass (but I think that is not yet working properly?).
If you have mastered the measurement process you could try to find another system to measure (in a studio, in a friends house, ...).
audiohobbit
500+ Head-Fier
@RENE:
Your speaker select screens look very odd. First of all you should mention that a gain has to be set for the speakers that should be measured, not 0.00 as in your pictures. normally something near to 1. I've never seen numbers over 1 (5.00 in your pictures), I think you can't manually dial in a gain over 1. The red bars besides the numbers are also add, never seen this before either.
How did you discover this method anyway? Since it's not documented I still have my doubts if it really delivers "correct" results.
Hi Rene, please could you clarify what is the main difference in term of head positioning regarding the Steps 7 to 11 for Rss/Lss and steps 12 to 16 for Rb/Lb?What I did to create a 9.1.6ch PRIR with just two stereo speakers (as of today with current firmware 1.75):
This will be a VERY long post.....
I copied the 'multiply speakers' approach of my A8 to create virtual side and rear speakers (by looking backwards). For doing this with the A16, I had to swap the rear and side R+L channels in the PRIR sound room of the A16.
In detail:
The speaker label assignments have to be done in Settings -> PRIR Sound Rooms -> PRIR room 1 (or 2) speaker setup. I used PRIR sound room 2 for this measurement and kept PRIR sound room 1 as a reference. I swapped channels 5<->6 and 7<->8 compared to PRIR sound room 1, so my PRIR sound room 2 looks like this:
After creating PRIR sound room 2:
- channel 1: Spk = L, Size = L
- channel 2: Spk = R, Size = L
- channel 3: Spk = C, Size = L
- channel 4: Spk = SW, Size = L
- channel 5: Spk = Rss, Size = L
- channel 6: Spk = Lss, Size = L
- channel 7: Spk = Rb, Size = L
- channel 8: Spk = Lb, Size = L
- channel 9: Spk = Lw, Size = L
- channel 10: Spk = Rw, Size = L
- channel 11: Spk = Ltf, Size = L
- channel 12: Spk = Rtf, Size = L
- channel 13: Spk = Ltm, Size = L
- channel 14: Spk = Rtm, Size = L
- channel 15: Spk = Ltr, Size = L
- channel 16: Spk = Rtr, Size = L
After level calibration has been done:
- connect the 16-ch Line Output connector 1-2 with a 3.5mm to RCA cable to your stereo system (Poweramp/Preamp/active speakers - make sure to power off your amp before connecting) - Red connector goes to the right speaker and white connector goes to the left speaker. Power on your amp.
- Go to Apps and
-> "Subject" and select your user
-> "Room" and select the PRIR sound room 2
-> "Phones" and select your headphone- Connect the blue grounding wrist-strap to the A16 and ground yourself
- put the microphones in your ears, connect the mics to the A16 and sit in your listening position
- Go to Apps -> Calibrate speakers (CAL) -> Speaker select and switch channel 1 (L) and 2 (R) on (green), all the other speakers to off (white)
- press BACK, go to CAL PRIR Gains and press ENTER, press CAL and then speaker level calibration begins (see manual if the bars are never green or are sometimes red to correct the speaker level)
Now we are ready to begin with the PRIR measurement:
- press BACK and go to PRIR measurements (SPK) in the Apps menu
- go to Speaker select to check if channels 1 and 2 are still selected and all the others are off, press BACK
- go to Config look angles and configure the required angles (see manual for configuration options, for me Look azi (+/-30 deg x 1) was ok), rest is switched off, Look angles is fixed, press BACK
(the procedure below is valid if you measure +/-30 degrees as well, otherwise you will have to adapt)- Mode is set to All, Sweep type is set to 12sec overlap
- go to SPK and press SPK button -> follow the announcements (eg: 'look center' -> look center (0 degrees) and keep still -> 'look left' -> look left 30 degrees (typically face your left front speaker) and keep still -> 'look right' -> look right 30 degrees (typically face your right front speaker) and keep still
- After the 1st measurement (channels 1+2 = L+R) has been done, press BACK
- go to Speaker select, deselect channel 1+2 and switch on channel 3 and 4 (center and subwoofer), press BACK
- Power off your amp, connect the 3.5mm plug to the 16-ch Line Output connector 3-4 and switch your amp on again
- go to SPK and press SPK button -> follow the announcements, but this time at 'look center' -> look 30 degrees to the left (face your left speaker - this will become your virtual center speaker) and keep still -> 'look left' -> look left 60 degrees and keep still -> 'look right' -> look center 0 degrees (straight ahead) and keep still
(by doing this, you just created a virtual center speaker which will sounds exactly as your left front speaker, but in front of you; your right front speaker will become the virtual subwoofer).- After the 2nd measurement has been done, press BACK
- go to Speaker select, deselect channel 3+4 and switch on channel 5 and 6 (Rss and Lss), press BACK
- Power off your amp, connect the 3.5mm plug to the 16-ch Line Output connector 5-6 and switch your amp on again
- Take a chair and sit between your front speakers, facing backwards (180 degrees, looking away from your screen/TV)
- go to SPK and press SPK button -> follow the announcements, this time at 'look center' -> look 180 degrees backwards and keep still -> 'look left' -> look left 30 degrees (approx. where a right rear speaker would be) and keep still -> 'look right' -> look right 30 degrees (approx. where a left rear speaker would be) and keep still
(by doing this, you just created virtual side speakers which will sounds exactly as your front speakers, but on the side of you. Your left front speaker will become the virtual right side speaker and the right front speaker will become the virtual left side speaker)- After the 3rd measurement has been done, press BACK
- go to Speaker select, deselect channel 5+6 and switch on channel 7 and 8 (Rb and Lb), press BACK
- Power off your amp, connect the 3.5mm plug to the 16-ch Line Output connector 7-8 and switch your amp on again
- sit on your primary seating postion, but facing backwards (180 degrees, looking away from your screen/TV; I have a couch and was just kneeling on it looking backwards)
- go to SPK and press SPK button -> follow the announcements, at 'look center' -> look 180 degrees backwards and keep still -> 'look left' -> look left 30 degrees (approx. where a right rear speaker would be) and keep still -> 'look right' -> look right 30 degrees (approx. where a left rear speaker would be) and keep still
(by doing this, you just created virtual rear speakers which will sounds exactly as your front speakers, but on the rear position. Your left front speaker will become the virtual right rear speaker and the right front speaker will become the virtual left rear speaker)- After the 4th measurement has been done, press BACK
- go to Speaker select, deselect channel 7+8 and switch on channel 9 and 10 (Lw and Rw), press BACK
- Power off your amp, connect the 3.5mm plug to the 16-ch Line Output connector 9-10 and switch your amp on again
- Starting from your primary listening position, move somewhat closer to the screen/TV, so that your front speakers will be at approx. +/- 60 degrees from you (and will become wide speakers - take a chair again)
- go to SPK and press SPK button -> follow the announcements, at 'look center' -> look center (0 degrees) and keep still -> 'look left' -> look left 30 degrees and keep still -> 'look right' -> look right 30 degrees and keep still
(by doing this, you just created virtual wide speakers which will sounds exactly as your front speakers, but on the wide position. Your left front speaker will become the virtual left wide speaker and the right front speaker will become the virtual right wide speaker)- After the 5th measurement has been done, press BACK
- go to Speaker select, deselect channel 9+10 and switch on channel 11 and 12 (Ltf and Rtf), press BACK
- Power off your amp, connect the 3.5mm plug to the 16-ch Line Output connector 11-12 and switch your amp on again
- Sit on your primary listening position and lower your head (tilt it downwards looking towards the floor) so that your front speakers will be at approx. 45 degrees "above" your head (and will become top front speakers)
- go to SPK and press SPK button -> follow the announcements, at 'look center' -> look center (still looking downwards to the floor, 0 degrees) and keep still -> 'look left' -> look left 30 degrees (still towards the floor) and keep still -> 'look right' -> look right 30 degrees (still towards the floor) and keep still
(by doing this, you just created virtual top front speakers which will sounds exactly as your front speakers, but on the top front position approx. 45 degrees upwards. Your left front speaker will become the virtual left top front speaker and the right front speaker will become the virtual right top front speaker)- After the 6th measurement has been done, press BACK
- go to Speaker select, deselect channel 11+12 and switch on channel 13 and 14 (Ltm and Rtm), press BACK
- Power off your amp, connect the 3.5mm plug to the 16-ch Line Output connector 13-14 and switch your amp on again
- Sit on your primary listening position and lower your head even more (tilt it downwards 90 degrees, looking to the floor) so that your front speakers will be at approx. 90 degrees "above" you (and will become top middle speakers)
- go to SPK and press SPK button -> follow the announcements, at 'look center' -> look center (but still down to the floor, 0 degrees) and keep still -> 'look left' -> look left 30 degrees (still to the floor) and keep still -> 'look right' -> look right 30 degrees (still to the floor) and keep still
(by doing this, you just created virtual top middle speakers which will sounds exactly as your front speakers, but on the top middle position approx. 90 degrees above you. Your left front speaker will become the virtual left top middle speaker and the right front speaker will become the virtual right top middle speaker)- After the 7th measurement has been done, press BACK
- go to Speaker select, deselect channel 13+14 and switch on channel 15 and 16 (Ltr and Rtr), press BACK
- Power off your amp, connect the 3.5mm plug to the 16-ch Line Output connector 15-16 and switch your amp on again
- Sit on your primary listening position and lower your head even more (tilt it further downwards, looking to the floor below and behind of you) so that your front speakers will be at approx. 45 degrees "above and behind" of you and will become top rear speakers (I have to say this is a quite uncomfortable position - lucky nobody else sees you when you are doing this....)
- go to SPK and press SPK button -> follow the announcements, at 'look center' -> look center (but still down to the floor behind of you, 0 degrees) and keep still -> 'look left' -> look left 30 degrees (still to the floor) and keep still -> 'look right' -> look right 30 degrees (still to the floor) and keep still
(by doing this, you just created virtual top rear speakers which will sounds exactly as your front speakers, but on the top rear position approx. 45 degrees behind and above you. Your left front speaker will become the virtual left top rear speaker and the right front speaker will become the virtual right top rear speaker)- After the 8th measurement has been done, press ENTER to save your 9.1.6ch PRIR !
With this procedure, your head movement will be always the same - looking center and then 30 degrees to the left and 30 degrees to the right (30 degrees being relative to the position you where looking at the 'look center' position - be it backwards or towards the floor).
- With the microphones still in the ear canal, do a proper HPEQ (autoEQ)
- Do not forget to copy the PRIR and HPEQ files from the circular recycle buffers to the permanent storage and/or SD card
- Remove the microphones and - if you can - do a HPEQ (manSPK) and compare the L+R speakers with the virtual L+R speakers
Enjoy !!!!!!!!
You can improve accuracy of the head tracking when switching on head tracking during measurements and watch the actual angle of your head position. On the A16 display in the right top corner there are small head tracking angles updated whenever you move your head. To be able to watch those tiny HT numbers at the same time you move your head, a "remote display" of the A16 display will come in handy. For doing so I tested the following: point the camera of an iPad towards the A16 display and use FaceTime (video call) to call an iPhone. Use the iPhone as remote display of the A16 display. This works - but with all those cables, head tracker on your head, lowering your head looking center, left and right and watching your iPhone at the same time you will look like a complete freak to others..... But what the heck - the final result will rock you !
One additional remark: The A8 has a 'multiply speakers' routine for creating a virtual speaker system (eg: 7.0) with a pair of stereo speakers. The A8 creates a virtual center channel by combining the R and L measured front speakers (as if you would listen to a mono source over your stereo speakers). This A8 virtual center speaker sounded well. After creating my first A16 PRIR and (just out of curiosity) using my left front speaker and measure it as a real center speaker as I described above, I have to say that this virtual speaker sounds better compared to the virtual center speaker the A8 created virtually.
Final remark:
Thank you to Smyth Research for allowing me to create a virtual system in my headphone I could never ever built in real live !! It sounds fantastic !!
Just watched some movies and it's brilliant- never heard a T-Rex like this.
Bc i am a bit confused as they look like exactly the same angles etc?
Cheers
Rene Lou
Head-Fier
- Joined
- Jan 21, 2014
- Posts
- 50
- Likes
- 65
Hi Christian@RENE:
Your speaker select screens look very odd. First of all you should mention that a gain has to be set for the speakers that should be measured, not 0.00 as in your pictures. normally something near to 1. I've never seen numbers over 1 (5.00 in your pictures), I think you can't manually dial in a gain over 1. The red bars besides the numbers are also add, never seen this before either.
How did you discover this method anyway? Since it's not documented I still have my doubts if it really delivers "correct" results.
Don't look at the specific numbers on those screen shots. For creating those screen shots I did not the complete procedure as described here: https://www.head-fi.org/threads/smyth-research-realiser-a16.807459/page-488#post-15313315 I made the screen shots with the 'dry run' method myself quickly to answer Kelvins questions only.
When you are doing the whole procedure, you will start with the CAL routine (as described, just see the link) and the gain values will be in an expected range afterwards.
Some words about the gain values: The A16 is designed to be connected to a power amplifier / active speaker directly. If you are connecting the output of the A16 to a preamplifier, make sure to turn up your volume on the preamplifier (I used a 0dB setting on my Lexicon). Then the CAL routine will hit with the first or second sweep already a correct level (bars are getting green).
And don't forget: This routine is a compromise only until SMYTH will implement the 'multiply speakers' routine with the A16 similar as they did with the A8 in an upcoming firmware.
With the resulting 9.1.6ch PRIRs I'm quite happy.
Last edited:
Rene Lou
Head-Fier
- Joined
- Jan 21, 2014
- Posts
- 50
- Likes
- 65
Starting with our normal listening position like this:Hi Rene, please could you clarify what is the main difference in term of head positioning regarding the Steps 7 to 11 for Rss/Lss and steps 12 to 16 for Rb/Lb?
Bc i am a bit confused as they look like exactly the same angles etc?
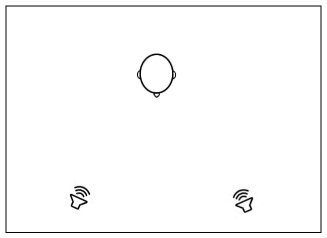
Steps 7 to 11 are designed to create virtual side speakers. Since we do not want to move stereo speakers to the position where side speakers would normally be, we have to move ourselves in a position that the stereo speakers are beside of us (sit between them, eg. a straight line between the left speaker and the right speaker and you in the middle of this straight line). Like this:
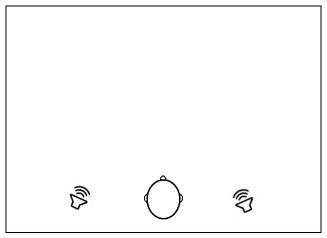
Steps 12 to 16 are designed to create virtual back speakers. Since we do not want to move stereo speakers to the position where back speakers would normally be, we have to move ourselves in a position that the stereo speakers are behind of us. For doing so, just sit on your normal seating position, but instead of looking towards the screen, look 180 degrees backwards (I typically knee on my couch and instead of looking towards the screeen, I look towards the rear of the room). Like this:
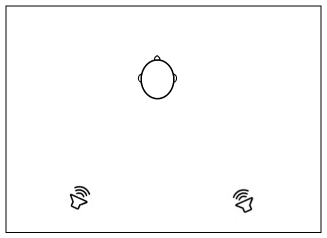
So in general (for all steps): When you want to create a virtual speaker in a specific posiiton (eg: rear, or side, or overhead, or wherever you like), but you do not want to move your speaker to this position to measure it, simply reverse it and instead of moving the speaker to the wanted position, position your head in a relative position that the speaker will be relatively positioned where you like it in the virtual room. So, when you are looking towards the back of the room, your stereo speakers will be behind of you. The A16 with the PRIR measurement App simply copies the speaker where it is in the room relatively to your ear.
Attachments
Last edited:
sander99
Headphoneus Supremus
Until now I didn't even look very closely to your post how you did the side speakers (and how you did the wide speakers). But there are alternative approaches possible of course. Personally I would prefer to do it in such a way that you always stay in the normal sweetspot of the room, and just turn yourself to different angles. In that case you can not measure both side speakers in one go of course, but you can do it in two parts each measuring one speaker (and inbetween these two parts you don't need to change the cable). Or you can do side right and back right in one go, and back left and side left in another go (jaakkopasanen does it this way by default).Steps 7 to 11 are designed to create virtual side speakers. Since we do not want to move stereo speakers to the position where side speakers would be normally, we have to move ourselves in a position that the stereo speakers are beside of us (sit between them, eg. a straight line between the left speaker and the right speaker and you in the middle of this straight line).
If you sit in the middle of the line between your speakers there could be a different frequency response compared to the normal seating position. It could be that with your room/system that is not the case, or not enough to cause trouble, but that might not apply to everyone. And do you also not turn the speakers more inward when you sit inbetween them? Maybe your speakers have a very wide and balanced dispersion pattern and don't need it, but again: maybe that doesn't apply to everyone.
Nevertheless thank you for your 'recipe', and if wanted or required it can be adjusted to personal preference or circumstances.
Brownsfan
New Head-Fier
Hi gang, first time post here. I apologize if this has been answered already but can the headtracker be placed behind a projector screen if the screen is somewhat porous? If not, how do folks deal with projectors and screens with the a16. Thanks.
Thx for the illustration Rene, now i can make my way for my future PRIR using stereo spkrs only..Starting with our normal listening position like this:
Steps 7 to 11 are designed to create virtual side speakers. Since we do not want to move stereo speakers to the position where side speakers would be normally, we have to move ourselves in a position that the stereo speakers are beside of us (sit between them, eg. a straight line between the left speaker and the right speaker and you in the middle of this straight line). Like this:
Steps 12 to 16 are designed to create virtual back speakers. Since we do not want to move stereo speakers to the position where back speakers would be normally, we have to move ourselves in a position that the stereo speakers are behind of us. For doing so, just sit on your normal seating position, but instead of looking towards the screen, look 180 degrees backwards (I typically knee on my couch and instead of looking towards the screeen, I look towards the rear of the room). Like this:
So in general (for all steps): When you want to create a virtual speaker in a specific posiiton (eg: rear, or side, or overhead, or wherever you like), but you do not want to move your speaker to this position to measure it, simply reverse it and instead of moving the speaker to the wanted position, position your head in a relative position that the speaker will be relatively positioned where you like it in the virtual room. So, when you are looking towards the back of the room, your stereo speakers will be behind of you. The A16 with the PRIR measurement App simply copies the speaker where it is in the room relatively to your ear.
Regarding the Center and Sub capture, knowing that i don t have any sub atm, noticed that you captured one of your stereo spkr instead..Does the A16 send a specific low range sweep to this sub output channel for the PRIR or is it the same one for all spkrs? does it make a huge difference compared to a real sub to be captured? As we all know that sub low frequencies aren t directional...
Also regarding the positioning and distance of the different spkrs in 9.1.6, as i understood so far Dolby Atmos acoustic set up, are the L,R and C spkrs more distant than us compared to the surrounds and top spkrs or should we be in the equal distance of all of them as sweetspot?
sander99
Headphoneus Supremus
Remember Rene has huge speakers, with huge bass drivers:does it make a huge difference compared to a real sub to be captured?
But if you have small speakers, you could always use a sub from the factory-installed generic PRIRs.
mrmac
Head-Fier
Steps 7 to 11 are designed to create virtual side speakers. Since we do not want to move stereo speakers to the position where side speakers would be normally, we have to move ourselves in a position that the stereo speakers are beside of us (sit between them, eg. a straight line between the left speaker and the right speaker and you in the middle of this straight line).
My two cents regarding this is to "record" the two stereo speakers one at the time for Rss & Lss sitting 90° perpendicular. I personally have 3 identical speakers as LCR (my surrounds are not worth using) so my last session I "recorded" my LCR's 3 times. Once facing forward (and turning head left and right +/-30°) and twice facing 90° right and left. So facing 90° right the R speaker will be Lw, C = Lss and L = Lb. Subsequently facing 90° left the R speaker will be Rb, C = Rss and L = Rw. All this is a bit of a mindf*ck and It helps immensely if you plot it out on paper first. You might wanna adjust the angles slightly to make sure L & R and Lw & Rw don't end up to close together. I just came a little bit closer to C and angled ever so slightly more then 90° to make Lw and Rw further out and Lb and Rb more behind me. I also followed @Rene Lou method of just leaning forward and doing a yoga headstand for the top back speaker. Luckily no one of my family caught me in this bizarre act...
I for one do this as separate PRIR's and combine them after. I feel that it's easier and I can redo each session if something goes wrong. Wish there could be more then 2 PRIR "rooms" so that I can have them all ready and just switch between them. This also has the benefit that I don't have to unplug anything during the session.
Also again thanks to @Rene Lou for the tip of using and iPad and FaceTime to see the display on the A16 while in the hotseat. Worked very well! And a great way to have the head tracker guide your head positions.
Wonder if the new firmware that was rumoured to arrive last week, will be released before the holidays??? Anyone with some inside info? @audiohobbit ?
audiohobbit
500+ Head-Fier
Yes I totally agree with Sander.Until now I didn't even look very closely to your post how you did the side speakers (and how you did the wide speakers). But there are alternative approaches possible of course. Personally I would prefer to do it in such a way that you always stay in the normal sweetspot of the room, and just turn yourself to different angles.
As sander pointed out, doing the sides that way and not even rotating the speakers so that they face you directly you will get a bad frequency response and it doesn't match that of the other speakers, something that should be achieved in a surround system, that all speakers sound the same.
Additionally those side speakers won't have the same distance as your fronts, so have to add a delay. Do you at least do that?
Otherwise your sides will play too early, when a sound is panned from the front over the sides to the back. And yes you can hear that, I already tested similar things with a real surround system.
We're planning a session here in Germany with two speakers, and we will always keep the listener in the sweet spot and rotate the listener. We'll do different PRIRs, as this is far easier to do and I still don't see a problem in that. This will be 6 takes with 6 different looking posititions of the listener, so we get a speaker every 30°. From this we can also take surrounds at 120° for a correct 5.1 system. Ceiling speakers we do separate since there are real ceiling speakers in the room.
I will post some pictures how we plan do that.
We will also do more look angles at finer increments. Stephen Smyths recommends 15° increments and we may do 60 or 45° max. so 7 or 9 look angles. For this we use the headtracker with the HT guided procedure so the measurement automatically starts when you reach the correct look angle.
When we rotate the listener then we also have to rotate the headtracker, either relocate the set top to the new center position or more elegantly just rotate the head top on the head, I plan to build a precise rotation mechanism for the head out of this: https://www.amazon.de/gp/product/B000X2FU0U/ref=ppx_yo_dt_b_asin_title_o00_s00?ie=UTF8&psc=1
With 3 speakers as mrmac pointed out it's easier, you just rotate the listener 90° 4 times. Actually the place where we'll do the measurements has a 5.1.4 system with Dirac live EQing and a double bass array subwoofer. But since we won't have Async signals we can only use two speakers if we want to have the Dirac EQ and the Bassmanagemen which we definitely want.
And this method has advantages: You get a Neumann KH310( that's the front speakers) 12 times around you, all in the same distance. So you can do more than the room itself makes normally possible.
I see there one problem, when you hold the smartphone in front of you that you block parts of the signal that reaches your ears and that may influence the measurement.Also again thanks to @Rene Lou for the tip of using and iPad and FaceTime to see the display on the A16 while in the hotseat.
As I said you can use the HT guided procedure, see the manual for that.
I wouldn't expect this before January, I think.Wonder if the new firmware that was rumoured to arrive last week, will be released before the holidays??? Anyone with some inside info? @audiohobbit ?
Stephen and the team should take a christmas break, they earned it I'd say.
I think it won't work behind a perforated screen. But you can place it above the screen, that's no problem. This is what I did, I attached it via adhesive ( velcro would even be better) to my black masking above my screen. You can now switch off the green LEDs totally so they don't distract you. Only thing you still faintly see is the dark red IR diode sending out the IR pulse to the head top. if this is still distracting one can put the set top also BEHIND you, and just turn the head top pn your head 180 deg. That works also. Of course there must be a free line of sight, as long as you use optical stabilisation. With magnetic stabilisation this would not be needed but my tests with magnetic were not very satisfying.but can the headtracker be placed behind a projector screen if the screen is somewhat porous? If not, how do folks deal with projectors and screens with the a16. Thanks.
Last edited:
illram
500+ Head-Fier
- Joined
- Nov 24, 2016
- Posts
- 624
- Likes
- 223
It's hard to keep up with this thread (a good thing, lots of useful info) so apologies if this has been pointed out already but: didn't Smyth say they would implement a means to do this easily with a single speaker and simply moving your head, with the head tracker beeping at you to prompt you when you are at the correct angles? And without unplugging/re-plugging in the speaker a bunch of times or needing to merge 16 different PRIR's or whatever. I hope that is still in the works!
Last edited:
Users who are viewing this thread
Total: 12 (members: 0, guests: 12)


