Sure.
It's all pretty simple but just looks like a big post, maybe I over-explained it but better than not enough.
Plus some things you have to be careful to avoid like pinching wiring and making sure to add a new dustguard.
DO AT YOUR OWN RISK...obviously.
Keep in mind I have yet to try replacing the stock damping materials so not 100% sure that it will reapply without using thin strips of double sided tape.
It likely will <<<<<<<<but don't hold me to that.
*** this applies to cup rears off usage primarily, though with them on things additionally get darker so if you prefer cups ON you might wish to SKIP the rear fabric layer in the cups***
Prority #1 is making sure the headband clamps decently, so do as BEAGLE posted and make sure the clamping force is adequate by twisting the headband to snug up the pads fit.
If you need to.
It's pretty forgiving if done carefully and adjusts a little less than you'd think due to the flexibility of that headband metal.
So in case it doesn't seem obvious this removes the stock rear damping to bring the low end out quite a bit, quantity and quality. But has some consequences I feel, that need addressing afterwards.
Basically this hits them in 3 ways to deal with issues the damping removal causes.
- Earside reduction from driver frontwave and also things entering from inside
- Inner cup strays
- Reflections off the cup rear crossbars
Stock damping material removal:
Crappy old pics not meant for posting
 ^ stock stiffened damping fabric and stock adhesive stuck to it
- Take something to slightly lift up one corner of the stock black rear damping so you can get a fingernail underneath it.
Begin slowly pulling it up and backwards, making sure you see that the pre-applied adhesive stays put on the stock damping material edges as you do so.
***If it looks like the stock adhesive strip is not staying on the stock damping material, try another corner until you can lift it away evenly and smoothly.
Nothing should remain stuck to the driver rears at all.
It is a stiffened dense fabric material so will have a bit of memory if you bend it at any point severely, so try not to.
Even so it will retain a curve when removed.
Put these somewhere safe and dust-free in case you want to use them again.
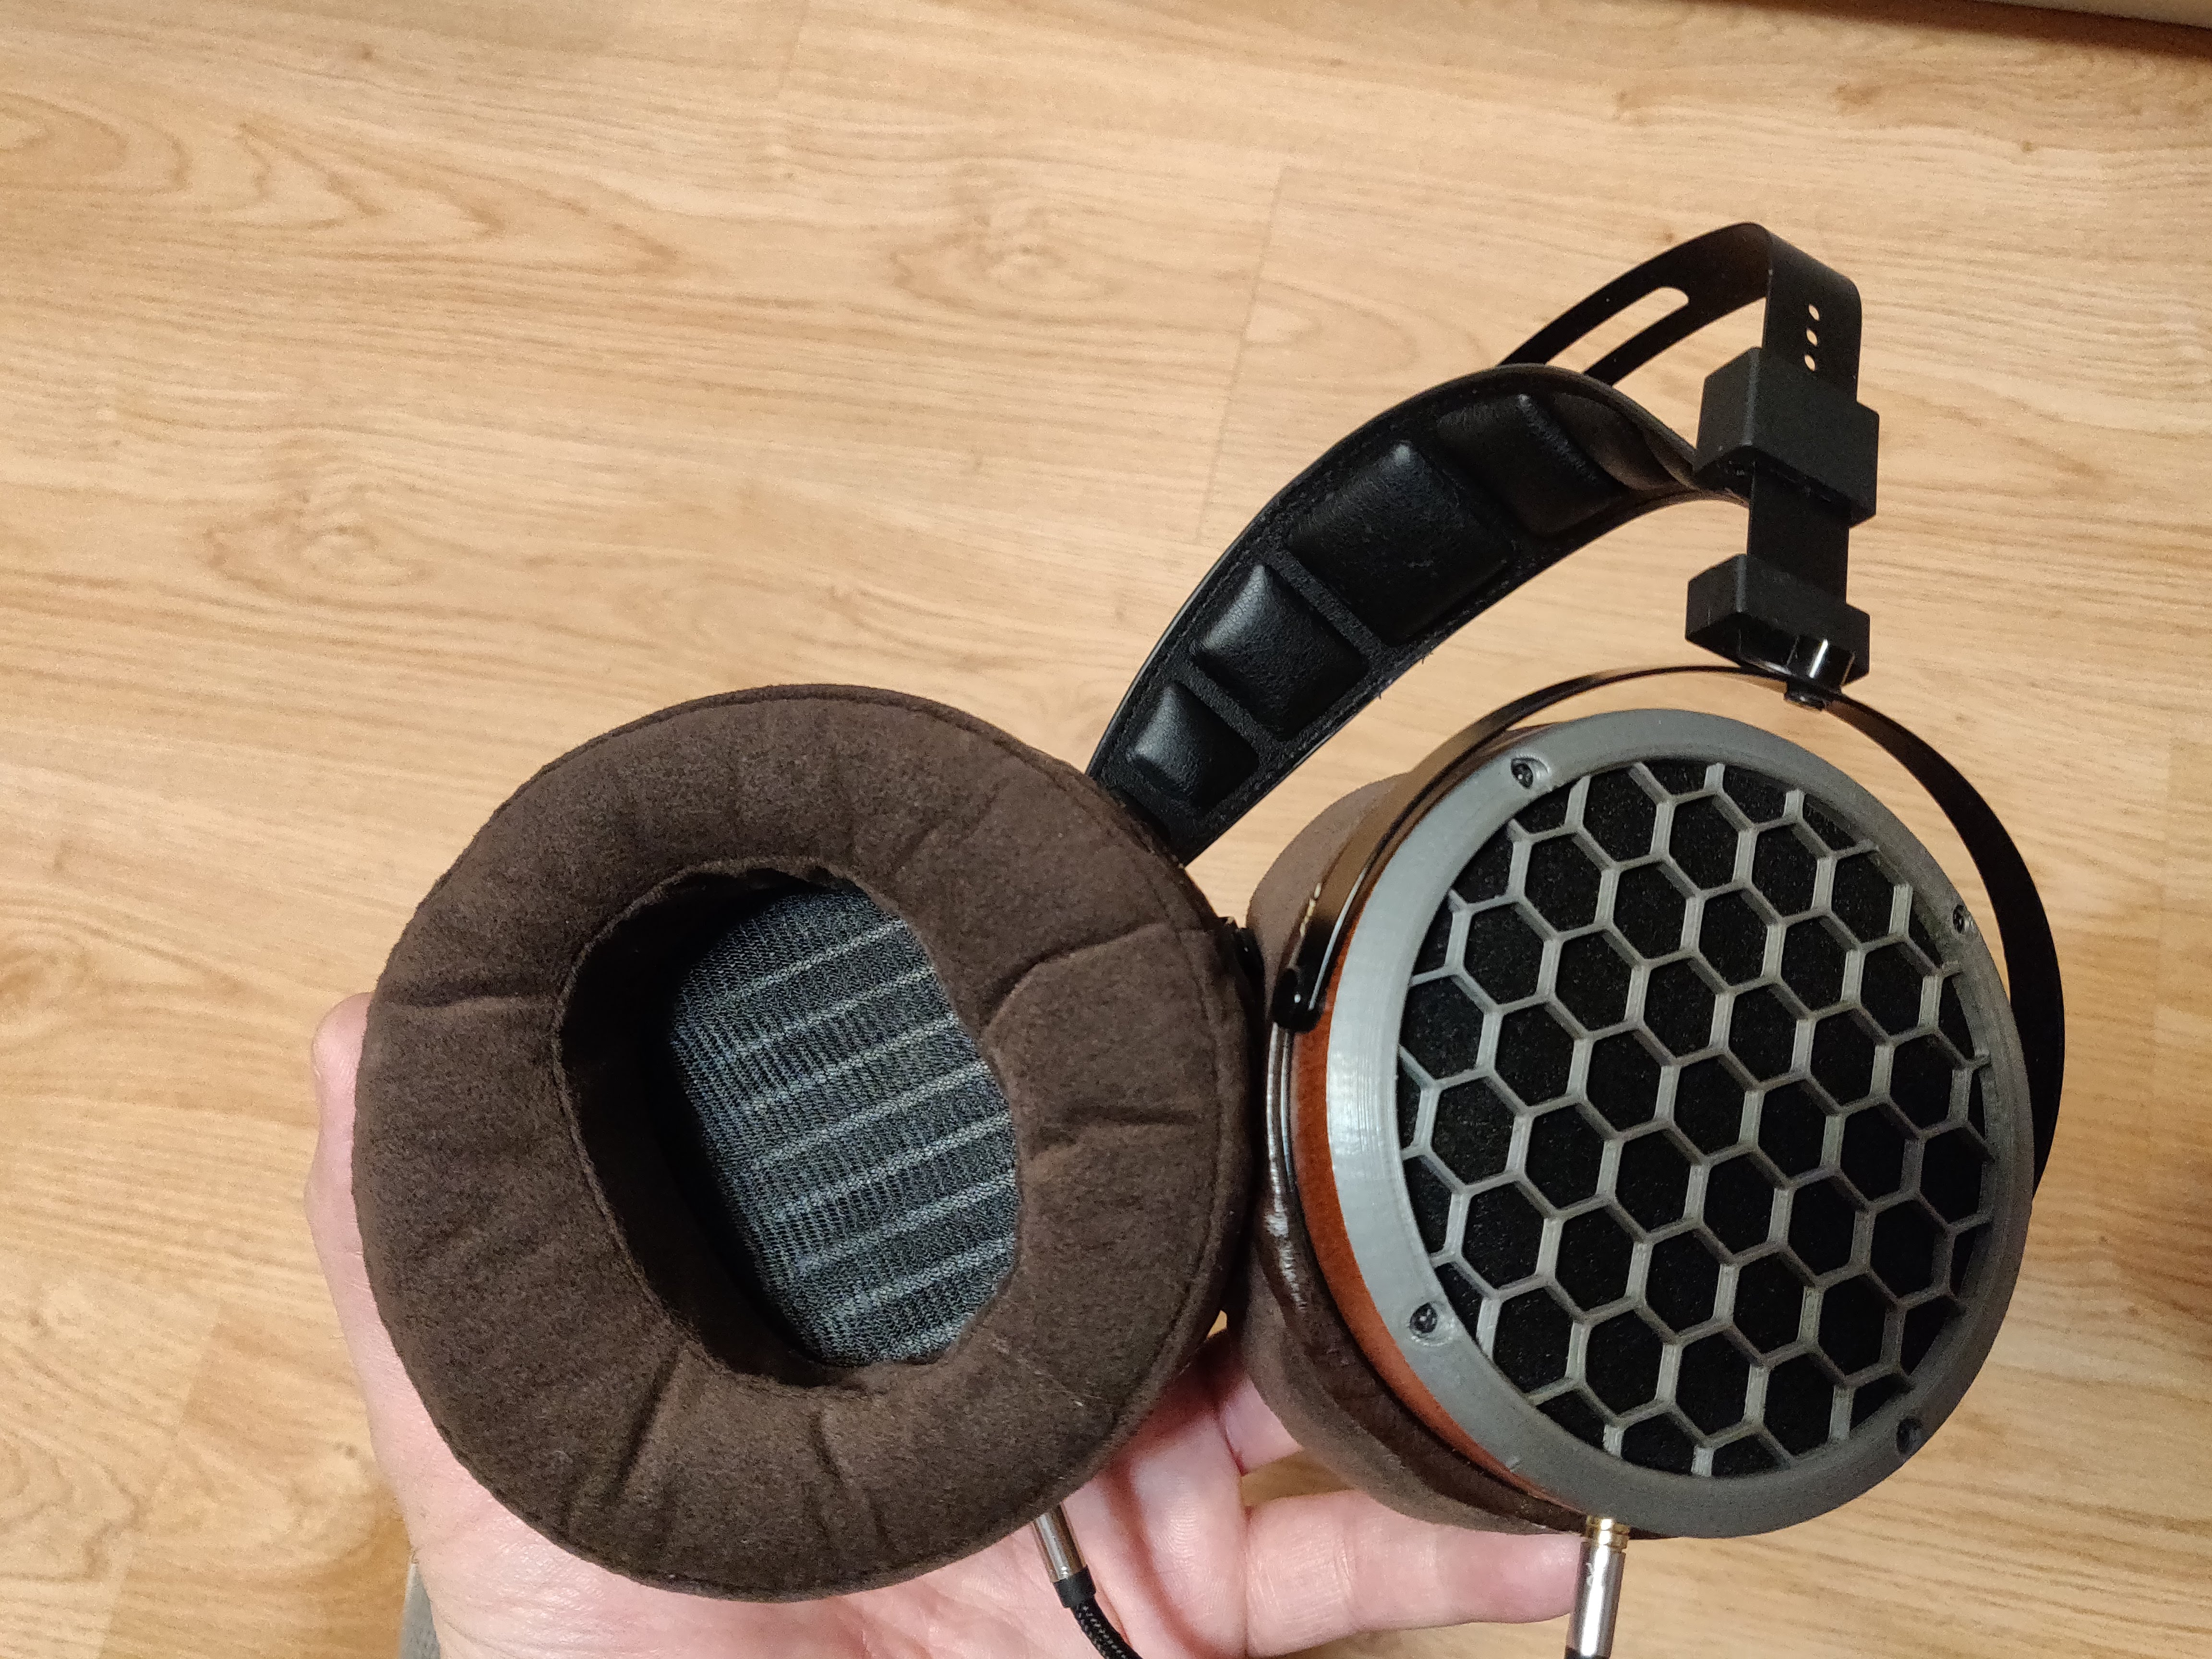
- Ideally you will want to apply a new dust-guard on the back of the now wide open driver to prevent anything during the mods from getting in there, even a hair or fiber could possibly cause problems.
I used some stuff I got from a fabric store= Pellon brand "Tricot Fusible" Style # 3131111000D / EK130. It's basically a very thin black mesh material available at any decent fabric shop. Cheap.
Either Aileens's Fabric Tape/ Peel N' Stick Fabric Fuse tape in
thin strips on the very outside of the driver frame to apply this Pellon dust-guard. Many types of double sided tape have a tendency to melt up and weep around in high temperatures, this seems a little better that way, just keep it on the very outside of the driver frames.
This will gum up any scissors or knife you use so be prepared to sacrifice those.
 ^ thin strips of Fabric Fuse tape around outermost edges of driver frame
 ^ Pellon Tricot Fusible mesh on rear for new dustguard.
Notice how close those driver wires are to the top screwpost they can get caught there be careful on reassembly!
^ Pellon Tricot Fusible mesh on rear for new dustguard.
Notice how close those driver wires are to the top screwpost they can get caught there be careful on reassembly!
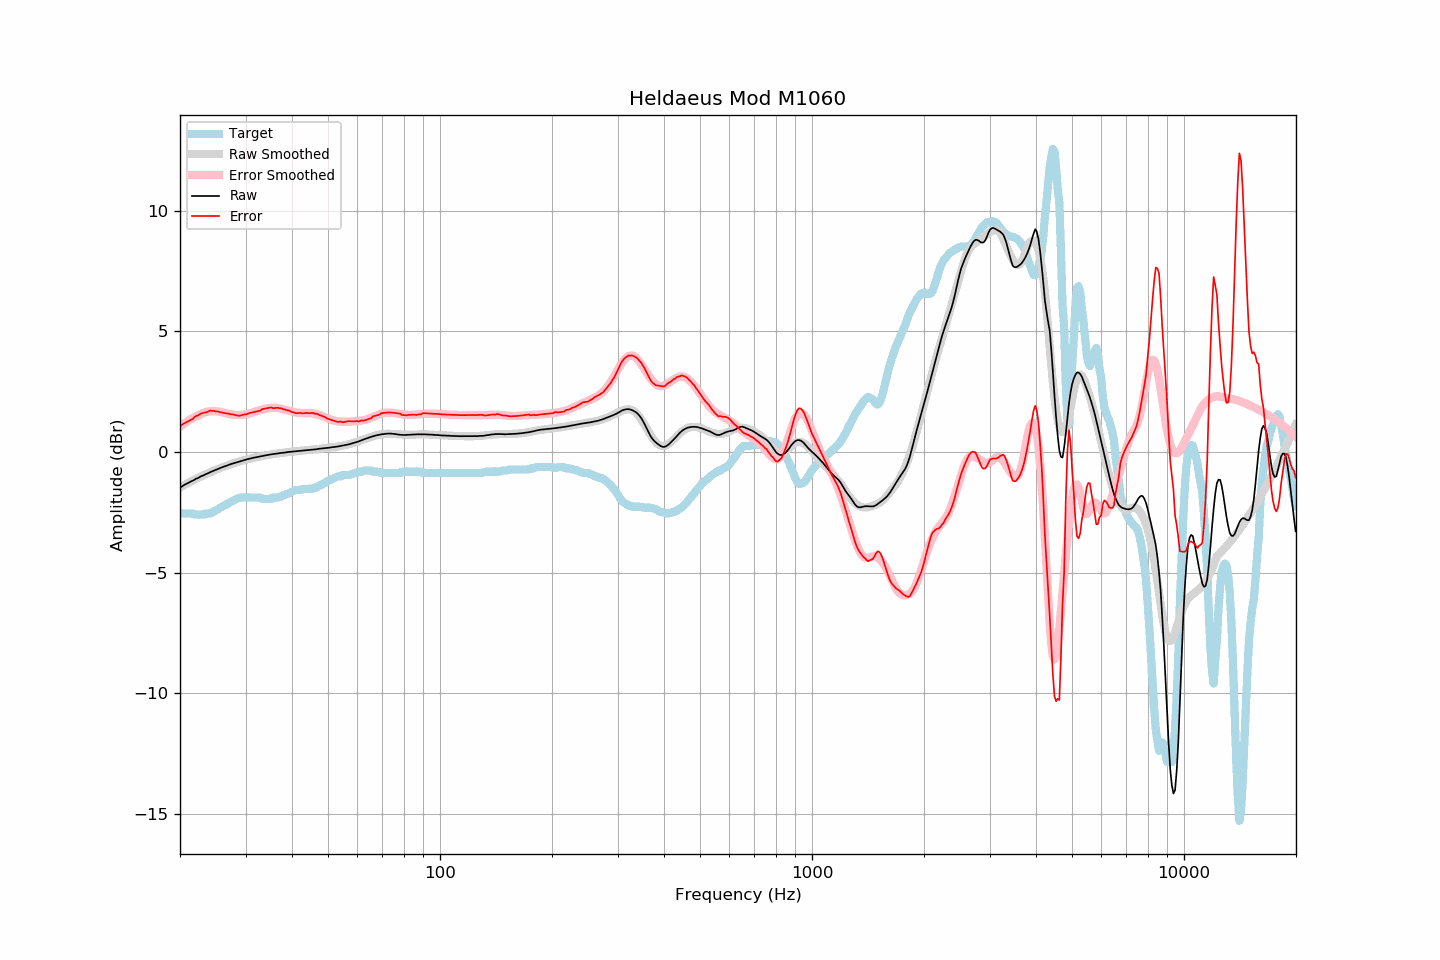
===== have a listen now and you'll see what I mean about the bass improvement in all areas,
and you will ( I hope ) also notice the peakiness is unruly and in need of addressing now. ( I figure has to be reflections off the rear vent slot crossbars, together with the driver's own inherent edginess ).
Big earpad openings don't help either but I am staying with the stock pads for this.
- Earside reduction from driver frontwave and also things entering from inside
 ^ thin dense Bose foam square on driver front ( stock Bose foams seen on blue mat ).
Traced out various fuzzy quilt batting to use in cup rears.
^ thin dense Bose foam square on driver front ( stock Bose foams seen on blue mat ).
Traced out various fuzzy quilt batting to use in cup rears.
- Earside damping is easiest with thin foams I find. Nice that the pads pop off so easily this makes it fast to test out.
I used a 1 layer square of the very dense and thin BOSE earside foam I ordered specifically for mods, as I can't find it separately.
Seems to only come with the pads ( Bose Aviation Headset A10 / A20 pads )
http://www.ebay.com/itm/152224554803?_trksid=p2057872.m2749.l2649&ssPageName=STRK:MEBIDX:IT
there are also these though right now it does not seem to need them.
http://www.ebay.com/itm/26150256371...49&var=560381958021&ssPageName=STRK:MEBIDX:IT
I guess you could try felts or the like, I just prefer the various foams.
Listen again.
It will likely need a bit more there seemed to be some of that trebly haze/peakishness left in there.
2. Inner cup strays:
 ^ Twaron Angel Hair acoustic filler and rear fuzzy quilt batting material installed, held there by Angel Hair pressure.
- Personally I would not use cotton in there but feel free.
Try and find some sort of acoustic filler, maybe some Polyfill to help deal with inner cup reflections.
I used Twaron Angel Hair at a 0.3 gram per cup rate but this stuff is it's own thing with it's own effects so Polyfill rates will be way different and trial and error.
****One thing to be careful of when reseating the baffles to the cups , = make sure the wiring is out of the way of the screw-posts the top screw-posts and grab the wiring at the spot and you could end up ruining it, so push it out of the way and check each time.
- It still seemed to need some toning back after this acoustic cup filler and since Twaron Angel hair is so strong a result usually I expect Polyfill to need more also
3. Reflections off the cup rear crossbars
- this next step I found necessary to reduce the still present reflections off the cup rear crossbars of the venting.
- Use the stock wooden backs to trace out the size of the material inserts for the cup rears, it is the same size and easy to use those as a template.
You can try anything that has some fuzzy aspect to it, ideally something thinner so that it scatters and absorbs while still allowing some passthrough of the sound.
I used a type of
quilt batting which is basically a felt type thickness but with a fuzzier side to it ( fuzzy side facing inner cups )
Any fabric store should have variations of this also.
Some can tend to absorb a bit more than others.
For instance this Arctic Bamboo material I used ( 45% Cotton/45% bamboo / 10% poly )has a little bit more detailed effect than the fuzzier Arctic Cotton ( 100 cotton blend or ~90% cotton blends versions ) which is likely soaking up/diffusing/scattering a bit more of the strays in there.
There are now tons of brands that carry this stuff. I'm not sure how felt will be here since the fuzzier the better it seems.
****Trick is to balance it out between absorbing, while retaining details and levels of openness. You'll notice when you go overboard here for sure.
= I pinned down all the above stuff in open backed form.
Even with the stock wood backs on and the above tweaks things are pretty good, much bolder sound overall and toned back top end just enough to not lose out much detailing or levels, just remove the peakishness.
It tends to warm up with backs on. Immediately obvious in the vocal area. Definitely a more closed feeling.
But particular amounts and materials used will affect all this very few will have the same materials I used, but I would think ( I HOPE ) the overall scheme should be repeatable to a decent effect using other stuff.
Depending if anyone even bothers trying the above, if going for closed back always, one could likely skip the earside foam ( or do a fast removal ), OR the rear inner quilt batting/fuzzy thin material disc
I kind of like both closed and open but
prefer the open .At least it is not totally one or the other. Using wood back s on them it's like I have 2 different headphones now.
It sounds
a lot different either way than stock.
Bass is
very nice in these just held back by that stock damping. You'll know it when you hear it that's for sure
especially in open form.
That's all I am gonna say about that
Adjust to taste.
Hope it was not too longwinded.
EDIT :
Oh YEAH this mod really makes me get into the tunes now uncontrollable moving around and singing along, that sort of thing. It's one of those things. Love it.