Fostex T50RP Incremental Mods and Measurements
Jul 23, 2018 at 6:56 AM Post #2,476 of 2,832
Well mechanical and digital tuning are two different things because mechanically tuning actual help to tighten or helps the driver push out more detail, on the other hand digital tuning just adjusts the loudness of each frequency in this case it is EQ. Hope you understood what am getting to.
Sure, but EQ isn´t helping in my case :)
 
Sep 20, 2018 at 9:07 PM Post #2,479 of 2,832
There might have been some issues in the recent site makeover that affected some things. Ask for a particular and likely someone can point you in the required direction.
I cannot get even a single table of contents link to work myself...
 
Last edited:
Sep 22, 2018 at 11:19 PM Post #2,481 of 2,832
Does anyone know where I could perhaps buy a pair of t50 drivers whether it be the mk2 or mk3.
try this site.
https://www.fullcompass.com/prod/51...1-driver-assembly-for-t40rp-mk3-and-t50rp-mk3
--------------------------------------------------------------------

Does anyone have any information on this screw???
I'm unable to find the same tread size at the local hardware store, no information on the fostex site and haven't found anything in this thread either (beside telling others to go to the hardware store):stuck_out_tongue_winking_eye:

qGFLQxo.png
 
Last edited:
Oct 7, 2018 at 4:58 AM Post #2,483 of 2,832
Well I never thought I would get going on these MK2 again any time soon.
My set here is quite heavily modded and slightly complex in the materials used - strategic hole punching of the memfoam pads over certain grids, AngelHair, Arctic Cotton material, Sorbothane all over the face of the baffle etc.


The one thing I did since my last update was go in and increase the bass levels and extension again.
It has definitely worked.
Even running off of a Zishan DSD DAP ( with the full on 15 volt upgrade mod ) one would think there is a bass booster on compared to the previous mod.
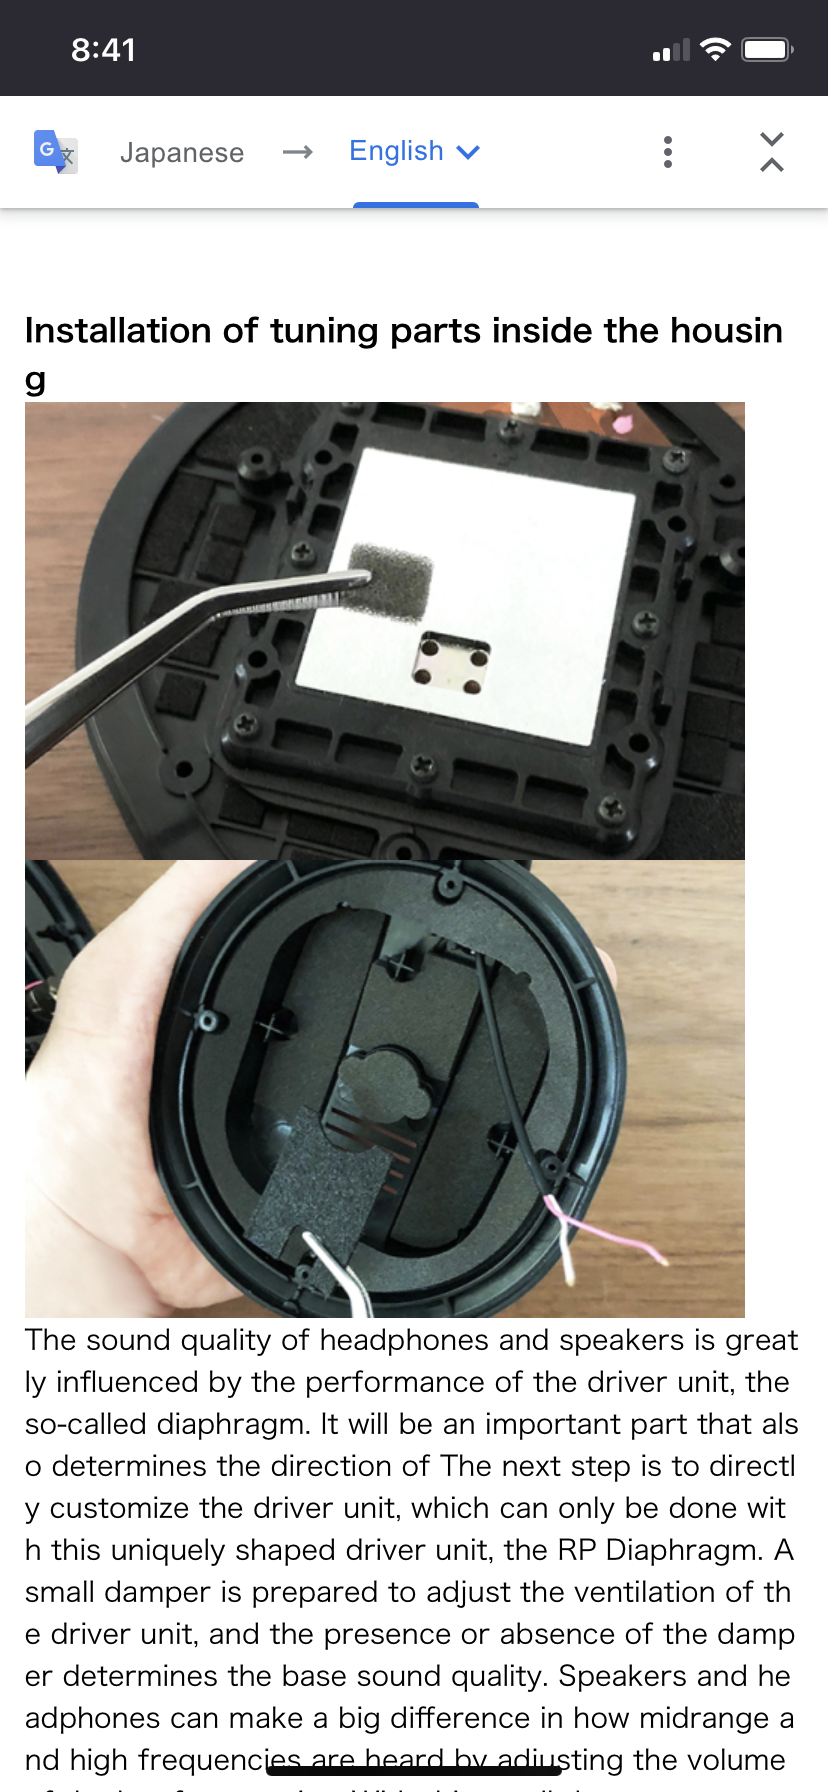
The previous mod entirely removed the rear white damping from behind 2 of the larger driver grid areas.
I have now fully removed that white damping paper from the entire middle strip of 3 grid squares, all of them are the larger grids with more of the metal flux plate holes beneath them.
*Levels are way up.
*Quality stays very similar since these last grids now exposed on each driver rear are still somewhat damped.
* very much extended reach as well
= It so happens that I had hole punched the memfoam discs directly above that spot for the previous mod, and this is the only vent hole there that the grid can vent from as the memfoam is all pressed down directly on the driver rears.
Obviously it is restricted in size still due to the hole punched in the memfoam being much smaller than the now exposed grid area.
Additionally there is an Arctic Cotton damping square frame whose edges fill that spot too.

So basic impressions are that the levels are wayyy up.
Quality is similar, but slightly slightly looser overall so there is some more all encompassing low end ( previous mod seemed solid but slightly tight still ).
So this new mod might be a bit more realistic sounding in comparison to that previous mod's tighter effect on the low end.
There's definitely additional spaciousness and it is very easy to detect that increased air effect ( these were already sounding quite on the open side ).
It's quite a large more expansive type of sound here now.

I might go back in and replace the punched plug from that memfoam at that exact spot to see what happens. I suspect it will tighten things up but just how much , no idea.


One totally bothersome thing about this series of cans is the driver variations, both between sets and as I have seen mentioned a few places also within individual pairs.
Mine are the peakier version :frowning2: , yet the one I did for waynesworld are obviously less so.
I even saw this mentioned on the Russian sites.
The earlier production the less peaky, or so it is said.
I honestly cannot recall what was figured out for possibly identifying them by checking the transparency/opaqueness of the stock white rear driver damping ???


Have another set here that has been sitting half done using some rear cup filler that dries to a semi-hard acrylic with pumice pieces embedded within it all.
An art store product.

*** I did omit a total sealing of the baffle to cup seam this time around, guess I will tackle that first before replacing memfoam plugs.

here we go again.

Update to this post #1

So keeping the baffle to cup perimeter unsealed ( no tightly stretched electrical tape ) took a very very slight amount of tizz out of the top end.
Better by a touch but not ideal yet.
Enough to go from sibilant to not quite though.
Was NOT expecting that.
I replayed a particular area in a track a few times prior then right after.

I went in and replaced the plug hole directly above the newly exposed grid area with a memfoam plug ( had a small bag of them saved )
Spacious expanse dropped back a bit to a lower vastness.
Still pretty good stuff though, there's enough of that feeling left without going overboard.
Some vocals that were pushed back into that expansiveness emerged a more forward again back to what I would consider more proper.
Low end a touch tighter and still bigger, still reaches very deep.

I did not think there would have been enough of a breathing room along the cup to bafffle perimeter to have done much, but it did drop off that edgy tizz slightly which did show at times.
it's right on the edge instead of barely over the top now.


yeah sorry about rambling.
I forgot how such small things can affect the overall sound, even if it is a subtle mod change. ( but this low end is not subtle now ).

I hope there are no more updates :)

Update #2


Had to replace another memfoam plug, this time over an intact grid. Improvement in vocal range forwardness..
Total of 2 memfoam pad holes on each driver replugged.


This will likely interest maybe 1/2 a member here. If that.
 
Last edited:
Nov 5, 2018 at 8:09 PM Post #2,485 of 2,832
Can someone help me with some comfort adjustments on the mk2?
The adjustment rods aren't as tight as i'd like. I have to push the rods back up once in a while. I tightened the bigger of the 3 screws on the headband but didn't notice a difference. Is that the right screw for this? I didn't want to overdo it and strip it.
 
Nov 5, 2018 at 10:04 PM Post #2,486 of 2,832
Can someone help me with some comfort adjustments on the mk2?
The adjustment rods aren't as tight as i'd like. I have to push the rods back up once in a while. I tightened the bigger of the 3 screws on the headband but didn't notice a difference. Is that the right screw for this? I didn't want to overdo it and strip it.

I believe that's the only thing to tighten. are they moving up and down alot? If you wanted you could use cable ties to secure them in place on the sliders by putting a tie on each side of the bar that attaches to the headband. Won't look pretty but it'll work. I have a huge issue with my denon d2k not having enough tension and doing the same thing, I haven't rigged that yet, but it's insanely annoying.
 
Nov 6, 2018 at 12:47 AM Post #2,487 of 2,832
Can someone help me with some comfort adjustments on the mk2?
The adjustment rods aren't as tight as i'd like. I have to push the rods back up once in a while. I tightened the bigger of the 3 screws on the headband but didn't notice a difference. Is that the right screw for this? I didn't want to overdo it and strip it.
I have had the same issue on my Sennheiser HD25 which the cups would just fly right down, but! I had a fix for it which you would have to buy some insulation tape and put it on the sliders, you can keep putting layers until your fully satisfied.
 
Nov 6, 2018 at 12:48 AM Post #2,488 of 2,832
I believe that's the only thing to tighten. are they moving up and down alot? If you wanted you could use cable ties to secure them in place on the sliders by putting a tie on each side of the bar that attaches to the headband. Won't look pretty but it'll work. I have a huge issue with my denon d2k not having enough tension and doing the same thing, I haven't rigged that yet, but it's insanely annoying.
You could check the springs on your pair or do the tape mod.
 
Nov 7, 2018 at 6:36 PM Post #2,489 of 2,832
Thought I would post these here. I made them for a gent out in Washington State. They were made using a pair of the Massdrop x Fostex Tx0rp headphones. The wood is Bocote. The baffles screw onto the cups, and are sealed to the cups using thin craft foam. The pads are ZMF, but I tested them using Alphas as well, and agree with the owner that the Alphas are more pleasing to the ear. The cables are by PETEREK, and terminated in a basic Rean balanced plug.

43018574_1067319226764789_7394853882954977615_n.jpg
 
Nov 11, 2018 at 9:43 AM Post #2,490 of 2,832
So keeping the baffle to cup perimeter unsealed ( no tightly stretched electrical tape )

I think I did similar mod as yours "keeping the baffle to cup perimeter unsealed".
I tried this on my T20RPmk2 and like it's openess wider sound and bass quantity increase (but have to re-tune the sound by extra damping).

Then I did it on my Open Alpha too.
pic#1 I placed a tiny screw nut in between the front thread hole , and a longer screw to make this baffle gap.
IMG_20181004_203820.jpg


pic#2 I improve this mod by a short spring instead of the screw nut. That let me can adjust the distance of the gap.
IMG_20181004_220743.jpg


However, I can't re-tune the Open Alpha to balance the sound after this gap-mod. So I return to its orginial stage without gap.
Not the same case on my mk2. I can increase the size of reflector and balance the sound so well. I kept this gap on mk2 and happy with this mod.
 

Users who are viewing this thread

Back
Top