Thunderpants!
Dec 8, 2010 at 8:13 PM Post #1,081 of 2,225
But you need a decently heavy drill press to turn them and not overload the drill press, so that's another $200+ if you don't have a drill press already.  So now it's quickly approaching a break even point for a mini lathe, except that the lathe will need $100 in tools and then you'll see that 4-jaw chuck for $150, and for just $125 you can get a variable speed mini-lathe...  and well, for just $100 more you get a midi-lathe and a nicer set of tools...  It never stops man.  It's a $2000 investment no matter which way you go.
 
tongue_smile.gif

 
And let's not even get started on all the wood they have at Woodcraft...  I don't want to total up how much money I have sitting on the shelf in 6"x6"x2" blocks. 
 
Dec 9, 2010 at 12:02 AM Post #1,082 of 2,225
Hahah.  Just stopped at Home Depot again tonight and picked up a 4-1/2 hole saw which gives me about a 4-1/4" ring when I'm done. That leaves an 1/8" for sanding  when I'm ready to get cleaned up.  Really wish I would have thought to measure the inner diameters when I went earlier.  
 
Dec 9, 2010 at 10:42 PM Post #1,083 of 2,225
What I am calling the "Crotchless Thunderpants" prototype took shape in my shop tonight.  I'll have some pictures of what's happened so far coming tomorrow.  The good thing about using hole saws is that I can easily add different widths of wood to see how certain cup sizes effect the sound.  It's time to get some better wood than MDF to build a less rough prototype.  
 
Dec 10, 2010 at 9:47 AM Post #1,085 of 2,225


Quote:
What I am calling the "Crotchless Thunderpants" prototype took shape in my shop tonight.  I'll have some pictures of what's happened so far coming tomorrow.  The good thing about using hole saws is that I can easily add different widths of wood to see how certain cup sizes effect the sound.  It's time to get some better wood than MDF to build a less rough prototype.  


we need pictures!!
biggrin.gif

 
Dec 10, 2010 at 10:09 PM Post #1,086 of 2,225
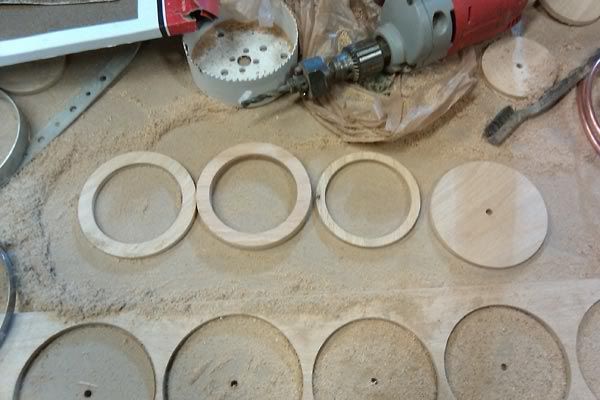
These are the rings cut out with a 4-1/2" holesaw.  The far left is the back (openbacked can be converted to closed easily), then the main part of the cup, a spacer which leaves room for the pads to grab (a 4" hole saw so it's smaller), and the baffle that the pads will hold onto and eventually get a hole for the driver (didn't have it on hand to measure for cuts)

Everything is made out of 1/4" red oak from menards (cheap and easy to get) except for the main part of the cup which is out of 1/2" red oak.  This is just what menards had in the store, and I'm sure you could get much better wood at an actual woodworking shop.  This is pretty much just to see if my ideas work.  I won't bother doing expensive wood until I hear how these sound.


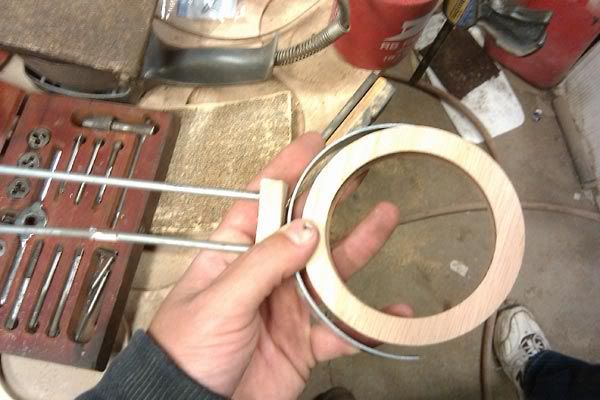
Now comes my crowning achievement.  I give you "Bryant Gimbal!"  It's 1/8" brake lines that have been tapped for a 6-32 screw which will act as the suspension system.  The actual gimbal is a stainless steel hose clamp that has been cut in half.  I haven't attached the gimbal to the wood block yet, but that is just going to be a metal insert into the bottom of the wood block, and a few washers between the gimbal and the wood to let it rotate.  


I will have more pictures eventually, but these were the only ones that turned out from my cell phone under fluorescent lights in our shop.
 
EDIT:  I forgot to add that above the block where the brake lines are attached I will have another block that a piece of leather attaches too.  This will slide up and down the lines (which will be shrink wrapped black too) and have a set screws in it to adjust for the up and down fit of the headphones.  
 
I've contemplated a type of spring system on this block but I will try it the easy way first.  
 
I'm aware that people have stated that open backed thunderpants don't sound good, but I'm going to give it the old college try.  The worst that can happen is I just cut a new back plate without a hole in the middle.  Which basically makes these modular headphones.  I really wish I had time to work on this all day tomorrow, but my significant other seems to feel the need to go to Chicago for the day.  
 
Dec 10, 2010 at 10:30 PM Post #1,087 of 2,225


Quote:
Everything is from menards
 
I've contemplated a type of spring system on this block but I will try it the easy way first.  


So you saved big money!
 
Really hard to beat a simple elastic band as long as you make it easily replaced.  I've always felt AKG's suspension is just brilliant.  Wish the elastics were just normal loops, but when the elastic is new, it rocks.  You can use thicker bands or double them up if they sag down too quickly. 
 
Dec 10, 2010 at 10:47 PM Post #1,088 of 2,225
I had originally gone to home depot because they have brand name tools.  I did figure out that menards has a much better selection of hardware and screws than home depot does.  Menards had threaded inserts out the wazoo, and some cool, but pricey chrome screws and and other little odds and ends that made my eyes light up.  
 
I think my favorite discovery of the day was that the 1/8" brake lines could fit a 6-32 tap perfectly.  I was originally going to use copper refrigeration line, and it would have worked.  The problem is that copper isn't as stiff as these steel brake lines.  
 
Dec 10, 2010 at 11:21 PM Post #1,089 of 2,225


Quote:
 
I think my favorite discovery of the day was that the 1/8" brake lines could fit a 6-32 tap perfectly.  I was originally going to use copper refrigeration line, and it would have worked.  The problem is that copper isn't as stiff as these steel brake lines.  


You can work harden the lines too to make them stiffer or temper them once you have the final shape and you can get it to near spring temper so that it would go back to the original shape if you open it up or compress it.
 
Edit:  Nevermind.  You can't temper brake lines because they are double-wall brazed, not welded.  Approaching spring tempering heats would reflow the brazing alloy. 
 
Dec 10, 2010 at 11:28 PM Post #1,090 of 2,225
They are fairly stiff to begin with, and I don't forsee any durability problems with them.  This is not going to be a portable set of headphones anyways that's for sure.  I'm going to the trouble of making these and I can't even get a pair of T50rp's to steal the drivers from.  My dad asked me what the hell I was doing and I told him I was making Thunderpants.  That got an interesting reaction out of him.  He asked why on earth I was wasting time making "Thunderpants" to which I replied, "Too see if I can."  
 
This coming from the guy that built a back-hoe from scrap metal, and a car trailer.  Guess DIY runs in the veins.  
 
Dec 12, 2010 at 2:06 PM Post #1,093 of 2,225
This is the little bit of progress i've been able to make today. I need to get to the hardware store again and pick of a few different things, but it's a blizzard outside right now so I'll just have to wait. Looking at the baffle and cup with the gimbal attached.


This is the back view of the gimbal and cup. I need to pick up a 3" hole saw next to make the back plate have a smaller hole than the cup to give myself somthing to attach whatever grill/screen I want to have.


I taped the suspension system to the gimbal just to see what it will look like. I'm having issues finding the right length and bend to hhave the brake lines for the suspension system. really wish I had a mannequin head or something to see what I need to do. The pipes in this picture are not the final ones, but just show what will be done in the end.


Users who are viewing this thread

Back
Top