Relatively cheap headphone measuring kit?
Jan 23, 2017 at 4:21 AM Post #31 of 66
   so I finally decided to try (moving up my never ending audio todo list, I do one thing, I have 3new I want to try ^_^).
whatever I tried, it's not worth the effort for FR alone IMO, and even the 30$ startech usb ADC works fine for such purpose into a cheap mic. but the distortion figures went down a good deal using a tablet as DC source (around 2.3v) and measurement done with the focusrite 2i2 as input.
thank you for reminding me to use an external DC supply. 

 
Yeah, the Startech is pretty good most purposes. But if you can build that battery adapter, it would be just as convenient as using the Startech. If you have to assemble the damn thing using alligator clips all the time, then it's not worth the effort. Speaking of an audio to-do list, I've been playing with a new audio toy and the my first project with it may or may not be on topic for this thread, so I'll also post it elsewhere.
 
The new toy: The Web Audio API. A web browser apparently has some pretty sophisticated audio tools already built in, and a programmer can quickly build synthesizers, recorders, FFT-based analyzers, and custom audio file playback systems. The API gives you access to oscillators, biquad filters, splitters, delay and gain modules, a convolver, etc. And you can work at the sample level if the processor you're looking for isn't already built in.
 
Unfortunately, I don't know anything about web programming, so these nifty tools are out of reach. I wanted to learn the minimum to use these tools. Some of the videos on YouTube show how you can build an adjustable sound source with a toy example that takes only a few minutes and a few lines of html and Javascript. Eventually I'm thinking of using it to build my own custom EQ/DSP/convolver/crossfeed playback system, and even using it to measure one's own hearing for a better idea on what the various parameters should be. Here's an example, my first project, starting small using the built-in oscillators. Perhaps it's relevant to this thread as you're using your own perception to "measure" your own hearing cheaply: YuCH


That link is flaky, so it might take a few tries to get it. An app like this has been made before, but using Flash. Maybe, as the project improves I'll rename it to MEH (misguided EQ helper) or SICH (self-inflicted calibrator for headphones)  Lol. Some more simple measurement ideas: maybe a finely and easily adjustable sine oscillator with a readout to make it super easy to find resonances and nulls quickly, a utility for experimentally determining what the ITD and ILD can be used as parameters in a crossfeed system. (I wonder if it can be done by using an earplug on the left ear and then using a the Web Audio API's oscillators to determine how much delay and magnitude on the left speaker can null the output on the right speaker the most.)
 
Let me see if I can find a more appropriate thread to re-post this info. 
 
Jan 23, 2017 at 11:03 AM Post #32 of 66
Samsung phones have something similar built in (adapt sound). Instead of asking for the people to evaluate equal volume the app asks you to indicate whether you can hear the tone or not. I suspect this is probably a better approach as it is a binary evaluation of the noise.
 
Edit: NM i forgot about the fletcher munson curves so maybe binary isn't a great idea unless you apply some sort of correction on top of the EQ according to the curves.
 
Jan 23, 2017 at 2:10 PM Post #33 of 66
@yuriv
 
yeah I gave up last time I couldn't find my breadboard and bought a soldering iron. last time I used one was about 20 years ago and it shows
redface.gif
.
 
there are a few topics with tutorials on how to EQ by ear, to make copies of a signature by ear, or just to get an idea of flat. the eternal problem being to keep consistent loudness for the equal loudness contour to stay the same.
for ILD ITD and more funky stuff, I'm not sure. usually you end up with stuff to use in matlab and that's where I stop
frown.gif
. something like the razer surround software could probably be a starting point, to "calibrate" you point at the direction you're hearing things, it is incomplete but a pretty fine idea IMO. I'm guessing this could then be used with impulses to get the loudness/EQ/timing applied. and then use that on our own as basis for crossfeed or convolution.  nothing we can't do on our own with something like xnor's crossfeed, music isn't always the easiest sound to set those things.
I ended up with  http://recherche.ircam.fr/equipes/salles/listen/sounds.html  picking the few ones that felt ok in the 0 to 45° area, and used the 30° ones as starting point for my kind of custom convolution. but getting a more balanced EQ seems like a good idea before messing around even more with positioning cues. so EQ stays a very relevant first step IMO.
 
Jan 23, 2017 at 3:56 PM Post #34 of 66
there are a few topics with tutorials on how to EQ by ear, to make copies of a signature by ear, or just to get an idea of flat. the eternal problem being to keep consistent loudness for the equal loudness contour to stay the same.

 
If you want to put in the effort I suspect some audio processing in Matlab or equivalent could probably make it pretty easy to shift EQ by loudness contour. A very layman's perspective, but I'm thinking you setup your EQ at one Fletcher Munson curve volume. As you change volume in the digital domain you update your EQ based on a relative change in fletcher munson curve values. Maybe I should learn some matlab/octave as this seems like it could be fun experiment. 
 
Jul 17, 2017 at 4:24 AM Post #35 of 66


I’ve been away for a while, but thank you for sharing that. It’s good to know how others are making measurements.

About the Focusrite Scarlett: It has 48V phantom power, no? You might fry the iMM-6 if you managed to wire it up to that. The capsule should be similar to the old discontinued Panasonic WM-61A electret condenser, which had a standard operation voltage of 2V. (Maximum is 10V according to its datasheet.)


The 1/8” TRS jack for computer mics typically supply 5V:


http://www.epanorama.net/circuits/microphone_powering.html

The one in the Startech works fine with the iMM-6 using a headset to PC adapter like this one:

https://www.amazon.com/gp/product/B008OB2NHA/ref=oh_aui_detailpage_o01_s00?ie=UTF8&psc=1

The Startech isn’t bad at all and I’m getting reasonably good results with it. If you’re determined enough, I suppose you could buy an adapter to downconvert the Scarlett’s 48V phantom power to 5V. But those adapters can be expensive unless you build it yourself. You could buy a UMM-6 or an EMM-6 for the price. Here’s Sennheiser take on it: link.

BTW, here’s a modest proposal: we should start a new thread called "The Measurement Gallery” or something like that. Anybody can post measurements as long as it is clear how they were made. With that in place, I don’t think the data will be too misleading. Even if the individual results are inaccurate, a reader might see a pattern emerge if enough measurements are posted. It would start small, but maybe it could eventually turn into a useful resource worthy of a sticky.

The thread’s first post would serve as an index, with links to the things being measured. I’d start the thread myself, but someone who is here more often than me should make the first post.


@goodvibes

Thank you for the idea. I might try that later, when it’s convenient. The vinyl tubing was just lying around here and is cheap, so I started with it. I have access to softer vinyl as well as silicone tubing, which might be a little closer to the acoustic Z of human skin. Moreover, their inside diameter is 7 mm–closer to average than the ¼” ID that I started with. Let’s see which makes a bigger difference—the small change in diameter or the change in tubing material.

Experimenting with tubing material to get it closer to the acoustic properties of human flesh is good, but at the same time it’s getting farther away from the materials used in an IEC 711 ear simulator. We’ll see what happens.


I was thinking of adding features to my Dayton iMM-6-based rig a little bit at a time. Maybe a mold of my outer ear first, then a simulated head around it much, much later.

Another approach is to use one’s own head for measurements instead of a dummy’s. I was thinking along the same lines as this misplaced thread in the Computer Audio subforum: http://www.head-fi.org/t/829549/equalizing-headphones-to-your-ears-with-in-ear-binaural-microphones

It has a link to this $170 binaural mic system:


https://www.amazon.com/gp/redirect.html?ie=UTF8&linkCode=ur2&camp=1789&creative=9325&tag=headfiorg-20&location=https%3A%2F%2Fwww.amazon.com%2Fgp%2Fproduct%2FB00HAL0ZWU

The premise here is that if headphone and speaker measurements at the ear’s opening are the same (even if blocked), then the response at the eardrum should be the same also. That’s a big if, and there are some folks who dispute the claim. But there are others who have reported good results with it. For example, look no further than the Smyth Realiser system’s in-ear microphones.


Keeping in mind the title of this thread, it should be possible to build your own binaural mic system for far less than $170, using WM-61A clones and a little elbow grease.

If you needed more motivation to do this, consider, also, the claim being made by David Griesinger here:


https://youtu.be/a-JGAobDwGs?t=660
Please fast forward to 11:00 to see (and hear) several subjects' in-ear measurements of pink noise being played by an HD600.

The paper with the same information: http://www.aes.org/tmpFiles/elib/20161225/18424.pdf

If you believe this video, then we can potentially get much better DSP corrections to a headphone’s response if the corrections were based on measurements made with mics inside our own ears, instead of a dummy head’s. DG advocates making measurements near the eardrum using a microphone similar to the Etymotic ER-7C Clinical Probe Microphone System.


On his web site, he has a tutorial video on how to construct comfortable low-cost probe mics that can measure near the eardrum. It’s a private YouTube video, but the link can be found on his site.


At the end of that tube is a modified Audio Technica ATR3350iS lavalier mic. I have a feeling that you can build a removable attachment for the iMM-6 instead of doing an irreversible mod on the AT. That could be a future project.


i watched some of daves videos and this one was very interesting does any of you try this method?
i wrote him an email and wait for the program could be also nice to opimise my diy electrostatic headphones :)

cheers janosch
 
Jul 17, 2017 at 10:21 AM Post #36 of 66
i watched some of daves videos and this one was very interesting does any of you try this method?
i wrote him an email and wait for the program could be also nice to opimise my diy electrostatic headphones :)

cheers janosch

as anything requiring actual work and probably more than a few tries to get used to the method/software(like where to start to avoid clipping), don't expect a lot of headfiers to try. I don't mean it as a critic but as an observation, most people just didn't come here for that.
there you have a dedicated topic with a few feedbacks and ideas https://www.head-fi.org/f/threads/frontal-sound-and-correct-frequency-response-with-eq-only.853443/
it is indeed a cheap but less reliable method compared to buying in ear couplers and measuring a speaker, then the headphone. the very obvious bonus with Griesinger's method is that you can also try with IEMs.
 
Dec 30, 2017 at 9:36 AM Post #37 of 66
Here’s a follow up to my post last year about the coupler based on the Dayton Audio iMM6 measurement mic. I abandoned the project several months ago because I found a way to get two IEC711 clones from China. And I’ve already put them to good use while modding cheap IEMs. But I think the results of my experiments with the iMM6-based coupler are interesting in their own right. Maybe somebody else here might find the following an interesting read.

Basically, I wanted to see what could be done to improve the coupler’s response. Sure, you could EQ the output or come up with a calibration curve. But Isuspect that while this approach can get you a little closer to a more accurate response, it may be the case that you’d need a different calibration curve for different IEMs—or at least for different kinds of IEMs. The acoustic circuit to model the system looks like this:

Source --> IEM’s acoustic output Z --> coupler’s acoustic Z --> iMM6 acoustic input Z​

What if the IEM has a very different acoustic output impedance from the one you used to make your initial calibration curve?

An IEC60711 (or IEC60318)-compliant coupler tries to mimic the acoustic transfer impedance of the average human ear. One of the ways it does that is to tune its response using side volumes (really Helmholtz resonators).

IEC711 coupler 2D section view.png
IEC711 coupler 3D section view.png

Source: https://www.head-fi.org/threads/a-h...the-ie800s-thread.865189/page-3#post-13851537
(Google image search found nice pictures in a thread by Jude)​


It’s not just a simple tube with a mic at the end. Maybe something like this can be done with a DIY iMM6 rig. Unfortunately, the hobbyist may have no reliable and inexpensive way of measuring the acoustic impedance of the coupler. Perhaps the best that can be done with limited means is to emulate the output of the IEC711 coupler for as many kinds of inputs as possible:

Input --> black box --> output​

If the black box behaves just like a copy of the real thing with most inputs, then for our purposes, who cares? We’re good to go. Lol. I know, lots of assumptions. But please bear with me.

Here’s another look at the IEC711’s side volumes:


As it says in page 11 of the slides (shown above), the IEC711 coupler has two Helmholtz resonators tuned to match drum impedance. A frequently-given example of a Helmholtz resonator is a bottle. If you blow across the top, you’ll hear a sound at its resonant frequency, which depends on the bottle’s volume and the neck’s geometry. That’s pretty much what’s going on inside the ‘711 coupler. The narrow slits are the bottle necks that lead to the side volumes.

Page 10 above shows the system’s lumped parameter model (LPM) as an LC transmission line (Ma,4, Ma,6, Ma,8, Ca,4, Ca,6, and Ca,8). Each Helmholtz resonator is modeled as an RLC branch (R_, M_, and C_ a,5 for the first one with the opening near the coupler’s reference plane, and R_, M_, and C_a,7 for the second one near the mic).

For each resonator, M and C determine the resonant frequency and R determines the damping, just like in an electrical RLC circuit. In fact, the slides show that this is how they have traditionally modeled the behavior of the coupler. The values of R, M and C are on page 11, and it shows how we can compute the values of R and M from the dimensions of the slit. Later, on page 21, they give the measurements of the first one: the opening is 0.17 mm x 1.11 mm (for a cross sectional area of 0.1887 mm^2) and the length is 2.57 mm.

From the values of M and R given on pages 11 and 14, we can compute the angular velocity at resonance, ω = 1/√(MC), from which you can get the frequency. Plugging in the numbers gives 1.19 kHz and 3.5 kHz for each resonator, and these are where the nulls occur in the graph of the undamped response on page 13:


With damping (energy losses from R), the response looks like this:


I circled in green the effect of the first resonator, the one with resonant frequency 1.19 kHz. It has a relatively large contribution to the response, compared to the second resonator, whose effect is subtler. This gives a 4 dB to 5 dB rise to the ‘711 coupler’s response. Our base iMM6-based coupler doesn’t have this behavior. Yet.

Have a look at my first attempt at placing a side volume on the iMM6 coupler:

iMM6, ER4PT, black syringe and needle as Helmholtz resonator 600x450.png

I drilled a small hole in the side of the tube and stuck in a 19-gauge blunt-tip needle and a 1 mL syringe. Earlier, I mentioned that the ‘711 coupler’s first slit had a cross-sectional area of 0.1887 mm^2. By my calculation, this falls between 24 and 25 gauge. At the time, I didn’t have a 25-gauge needle, so I used 19-gauge, which is much thicker (0.6528 mm^2 cross section). Here’s its effect with an Etymotic ER4PT in the tube:

ER4PT FR into iMM6, 1mL syringe, 19 gauge needle.png

As the syringe volume gets smaller, the resonant frequency increases and the response swings less. You could compare this to a spring-mass-damper system. The air volume in the syringe is like a spring, as air is compressible and elastic. The mass is the mass of the air inside the needle’s tube. The damping comes from energy loss in viscous flow. Smaller springs and smaller moving masses start off with less energy, so less swing.

Another observation is that the wiggles in the graph look like behavior that's somewhere between the undamped and damped responses in pages 13 and 15 of the AES slides shown earlier. So it looks like we need more damping if we want to copy the damped response on the ‘711 coupler. Also, the red curve above is the response with the syringe already at its minimum volume. To increase the resonant frequency to something close to 1.19 kHz, we can’t decrease the air volume in the syringe any further, but we can still shorten the needle’s tube or increase its width.

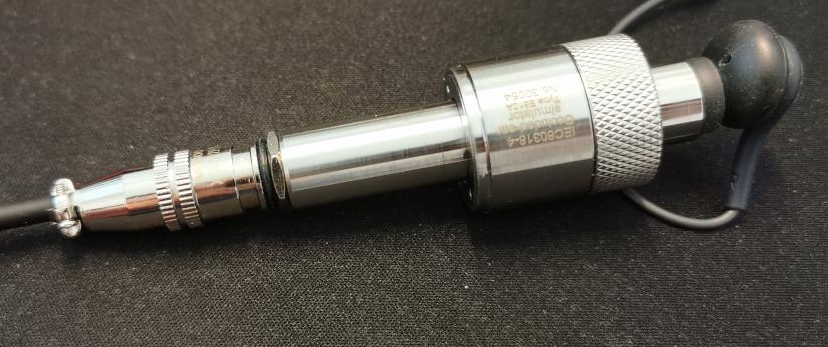
I decided to saw off the end of the needle. I didn’t need to make it as short as the ‘711 coupler’s first slit (2.57 mm) because the 19 gauge needle’s larger cross section gives a much higher M (related to mass really) for the same length. Here’s what it looks like:

iMM6, ER4PT, black syringe and needle as Helmholtz resonator 2 600x450.png

The needle is a bit shorter now. The picture also shows a bit of earbud foam; part of the piece that’s missing was placed in the air volume to increase the RLC branch’s series R for damping. After playing with it for a while, I discovered that if I instead placed the damper in the needle’s metal tube, then I needed very little foam to get the same result. Also, since the air volume needed to get the resonance close to 1.19 kHz is less than 0.1mL, I found that I could do away with the syringe and just use some putty (Blu-Tack) to seal the air in the needle’s plastic sleeve. Here’s the result:

ER4PT FR into iMM6 base response.png

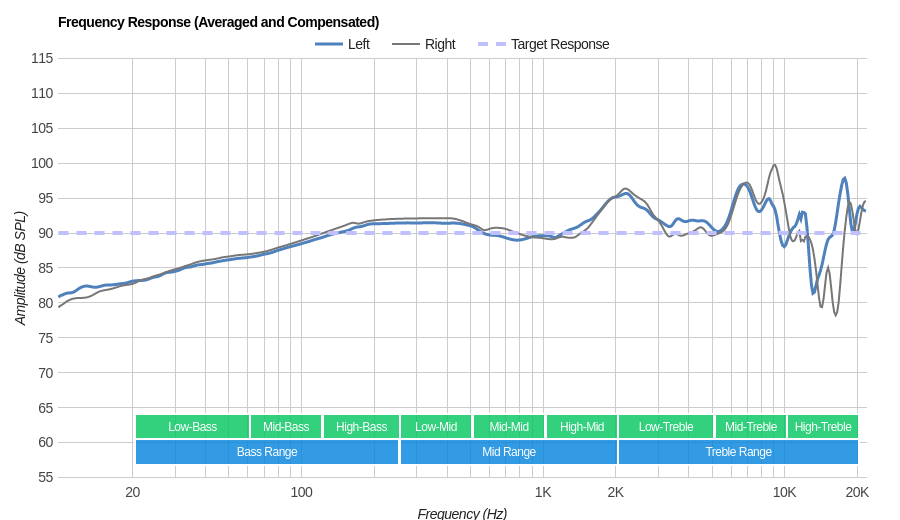
Before: the iMM6’s base response without the resonator. (Ignore the bass roll-off for now. After taking apart and putting the iMM6 back together, it now has an air leak that I should take care of some day.)​

ER4PT FR into iMM6, shortened 19 gauge needle, foam damper.png

After: the response with the resonator. Frequencies above the bump effectively get around a 3 dB boost. If we subtract the two responses, we see that the biggest difference from my ‘711 clone comes at around 2.3 kHz, where the iMM6 measures approximately 4 dB lower compared to the rest of the spectrum. Also, the peak is a different spot.​

I thought about the placing the second resonator near 3.5 kHz, just like on a ‘711 coupler, but maybe being slick about it and getting the resonator’s dip to partially cancel the right side of the 3 kHz peak, thereby shifting the peak lower in frequency.

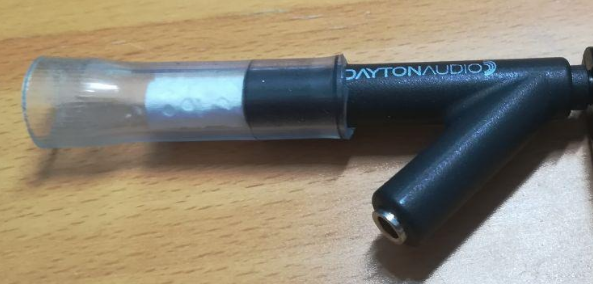
I also thought about placing a third resonator to fix the response at 2.3 kHz. Maybe if I had used an 8-mm tube instead of 7 mm, I wouldn’t need this fix. I don’t know. I abandoned the project before I could explore it. Here’s where I left off:

iMM6, silicone tube and three Helmholtz resonators 600x450.jpg

Dayton Audio iMM6-based coupler with three Helmholtz resonators, with resonances near 1kHz (19 gauge shortened needle, the one with the black plastic sleeve), 2 kHz (16 gauge, green, damper in tube), and 3.5 kHz (18 gauge shortened needle, orange).​


Here were the kinds of measurements I was getting before I put the project aside:

ER4PT FR into iMM6, three resonators, two attempts.png
iMM6, ER4PT, three Helmholtz resonators and FFT Plot in IOS 667x375.png

I’m not completely satisfied with the results, but maybe someone out there will have better luck. The seal with the putty isn’t permanent, but it allows for quick changes. After a few months, the parameters probably have drifted. If I had been satisfied with the results, maybe I would have made the seal more permanent.

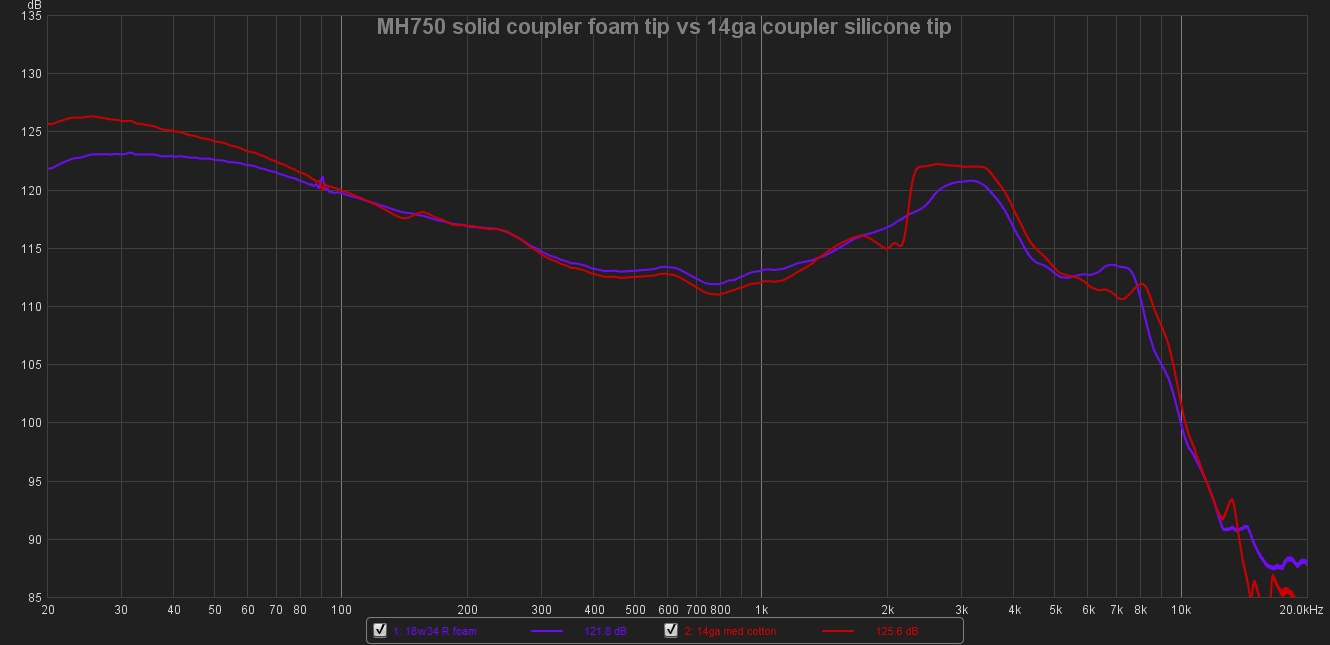
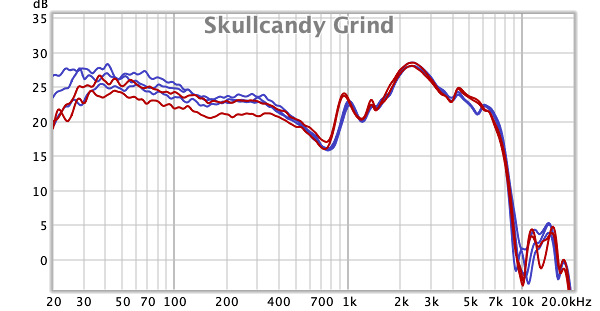
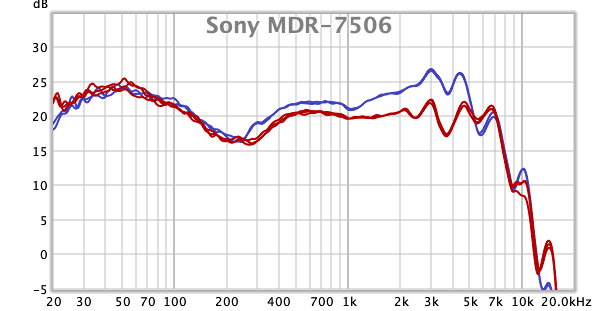
On the other hand, I’m not completely dissatisfied with the results either. I had some fun playing with it. Here are a few more comparisons:

Philips SHE3905 frequency response into iMM6 with three resonators (red), IEC711 clone (green).png

Philips SHE3905​


Sony XBA-C10ip frequency response into iMM6 with three resonators (red), IEC711 clone (green).png

Sony XBA-C10iP​

I stopped working on the project, but I still find it interesting. If you already have a measurement mic, the material cost of constructing and tweaking a coupler is very low, even with these resonators. An added advantage is that you can see the IEM inside the tube and you can mark off where the reference plane should be.

So, if you have a DIY IEM measuring rig, please share what you did to move beyond just having the mic in the tube. Or share any other ideas anyway. For example, I suppose you could buy a ‘711 clone without mic and use whatever measurement mic you have at hand. But I’m glad I ordered the ones with the microphones already included.

Even if this project leads to a dead end, I still found its experiments fascinating. I’m thinking of using some of the ideas here to mod cheap IEMs, maybe even full-size cans, to further tune their response. (Yes, I'm aware that these are old ideas that have been done to death by manufacturers and hobbyists alike.)
 

Attachments

  • Traditional Simulation using LPM from Simulation of Couplers, p.15 .PNG
    Traditional Simulation using LPM from Simulation of Couplers, p.15 .PNG
    32.1 KB · Views: 0
Last edited:
Dec 30, 2017 at 11:03 AM Post #38 of 66
it's fun how we end up using similar IEMs for those test. the other day I posted this https://head-fi.org/threads/headpho...different-results.751100/page-2#post-13933374 and picked randomly 3 of my IEMs. guess what? an er4 (although not the same model), and a xba-c10 ^_^. I had a Philips on the table and ran some measurements in it too, but I'm not sure about the exact version number so I decided not to use them.

and I have been thinking about the same sort of things, but for my EMC8000+coupler, because the extrusions on the side of the mic are adding free space that I didn't want to have. and I I struggled a little trying to find a solution the wouldn't move with time yet let me still use the EMC8000 alone for room measurements. I gave up and just placed a thin aluminum sheet over it with a hole over the capsule. it doesn't totally remove the effect of the extrusions around the EMC8000's head compared to filling them with blu tack, but came close enough IMO for an easy and fully reversible option. having very low expectations really helps to set the "close enough" level.
 
Dec 31, 2017 at 8:54 AM Post #39 of 66
The ER4 series IEMs are an obvious choice for a sample response because they’ve been around for a while and everyone knows what they sound like and how they measure. I happened to have my XBA-C10 on the workbench because it developed a channel imbalance, and I’m trying to fix it. Ha. But maybe should have a used a different one for the other sample graph as it’s also single-BA like the ER4.

The ECM8000 gave me some unexpected results too when I first used it with some vinyl tubing. It’s right here in this thread, post #14 on page 1. Looking back and reading it again, I can see that the rig gets the correct frequency of the peak on my ER4PT. It agrees with the Chinese IEC711 clones and the FR graph that comes in the box. It’s my iMM6 coupler that has the unusual response at 3k. It’s the odd one out, so I’ll have to investigate the problem some time.

Your iMM6 doesn’t seem to have the same weird response. This is why it’s good to see what others are doing with the same gear. Maybe we can get really good results with properly functioning iMM6s with just a single resonator. It’s really the one near 1 kHz that makes the big difference. The one near 3.5k is just fine-tuning the response. I’d love to see what that would look like on an ER4SR.

It’s not hard to make a resonator that gets the resonance's f and Q that’s close to the ‘711 coupler’s first slit and side volume, even if the resulting R, M, and C are very different. I used a 19-gauge blunt needle with the end sawed off, some earbud foam, and some Blu-Tack for making quick changes. I bet that you can get the response closer to the graph in the box than what you’re getting with your other rigs: The EARS response looks way off. The ECM8000’s looks rolled off on both ends. The Veritas response looks like it’s falling off a cliff. Those might be harder to fix. Your iMM6 rig’s response, on the other hand, looks like it’s already close above 2k. The effect of the first resonator will be to bump 1k and lower by a good 3 dB down, preferably closer to 5 dB.

BTW, I’ve had my eye on that EARS rig, but I didn’t pull the trigger. Are you planning to write a review before Tyll and Bob Katz get a chance to write about it?
 
Jul 12, 2019 at 10:05 AM Post #40 of 66
The Dirt Cheap In-Ear Microphone

Please excuse the thread resurrection. It took me more than two years to follow up on the ideas in post #17. Lol. Among other things, it was about constructing your own in-ear microphones for making headphone measurements. The idea is not at all new, and head-fi’ers have written about it long before: see here and here. Those guys used relatively expensive Sound Professionals binaural microphones. This thread is about making measurements on a ramen budget, hence this post.

Turning a cheap lapel mic into an in-ear mic
I got myself some Panasonic WM-61A mic capsules, but first, I wanted to make something from even cheaper parts, using less effort. Amazon sells dirt cheap lapel lavalier mics, and I ordered some:


They’re basically $2 each, and they already come wired. All you have to do is strip the plastic covering off the mic capsule, which isn’t too hard if you have something like a wire cutter. It took me minutes to go from this:

Cheap mic and and foam.jpeg

Wire cutter and mic.jpeg


To this:

Cheap mic capsule, stripped.jpeg

I cut a small slit on the side of a Comply T400 foam tip so I could fit in a mic capsule.

Cheap mic in Comply T400.jpeg

Mic capsule in Comply T400 foam tip​

The foam tip is for holding the mic in place in the ear, flush with the opening of the ear canal. That’s something that doesn’t seem to happen with the Sound Professionals mics. They have plastic hooks that wedge the mics in place. I don’t know how much of an effect they have, compared to what the result would be if they weren’t there.

9499344_thumb.jpg

Sound Professionals binaural microphones​

The mics that come with the Smyth Realiser system are more similar to our cheapies. They also use foam for blocked meatus measurements.

9499351_thumb.png

In-ear microphones from Smyth Realiser A8​

The T400 tip’s other job is to completely block the ear canal, so that its tube resonance has no contribution to the measurement. Here’s what an early attempt with one of them looks like in the ear:

Cheap mic in ear.jpeg
Mic in ear​

The exposed capsule is a bit fragile. It doesn’t take much force to pull out the thin wires from the solder joint. Some care must be taken when inserting it in the ear. I damaged one already, but not before taking a few measurements. I’ll have to figure out a way to make the whole thing more resistant to rough handling.

In-ear mic and Surface Go.jpeg

Somewhat portable measurement rig: In-ear mic and Microsoft Surface Go. More portable: just plug the mic into a smart phone and possibly export the result to REW later.​


How the mic performs
The microphones have an omnidirectional pick-up pattern. Their frequency response didn’t change much in the free field when I changed their orientation. So we hope it doesn’t exhibit too much of a proximity effect in the ear. In the spirit of this thread’s title, I used a $9 Apple USB-C to 3.5mm jack adapter to connect the mic to a computer running Room EQ Wizard (REW). Here’s how one of them measures at the listening position in front of my Mac:

Sine sweep measurement from HUACAM YYPJ-01 cheap mic 2.png

Cheapo HUACAM YYPJ-01-1 mic measurements of left and right speaker, 1/6-octave smoothing​

The result is similar when measured with white noise at a moderate level instead of a sine sweep:

White noise measurement from HUACAM YYPJ-01 cheap mic 2.png

Cheapo mic measurements made with white noise in REW, 32 averages, 1/6-octave smoothing​

I don’t know yet why this particular measurement didn’t show the bass roll-off. I’d disregard the result below 100 Hz. There’s also pink noise with REW’s RTA, which is standard for calibrating speakers. It gives similar results.

The listening position is at one vertex of an equilateral triangle and the speakers are at the other two, +/- 30 degrees from center. The room has Owens-Corning 703 and 705 fiberglass wide-band absorbers. Measured with a proper measurement mic, the frequency response at the listening position wasn’t too jagged before applying ARC Genesis room correction:

ARC Genesis report.png
ARC report, subwoofer off​

The left channel has still has a dip around 70 Hz because ARC limits boosts to 6 dB. Maybe I should fix this with better placement, but in practice, I don’t really notice it because bass isn’t as directional, and the speakers’ combined response there is smooth, especially after turning on the crossover and subwoofer.

ARC’s default target doesn’t have much of a warm tilt from the bass to the treble, so I increased it. Come to think of it, maybe it should be tilted even more.

I also tried to make a few measurements on my home theater system, which has the main speakers 3m or more from the listening position. The results weren’t too different after applying ARC.

The mics in the HDE 5 pack come out cheaper than the ones in the HUACAM 3 pack. They seem to use the same mic capsule. The cable is thinner and softer, so it’s easier to fit in the T400 tip. My measurements from the HDE mics pick up a bit of 60 Hz noise. I’ll have to figure out later how to fix it. The rest of the results here are from the HUACAM 3 pack.


Speaker measurements with the mic in my ear
These cheap mics have some roll-off at both frequency extremes, but the result isn’t bad at all. We’re not after absolute accuracy–rather relative differences. Here’s how the speakers measure with the mics in my ears:

In-ear measurements 2.png

In-ear measurements using white noise, 1/6-octave smoothing:
Blue: left speaker to left ear
Red: right speaker to right ear
Light blue: left speaker to right ear
Pink: right speaker to left ear​

I made sure to completely block the ear canals with the mic in the T400 foam tip so that the ear canal resonance doesn’t come into play. Even so, there’s already a 9-dB peak around 3.5 kHz. It seems to be a consistent result after repeatedly reseating the mic and taking measurements. I haven’t decided whether this could be an artifact of the measurement technique. If it’s real, the peak will be even higher at the eardrum, with the added contribution of the ear canal’s resonance.

I think the peak really is there, and that it’s a result of my individual anthropometry. I hear 3.5 kHz stronger from calibrated speakers than I do from headphones whose measurements already show a tall peak there—for example, the HD600. I have verified this over the years with test tones and sweeps. I don’t think my hearing is an outlier though. I like the same headphones as a lot of other people.

The dip between 6 kHz to 9 kHz is more variable between measurements. Sometimes, it’s smoothed out and shallower. Maybe the best way around this is to take many measurements and average them. The amount of treble roll-off surprised me. I don’t think it’s because I’m using a T400 foam tip around the mic. I got similar results with silicone sleeves. Perhaps it’s because my tragus sticks out so that it covers a good part of the ear canal opening from a side view or mug shot. It would be interesting to see others' blocked meatus measurements.


Some headphone measurements
So what do the headphone measurements look like? Here’s the one for an HD600:

Sennheiser HD600, no smoothing.png

Sennheiser HD600 measured by HUACAM in-ear mic, no smoothing
Top: white noise generated by Audacity, playback from iPhone
Bottom: white pseudorandom noise generated by REW, 131,072 sequence length​

Sennheiser HD600, 1-48-octave smoothing.png

The same data, 1/48-octave smoothing​

What’s going on here? The trace on the bottom was recorded by REW from a signal generated by REW on the same computer (a trash can Mac Pro). The one on the top was recorded by REW, but the signal was coming from an iPhone playing back white noise generated by Audacity. It shows the roll-off in the bass, so it’s consistent with the sweep measurement. It also shows more detail in general. The rest of the measurements here were done with the iPhone playing the signal. In hindsight, maybe I should have used REW’s sweep function for these.

Here are a few that I’ve measured so far:

Sennheiser HD600.png

Sennheiser HD600 measurement, 1/12-octave smoothing​

The measurement is consistent and repeatable even after taking off and putting the headphones back on. The measurement is surprisingly flat, even knowing that the ear canal resonance is not in effect. The result is similar to the one JMS got back in 2012:

3674053.jpg

HD650 measured by Sound Professionals MS-TFB-2 binaural mic. Link: https://www.head-fi.org/threads/hrt...ts-of-sennheiser-hd650-hd700-akg-k550.641860/

AKG Q701.png

AKG Q701 measurement, 1/12-octave smoothing​

Only one measurement for each channel is shown, but just like the HD600, the result is almost the same after taking off and putting the headphones back on. It clearly shows the peak near 2 kHz. It’s a coloration that I don’t like and I’ve been flattening it with EQ long before I saw any published measurements. Innerfidelity and rtings.com show the peak clearly:

frequency-response-graph.png

Rtings.com AKG Q701 measurements​

Massdrop HiFiMan HE4XX.png

Massdrop HiFiMan HE4XX measurement, 1/12-octave smoothing​

I thought I’d include a planar magnetic headphone here. The channel matching isn’t as good as the first two. It’s not my ears causing the difference either. The HD600 is a better match for my hearing.

Beyerdynamic DT250-250.png

Beyerdynamic DT250 (250 ohms) measurement, 1/12-octave smoothing​

The channel imbalance is a known issue with this model. It’s too bad. I think it sounds pretty good otherwise. To show that the difference in measurement is not caused by my ears, I flipped the headphones around and measured the left channel on the right ear:

Beyerdynamic DT250-250 L channel on R ear.png

Beyerdynamic DT250 (250 ohms) measurement of left channel on right ear​

If we’re going to mod the DT250-250 so that the channels match, it’s nice to have a tool that tells us quickly if we’re getting close. Even this cheap mic system can show the difference effectively.

Sony MDR-7506.png

Sony MDR-7506 measurement, 1/12-octave smoothing​

Here’s another one with a channel imbalance, but in a different part of the spectrum. I’ll have to measure another 7506 to see which channel has it correct. Or EQ one to match the other to and see which one I prefer. The 7506 also doesn’t have angled drivers, so we can flip them around and measure the left channel on right ear:

Sony MDR-7506 L channel on R ear.png

Sony MDR-7506 measurement of left channel on right ear​

It sometimes takes me a while to notice these imbalances when I’m just listening to music casually. It’s a lot faster with test tones. Now it’s faster still with a simple measurement.

Bose QC35.png

Bose QC35 measurement, 1/12-octave smoothing​

The QC35 seems to have good channel matching. Unlike the HD600 and Q701, the placement of the cups around the ears has a big effect on the response. The trace in pink shows another measurement of the right channel with the ear cup at a different position.

The cheap mic picks up the sloped response from the bass to 1 kHz shown by published measurements online.

Skullcandy Grind.png

Skullcandy Grind measurement, 1/12-octave smoothing​

I decided to include an on-ear model. The cheapo Skullcandy has better channel channel matching than some others here. Our jury-rigged in-ear mic picks up the same features in the frequency response as this measurement from Innerfidelity:


Skullcandy Grind FR from innerfidelity.com.png
Skullcandy Grind frequency response measured by Innerfidelity.com​

My measurement, of course, is missing the contribution of the ear canal to the overall response. But it picks up the small peaks, dips, and ridges at roughly the same frequencies.


Applications? Where to go from here?
As we’ve seen, the cheap mic is good enough for showing relative differences between headphones—and even differences between the left and right channel of the same headphone. It could be a good enough tool for verifying the effectiveness of headphone mods.

The mics might be good enough to help someone come up with a ballpark EQ for their headphones. One of the assumptions of Harman’s research is that a good headphone should sound like calibrated speakers in a good room. Their headphone targets evolved from that starting point.

I’ve been playing with equalizing some headphones so that they match the frequency response of my speakers. For years, I had been doing that with test tones and perceived loudness. Now, there’s the potential for doing it faster and with little material cost. It’s still in the early stages, but the results have been promising. I don’t want to jump to conclusions just yet.

The mics might be good enough for speaker virtualization. The idea isn’t new; undo the headphone’s impulse response and replace it with another. There has been good progress toward building a poor man’s Smyth Realiser. (See Jaakko Pasanen’s Speaker Virtualization thread here: link.) I’ll have to check it out again.

Most of the reports I’ve read use Sound Professionals binaural mics, which aren’t that expensive. If the cheapo mic + dongle is suitable for the application and has flat enough response and low enough self-noise and distortion, we can further lower the barrier for entry. Even a high school student with no budget can start playing.

Better results might be possible if we take measurements near the eardrum, using a probe mic. David Griesinger has a tutorial video for building a DIY probe mic with small silicone tubes and an Audio Technica ATR3350iS lavalier mic.

9499357_thumb.png

Screenshot of David Griesinger’s DIY probe mic video​

If I have time, maybe I will try it with the cheap mics. I hope it won’t take two years. Who knows, maybe speaker virtualization with IEMs is on the horizon:


I haven’t seen it done, but maybe someone is crazy enough to try.

Anyway, these mics were a cheap way to get my feet wet before committing to something more expensive. Or maybe I should just give up now and get my colleague in Beijing to bring me back one of these ear and cheek simulators from Taobao. Lol.

 
Last edited:
Jul 13, 2019 at 4:01 AM Post #42 of 66
I haven’t measured that many custom IEMs. The standard advice is to use putty like Blu Tack to ensure the seal. It worked just fine in my IEC coupler. The other issue is the insertion depth, which is practically unchanging on the person wearing the custom mold. If the IEM is tailor-made for you, you can determine by experiment where you’re hearing the peak from the ear canal’s half-wavelength resonance.

I used to have an online sine sweep utility, but I’ll have to find a way to host it online again. This one is well known, but you can’t make really fine adjustments: https://www.szynalski.com/tone-generator/

Sweep it slowly between 5-10 kHz and pay attention to where it gets really loud. It could be at a different frequency for the left and right ears, and you’ll notice this as the sound moving from left to right (or the reverse). Matching that in the coupler measurement gives the least dishonest representation of what you’re hearing.

Sinegen is also an option. The last time I checked it was still freeware.

If the IEM isn’t yours, just make measurements at varying insertion depths. Data is cheap, and it’s better to present the range of possibilities superimposed in a graph instead of guessing. Customs often have shallow insertion, so reporting the peak at 8+ kHz might be misleading. Or you can ask the owner to run the sweep.
 
Last edited:
Jul 13, 2019 at 4:35 AM Post #43 of 66
If the IEM isn’t yours, just make measurements at varying insertion depths. Data is cheap, and it’s better to present the range of possibilities superimposed in a graph instead of guessing. Customs often have shallow insertion, so reporting the peak at 8+ kHz might be misleading. Or you can ask the owner to run the sweep.

This is the thing I wish someone would make a "standard" in measurments - at least 3 different measurements distances for different ear-channel volume sizes.
 
Jul 13, 2019 at 5:06 AM Post #44 of 66
This is the thing I wish someone would make a "standard" in measurments - at least 3 different measurements distances for different ear-channel volume sizes.
you can just do as many do in headphone measurements, superimpose graphs at various positions(in a discrete color) and pick one you think is representative in a special color, or just create an average as the main one.
 
Jul 13, 2019 at 7:15 AM Post #45 of 66
you can just do as many do in headphone measurements, superimpose graphs at various positions(in a discrete color) and pick one you think is representative in a special color, or just create an average as the main one.
Didn`t quite get Your thought.

My idea, when measuring one IEM, was to use 3 different coupler sizes/lengths for different ear sizes (small ears, medium ears and large ears) not just by one averaged volume size and present those results in one FR graph (always for each IEM). So, for example I with small ear-canals with less volume could look at S-size ears FR graph to get more accurate information for my small ears. I know that I get more deeper fit and have noticeably less volume in my ear-canals, so that "8kHz peak" is much further high up the FR than average ppl with medium sized ear-canals hear. I have to "translate" many graphs to my perspective to get an idea how that IEM would be for me and by that I get pretty inaccurate result. And it is hard for me to explain my different experience from general "consensus".
 

Users who are viewing this thread

Back
Top