Post pics of your builds....
Nov 3, 2008 at 3:00 AM Post #3,781 of 9,811
gamma1 prototype - usb lite configuration

dac board:
gamma1dactn8.jpg


USB board
gamma1usbbe4.jpg


need to get some flux cleaner to get that flux off, isopropyl alcohol does not take this flux off worth crap.
 
Nov 3, 2008 at 4:17 AM Post #3,783 of 9,811
Quote:

Originally Posted by cobaltmute /img/forum/go_quote.gif
gamma1 prototype - usb lite configuration


Another one - full configuration.


Ti and Marshall really put together some amazing work.
 
Nov 3, 2008 at 5:12 AM Post #3,784 of 9,811
After doing a lot of nitpicky (but necessary) little things the past few weeks, I got around to an early dry fit of the Brute Force tonight:

DSC_0030.JPG


DSC_0028.JPG


DSC_0025.JPG


DSC_0024.JPG


DSC_0023.JPG


DSC_0022.JPG


DSC_0021.JPG


There's still more work to do. A Neutrik jack is going on the front panel and the IEC jack will go on the back. I still need to drill and tap the holes to screw the top, sides, interior, and bottom together. And you might have noticed that the four tubes up front are just set in there. The hole saw cuts a 1" hole which is just barely not enough for the sockets to fit. I only had time to trim out the other four before it got dark.

Changes from the last photo set include moving the tube plates up top. I tried to make them recessed into the top, but that just wasn't going to look right. I initially cut the holes out with a jigsaw, then spent several hours trying to square them up with files. That was going to take way too long, so I recut all the mounting panels from 1/16" aluminum and put them up top.

The good news is that everything fits and I didn't screw up anything I can't fix.

I'm busy next weekend, but should be able to finish the minor casework then. After that, I'll spend a weekend sanding, detailing and polishing the case. I've been experimenting with ways to inexpensively polish aluminum by hand.

Anyhow, I'll post pics as I go along. I'm hoping I can use it to provide extra heat in the bedroom by December!
 
Nov 3, 2008 at 4:02 PM Post #3,786 of 9,811
Boy oh boy, Uncle Erik, that amp looks great. The stack of venting plates on the sides turned out really nice. It kind of has an art deco look to it. Great work!
 
Nov 3, 2008 at 6:37 PM Post #3,789 of 9,811
Quote:

Originally Posted by Uncle Erik /img/forum/go_quote.gif
After doing a lot of nitpicky (but necessary) little things the past few weeks, I got around to an early dry fit of the Brute Force tonight:


Yeah, what a great looking amplifier.
biggrin.gif
 
Nov 3, 2008 at 8:01 PM Post #3,790 of 9,811
Malldian - I'll put it in the headphone amp rack, which will be the next project. I've had a big stick of Purpleheart in the garage for a few years, looking for a project. I think I'll use it for the amps as well as pick up a Shallco selector switch so I can switch between amps.

The cost hasn't been that bad. That's Hammond iron (I repainted the covers) and was about $150 for the three. The main aluminum plate was a 3/8" thick offcut I found on eBay for $35. Probably another $100 for the rest of the aluminum. The caps and resistors are from Michael Percy and cost around $75, though you could get good ones at Digikey or Mouser for $30. Then another $100 for the Alps pot, Cardas jacks, knob, fuse holder, IEC jack, switch, lamp, and Neutrik jack. Maybe another $50 for screws, bolts, threaded rods and other parts. So not too bad.

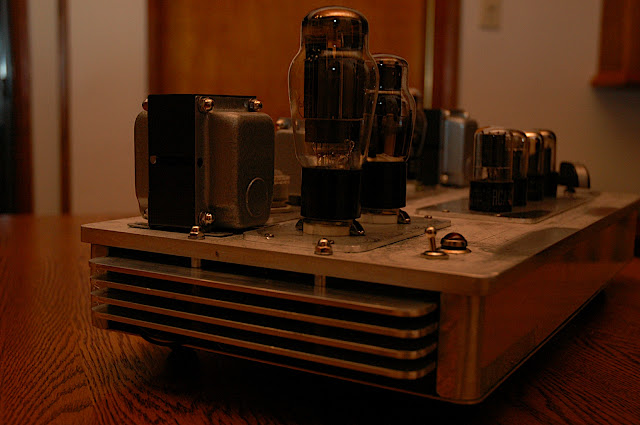
Oh, the tubes are pretty common and run $6-$12 NOS. Can't remember exactly what I paid, because I bought a number of them in bunches at swapmeets and old electronics stores.

I've been documenting the build along the way. I have photos of most of the layout, cutting, drilling, and shaping. I'm going to take photos of the wiring step-by-step, too.

The plan is to do a writeup from start to finish with the dimensions and instructions. Most tube amp projects just have the schematics and circuit description, the only full build guides (that I know of) are for the CMoy and Dynalo. There should be a build guide for an all tube amp. While not inexpensive, Hammond iron is reasonable and available. The tubes are reasonable and easy to find. Of the DIY plans I've gone through, this is one of the few that has reasonable, accessible parts and a pretty straightforward circuit. I'd like to see more people build amps like this, so a writeup might help.
 
Nov 3, 2008 at 10:53 PM Post #3,791 of 9,811
Very nice amp Erik, I really couldnt picture it when you had just cut the venting holes.

Personally not my style, but that is in no way saying it looks bad, it is very nice looking and excellent work, just not what trips my trigger. (excuse the cliche)
 
Nov 8, 2008 at 10:44 AM Post #3,792 of 9,811
Just finished the first of the two SOHA II prototypes I have been playing with; both with the updated HV supply. Only thing left is waiting for the metal screen for the top. This one is a dual case solution so as to fit a beefy IEC inlet with built-in AC line filter and to keep the transformer as far away from the amp as possible. Fairly standard build, just tagged on a stepped attenuator and Vitamin Q coupling caps. It sounds really good.
smily_headphones1.gif


Nov 8, 2008 at 6:04 PM Post #3,793 of 9,811
Quote:

Originally Posted by FallenAngel /img/forum/go_quote.gif
Just finished the first of the two SOHA II prototypes


redface.gif
oh jeez. I was still going to etch up those HV boards - just as well you were not waiting on me.

Great work BTW - it all finishes up so neatly..dB
 
Nov 8, 2008 at 11:40 PM Post #3,794 of 9,811
Quote:

Originally Posted by dBel84 /img/forum/go_quote.gif
redface.gif
oh jeez. I was still going to etch up those HV boards - just as well you were not waiting on me.

Great work BTW - it all finishes up so neatly..dB


Thanks

No worries about etching the board, at least for me, I got the layout to be as simple as possible.
wink.gif
 
Nov 10, 2008 at 8:14 AM Post #3,795 of 9,811
Just because I rearranged my desk and system today, I wanted to take a photo and share it since it'll likely never be this clean again.
tongue.gif


The result (maybe for another few months) of 2 years of Head-Fi - my current system (and cleanest desk in ages).

Source: ESI Juli@ with custom I2S breakout cable
DAC: North Star m192 DAC
Amp #1 : Beta22 for MarkL Denon D5000 & Sennheiser HD650 with Jena cable
Amp #2 : Heavily modded Melos for Grado RS-1
DIY integrated GainClone for Omega Grande 6R speakers

*Speakers not hooked up yet, just rearranged system and my Cardas speaker cables no longer reach.


Users who are viewing this thread

Back
Top