Post pics of your builds....
Aug 31, 2008 at 2:48 PM Post #3,602 of 9,811
Quote:

Originally Posted by Ferrari /img/forum/go_quote.gif
Thanks for the tip, MrMajestic2.
I was just thinking of sending Schaeffer an email to notice them about this.


I had no problems with them after I confirmed the errors with a few photos. Very supportive and helpful bunch.
 
Aug 31, 2008 at 3:24 PM Post #3,603 of 9,811
Quote:

Originally Posted by Ferrari /img/forum/go_quote.gif
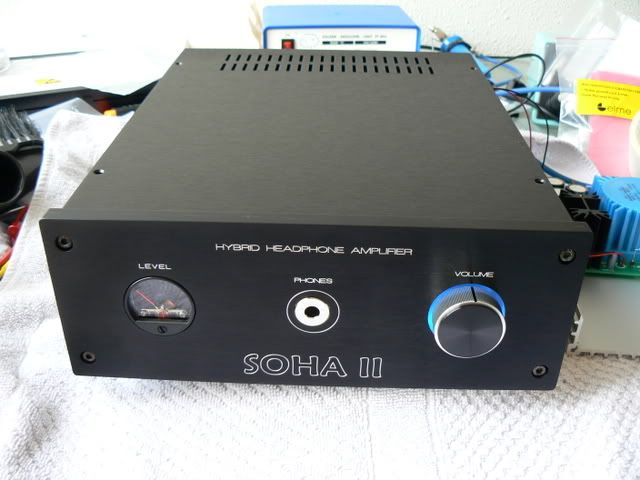
Still far from completed, but here is a primarily picture of my most recent work.


That is looking great , I particularly like the level meter ..dB
 
Aug 31, 2008 at 3:49 PM Post #3,604 of 9,811
Latest Mini^3
DSCN2730.jpg
 
Sep 6, 2008 at 10:10 AM Post #3,607 of 9,811
Quote:

Originally Posted by Ferrari /img/forum/go_quote.gif
Still far from completed, but here is a primarily picture of my most recent work.
Apart from a flaw on the faceplate (made during production at PFE
frown.gif
) and the lighting for the VU meter, everything turns out as I thought how it should be.

Afbeelding529-1.jpg


Could you tell us how you managed that cool iluminated volume knob?

Looks really nice, VU-meters also a nice idea
biggrin.gif
 
Sep 6, 2008 at 4:41 PM Post #3,608 of 9,811
Quote:

Originally Posted by Sathimas /img/forum/go_quote.gif
Could you tell us how you managed that cool iluminated volume knob?
Looks really nice, VU-meters also a nice idea
biggrin.gif


Sathimas, I have pointed that out in some posts back. I prefer to do it my way, with one single LED.
biggrin.gif


There is also a recent thread about Knob Backlighting where some HF-members discussed about it and provided some ideas on how to do it.
 
Sep 7, 2008 at 3:27 PM Post #3,609 of 9,811
I'm sure you can guess what this is. My three year old (and I) had a great time helping tighten screws.

Kuroguy


ssha.jpg


sshaout.jpg
 
Sep 11, 2008 at 4:31 AM Post #3,611 of 9,811
Made this last weekend just for heck of it.


up.jpg


You can see the size of it. It's roughly 80% of cigarette box.

Bottom looks like this;


down.jpg


This is my 5th class AB amp. Just not in the altoid tin.
I like this little amp. Small, cheap, as generic as it can be and quite nice to listen.

I tried 4 different TR combinations so far, and I think BC337/327 combo is quite good at this amp. FYI, TRs used at this amp are generic 2N3906/3904.
 
Sep 11, 2008 at 1:53 PM Post #3,613 of 9,811
Quote:

Originally Posted by Seaside /img/forum/go_quote.gif
Made this last weekend just for heck of it.


You can see the size of it. It's roughly 80% of cigarette box.

Bottom looks like this;

This is my 5th class AB amp. Just not in the altoid tin.
I like this little amp. Small, cheap, as generic as it can be and quite nice to listen.

I tried 4 different TR combinations so far, and I think BC337/327 combo is quite good at this amp. FYI, TRs used at this amp are generic 2N3906/3904.


Nice job! Resistor leads for the traces?
 
Sep 11, 2008 at 11:26 PM Post #3,614 of 9,811
I use resistor leads / TR pins for the traces if that's possible.

Most parts I used there were taken off or left overs, the leads are too short to be used as traces.

The traces you're seeing is 24GA tinned copper wire from radioshack, which I found quite adequate for this kinda job, has about the same thickness with resistor leads.
 
Sep 15, 2008 at 5:47 AM Post #3,615 of 9,811
A work in progress:

DSC_0102.JPG


I did quite a bit of work on it this weekend and just did a quick "dry fit" to see if everything did. It didn't, of course, but nothing I can't fix with a drill and a little work.

Had to make sure the tubes fit (
biggrin.gif
) and thought I'd put a picture up.

This is Eric Barbour's "Brute Force" amp (HeadWize - Project: Brute Force In A Line Stage by Eric Barbour) and I am building it with the tube regulators.

The top is a 3/8" aluminum plate where I've recessed the strips for the tubes and fuse. I did this because I really wanted to use the 3/8" plate, but there's no way to use a chassis punch on something that thick. So I decided to suspend thinner plates below it, which would add interest and also allow me to quickly make new ones if I screwed one up. I'm going to have to remake the plate for the four tubes up front because there's not enough room for the outermost socket mounting straps. No biggie, I figured in extra room on all the dimensions because I was sure I'd do something like that.

The front and back strips are 3/4" by 2" strips of aluminum. What a pain in the posterior to cut. I still have to put a hole in the front one for the Neutrik jack and a hole in the back one for the IEC jack. Not looking forward to it, but I should be able to do it next weekend.

I haven't cut the sides yet, but each side gets four horizontal Art Deco-style fins. I've got a 1/4" x 1" strip of aluminum I'll cut up for that next weekend. Also have a thin aluminum plate I'll cut to size for the bottom plate next weekend.

Haven't decided on a color yet, but once I get everything roughed in and fitting correctly, it's headed over to the local powdercoater. I'll have the top, plates, front and back, bottom plate, and transformer covers powdercoated. I'll put a brushed finish on the aluminum fins and spacers and use stainless socket cap screws for everything.

Construction will be entirely point-to-point with Teflon wire and spaghetti on all leads. It will have a star ground, too. That's Hammond iron and all the caps and resistors are from Michael Percy Audio. In the background, you'll see the RCA jacks right behind the shaft for the pot. I decided to do that because I wanted the inputs to go right into the pot. You can't see it, but underneath, I ran two pieces of the 3/4" x 2" aluminum to completely isolate the amp circuit from the power supply.

Not in the photo are a nifty vintage aluminum knob I got from Nevada Surplus and a red glass indicator lamp from an old Drake radio. The indicator lamp will go just to the right of the toggle switch.

If all goes well, I should have this wrapped up in time for the LA meet on 10/18/08. If not, I'll dry fit everything and bring it along anyway. Though I'd love to have it ready to listen to.

Also, I've been taking photos of every step along the way. When I'm done, I'll write up a long post with photos on how I built it.
 

Users who are viewing this thread

Back
Top