Millett "Starving Student" hybrid amp
Jun 10, 2009 at 8:21 PM Post #3,391 of 7,277
Quote:

Originally Posted by tomb /img/forum/go_quote.gif
It's not grommets, but hole bushings. I used these on one of the SSMH PCB prototypes (the black one):
SSMH-dual1-sm.jpg


They were used on the Millett MAX (prototype in pic):
MAXfinish1.jpg


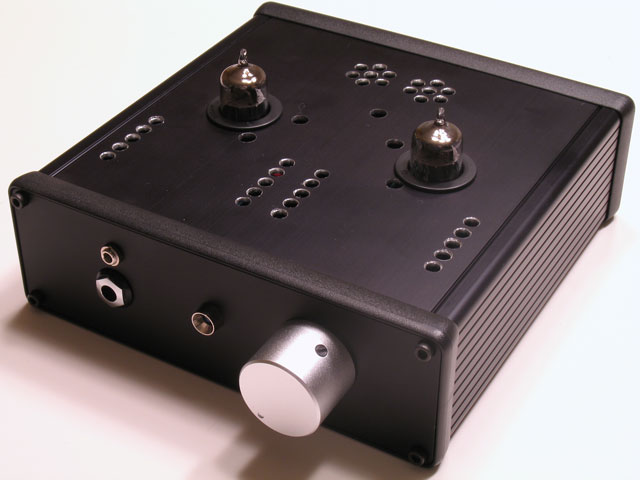
but their use first started way back on the revMH Millett Hybrid:
Millett1-2.jpg


n_maher came up with the idea as a way to cover his nasty tube holes.
tongue.gif
tongue.gif


Here's the specific info:
Mouser Part #561-MP10012

and the catalog diagram:
MAXtubeBushing.jpg


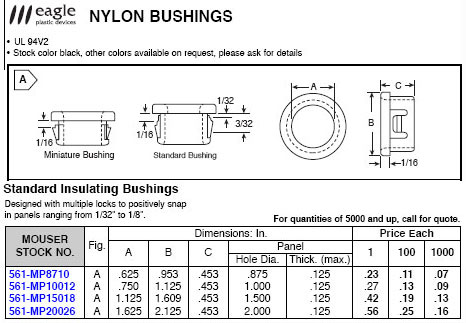
You want to cut a 1" hole. These snap in, leaving a 3/4" hole opening for the tubes - just perfect.
wink.gif


FYI...
This is one of the few items I can get local. My local Ace/Homeco carries these nylon bushing in the hardware isle (where the nuts and bolts are). If you have an Ace nearby, you might wanna check if they have them. Home Depot near me does NOT carry anything like this though
frown.gif
 
Jun 10, 2009 at 8:44 PM Post #3,392 of 7,277
Quote:

Originally Posted by gurusan /img/forum/go_quote.gif
thanks for the link tomb...

anyway...
Well my build was going so nicely..then I managed to get the center pot hole on the faceplate off by about 4mm!! So I temporarily mounted the power switch next to it to try to make it line up better but it looks worse i think lol. Going to have to redo the faceplate i think.

I had it measured perfectly as well but just don't have the appropriate tools.

I really need some sort of pillar drill. I'm looking at some smaller ones on the net that mount a hand-drill and use that as a pillar drill. Would one of those suffice for small hobbyist casework kind of jobs?


You need a spring loaded center punch to get the hole started in the right place.
- Harbor Freight Tools - Quality Tools at the Lowest Prices
 
Jun 10, 2009 at 9:51 PM Post #3,393 of 7,277
Quote:

Originally Posted by gurusan /img/forum/go_quote.gif
thanks for the link tomb...

anyway...
Well my build was going so nicely..then I managed to get the center pot hole on the faceplate off by about 4mm!! So I temporarily mounted the power switch next to it to try to make it line up better but it looks worse i think lol. Going to have to redo the faceplate i think.

I had it measured perfectly as well but just don't have the appropriate tools.

I really need some sort of pillar drill. I'm looking at some smaller ones on the net that mount a hand-drill and use that as a pillar drill. Would one of those suffice for small hobbyist casework kind of jobs?


So what was wrong with the center pot? Looks like its in there all right to me
biggrin.gif
 
Jun 10, 2009 at 11:58 PM Post #3,394 of 7,277
gurusan- I would get a dedicated pillar drill and be done with it. You won't have buyers remorse.

Did you use an automatic center punch or centerpunch/hammer to mark your layout points on the faceplate? Should be able to get good results with a hand drill. Check the drill chuck to see if it spinning eccentric.

Measure and make your layout marks. Then make light dimples by lightly tapping with the centerpunch. Now go back and remeasure all of your layout points with the same ruler that you used for the initial layout- measure from the same edge to the layout point. If the dimples are a little off, you can "massage" the dimple's location. Gently tap the centerpunch at an angle towards the correct location then tap the centerpunch perpendicular to the work surface. This technique works with metal, I would not do this to a plastic faceplate.

Select a small for a pilot hole and check that you are square to the workpiece. Check the pilot hole for proper location before moving to the next size drill bit.
 
Jun 11, 2009 at 1:37 AM Post #3,395 of 7,277
$99 gets you a benchtop drill press that will work for pretty much any chassis you make. I'd bet you can get one for $40 at a pawn shop.
 
Jun 11, 2009 at 2:13 AM Post #3,396 of 7,277
Quote:

Originally Posted by kuroguy /img/forum/go_quote.gif
tin snips - $5 at the flea market. They'll dull easily, but a pair from Sears with a better steel so it resists dulling is $15 and has a Craftsman lifetime warranty covering anything you might do with them (including burning a hole in the blade from cutting a live wire).


hahahah funny kuroguy, I have a 'holed' one sitting in my tool chest
tongue.gif


llama, are you doing a pcb build or p2p? Just want to note that none of my heatsinks touch the wood at all. Many can confim the SSMH sinks do get pretty hot when mosfets are mounted to them directly, maybe even hot enough to melt plastic/acrylic.

gurusan, the heatsink and that black case are a match in heaven - looking good!
 
Jun 11, 2009 at 4:21 AM Post #3,397 of 7,277
Hi, I just built my first P2P SSHA and its not working. I keep going over the wiring, but I can't figure out what's wrong. I'm getting 48v out of the 3rd pin (both sides) instead of 19v. The transistors aren't warming up and the tubes aren't either (not glowing/heating). Can anyone think of why I might be getting 48v instead of 19v? I'll post pictures as soon as i can. Thanks!
 
Jun 11, 2009 at 5:08 AM Post #3,398 of 7,277
Hi yebisu, is it possible that your MOSFET (IRF510s) pins got mixed up?

See the pic below from the web, check that your:
Gate = Pin 1
Drain = Pin 2
Source = Pin 3

irf510ly5.jpg
 
Jun 11, 2009 at 5:16 AM Post #3,399 of 7,277
Looking at the schematic, the most confusing part for me is the part where you connect the MOSFET to the heatsink. Can anyone provide some explanation here?
 
Jun 11, 2009 at 6:56 AM Post #3,400 of 7,277
The heatsink is attached to the MOSFET with a mounting kit. Basically nut, bolt washers and an insulating pad.

Beezar.com <-see here.


Quote:

Originally Posted by ezzieyguywuf /img/forum/go_quote.gif
Looking at the schematic, the most confusing part for me is the part where you connect the MOSFET to the heatsink. Can anyone provide some explanation here?


Jun 11, 2009 at 8:52 AM Post #3,402 of 7,277
Gurusan, very nice build
biggrin.gif
I like the heatsink alot (but I think I've noted that before).
I don't really see about the pot not centered, on your pictures it looks pretty good perfect even.

Zkool: I'll exclude acrylic then
tongue.gif
it. i'll see and measure what the heatsink temps are on both 1.5 and 2" and I'll go from there. I'll probably go with a nice brushed aluminum plate and add some touches of aluminum to the feet and
/or knob as well.
 
Jun 11, 2009 at 9:08 AM Post #3,403 of 7,277
Woot, see what I got in the mail
biggrin.gif
.
Now it just got serious.

I already unwrapped them, they fysically seem to be in perfect shape. Well wrapped in nice big bubbles.
Great server, faster then I expected. And the shipping cost 5dollars international!!! I thought (as onyu pointed me out) I had to pay alot on customs after arrival. But 5bucks for shipping to belgium is awesome.
I'll probably have to pay 40euros on customs for stuff from mouser by fedex... grrr. Free shipping after 75euros... my $ss. Sorry for that
wink.gif


1013279.jpg


Dries
 
Jun 11, 2009 at 12:38 PM Post #3,404 of 7,277
Quote:

Originally Posted by smeggy /img/forum/go_quote.gif
The heatsink is attached to the MOSFET with a mounting kit. Basically nut, bolt washers and an insulating pad.

Beezar.com <-see here.


There's also this pic from the MAX websites that may be helpful:
heatsinkmtg.gif


Quote:

Buggeration, my ss prts arrived and I underordered the .22uf Wima caps so I need another pair.
frown.gif


Sorry about that, Smeggy. I usually contact people if I think they've shorted something, but peoples' choices in bypass caps can vary quite a bit. Guess I should've said something anyway. Shoot me a PM and we can work something out.
wink.gif
 
Jun 11, 2009 at 1:21 PM Post #3,405 of 7,277
it is also a good idea to measure the resistance between the heatsink and the tab on the mosfet. Anything other than an open circuit is going to be a problem. Do this before your first powerup and you might just save yourself from needing new mosfets.
 

Users who are viewing this thread

Back
Top