


Bostonears
1000+ Head-Fier
- Joined
- Jan 30, 2003
- Posts
- 1,126
- Likes
- 87
After breaking in my new Denon AH-D1001 for about 200 hours, I was reasonably pleased with the sound of these sub-$100 cans, but the prodigious bass from these little suckers was definitely loose and not well controlled. So, I decided to try to tame it with a few of the mods that Head-Fi guy Markl devised for the larger, higher-line Denon D5000 (and D2000). See his extensive thread http://www.head-fi.org/forums/f4/how...0-mods-299627/ .
Since the D1000/1001 models are a different, less elaborate, design than the larger models, I have documented the procedure I performed on mine, and with Markl’s permission, here’s the skinny on what I did. (The D1000 and D1001 models are identical to each other except for slightly different accessories in the packages.)
I made three specific mods to my D1001 (which is only a partial set of the full mods for the D5000):
-added Dynamat to rear of driver
-added Dynamat inside the earcups
-added fiber stuffing to the earcups
The Usual Disclaimer: Attempting these modifications risks damaging your headphones and will definitely void your warranty. I accept no responsibility if you muck things up. If you do not accept this responsibility yourself, do no undertake these mods.
As with the Markl mods for D5000, you need a few tools: small Phillips head screwdriver, scissors, and a hole punch.
Opening the phones
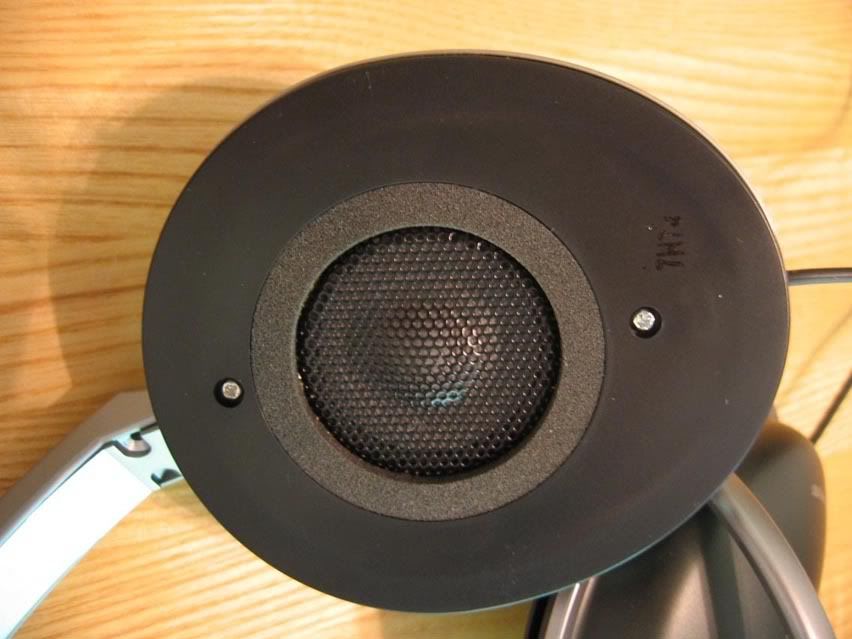
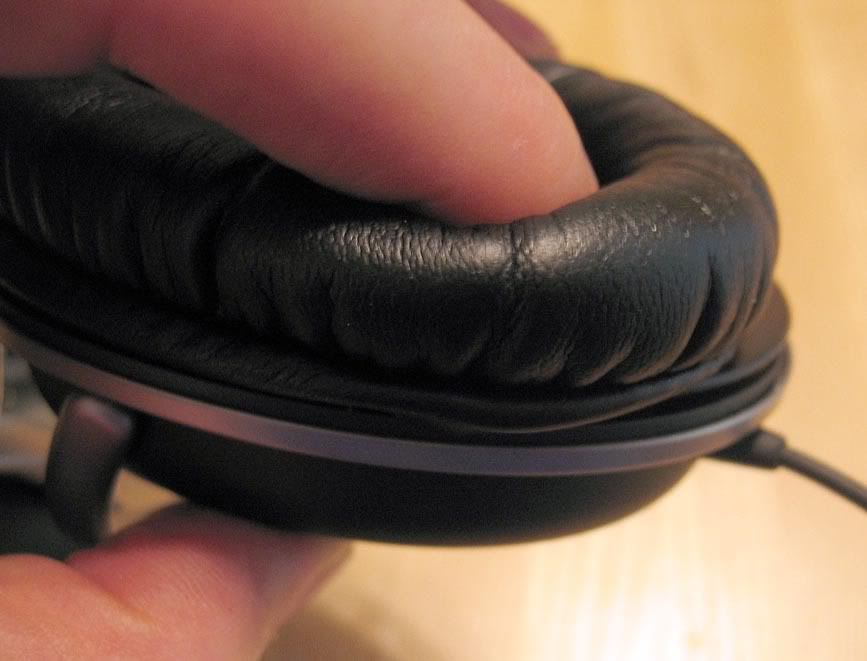
Before you can do the mods, you need to get the earpads off the phones. For the D1000/1001, this is done by just peeling the pads outward to work them off the plastic lip around the circumference of the earpiece (see photo). Thanks to JamesL for the tip on how to do this.

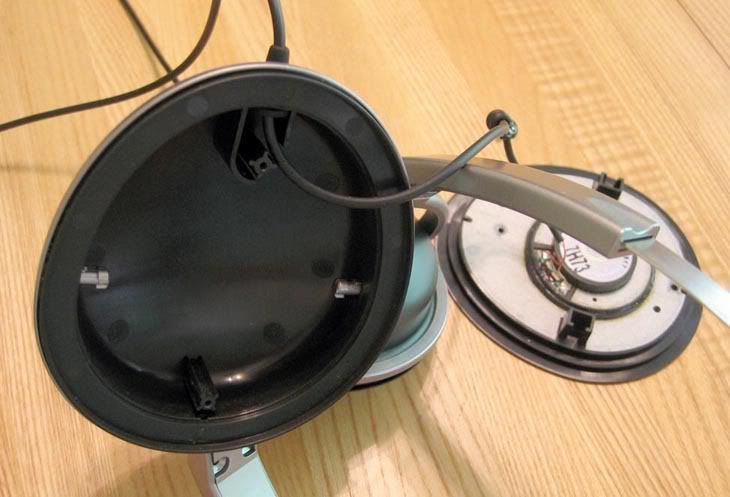
Next, remove the two silver screws (see photo) that hold the driver assembly to the earcups. Then slowly remove the plastic plate with the driver assembly. As you do this, be very careful of the cable attachments on the rear of the driver. The wires are thin and fragile, and you must not break them or else you will have a PITA precision soldering job to do before you can use your phones again.
Once you detach the driver plates, reach into the earcups and gently pull the knotted portion of the cable out of the slot in which it is wedged, then pull several inches of the cable inward through the strain relief. This gives you a sufficient working length of cable so that you can set the driver down apart from the cup.
Applying Dynamat to the Driver
The first mod, applying Dynamat to the rear of the driver, is done exactly as Markl described for the D5000.
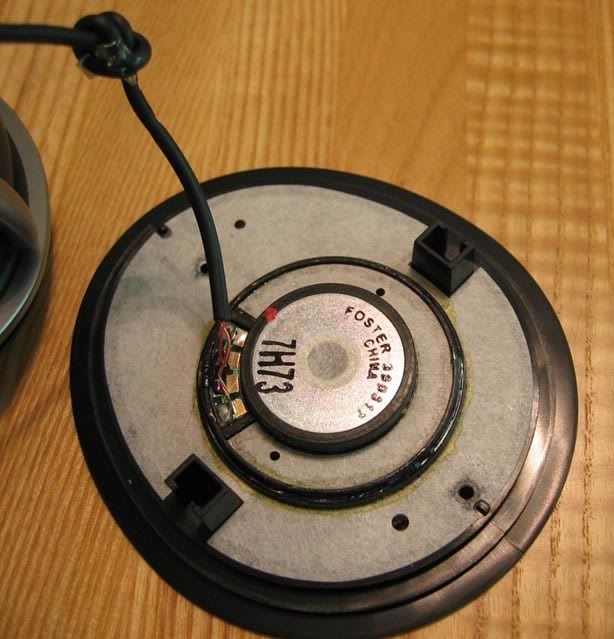
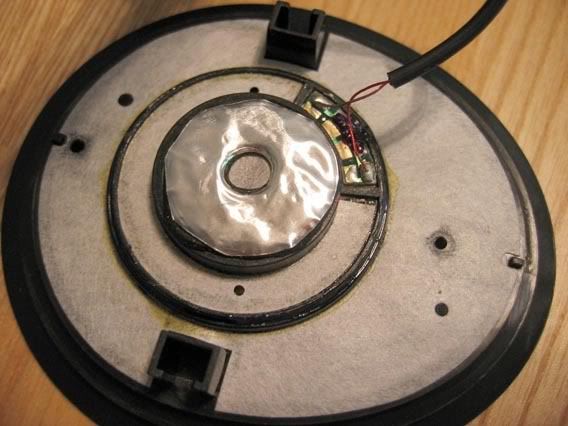
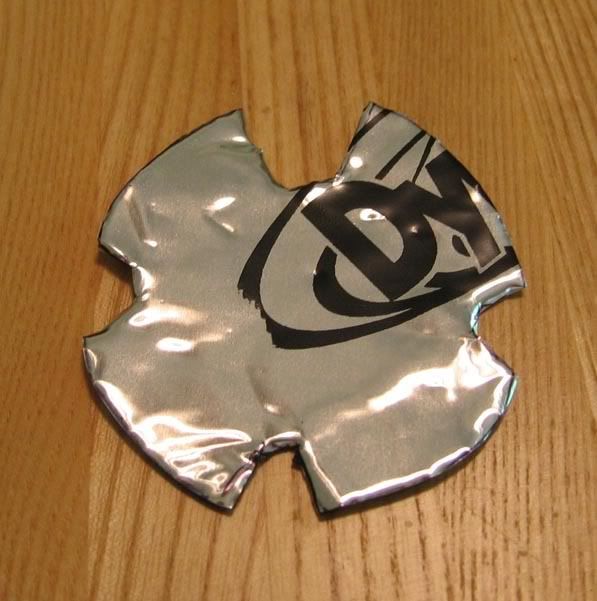
Even though the D1000/1001 has a smaller driver diaphragm, the round magnet on the rear of the driver appears to be the same size, so use a U.S. quarter to make an impression in the Dynamat, and cut out the round piece. Then, use the hole punch to make a hole in the center of the piece. With my clunky hole punch, it was difficult to see where the hole was going to end up, and it took a few trial-and-error attempts to get it right. Apply the Dynamat with the hole centered over the hole in the rear of the driver (see photo), making sure to firmly press down every bit of the Dynamat.
Applying Dynamat to the Cup
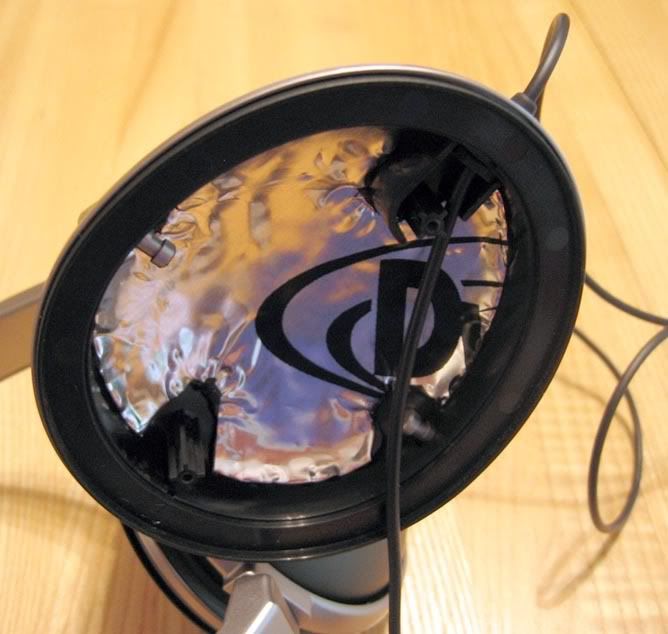
I used a piece of paper to make a template for the shape to cut from the Dynamat to line each cup, tweaking the size and shape of the paper until I came up with one that fit just right in the cup. In the D1000/1001 models, the pivot points for the external hanger piece protrude into the cup (see earlier photo), so you need notches in the Dynamat to accommodate these, as well as for the screw sockets. I then traced the template onto the Dynamat and cut it with the scissors.
Prior to permanently mounting the Dynamat, place it into the cup without removing the adhesive backing. This will form the Dynamat into the desired concave shape. Then, extract the Dynamat, remove the adhesive backing and install it. To minimize air bubbles, start pressing the material firmly in place in the center of the cup, working your way outward. As Markl noted, you need to make sure every square millimeter of the Dynamat is firmly adhered. If you have any air bubbles, work them toward an edge, where you will here a snap sound when they are released (like the pop of chewing gum). If you are unable get air bubbles to the edge, you can use an X-Acto knife to cut through the Dynamat and squeeze out the air.
Preliminary Reassembly
At this point, I reassembled the phones to hear how they sounded without inserting any stuffing in the cups. The reassembly process is straightforward. When you pull the cable back out through the strain relief, be sure to reseat the knot in the internal cable into the plastic slot. I used the tip of a letter opener to press the cable back into the curved portion of the slot.
Reseating the earpads is a little tricky, but after a few attempts, I discovered that the best way to do it is by placing an index finger inside the edge of the pad, then gradually work your way around the pad, stretching the outer edge over the plastic lip (see photo).
Preliminary Listen
Listening to the modified D1001 phones, it was immediately apparent that the bass was much better controlled. The bass also gained noticeable punch to it. I could actually feel the air pressure created by the now stabilized earcups (ahh, the benefits of closed cans). Initially, this seemed desirable, but after a few hours of listening, I realized that the bass punch was stronger than it needed to be, sounding artificially enhanced.
Stuffing the Cups
Markl has a description of the advantages and disadvantages of using stuffing in the D5000 in his mod thread, but I wasn’t sure how well those changes would translate to the reduced size earcups of the D1000/1001. Specifically, I suspected that the volume of air displaced by the installed Dynamat in the D1000/1001 could be creating a smaller cup cavity than was optimal. In speaker building, adding stuffing to cabinets makes the air inside behave as though the cabinet size is larger than it actually is, which tends to smooth out mid-bass humps, sacrificing sheer volume of mid-bass in favor of extended deeper bass (at least with acoustic suspension speaker designs). I figured the same effect might benefit my modified D1001.
I reopened the phones, and made appropriately small wads of stuffing, using material I had extracted from an old pair of speakers that I had decommissioned. Photo below shows the right wad size, but as Markl noted, it needs to be really thin and wispy. With stuffing, too little is better than too much. Additional photo shows the stuffing in the earcup, prior to reassembly.


Stuffed Listen
With the now stuffed earcups, the bass punch is reduced compared to the unstuffed mod. However, the overall sound seems more natural, and the low bass frequencies come through better. For me at least, the clear preference is for the stuffed cups. But you might like lots of bass punch. If you do mod your Denon D1000/1001, I recommend listening to them both unstuffed and stuffed to decide for yourself which you prefer.
Frankly, I am amazed at how good my modded Denon AH-D1001 sound for a sub-$100 pair of phones. No, they’re not going to displace the top end models in my home rig, but they are ideal for my use at work, where their closed design won’t disturb coworkers, and I don’t have to worry that much about them getting stolen or damaged. (Here's how I hang them on my office wall http://www.head-fi.org/forums/f21/cu...-style-350413/)
Plus, has anybody mentioned how incredibly comfortable these things are? I don’t have D5000 or D2000 cans for comparison, but hands down, the D1001 phones are more comfortable than Grado GS1000 or Sennheiser HD650, two models which many people (including myself) consider to be extremely comfortable. For the price of the D1001, you can’t go wrong. And now that I have seen what’s inside the D1001, I’m sure that someday I’ll get the itch to upgrade the cable. But that will be another story.
UPDATE: I've now gone and done the cable. See http://www.head-fi.org/forums/f4/rec...-d1000-353941/.
UPDATE2: I have also since purchased a Denon D2000, which I have modded by a variation of the Markl method. The D2000 does sound better than the D1001, but it should, since it it costs about three times as much. The D1001, however, is actually more comfortable than the D2000, because it is only about half the weight.
Since the D1000/1001 models are a different, less elaborate, design than the larger models, I have documented the procedure I performed on mine, and with Markl’s permission, here’s the skinny on what I did. (The D1000 and D1001 models are identical to each other except for slightly different accessories in the packages.)
I made three specific mods to my D1001 (which is only a partial set of the full mods for the D5000):
-added Dynamat to rear of driver
-added Dynamat inside the earcups
-added fiber stuffing to the earcups
The Usual Disclaimer: Attempting these modifications risks damaging your headphones and will definitely void your warranty. I accept no responsibility if you muck things up. If you do not accept this responsibility yourself, do no undertake these mods.
As with the Markl mods for D5000, you need a few tools: small Phillips head screwdriver, scissors, and a hole punch.
Opening the phones
Before you can do the mods, you need to get the earpads off the phones. For the D1000/1001, this is done by just peeling the pads outward to work them off the plastic lip around the circumference of the earpiece (see photo). Thanks to JamesL for the tip on how to do this.
Next, remove the two silver screws (see photo) that hold the driver assembly to the earcups. Then slowly remove the plastic plate with the driver assembly. As you do this, be very careful of the cable attachments on the rear of the driver. The wires are thin and fragile, and you must not break them or else you will have a PITA precision soldering job to do before you can use your phones again.
Once you detach the driver plates, reach into the earcups and gently pull the knotted portion of the cable out of the slot in which it is wedged, then pull several inches of the cable inward through the strain relief. This gives you a sufficient working length of cable so that you can set the driver down apart from the cup.
Applying Dynamat to the Driver
The first mod, applying Dynamat to the rear of the driver, is done exactly as Markl described for the D5000.
Even though the D1000/1001 has a smaller driver diaphragm, the round magnet on the rear of the driver appears to be the same size, so use a U.S. quarter to make an impression in the Dynamat, and cut out the round piece. Then, use the hole punch to make a hole in the center of the piece. With my clunky hole punch, it was difficult to see where the hole was going to end up, and it took a few trial-and-error attempts to get it right. Apply the Dynamat with the hole centered over the hole in the rear of the driver (see photo), making sure to firmly press down every bit of the Dynamat.
Applying Dynamat to the Cup
I used a piece of paper to make a template for the shape to cut from the Dynamat to line each cup, tweaking the size and shape of the paper until I came up with one that fit just right in the cup. In the D1000/1001 models, the pivot points for the external hanger piece protrude into the cup (see earlier photo), so you need notches in the Dynamat to accommodate these, as well as for the screw sockets. I then traced the template onto the Dynamat and cut it with the scissors.
Prior to permanently mounting the Dynamat, place it into the cup without removing the adhesive backing. This will form the Dynamat into the desired concave shape. Then, extract the Dynamat, remove the adhesive backing and install it. To minimize air bubbles, start pressing the material firmly in place in the center of the cup, working your way outward. As Markl noted, you need to make sure every square millimeter of the Dynamat is firmly adhered. If you have any air bubbles, work them toward an edge, where you will here a snap sound when they are released (like the pop of chewing gum). If you are unable get air bubbles to the edge, you can use an X-Acto knife to cut through the Dynamat and squeeze out the air.
Preliminary Reassembly
At this point, I reassembled the phones to hear how they sounded without inserting any stuffing in the cups. The reassembly process is straightforward. When you pull the cable back out through the strain relief, be sure to reseat the knot in the internal cable into the plastic slot. I used the tip of a letter opener to press the cable back into the curved portion of the slot.
Reseating the earpads is a little tricky, but after a few attempts, I discovered that the best way to do it is by placing an index finger inside the edge of the pad, then gradually work your way around the pad, stretching the outer edge over the plastic lip (see photo).
Preliminary Listen
Listening to the modified D1001 phones, it was immediately apparent that the bass was much better controlled. The bass also gained noticeable punch to it. I could actually feel the air pressure created by the now stabilized earcups (ahh, the benefits of closed cans). Initially, this seemed desirable, but after a few hours of listening, I realized that the bass punch was stronger than it needed to be, sounding artificially enhanced.
Stuffing the Cups
Markl has a description of the advantages and disadvantages of using stuffing in the D5000 in his mod thread, but I wasn’t sure how well those changes would translate to the reduced size earcups of the D1000/1001. Specifically, I suspected that the volume of air displaced by the installed Dynamat in the D1000/1001 could be creating a smaller cup cavity than was optimal. In speaker building, adding stuffing to cabinets makes the air inside behave as though the cabinet size is larger than it actually is, which tends to smooth out mid-bass humps, sacrificing sheer volume of mid-bass in favor of extended deeper bass (at least with acoustic suspension speaker designs). I figured the same effect might benefit my modified D1001.
I reopened the phones, and made appropriately small wads of stuffing, using material I had extracted from an old pair of speakers that I had decommissioned. Photo below shows the right wad size, but as Markl noted, it needs to be really thin and wispy. With stuffing, too little is better than too much. Additional photo shows the stuffing in the earcup, prior to reassembly.
Stuffed Listen
With the now stuffed earcups, the bass punch is reduced compared to the unstuffed mod. However, the overall sound seems more natural, and the low bass frequencies come through better. For me at least, the clear preference is for the stuffed cups. But you might like lots of bass punch. If you do mod your Denon D1000/1001, I recommend listening to them both unstuffed and stuffed to decide for yourself which you prefer.
Frankly, I am amazed at how good my modded Denon AH-D1001 sound for a sub-$100 pair of phones. No, they’re not going to displace the top end models in my home rig, but they are ideal for my use at work, where their closed design won’t disturb coworkers, and I don’t have to worry that much about them getting stolen or damaged. (Here's how I hang them on my office wall http://www.head-fi.org/forums/f21/cu...-style-350413/)
Plus, has anybody mentioned how incredibly comfortable these things are? I don’t have D5000 or D2000 cans for comparison, but hands down, the D1001 phones are more comfortable than Grado GS1000 or Sennheiser HD650, two models which many people (including myself) consider to be extremely comfortable. For the price of the D1001, you can’t go wrong. And now that I have seen what’s inside the D1001, I’m sure that someday I’ll get the itch to upgrade the cable. But that will be another story.
UPDATE: I've now gone and done the cable. See http://www.head-fi.org/forums/f4/rec...-d1000-353941/.
UPDATE2: I have also since purchased a Denon D2000, which I have modded by a variation of the Markl method. The D2000 does sound better than the D1001, but it should, since it it costs about three times as much. The D1001, however, is actually more comfortable than the D2000, because it is only about half the weight.


