SR60-Mod
Sep 24, 2010 at 10:15 PM Post #227 of 5,004
 
Interesting but couldn't you just buy a jmoney headband?


Absolutely.  Not to sound like a schill but JMoney makes fantastic stuff.  Their headbands are probably the premiere replacement headbands for Grados.  Their shells are also exquisite - and yet reasonably priced.  
 
The problem of which I speak is not the crappy, minimalist, vinyl headband issue.  I've never really cared what my coat hanger is wrapped in - whether it's vinyl, leather or lambskin.  The problem of which I speak is the difficulty with which a Grado headband - designed for flat pads and classically small shells - accommodates larger pads and larger shells.  The idea of placing the headband wire and the gimbal rod so close to the temples made perfect sense a long time ago, but the bigger you make the pads and/or the shells, the more the rods get pushed away from the temples, essentially releasing the familiar vice grip and making the larger cans prone to roll off the head.  If I want to take balance lessons, it's cheaper to buy a book at a yard sale and mumble lines from My Fair Lady.
 
No thanks.
 
The vice grip of the headband should not be affected by the size of the pads or the size of the shells.
 
Sep 25, 2010 at 2:43 AM Post #228 of 5,004
So I was messing around with Solidworks today and decided to make some cups. After working on it a bit, I thought perhaps it might be possible to find a place that does wood CNC work and see if they can make a few of these. If there's interest, maybe we can do some sort of group buy bulk order. I have no idea how much it would cost though, but I'll try looking into that. Here's a picture;


I designed it with the idea that you would remove the driver from the stock piece and slot it into this. The second picture shows the hole where the cable would go through. There's a small lip at the top inside so it's easier to attach a grill. I can get more angles and measurements if anyone is curious.
 
Sep 25, 2010 at 6:12 AM Post #229 of 5,004
Sep 25, 2010 at 9:13 AM Post #230 of 5,004
I am wondering what you come up with Bila. The most easiest thing to do is to buy a Beyerdynamic headband and bend the metal but I know that doesn't include something made out of wood. :)
 
Sep 25, 2010 at 12:34 PM Post #231 of 5,004
That looks really good, earthpeople. I've been thinking about the same thing, essentially a clone of the RS1/2 cup.
 
I wouldn't be interested in a built in distancer as they would be used on a pair 225s.
 
If you do find a place that could do the work for a reasonable price, please let us know.
 
Sep 25, 2010 at 5:43 PM Post #232 of 5,004
Thinking about it, we'd probably have to make a really large order for CNC production to be cost effective. It would probably be much cheaper to find someone experience with a lathe to make some of these. I'll try asking some local cabinet shops and whatnot. Or perhaps there are some members here on head-fi who could whip up a batch of these? I'll try posting in the DIY section...
 
Sep 25, 2010 at 7:07 PM Post #233 of 5,004
Hi guys, this goes slightly off-topic, but since all the grado modders are in one thread I'll post here instead of in the DIY forum.
 
When I was punching my holes in the back of the felt my pencil tip broke off and rolled inside
angry_face.gif
 (I mentioned this about a week ago). It is impossible to get it out without taking it apart. At first I didn't hear it, it was like having a hair on your driver, but today i turned them on and you could hear it (loudly) banging against the diagphram. I'm afraid to turn them on again for fear of damaging them. They are unusable till I get this out.
 
Any way, this site http://gilmore2.chem.northwestern.edu/projects/showproj.php?file=grado_prj.htm gives the vaguest possible explanation on how to take that part of the headphones out. I've sanded the tabs that keep it in place, however it seems to be glued in or something. 
 
Please help 
redface.gif

 
Sep 25, 2010 at 9:56 PM Post #234 of 5,004
 
[size=medium]

Hi guys, this goes slightly off-topic, but since all the grado modders are in one thread I'll post here instead of in the DIY forum.
 
When I was punching my holes in the back of the felt my pencil tip broke off and rolled inside 
angry_face.gif
 (I mentioned this about a week ago). It is impossible to get it out without taking it apart. At first I didn't hear it, it was like having a hair on your driver, but today i turned them on and you could hear it (loudly) banging against the diagphram. I'm afraid to turn them on again for fear of damaging them. They are unusable till I get this out.
 
Any way, this site http://gilmore2.chem.northwestern.edu/projects/showproj.php?file=grado_prj.htm gives the vaguest possible explanation on how to take that part of the headphones out. I've sanded the tabs that keep it in place, however it seems to be glued in or something. 
 
Please help 
redface.gif


[/size]

 
I can help you.  Today, I had a wonderfully insightful experience removing drivers from the plastic.  It simply involves a bit of patience - and a screwdriver.
 
Start with the screwdriver.  Better yet, start before the screwdriver.  These drivers are held captive in their plastic prisons by glue.  It's not thick glue.  It's not the same kind of gooey stuff that holds the shells together.  Whatever it is, it's relatively brittle.  Pop the seal, so to speak, and you're on your way home.  I've added to my bag of tricks a fairly old trick - that of steaming the area to be worked on.  I don't know if it really works, but it seems to make my job a little easier.


When I first started doing this, I used a steak knife.  Not a good idea.  You want something sharp but not that sharp.  On the other hand, you're trying to get into a fairly small place so it may help to have something a little finer to work with.  These are what I had.


The name of the game is to get in there with a screwdriver and start working things loose.  You don't want to go hog wild.  The metal that encases the frame is malleable, but that also means it's bendable.  You don't want to emerge from this with a driver that looks like it got into a bar fight, so use patience and just keep working your way around the circle.  At first, this will seem pointless and absurd.  Just keep at it without losing your cool.  It's tedious but not impossible, even if you're all thumbs.  Just keep working the loop until you hear a "crack."


The "crack" is not the end.  To quote Winston Churchill, "It's not the beginning of the end.  It's the end of the beginning."  You want to keep working that plastic loose and applying pressure as you go until little parts of the seal start coming undone: "Crack," "crack," "crack."
 
When I say this work is tedious, I am not kidding.  Unless you are Mr. Slick and you solve Rubik's cube at breakfast every morning, you're going to be at this for a while.  Don't beat yourself up.  That's the price for getting this sucker out of there.  The unreligious will find God; the pious will utter curses that are not to be repeated.  Once you get some leverage, that's when you start using it to force the driver up.  I like having more than one screwdriver around, so that when I've got movement on one corner, I can hold it there while I put a second screwdriver to work.  Otherwise, it's like climbing Mount Kilimanjaro - two steps forward, one step back.


If you're lucky, you'll pull out a driver that looks as smooth as a baby's bottom.  So, the question you have to ask yourself is, "Do I feel lucky?"  Well, do you punk?  As often as not, you may just end up with something that looks more like somebody's mother-in-law, or Roseanne Barr, or the results of some fifty-year-old's last colonoscopy.


Don't be afraid.  To paraphrase the makers of the Asgard Amplifier, Shiit happens.  If you want to wear that Masters' jacket, you have to play through it, Tiger.  Even a car wreck like this can be fixed.  This is where you go Nip/Tuck all over this thing.


Just look this bad boy straight in the eye and say, "What is it you don't like about yourself?"  Then schedule it for a little lipo and botox.  I read somewhere that tape could be used for this purpose and I'm here to say, I didn't hear wrong.


As Barry Scheck would say, "There, Mr. Feng!"  Slap on the tape, smooth it over the dent, and then lift.  Don't go crazy, just "Get'r done."


Too bad, you can't take the dirt with it, but that's an issue we'll leave for another day.  The point right now is that you don't have to live with wrinkles.  You can Joan Rivers the whole driver.  Do it right and you'll erase more sins than a priest on Easter Sunday.


This . . . 


. . . can be turned into . . .


This!


It's absolutely therapeutic.  One minute, you feel like Britney Spears, running from Dr. Phil as he barges into your hospital room saying, "How's that workin' out for ya?"


The next minute, you're free.  Life is good.  Your worst fears have been shattered by your steely resolve.


In the meantime, your drivers have you to thank for springing them from this plastic Alcatraz.  Is it just me or does this thing look like a mask worn by a machete-wearing psychotic in a horror franchise?


It's time to drive a stake through the heart of this plastic monster.  While you're doing it, don't let up.  Just keep telling yourself, "Mercy is for the weak."


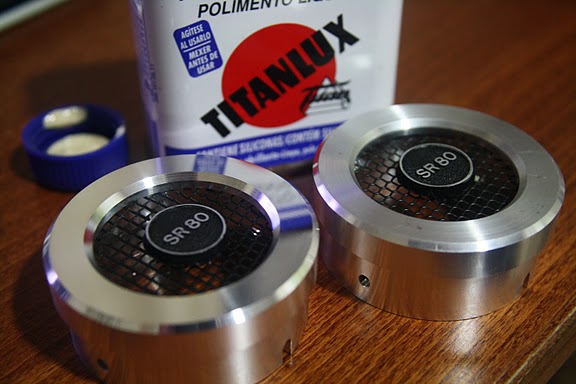
I wasn't done when I flashed this picture, but I was still pretty jazzed.  With liberated drivers, you can unleash the potential of your Grados.
 
Sep 25, 2010 at 10:45 PM Post #235 of 5,004
hmm, I cracked the entire circle, however it doesn't seem to be moving at all. Also, the circle now looks like a trainwreck. 
cool.gif

 
Also, thanks a ton. I wish I had seen this guide before I started. It would have made things go... smoother.
 
edit: I forgot to do the most important part, steam. Tomorrow I'll get on that
 
Sep 25, 2010 at 11:31 PM Post #236 of 5,004

 
A friend of mine had a pair of SR60s from way back.  They were looking pretty ghetto, so he asked me to help spruce them up.  Normally, I'd have simply packed his cups into wood, but I was short on wood to make new shells and I had some wood I'd cut up specifically for liberated drivers.  I popped the liberated drivers into the wood, and then used 16 gauge speaker wire as a shim.  Going around the gap, I plugged cut-up pieces of wire to hold the driver in secure.  It worked better than relying on glue alone.


 I also cut more screen into circles for grills.  


Wedging the screen into the guts of a quarter-modded comfy, I now had a metal replacement for my old plastic grills.


What I didn't have was a wooden lip to hang the comfies on.


So, I lathered up the front of the shells with wood glue.


Pressing my grilled comfies onto the wood, I got an instant replacement for the old plastic cage-and-lip arrangement.  


To be sure, these comfies don't sound exactly like comfies.  Because they're on the wood, rather than wrapped around a lip, there's an increase in the ear/driver distance.  On the other hand, as many bowls users well know, the supra-aural approach can often give way to a near circum-aural approach as the pinnae end up partly in the shells rather than strictly on them.  The result, here, is a more open sound for a pair of comfies.  I like the sound, which is open, crisp, and thumpy when the music calls for it (thanks to the venting of the driver backs and the replacement of plastic with wood).  The level of detail on these things is amazing.  On Luciana Souza's and Romero Lumbabo's Muita Bobeira, the acoustic guitar plucks just pop and Souza's voice just dazzles.  On U2's 40, the snaps are so percussive, they pierce the tapestry of the band and vocals.  On the Blues Brothers' Soul Man, the horns are so crisp they buzz.  That's not to say there isn't plenty of bass, too.  Bob Marley's Jamming  thumps; it just doesn't thump at the expense of the sizzle.  I can hear the hiss on George Carllin's A Place for My Stuff!, hiss that's there, but less prominently on the Mormon Tabernacle Choir's Rock of Ages (Only on my iPod could those two follow one another).  REO Speedwagon's Out of Season is as sharp as a razor's blade.  The Beatles' All You Need Is Love proves that forty-year-old recordings can be so crystal clear that the brass, strings and accordion resonates as clearly as the off-center comment.  Lennon's vocals are not just crisp.  Occasionally, you can hear the slight echo positioning his voice.  I liked the electric guitar solo that starts at 1:14 and then goes awry just short of 1:34.  Motley Crue's Danger comes with a little more soundstage while Kiss's Rock and Roll All Nite sounds more intimate and more live.  Cake's Hem of Your Garment slams, which is pretty good for a song that otherwise feels stripped down and augmented by inserts.  Cheap Trick's Just Got Back bristles with energy while Fleetwood Mac's Silver Girl has a slightly-sibilant crystal clarity to it, yet Suzanne Vega's Freeze Tag remains dark and distant and Steely Dan's Deacon Blues - crisp as new money - remains relatively mellow.
 
Sep 26, 2010 at 1:55 PM Post #238 of 5,004
Hey, Bilavideo. Do you completely submerge the drivers in boiling water, or is it like halfway up? Also, how to you work the screwdriver? Is it a back and forth, or some other way? I also can't get it out with brute force. I'm thinking of going berserk and just cutting it out with a knife.
very_evil_smiley.gif
 Any help would be appreciated.
 
EDIT: I just realized that even if I got it out, then my problem wouldn't be solved. the plastic is still in the way. Does anyone have an extra sr60/80 driver they would be willing to part with?
 
Sep 26, 2010 at 2:31 PM Post #239 of 5,004
 
Hey, Bilavideo. Do you completely submerge the drivers in boiling water, or is it like halfway up? Also, how to you work the screwdriver? Is it a back and forth, or some other way? I also can't get it out with brute force. I'm thinking of going berserk and just cutting it out with a knife.
very_evil_smiley.gif
 Any help would be appreciated.
 
EDIT: I just realized that even if I got it out, then my problem wouldn't be solved. the plastic is still in the way. Does anyone have an extra sr60/80 driver they would be willing to part with?


I pour hot, steaming, water into a cake pan.  It doesn't have to be boiling, just a bit steamy.  It won't the hurt the drivers.  I pour the water deep enough to create a pool but not so deep as to leave the drivers submerged.  A third to a half the height of the cups is more than enough.  You might even be able to get by with thinner layers of hot water.  The glue weakens fairly quickly.  It also hardens fairly quickly, so you can pull the cup out, dry off the condensation and get to work.  This technique is great for pulling the cups apart.  I've just started using it for releasing the drivers from their plastic sHell.
 
This can also be done dry.  The point is you have to work your way around the circle, working and jerking.  You're loosening things up.  A promising sign is the "snap" or "crack" that comes from popping loose some of the gluing.  Just getting that pop from one corner is no release for the others, so you just have to keep making the rotation.  In the meantime, you're warping the outside plastic shell (stage one, the front shell).  It's getting a beating as you work your way around the circle.  Don't despair; just keep at it.  The disk of the driver may also get some wear and tear.  That's okay.  All you can see at the moment is the back but what matters is the front.  This is an annoying, tedious, process but it does get better.  I had some 325 shells that gave me nothing but grief.  Patience pays off.
 
About that plastic that's still in your way: It's not.  To be sure, the plastic bump isn't going anywhere but as you put pressure on the outer walls, as well as the driver disk, there's going to be some room to squeeze the driver up and over even this bumpy part.  To quote Walter from The Big Lebowski, "Nothin's f--d, dude.  Nothin's f--d."
 

Users who are viewing this thread

Back
Top