Schiit Bifrost Uber Analog Upgrade
May 4, 2013 at 7:34 PM Post #61 of 1,448
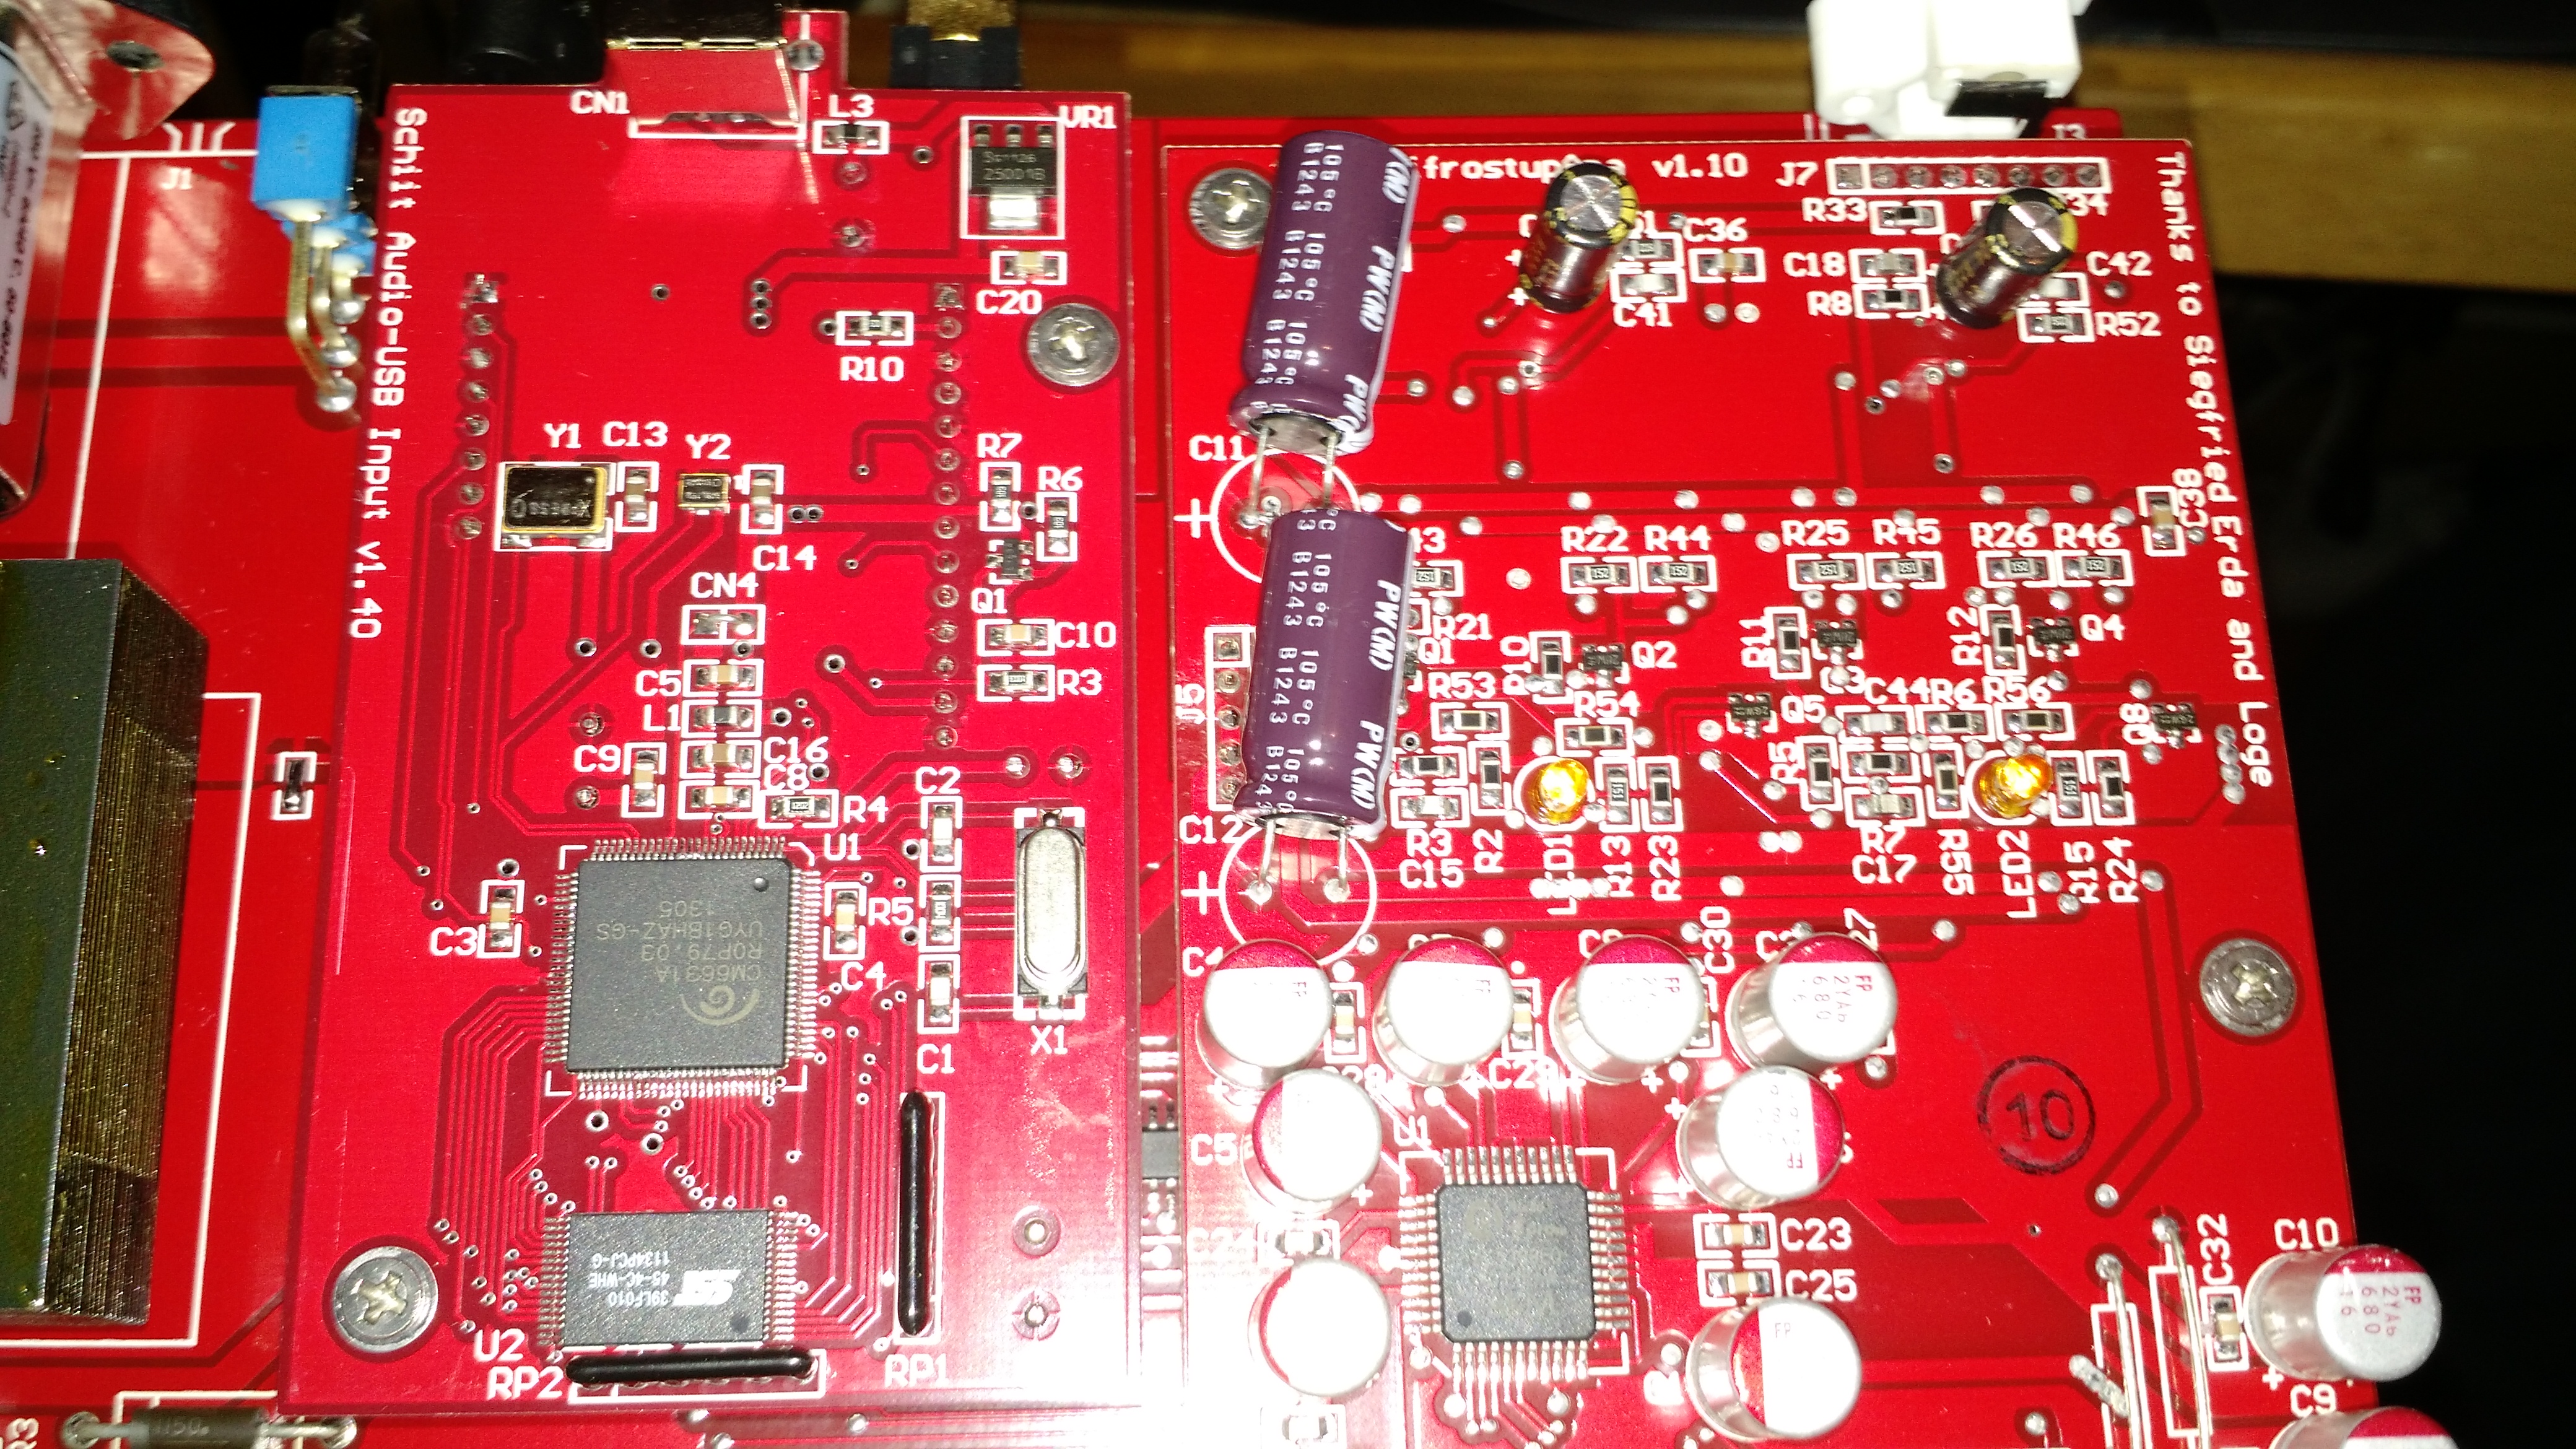
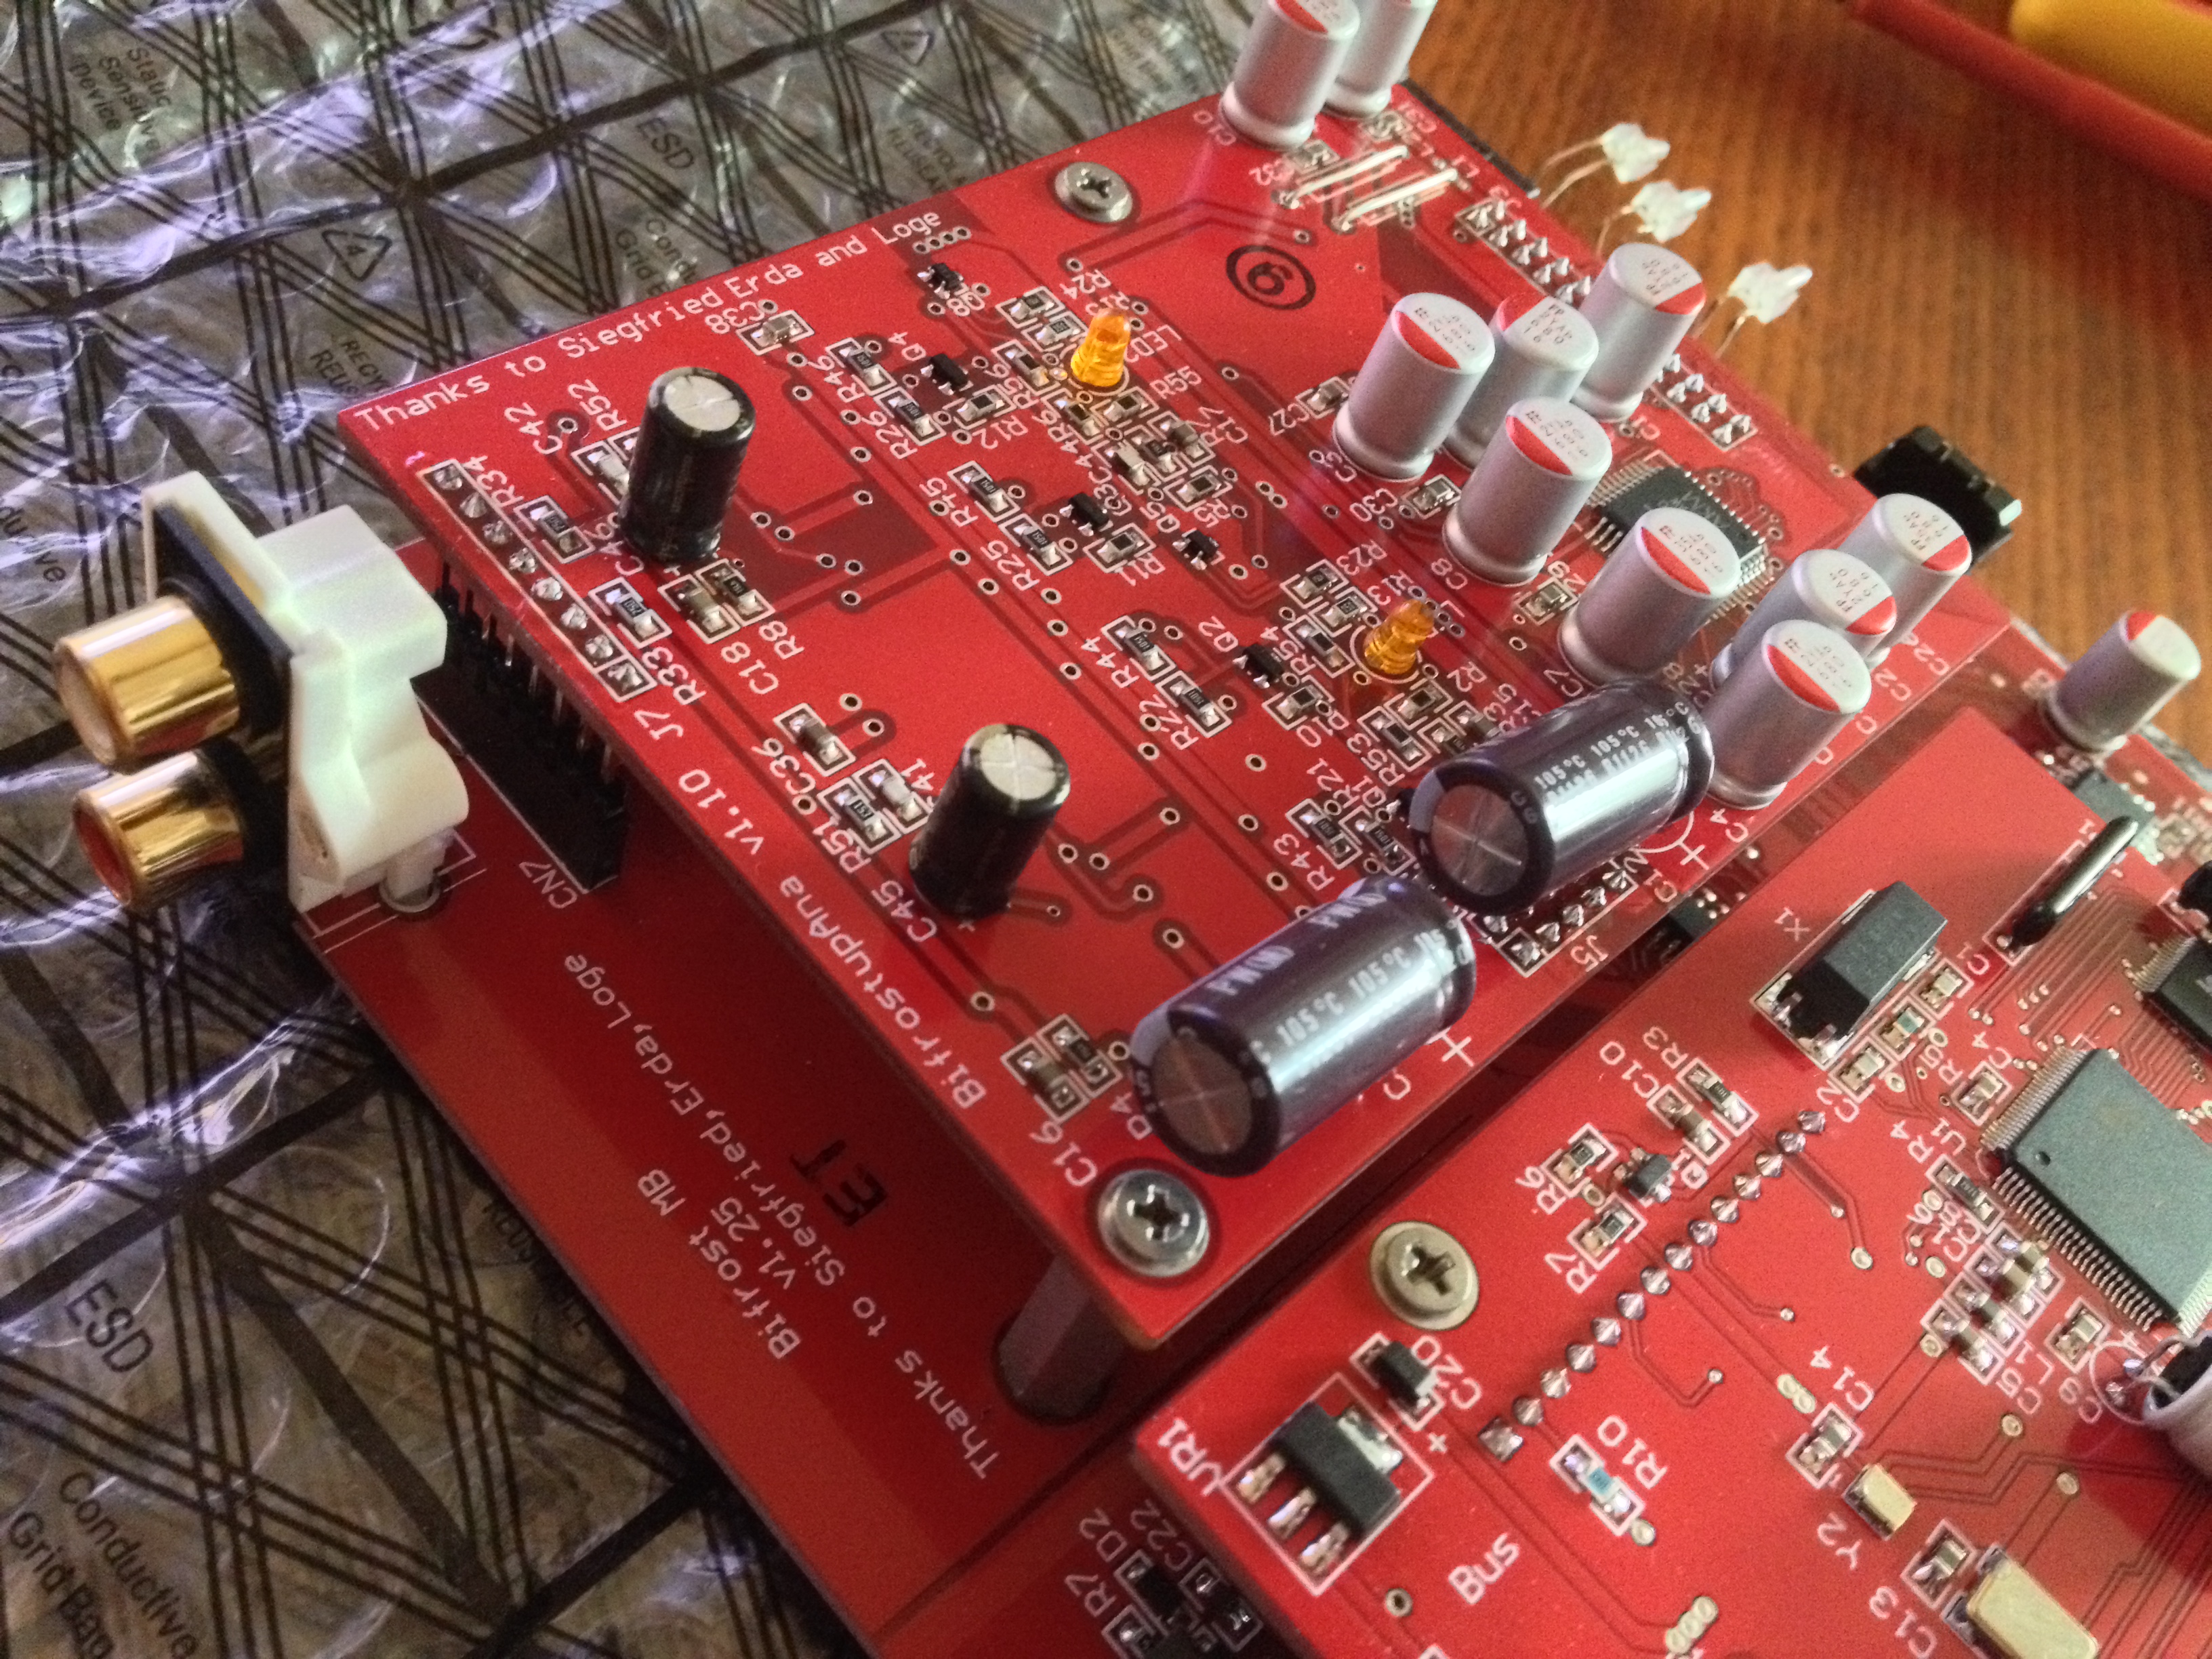
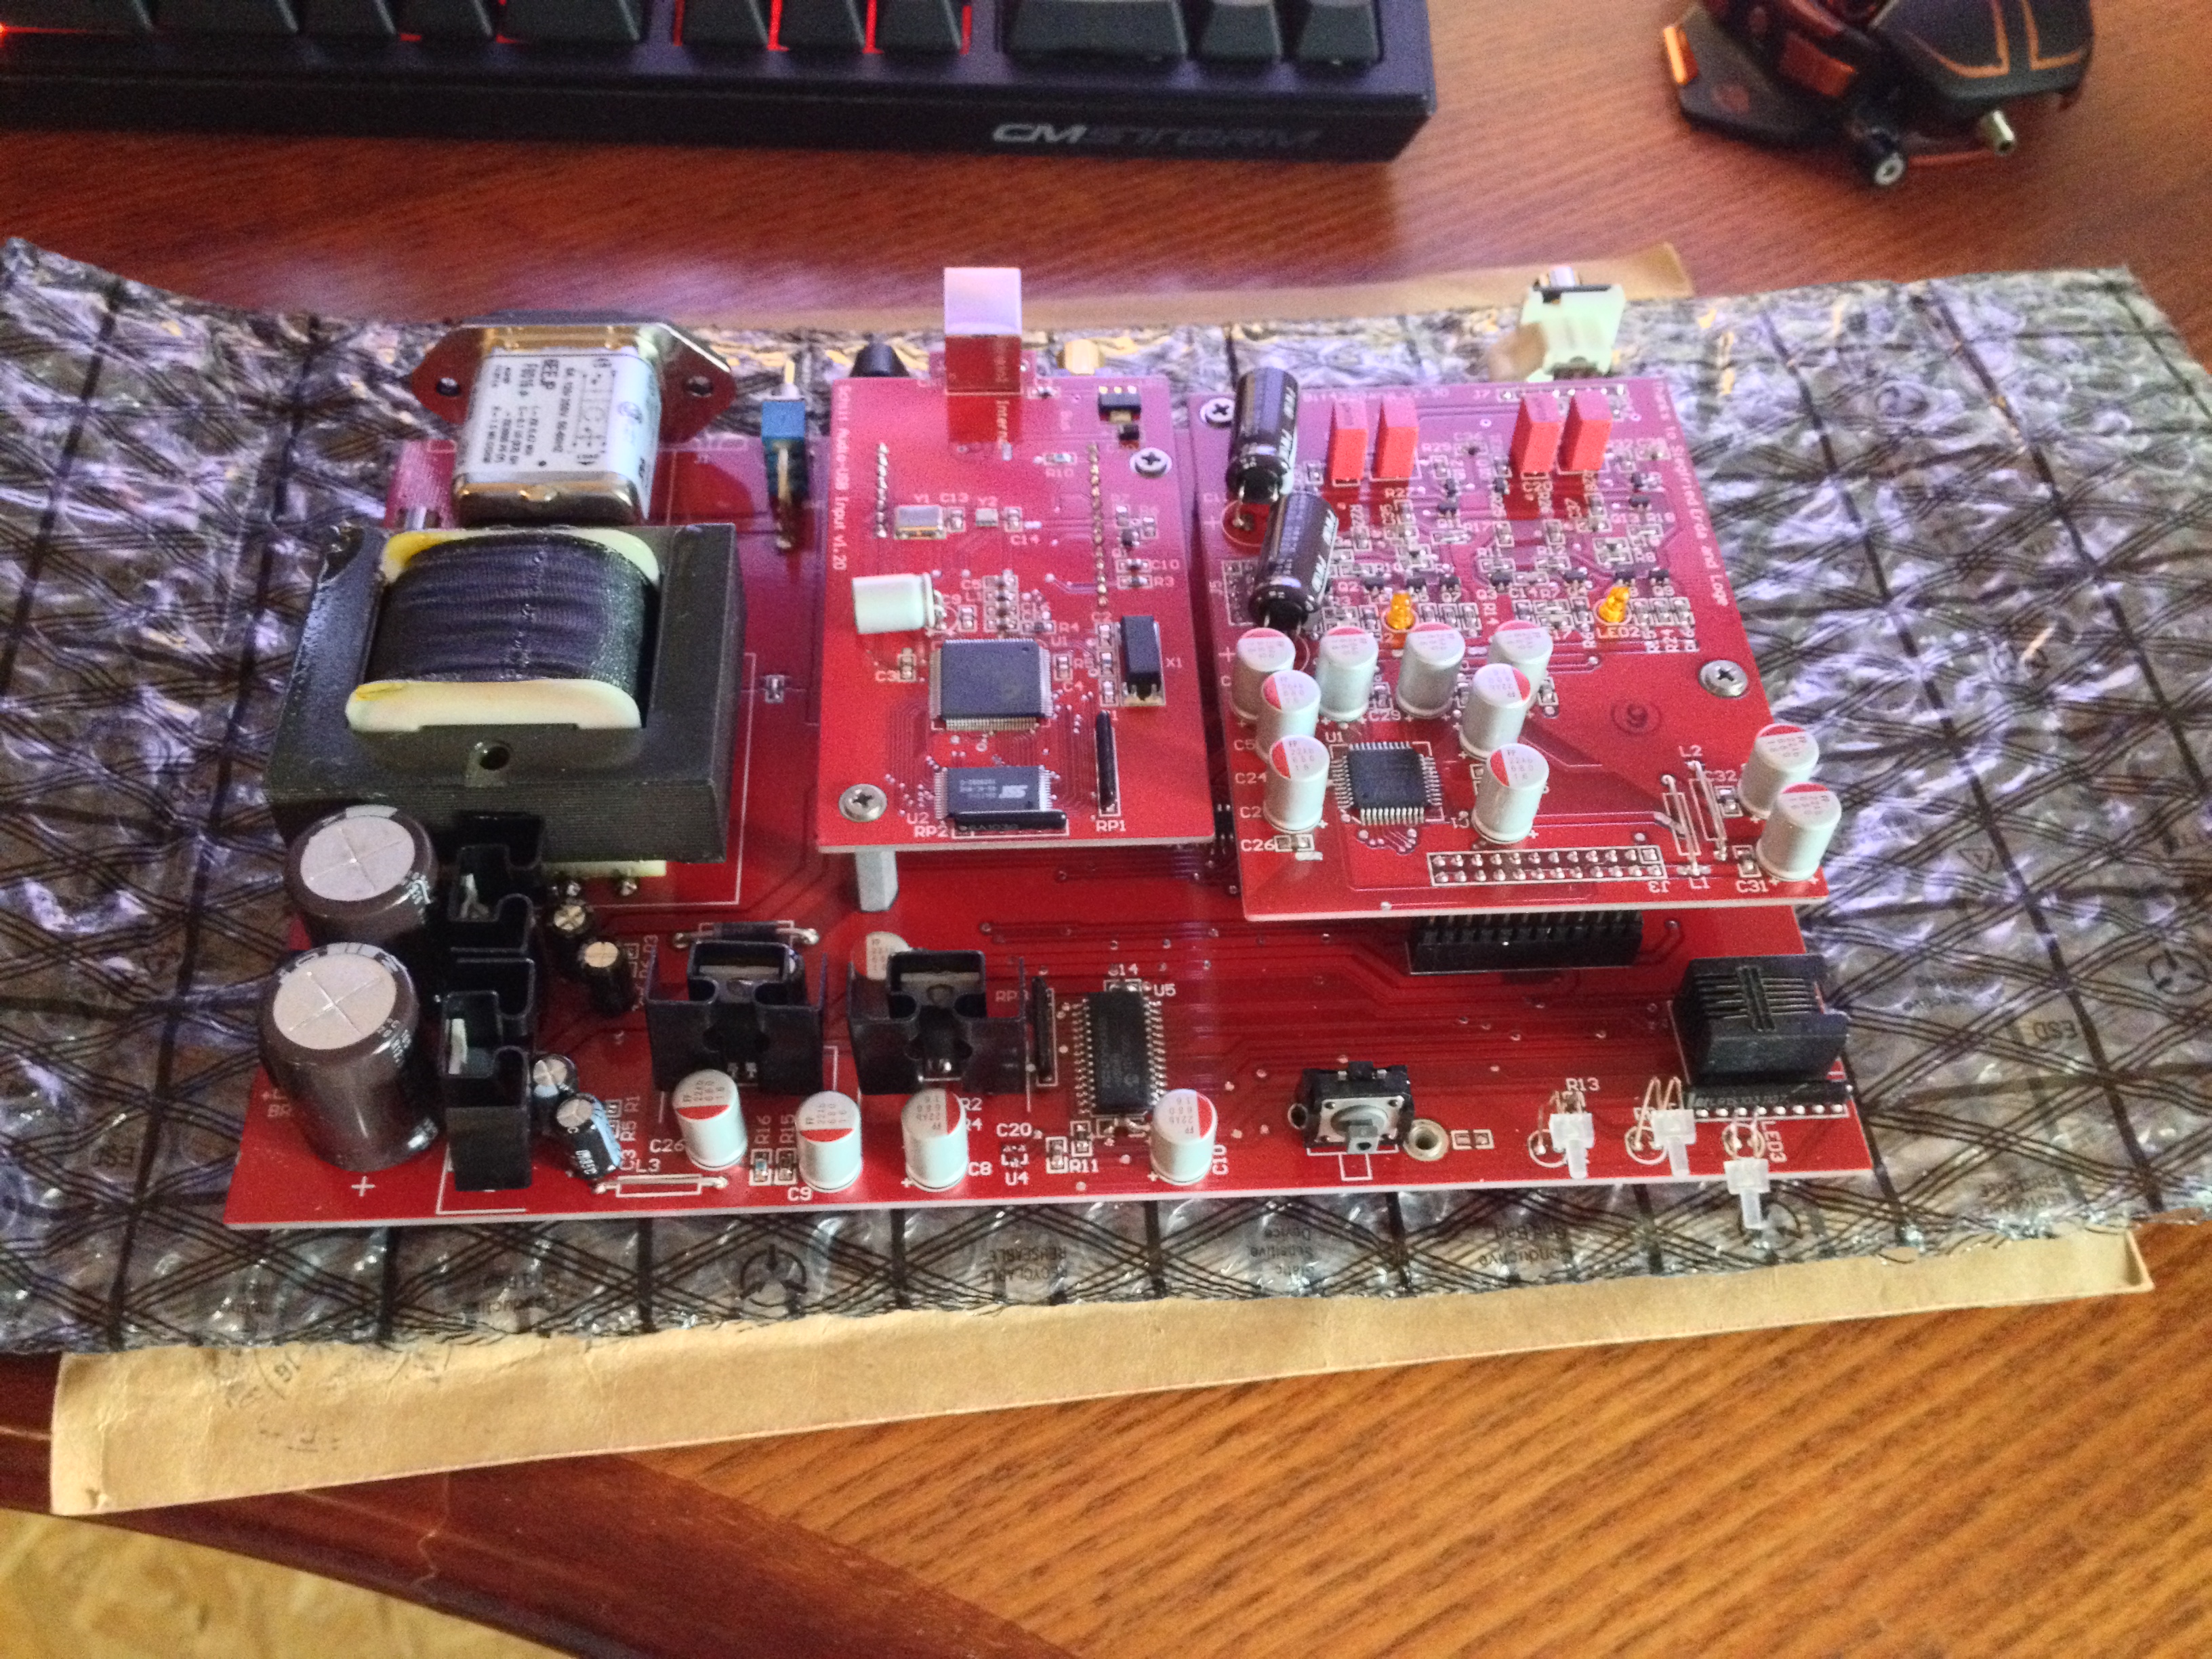
Interesting, I didn't realize the more recent non-uber boards were using the SMD components rather than the larger through hole parts seen on Schiit's site.  That explains the initial confusion between the upgraded boards and old ones.  I wonder when they started implementing the SMD non-uber boards?  I certainly have nothing against SMD components though. It generally reduces cost and improves manufacturing consistency.
 
May 4, 2013 at 8:21 PM Post #62 of 1,448
This is great. A good upgrade to buy me some time before trying to go full balanced; just when I was wondering if this was ever going to happen. I wonder if this will put it in front of my XA5400ES for redbook.
 
May 4, 2013 at 9:42 PM Post #63 of 1,448
Does the Uber upgrade really make that much difference to the Bifrost? what amp do you guys use with the Bifrost? I run mine to the Asgard, I'm debating whether or not to drop $100 for the Uber. More information would appreciated.
 
May 4, 2013 at 9:58 PM Post #64 of 1,448
Han, it's too early to know. Boards are only just being received. I think it'll be weeks at least before we get firm ideas of the difference.

The only reasons to 'upgrade' in my case are (a) I find something lacking in my 'sound' and think the DAC is the problem, or (b) curiosity.

Reasons to hope for a significant difference? One I can see is that reports suggest the Gungnir is more than subtly better than the Bifrost in detail, resolution and tone. However, it seems this only applies when Gungnir is used balanced, according to these same reports. As the uber-board is based on the Gungnir's output board, my hope is Bifrost single-ended might get some way toward Gungnir performance balanced.

But again, too early to know.
 
May 4, 2013 at 10:04 PM Post #65 of 1,448
Good information. I just checked on Schiit's website, and there's not much difference in the specs besides a slighter better THD, which I don't think I can tell the difference, even with the Unique Melody Miracle. I think I will wait as well.
 
May 4, 2013 at 10:43 PM Post #66 of 1,448
Quote:
Han, it's too early to know. Boards are only just being received. I think it'll be weeks at least before we get firm ideas of the difference.

The only reasons to 'upgrade' in my case are (a) I find something lacking in my 'sound' and think the DAC is the problem, or (b) curiosity.

Reasons to hope for a significant difference? One I can see is that reports suggest the Gungnir is more than subtly better than the Bifrost in detail, resolution and tone. However, it seems this only applies when Gungnir is used balanced, according to these same reports. As the uber-board is based on the Gungnir's output board, my hope is Bifrost single-ended might get some way toward Gungnir performance balanced.

But again, too early to know.

Funny you should mention it but I found the Bifrost uber board is subtly yet noticeably better in detail, resolution, and tone.  It is an accurate impression.
 
Cheers!
beerchug.gif

-HK sends 
 
May 5, 2013 at 12:49 AM Post #67 of 1,448
Dear Mr. Schiit,
 
Please consider throwing in a packet of rubber feet with an upgrade that requires
taking the device apart.
 
Kind regards
 
A customer.
 
May 5, 2013 at 12:58 AM Post #68 of 1,448
I put these in the Tube Rolling thread...  Might help those with LED issues..
 
 
Installation notes on the Bifrost Uber Upgrade.
 
Fastener Removal.
 
1)  Remove all the "perimeter" fasteners first.  Top and bottom. Do not remove the fasteners in the bottom center.  They secure the PCB board to the chassis and you don't want it rattling around.
2) Next remove the 4 black fasteners in the back of the unit.  The two halves of the enclosure can be separated.
3) Now remove the center fasteners on the bottom of the chassis.  The board will slide out.
4)   ***** Be very careful of the 3 front indicator LED's they are vulnerable.
 
Reseating the LED
5) When you have swapped daughter cards and secured the top card here is how I was able to get the LED's back into their tiny holes.
Gently slide the board in and put in the bottom center, rear fastener.  This will hold the board in the correct place. Position the enclosure face down on edge.
6) Working from the side.... To seat the LED's use needle nose pliers or sturdy tweezers. The leads bend.  You can slide and center the LED's.  To seat them securely it may be necessary to "pull" them down into the holed.  The leads are pliable and gentle positioning with tweezers will not hurts them. 
7) Finish securing the PCB to the chassis before putting the enclosure together.   NOTE:  There are 2 different sizes of fasteners. (Besides the black ones in the rear)
 
There are 5 long stainless steel fasteners and 10 short stubby ones.  Use the 5 long fasteners in the bottom center holes to secure the PCB board to the enclosure.  Use the 10 short ones to fasten the case halves.
 
May 5, 2013 at 1:00 AM Post #69 of 1,448
Probably common knowledge but I posted this as well.
 
 
To the non-USA folks with 230V power and a 115V Bifrost.
WARNING... DANGER...DANGER.
Consult with a knowledgeable person before reading further.
 
Whilst installing my Uber upgrade in my Bifrost, I looked at the transformer and PCB board and
noticed that the transformer is Dual Voltage. I went to the manufacturer's web site and confirmed
that the transformer model number in my Bifrost was dual voltage.  The AC receptacle is as well.
115VAC and 230VAC
 
It "APPEARS" to be a simple matter of removing 2 jumpers and installing a a single jumper to convert it to 230V.
This wire the primaries in Series rather than Parallel.
 
If this is interesting, I'd be happy to open up my Lyr and take a look.
If you were desperate enough to try this upgrade the fuse.
 
May 5, 2013 at 1:21 AM Post #70 of 1,448
Interesting HK. Cheers!
 
May 5, 2013 at 3:39 AM Post #72 of 1,448
^ Glad you got this 'uber' result, sceleratus :wink:

I hope to find out for myself in the next week or two.

Thanks for the added installation notes.
 
May 5, 2013 at 1:31 PM Post #74 of 1,448
Lastly, I put this on the Lyr tube rolling thread too.   Many probably know this but it might help someone that's never done this before or doesn't like screwdrivers.  It's a couple tips for removing and replacing fasteners.
 
1) Set up a good place to work with good light.  You will have over 20 fasteners to keep track of, so have a small container to put them in while you work.  Be methodical.
 
2) When removing a philips head fastener, it is very important to have the correct size screwdriver.  The worst case is too small a bit that will strip the cross slots.
Use the largest bit that will fit in the slot.
 
3) Push straight down on the fastener with the screwdriver and "crack" it loose.  "Lefty - Loosen"  "Righty - Tightly"  I like screwdrivers like the one pictured, because the red-head of the handle turns in the palm while pushing down.  Taking care to keep the screwdriver at a right angle will reduce the chance of stripping the head.  The Bifrost screws seem to have a  bit of lock-tite type of compound so they will stick a bit when removing them.  Apply downward pressure most of the time you are backing out the fastener.
 
4) I don't like powered screwdrivers for this job, certainly not for inserting the fasteners.  You need to be able to "feel" the fastener.
 
5) When reinserting the fasteners don't completely tighten one fastener and move to the next.  Instead just "start" all the fasteners on the side you are working on.   Once they are all started half way, move around and snug each one up.  This procedure helps to ensure that all the holes line up.  You are not building a race car, snug is just fine.  Pay special attention to the fastener when starting it in the hole.  It should go in smoothly.  If not, Stop, remove the fastener and start again.  You don't want to cross thread the holes.  Again, it is a "feel" thing.  If it feels wrong, it's wrong.


May 6, 2013 at 12:18 PM Post #75 of 1,448
Quote:
Lee Harvey, I'd be interested to hear what the iFi does for the Modi, too. Do you find the iFi to be a good match for the Bifrost? (obviously with the older USB board)


I do find that the iFi Power Supply helps the Bifrost.  It adds more focus to the overal presentation to the soundstage.  It helps with separation between the players and makes everything a little more sold sounding.  I think its well worth its $199 price.   I have about 40 hours on the Modi as of this morning.  It has a lot of the same sound character that the Bifrost has.  Not as reveling as the Bifrost but I think it needs more time powered up.  I feel that the Bifrost didn't really settle in until after a month of being powered on and playing music. YMMV.  I am having second thoughts about keeping the USB board when it arrives.  I will have to look at the new board and compare with what came with my Bifrost that I got in January of this year.  Does anyone have an idea when Schiit started throwing the new USB board into production units this year?
 

Users who are viewing this thread

Back
Top