Fostex T50RP Incremental Mods and Measurements
Jan 25, 2022 at 2:32 PM Post #2,792 of 2,829
I made my last change to these - put a square of sticky felt with holes punched in it over the back of the driver. Vocals have arrived. These are now really nicely balanced, to my ears - I like them quite a bit.

Why is it that only Dekoni seems to be selling modded versions of these at any sort of scale? I'd think there would be some decent demand, considering ZMF and DCA are no longer selling theirs.
 
Jan 25, 2022 at 4:54 PM Post #2,793 of 2,829
I made my last change to these - put a square of sticky felt with holes punched in it over the back of the driver. Vocals have arrived. These are now really nicely balanced, to my ears - I like them quite a bit.

Why is it that only Dekoni seems to be selling modded versions of these at any sort of scale? I'd think there would be some decent demand, considering ZMF and DCA are no longer selling theirs.
That's usually the story of the T50 and all it's variants.....they been rediscovered many a times in it's Fostex lifespan!

They are probably the ultimate headphone project for the True Tinkerer out there!
 
Sep 5, 2022 at 4:06 PM Post #2,794 of 2,829
I made my last change to these - put a square of sticky felt with holes punched in it over the back of the driver. Vocals have arrived. These are now really nicely balanced, to my ears - I like them quite a bit.

Why is it that only Dekoni seems to be selling modded versions of these at any sort of scale? I'd think there would be some decent demand, considering ZMF and DCA are no longer selling theirs.

Looking back it's been a very long time since the Fostex TxxRP modding scene started (over 10 years for the mk2s crazy enough). Since then there have been some seriously strong budget options that have come out. Hifiman comes to mind immediately, as crazy detailed and tight my Open Alphas are, they cost more than my HE-4xx. Never mind the fact the 4xx have gobs of sound stage and instrument separation, all for less than the money spent on my DIY Open Alphas

Is modding a set of T50RPs still a really fun project I HIGHLY recommend to anyone? 100%. Not only do you get a set of cans you can tune to your exact tastes, but the act of modifying teaches you so much about the physical process, and more importantly being critical about the sound. Modding mine really taught me the different sound aspects headphones can have more than a frequency response graph
 
Last edited:
Sep 9, 2022 at 8:48 AM Post #2,795 of 2,829
I am very late to this modding community. The amount of work here is amazing. I am wondering why I cannot see all the photos on page 1? Any opinions on whether the DBV 3 mod would be a good jumping off point for mk3 drivers? If so, does anyone have pictures of this somewhere.

Thanks to all who advanced this. It is going to be fun!
 
Sep 9, 2022 at 8:59 AM Post #2,796 of 2,829
I am very late to this modding community. The amount of work here is amazing. I am wondering why I cannot see all the photos on page 1? Any opinions on whether the DBV 3 mod would be a good jumping off point for mk3 drivers? If so, does anyone have pictures of this somewhere.

Thanks to all who advanced this. It is going to be fun!
It used to be common practice (across forums on the internet) to host images off-site on other image hosting websites like the now long defunct 'Photobucket', so when those hosts died off, so did all the hosted images.
 
Sep 9, 2022 at 2:40 PM Post #2,797 of 2,829
I am very late to this modding community. The amount of work here is amazing. I am wondering why I cannot see all the photos on page 1? Any opinions on whether the DBV 3 mod would be a good jumping off point for mk3 drivers? If so, does anyone have pictures of this somewhere.

Thanks to all who advanced this. It is going to be fun!
I worked from the "Blue Monkey" suggestions:

https://www.head-fi.org/threads/jus...50rps-today-wow.452404/page-737#post-11388141.

I still use my modded TR50RP, and would compare it to the Oppo PM3 for sound signature. I used to call the Fostex the "poor man's Audeze LCD2"
 
Sep 9, 2022 at 3:11 PM Post #2,798 of 2,829
Somewhere in the basement I think I still have a bag of spare parts, like baffles, cups, maybe a headband. If anyone wants them, you can have them for the price of shipping. Just send me a message.
 
Sep 10, 2022 at 7:15 AM Post #2,799 of 2,829
I remade my FOSTEX T50RP mk3 into a balanced 4.4 pentaconn version, since on my DAC the balanced output has 2 times more power.
I decided to make a balanced version with the ability to return to the standard (orange cable) 3.5, so in my case it was important to do without all sorts of drilling and finishing. it didn’t take much time to remake and about $10 of the budget (all parts were bought on aliexpress). I can post step by step instructions later.
Копия photo_2022-09-13 11.57.17.jpg
 
Last edited:
Sep 12, 2022 at 8:21 AM Post #2,800 of 2,829
Simple balanced mod
(with the ability to easily revert to the original version)

What you need:
soldering iron, solder, flux, multimeter (if you use another cable not from the link), glue.

Spare parts (from Aliexpress)
1. 3.5 4-pin female connector for replacement in headphone housing. connector
2. Cable with angled 3.5 x 3.5 4-pin male connectors that fit into a hole in the housing. cable
3. 4.4 pentaconn (optional for your needs, you can put 2.5, pinout can be found in Google) 4.4 connector
4. Heat shrink tubing with a diameter of about 5-7mm.
You can find the pinout of the 4.4 balanced connector in the screenshots below
Process:
1. Cut the cable to the required length and solder the balanced connector. To do this, check the contacts on the angled 3.5 connector with a multimeter and solder the balanced connector, make sure that the wires on the balanced connector do not short-circuit after soldering. Pinout for 4.4 L+ L- R+ R- (see photo under the spoiler).
This connector in the screenshot requires heat shrink at the end, because the hole diameter is too large. You need to cut off several pieces of the heat shrink tube and put it on the cable by heating, then assemble the plug.
2. Remove the ear pad from the left earpiece, unscrew 4 screws, disassemble the shell. Unsolder the speaker wires from 3.5 connector (here it is important not to pull the speaker so as not to break the contact pads from the speaker film). Set the speaker aside. The connector on the housing is fixed with a slotted nut from the outside. With a thin narrow screwdriver or something suitable (thin-narrow), unscrew the nut, remove the connector.
Solder the speakers wires to the 4-pin connector according to the pinout on the plug. To do this, check with multimeter the connector and determine the numbers of contacts. Solder L+L-R+R- (see photo). On the round part of the female connector, which will go into the ear cushion hole, you need to put on 2 thin heat shrink rings (it is advisable to use glue before shrinking so that they cannot slip), since the diameter of the connector is smaller than in the ear cushion hole. The connector must be firmly inserted into the hole in the housing. When you get a suitable diameter, glue it (I used B7000 glue, since I did a reversal conversion to stock).
Assemble the case, check that 4 round foam rubber dampers are not lost (they stand on cross-shaped stops inside the shell, they tend to peel off).

That's all with the modification - connect, enjoy

Снимок экрана 24.08.2022 в 12.18.55.png

Снимок экрана 24.08.2022 в 11.58.30 — копия.png

Снимок экрана 2022-08-24 в 10.45.20.png


If you use the cable from the link, then in this case you can do it without a multimeter, using the color differentiation of the wires in the cable. It is enough to solder the wires on the connector 4.4 as in the photo
1-blue,
2-green,
3-white,
4-red

photo_2022-08-24 21.55.12.jpg


Solder the wires to the 4-pin female connector as indicated by the numbers in the screenshot.
1. blue L+
2. white L-
3. red R+
4. white R-
photo_2022-08-24 21.55.17.jpg
 
Last edited:
Nov 23, 2022 at 6:40 AM Post #2,802 of 2,829
I'm not sure if this has been published before, but now you can buy a set for the mod and see a small instruction on the official website www.fostex.jp
Снимок экрана 2022-11-23 в 13.43.40.png
They want to squezze out the last bit from this line.
What do you thing, are they worth the price?
33.000 Japanese Yen equals 233,23 United States Dollar

In my opinion they should go further and design a new driver.
 
Nov 23, 2022 at 8:47 AM Post #2,803 of 2,829
They want to squezze out the last bit from this line.
What do you thing, are they worth the price?
33.000 Japanese Yen equals 233,23 United States Dollar

In my opinion they should go further and design a new driver.
I think this is a normal price for Japan, standard headphones T50RPmk3g (what's mean g? there is nothing different in the description) cost ¥31,900 which is cheaper about $7,80.
 
Nov 23, 2022 at 11:46 AM Post #2,804 of 2,829
I'm not sure if this has been published before, but now you can buy a set for the mod and see a short instruction on the official website www.fostex.jp
Снимок экрана 2022-11-23 в 13.43.40.png
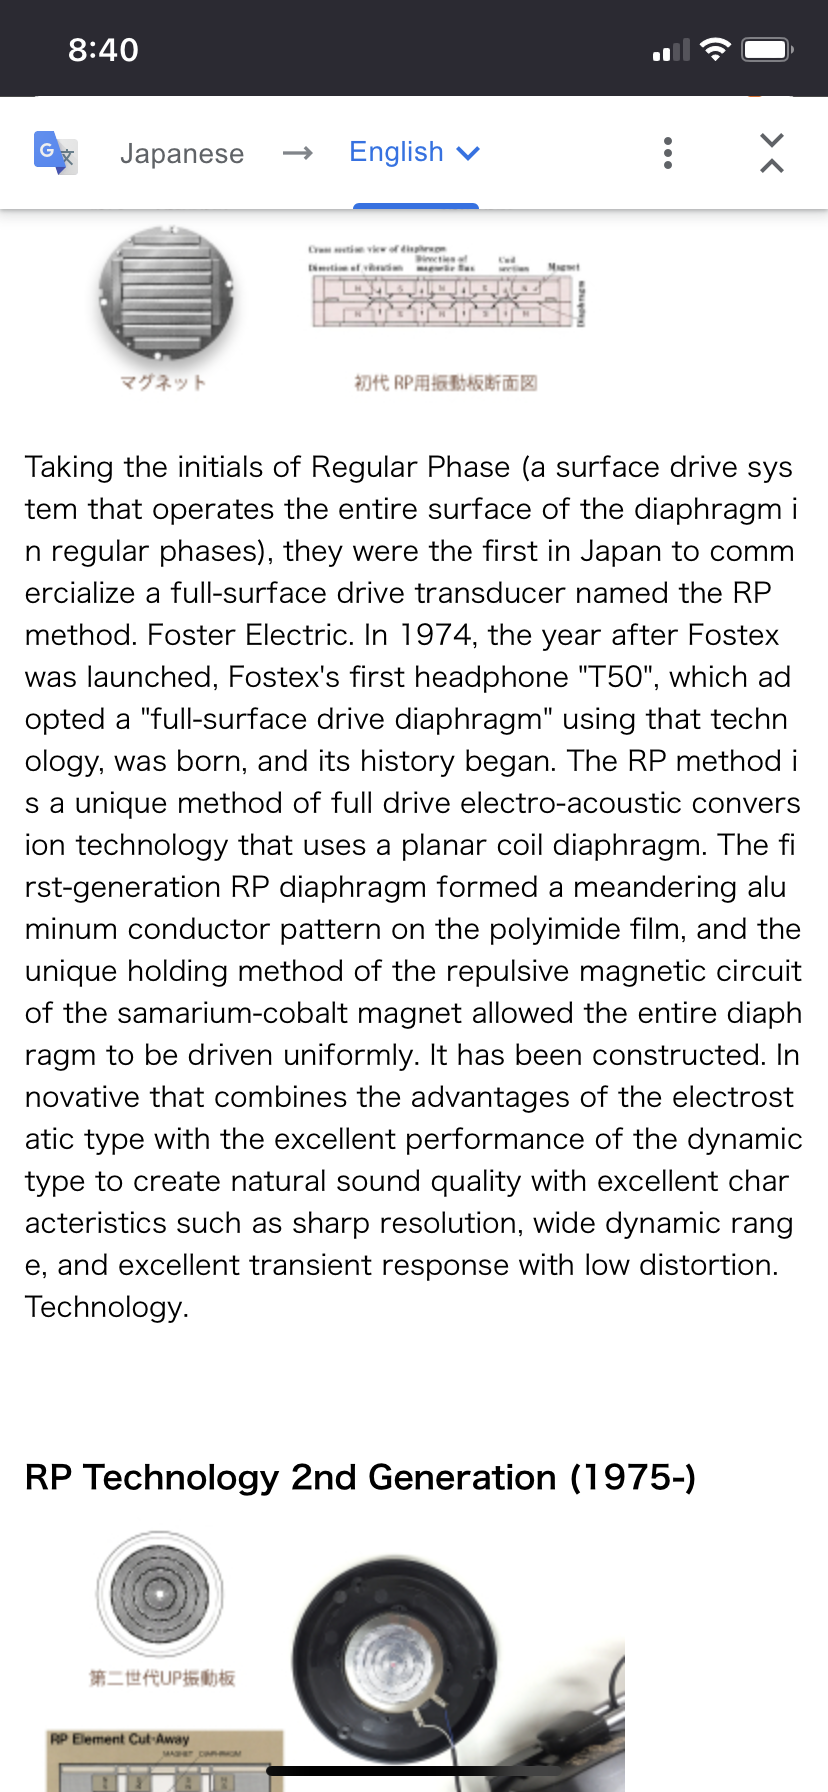
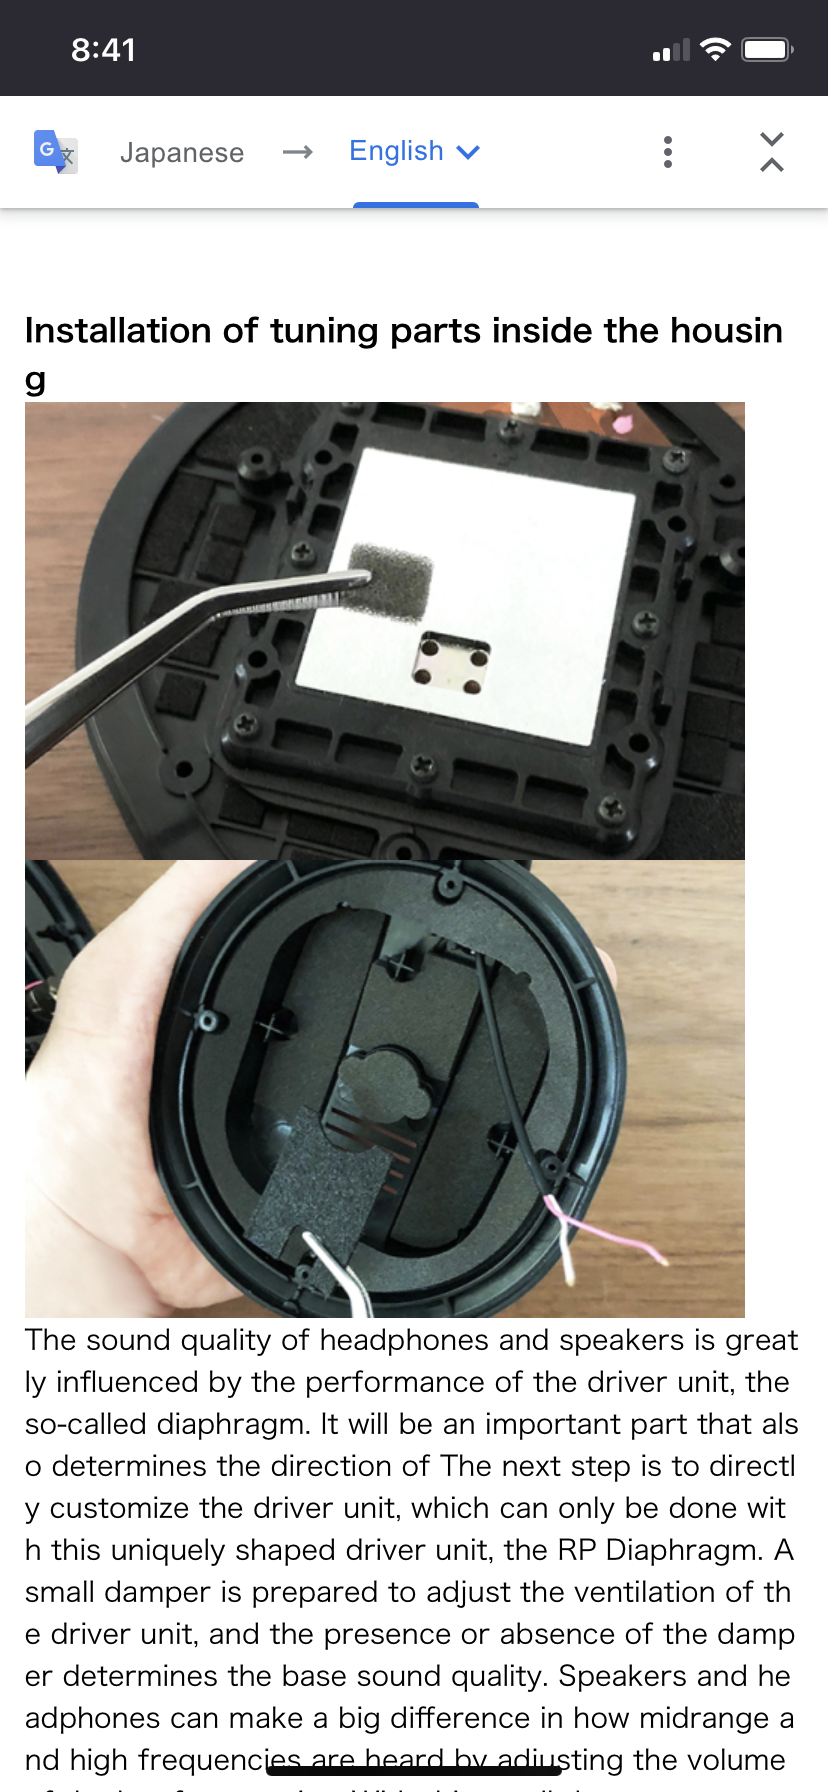
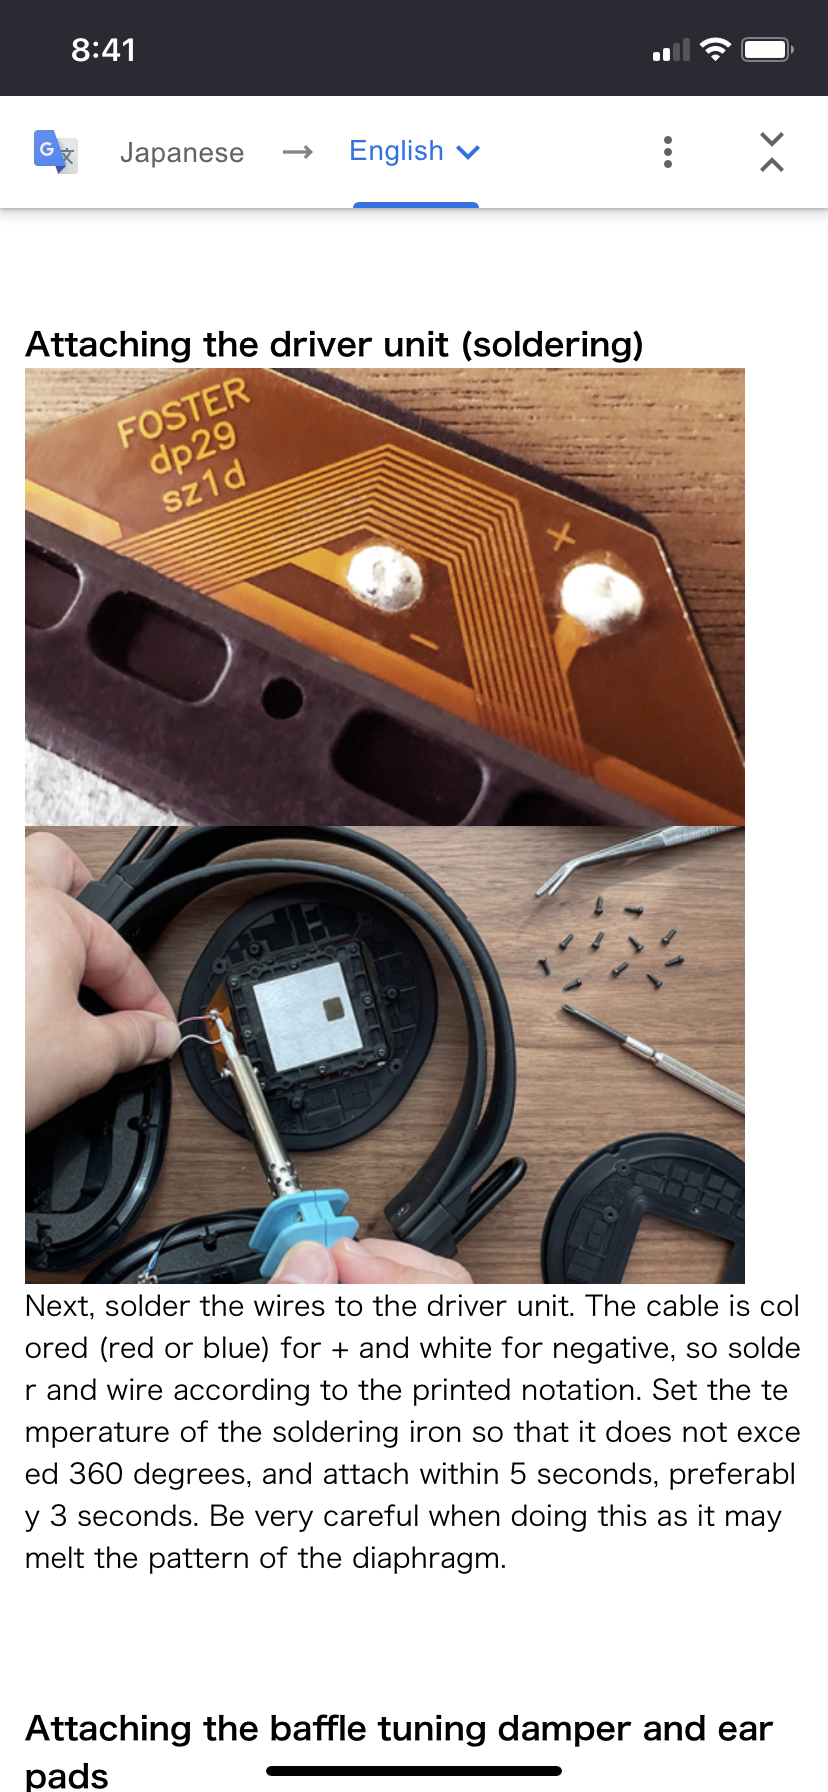
Cool. Im going to upload some screen shots from the link in case it gets disbandoned after kit sells out.
 

Attachments

  • 1B156CD2-CF27-43FB-985B-4860C82DA903.png
    1B156CD2-CF27-43FB-985B-4860C82DA903.png
    930.3 KB · Views: 0
  • E5D05E3B-9556-4DFC-88F1-707AE90CA00F.png
    E5D05E3B-9556-4DFC-88F1-707AE90CA00F.png
    2.1 MB · Views: 0
  • 8DCB649E-1663-4E33-8B92-B7375316E34C.png
    8DCB649E-1663-4E33-8B92-B7375316E34C.png
    880.8 KB · Views: 0
  • 871A5B14-40F8-476F-AD5A-D0F2FD182AD0.png
    871A5B14-40F8-476F-AD5A-D0F2FD182AD0.png
    1.1 MB · Views: 0
  • 8C982516-E84B-4E0F-B50A-E80D71778A09.png
    8C982516-E84B-4E0F-B50A-E80D71778A09.png
    847.8 KB · Views: 0
  • EC99A11F-CCF3-48E0-8E34-1776A68BCDE3.png
    EC99A11F-CCF3-48E0-8E34-1776A68BCDE3.png
    1.6 MB · Views: 0
  • E46E8199-BDAF-43E8-94B1-6862FD2AC35B.png
    E46E8199-BDAF-43E8-94B1-6862FD2AC35B.png
    1.1 MB · Views: 0
  • 2323C50B-F7C2-40DB-BFBA-02FC3407CCEA.png
    2323C50B-F7C2-40DB-BFBA-02FC3407CCEA.png
    3.5 MB · Views: 0
  • 3D3713A6-B5A5-413B-8814-C6D845685C0B.png
    3D3713A6-B5A5-413B-8814-C6D845685C0B.png
    3 MB · Views: 0
  • D59AA741-A9BF-43E1-991E-0D53008231A2.png
    D59AA741-A9BF-43E1-991E-0D53008231A2.png
    3.5 MB · Views: 0

Users who are viewing this thread

Back
Top