kontai69
1000+ Head-Fier
- Joined
- Feb 27, 2005
- Posts
- 1,009
- Likes
- 19
Most of you who own a plastic-cupped Grado (and MS-1) may feel that the vinyl headband looks cheap, feels cheap, and is flimsy. I sure do! It also has no internal padding, making it uncomfortable to wear after a short time from the metal band pressing against my skull. I know that you can use a Beyer headband, but that looks tacky. I heard Grado charges $75 in order to upgrade to a leather headband AND you have to send in your cans! Therefore, I decided to make my own. I modeled the design and construction after the one that came on my MS-Pro. Here is the recipe along with pics I've taken at each step...
MATERIALS
- leather: I used lambskin which I got on eBay (search for “lambskin hide). Use (ultra)thin hide that is 1 to 1.5 oz. It is critical to use high quality leather that is relatively thin, soft, and "stretchable." If you use a thicker, stiffer, or non-stretchy leather (generally low quality hides), it will be impossible to smoothly wrap the leather around the frame as described in Step 3.
- thin cardboard: for use as the “frame." I used the back of a notepad. A cereal box will also work. I spray-glued together two layers (one was too flimsy; three was too thick)
- thick felt: for use as padding; I spray-glued together two 1/8" thick sheets to make 1/4" thick sheet
- masking tape: cut into narrow 1 inch strips; you will need a couple dozen strips
- contact cement: I used DAP brand
- superglue
- disposable single edge razor blade: use a fresh one for cleanest cuts
- very sharp scissors
- pen
- cutting board
PROCEDURE (to install my pre-made headbands, follow steps highlighted in BOLD)
Step 1: Separate plastic "block" from metal headband. You only need to this on one side, take your pick. Grab hold of headband assembly as pictured...
http://i35.photobucket.com/albums/d1...uy69/step1.jpg
Twist plastic block back and forth along the axis of metal headband. Start off with light twisting force and gradually increase force until you hear a cracking sound (yes, it's scary!). The glue bond should now be broken and you can pull out the metal headband from the block. If not, twist some more or work on the other side as it may not be glued as tightly. Slide off the vinyl headband.
Step 2: Use vinyl headband as a template to cut cardboard "frame"...
http://i35.photobucket.com/albums/d1...uy69/step2.jpg
You will need to slightly shorten and taper the ends of the frame after cutting. Test fit frame onto metal headband to be sure of correct length. Also, draw a centerline bisecting the frame.
Step 3: Cut two pieces of leather larger than frame (only one is shown in the pic; other leather piece will be used later)...
http://i35.photobucket.com/albums/d1...9/IMG_3071.jpg
Wrap leather piece around frame and secure edges with tape. This step is VERY time consuming (may take over an hour). It involves alot of retaping, trimming, and stretching to get the leather edges to join (not overlap) cleanly in the middle while wrapping smoothly and evenly along the length of the frame. If you used a thicker and/or non-stretchy leather, this will be impossible to do. Use the centerline as guide to join the two edges of leather. Once taping is done, firmly press down along the tape line to smooth things out and get max adhesion. Here is how it should look if done correctly...
http://i35.photobucket.com/albums/d1...uy69/step4.jpg
Step 4: Make felt padding; it should be around 1/8" narrower than frame on both sides and tapered on both ends
http://i35.photobucket.com/albums/d1...9/IMG_3088.jpg
Step 5: Apply liberal amount of contact cement to entire side of headband that has the tape (use two thick coats)...
http://i35.photobucket.com/albums/d1...9/IMG_3064.jpg
Step 6: Stick on felt padding...
http://i35.photobucket.com/albums/d1...9/IMG_3065.jpg
Step 7: Lay other piece of leather over felt and FIRMLY squeeze together the leather pieces...
http://i35.photobucket.com/albums/d1...IMG_3069-1.jpg
Here is how it should look when finished...
http://i35.photobucket.com/albums/d1...9/IMG_3070.jpg
Step 8: Trim off excess leather with razor blade, being careful not to nick wrapped edges!
http://i35.photobucket.com/albums/d1...uy69/step8.jpg
Use one continuous cutting motion for smoothest cuts. Seal edges (not the ends!) of headband with cement by using a screwdriver to dab small amounts of cement between the two layers of leather and squeezing them together. Allow cement to dry for several hours.
Step 9: Gently pre-bend headband into curve before installation...
http://i35.photobucket.com/albums/d1...uy69/step9.jpg
Step 10: SLOWLY and GENTLY slide metal headband through "upper" side of frame exactly as pictured...
http://i35.photobucket.com/albums/d1...9/step9a-1.jpg
Be careful not to stretch the leather as you do this. Metal headband should run down center of leather headband.
<<<DO NOT slide the metal band through the "bottom" or padded side of frame as this will tear through the taped edges and felt padding!>>>
Step 11: Reattach plastic block. Check for fitment. There should be little to no gap between ends of headband and each plastic "L" and "R" block. If too long, slide off headband and trim down ends. Once fitment is correct, superglue end of metal headband and reinsert into the block. Once superglued, you will no longer be able to pull it apart ever again! You may want to use a less permanent adhesive (e.g. hot glue).
RESULTS
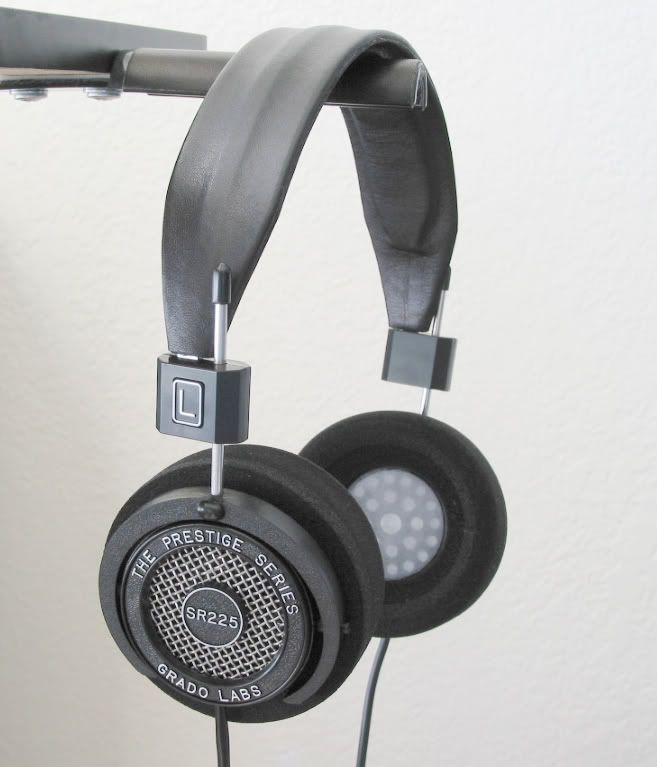
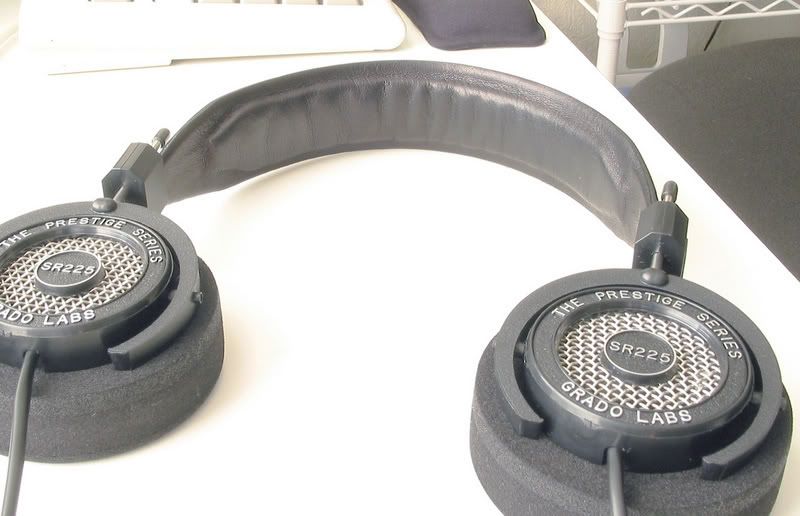
The leather headband turned out alot better than I anticipated. It looks (and smells) great and is quite comfortable. It makes my SR225 feel and look less like a cheap plastic toy. The headband actually looks better and is of higher quality than the one that came on my MS-Pro.
Addendum...
I stressed-tested one of my DIY headbands by twisting it like a pretzel and jamming a screwdriver into it to rip it apart...
http://i35.photobucket.com/albums/d1...9/IMG_3097.jpg
Here is a pic after I straightened it out...
http://i35.photobucket.com/albums/d1...9/IMG_3098.jpg
As you can see, despite looking tattered, it held together very well and was very much still usable. Therefore, the construction of my headbands should hold up well under normal use despite the lack of stitching.
MATERIALS
- leather: I used lambskin which I got on eBay (search for “lambskin hide). Use (ultra)thin hide that is 1 to 1.5 oz. It is critical to use high quality leather that is relatively thin, soft, and "stretchable." If you use a thicker, stiffer, or non-stretchy leather (generally low quality hides), it will be impossible to smoothly wrap the leather around the frame as described in Step 3.
- thin cardboard: for use as the “frame." I used the back of a notepad. A cereal box will also work. I spray-glued together two layers (one was too flimsy; three was too thick)
- thick felt: for use as padding; I spray-glued together two 1/8" thick sheets to make 1/4" thick sheet
- masking tape: cut into narrow 1 inch strips; you will need a couple dozen strips
- contact cement: I used DAP brand
- superglue
- disposable single edge razor blade: use a fresh one for cleanest cuts
- very sharp scissors
- pen
- cutting board
PROCEDURE (to install my pre-made headbands, follow steps highlighted in BOLD)
Step 1: Separate plastic "block" from metal headband. You only need to this on one side, take your pick. Grab hold of headband assembly as pictured...
http://i35.photobucket.com/albums/d1...uy69/step1.jpg
Twist plastic block back and forth along the axis of metal headband. Start off with light twisting force and gradually increase force until you hear a cracking sound (yes, it's scary!). The glue bond should now be broken and you can pull out the metal headband from the block. If not, twist some more or work on the other side as it may not be glued as tightly. Slide off the vinyl headband.
Step 2: Use vinyl headband as a template to cut cardboard "frame"...
http://i35.photobucket.com/albums/d1...uy69/step2.jpg
You will need to slightly shorten and taper the ends of the frame after cutting. Test fit frame onto metal headband to be sure of correct length. Also, draw a centerline bisecting the frame.
Step 3: Cut two pieces of leather larger than frame (only one is shown in the pic; other leather piece will be used later)...
http://i35.photobucket.com/albums/d1...9/IMG_3071.jpg
Wrap leather piece around frame and secure edges with tape. This step is VERY time consuming (may take over an hour). It involves alot of retaping, trimming, and stretching to get the leather edges to join (not overlap) cleanly in the middle while wrapping smoothly and evenly along the length of the frame. If you used a thicker and/or non-stretchy leather, this will be impossible to do. Use the centerline as guide to join the two edges of leather. Once taping is done, firmly press down along the tape line to smooth things out and get max adhesion. Here is how it should look if done correctly...
http://i35.photobucket.com/albums/d1...uy69/step4.jpg
Step 4: Make felt padding; it should be around 1/8" narrower than frame on both sides and tapered on both ends
http://i35.photobucket.com/albums/d1...9/IMG_3088.jpg
Step 5: Apply liberal amount of contact cement to entire side of headband that has the tape (use two thick coats)...
http://i35.photobucket.com/albums/d1...9/IMG_3064.jpg
Step 6: Stick on felt padding...
http://i35.photobucket.com/albums/d1...9/IMG_3065.jpg
Step 7: Lay other piece of leather over felt and FIRMLY squeeze together the leather pieces...
http://i35.photobucket.com/albums/d1...IMG_3069-1.jpg
Here is how it should look when finished...
http://i35.photobucket.com/albums/d1...9/IMG_3070.jpg
Step 8: Trim off excess leather with razor blade, being careful not to nick wrapped edges!
http://i35.photobucket.com/albums/d1...uy69/step8.jpg
Use one continuous cutting motion for smoothest cuts. Seal edges (not the ends!) of headband with cement by using a screwdriver to dab small amounts of cement between the two layers of leather and squeezing them together. Allow cement to dry for several hours.
Step 9: Gently pre-bend headband into curve before installation...
http://i35.photobucket.com/albums/d1...uy69/step9.jpg
Step 10: SLOWLY and GENTLY slide metal headband through "upper" side of frame exactly as pictured...
http://i35.photobucket.com/albums/d1...9/step9a-1.jpg
Be careful not to stretch the leather as you do this. Metal headband should run down center of leather headband.
<<<DO NOT slide the metal band through the "bottom" or padded side of frame as this will tear through the taped edges and felt padding!>>>
Step 11: Reattach plastic block. Check for fitment. There should be little to no gap between ends of headband and each plastic "L" and "R" block. If too long, slide off headband and trim down ends. Once fitment is correct, superglue end of metal headband and reinsert into the block. Once superglued, you will no longer be able to pull it apart ever again! You may want to use a less permanent adhesive (e.g. hot glue).
RESULTS
The leather headband turned out alot better than I anticipated. It looks (and smells) great and is quite comfortable. It makes my SR225 feel and look less like a cheap plastic toy. The headband actually looks better and is of higher quality than the one that came on my MS-Pro.
Addendum...
I stressed-tested one of my DIY headbands by twisting it like a pretzel and jamming a screwdriver into it to rip it apart...
http://i35.photobucket.com/albums/d1...9/IMG_3097.jpg
Here is a pic after I straightened it out...
http://i35.photobucket.com/albums/d1...9/IMG_3098.jpg
As you can see, despite looking tattered, it held together very well and was very much still usable. Therefore, the construction of my headbands should hold up well under normal use despite the lack of stitching.


