


JamesMcProgger
Headphoneus Supremus
- Joined
- Oct 8, 2010
- Posts
- 6,552
- Likes
- 189
mouse6nelson, is that cup one piece including the part that holds the driver? looks very pro. me wants

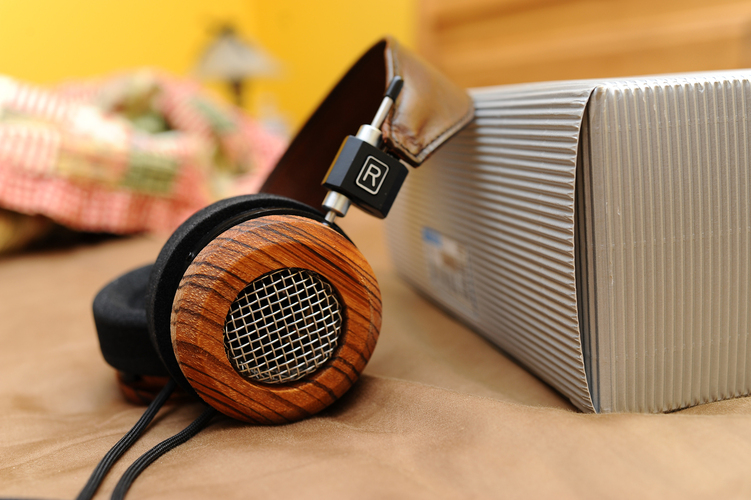
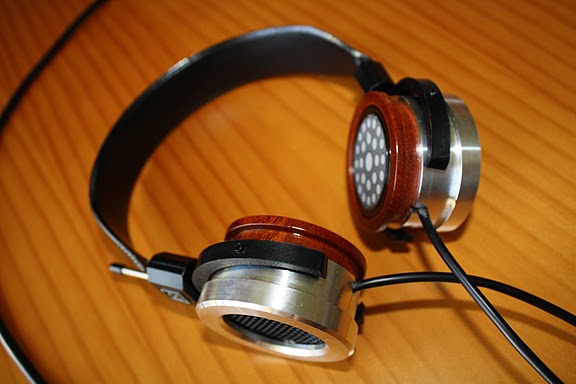
My new cups, one set is Sapele, one is Walnut and the other is Beech
Those are awesome Mouse. I'm picking up some cups I had lathed out of African Blackwood today. In retrospect I should have gone with a one piece design rather than have them fabricate separate driver housings out of African Mahogany. The more I think about it that may have been a better way to go after seeing your pics and the Techermod ones. Ultimately though the two piece design should both look and sound awesome (I hope). Anyway props on your beautiful cups.
You know.... It does seem to make more sense to just make them one piece.

Originally Posted by JamesMcProgger /img/forum/go_quote.gif
Originally Posted by chrislangley4253 /img/forum/go_quote.gif
You know.... It does seem to make more sense to just make them one piece.
but there are some of us (or only me) who wouldnt be excited at the idea of cut the cable, specially from the drivers.. (poor solder hability) the two cups allow us to leave the cable in peace
one cup look sleek and solid though
but there are some of us (or only me) who wouldnt be excited at the idea of cut the cable, specially from the drivers.. (poor solder hability) the two cups allow us to leave the cable in peace
one cup look sleek and solid though
")
but there are some of us (or only me) who wouldnt be excited at the idea of cut the cable, specially from the drivers.. (poor solder hability) the two cups allow us to leave the cable in peace
one cup look sleek and solid though
Unfortunately that's not the case. Both designs require the driver to be partially liberated from the plastic housings they are currently in. Which means the cable has to be terminated and resoldered. Not only that the procedure to partially liberate the drivers from their existing housing requires a knife and hammer. You ready to take a knife and a hammer to your Grado's?
the cable doesn't have to be removed to partially liberate the drivers. Unless I'm misinterpreting what you are saying. Also, don't make partial liberation seem so scary, there is a pretty slim chance of you messing up anything but the inner shell. The driver stays pretty safe in its plastic.
Edit - I guess i shouldn't claim that.. I haven't partially liberated any drivers, but it doesn't seem scary to me.
You are quite right, I am not planning on removing the cable when I partially liberate mine. And I have done a partial liberation once before for kicks on a spoilt driver, there is actually quite a high chance of messing up the driver as a lot of force is needed to separate the driver from its shell - for some reason Grado's superglue there is insanely strong. Am still wondering how to do it as the last time was painful, messy and tedious. And I cannot possibly imagine going through the same process with cables still attached to the driver.
Unfortunately that's not the case. Both designs require the driver to be partially liberated from the plastic housings they are currently in. Which means the cable has to be terminated and resoldered. Not only that the procedure to partially liberate the drivers from their existing housing requires a knife and hammer. You ready to take a knife and a hammer to your Grado's?

the cable doesn't have to be removed to partially liberate the drivers. Unless I'm misinterpreting what you are saying. Also, don't make partial liberation seem so scary, there is a pretty slim chance of you messing up anything but the inner shell. The driver stays pretty safe in its plastic.
Edit - I guess i shouldn't claim that.. I haven't partially liberated any drivers, but it doesn't seem scary to me.
You are quite right, I am not planning on removing the cable when I partially liberate mine. And I have done a partial liberation once before for kicks on a spoilt driver, there is actually quite a high chance of messing up the driver as a lot of force is needed to separate the driver from its shell - for some reason Grado's superglue there is insanely strong. Am still wondering how to do it as the last time was painful, messy and tedious. And I cannot possibly imagine going through the same process with cables still attached to the driver.
ready!!!
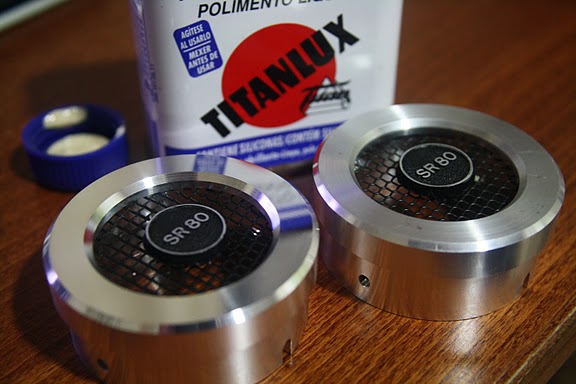
Let me clarify what I consider partial liberation. Bill has a video on how to do this, unfortunately I didnt book mark it. The gist of the video though is with magnet side down and cloth side up take a knife (I used a pearing knife) and tap it into the groove between the driver and the housing working your way around until the driver separates from the plastic housing. It's actually pretty easy and no real danger to the driver if separated with this method. I think full liberation is a hairier process and is a road I dont want to travel.
The reason you will need to terminate the cable at some point is to feed the L/R portion of the cable through the new ear piece. The only way I can think of getting away with not desoldering and resoldering the cable is to leave the driver in the existing driver housing and just insert that assembly into the cup. That's essentially what I did with the Cocobolo cups I got from Bill. Heat up the SR60's with a hair dryer, separate the two pieces, slide the driver assembly into the new wood cup. with partial liberation you are going a step further.
If it's any consolation desoldering and soldering is pretty easy. I recabled my Porta Pro's for practice with the 4 braided silver I had on my SR60. I had my struggles but it wasnt rocket science. I'll have my soldering gun out again soon enough to install my new cups.
I modified my set of SR 80's with the hole punch mod ( I originally punched all of them but then had to cover them up now i have 5 holes), the grill cloth mod, the felt around the chamber and some bluetack over the driver. Awesome results- More Bass, better HF clarity and a larger soundstage. The only issue I am having now is an overabundance of sibilance which I cannot seem to tame. Anyone have the same issue?
