Ripping CDs in X-App
This is for those who might use X-App but can't read the Japanese. I have language packs from Windows installed, so the pics below may look different from your screens.
http://windows.microsoft.com/en-us/windows/downloads/languages if interested in such packs.
The first shot shows the CD Import viewport. It will pop up when a CD is inserted. It can also be selected by choosing it from the column of viewports on the left edge of the screen. Pick the box with the CD icon, shown here highlighted in yellow.


Here, X-App has already read info off the CD and found album art. If if finds multiple art choices, a box will pop up listing available CD titles as in the next shot. In that case, highlight the desired choice & click the middle button to accept-the left button would make a new Gracenote rule (I think) and the right button is cancel.
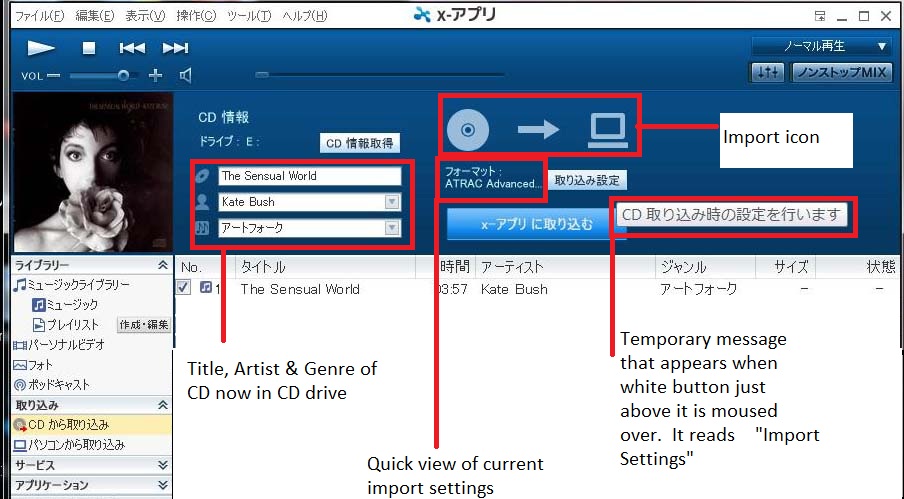
The shot on the left below identifies various parts of the CD Import viewport boxed in red.

At this point you can edit the title, artist, or genre of the CD, but this can be done at any time later. If no artwork is displayed or you wish to change it and have an image available, go to where the artwork (in this case, Kate Bush's photo) is shown and right click. Top options (S) let you browse to your saved image and bottom (P) plays the CD. I don't know why there are 2 (S) choices (jacket and artist pictures).
To choose the format to rip to, click the Import Settings button as pointed to in the next shot on the left. That menu can also be found as option (O) in the Tools menu shown in the shot below right.


There are lots of settings that can be made from this port. Ensure that you are in the CD Import Settings by highlighting the 3rd item on the left column as shown below. If you are in the right place, you should see ATRAC in at least a couple spots on the right side as below.

The options on the right from top to bottom are
(D) choose CD drive if you have more than 1
Then the capture & playback section
(P) Auto play inserted CD
(I) Auto import of inserted CD
(T) Auto play and import of CD (for ATRAC only)
(N) Do Nothing on CD insertion
Then options at end of rip
(L) Play CD while importing after start import button pushed (ATRAC only)
(E) Eject CD when import done
Format & Bit rate settings are drop down boxes & not in Japanese
(M) chooses priority for speed or quality but don' show up as any recognizable language-my guess is that the longer gibberish is for better quality.
Then choose OK (left), cancel (middle) or (H) Help (right, & you're on your own there!)
That window will close, then click the large blue button to start import. Once started, the percentage completed will be displayed at the bottom edge of X-App. Immediately to the right of the percentage is a white suspend/cancel button.
Is this stuff helping anyone out there?
Is this very similar to SonicStage?


")


