


I completed the mods

")

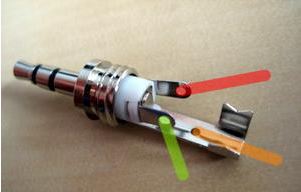
( front material removal, resistor removal & balanced rewiring), and that certainly elevated the unit to erradicate the lack of clarity, and increase the image size.
Also,
I have to say out of all the pads I tried, the Audeze had the most realistic, detailed sound, and excitement, and balanced large size.
The Dekoni ferenstrated pads was second best, having a bit more distanced stage and more relaxed top end.
Now I going to get some replacement stock pads.


 best purchase ever!


