Rewiring an ER-6i just aint that hard, folks. Pics enclosed.
Oct 28, 2013 at 3:25 PM Post #79 of 83
Just wanted to add my experience with a more quick and dirty rewire based on the info here.

My right channel had gone out. Having gotten 5 years of use out of my ER-6i's I was planning to just buy a new pair of headphones -- but being a fix-it kind of guy, looked up the possibility of repairing them myself, and found this thread.
 
I cut the original right channel cable shorter a bit shorter and re-soldered it to the contacts. I had sound at first, but noticed that once back in the casing it went out. A little playing around and I found that the sound worked when that flexible PCB was at certain angles, but not others. Eventually it no longer even did that, and I realized it was probably a crack in the flexible PCB as the original poster had problems with as well. I tested this by touching the two wires to the contacts that are higher up on the PCB (the non-flexible part under the clear plastic) while music was playing through the headphones (volume turned up). I got sound, so I knew it was the PCB. I had to melt away a bit of the clear plastic to get better access, as another user mentioned as well, then quickly soldered the wires onto each contact. Bang, working right channel again. 
 
Also, instead of ordering and using new heat shrink tubing, I simply put the old one back on (I was able to get it off without cutting all the way through when I removed it) and wrapped some clear Scotch tape tightly around it to secure it. Again, quick and dirty -- but it works.
 
This probably isn't as durable as what the original poster did, and I know I'll have to be gentle with them if I don't want to have to repeat the process. Although honestly, now that I know how easy it is, that wouldn't be such a big deal.
 
Also, I took the filters out and the headphones are definitely louder without them. Not that I needed them to be louder, but now I can play music at a lower volume on my mp3 player to save battery.
 
Best of luck to any others looking to do their own repairs.
 
Oct 30, 2017 at 2:34 AM Post #80 of 83
thanks to the OP ericj for the detailed info. i wasn't sure how these came apart. i'm really surprised that it's just heat shrink that makes up the outer "shell".

i replaced the plug on mine years ago (the angled part had split & separated), now the cable is starting to give way around the Y.

thinking about embedding these in those moldable silicone earplugs once cable is replaced.
 
Mar 18, 2021 at 11:16 AM Post #81 of 83
Sorry for the bump on this old thread, but like others posting, I wanted to express my thanks to the original poster on this long lived thread! I registered just so I could say thanks!

The cable going into the earpieces on my circa 2006 ER6i were just about severed with the insulation dry rotting and cracking. I rely on my ER6i on long distance touring on my motorcycle. They help keep me focused and reduce fatigue. I was dreading the cables breaking on my next long distance ride.

I had been debating getting new MK series, but they looked significantly bigger. The cable replacement was super easy other than the plastic outer white part had gotten brittle and cracked probably due to age. A little hot glue helped.
 
Feb 5, 2022 at 2:30 PM Post #82 of 83
I know this is an old thread, but I also want to thank the OP for this. After successfully completing an MMCX mod to a pair of Shure SCL4s that I had kept in my drawer for years after the wires started deteriorating by following this tutorial, I wanted to do the same to my ER-6i that had had the wiring fail. I couldn't figure it out how to open it safely, though, and since the wire issue seemed to be at the 3.5mm jack, I just ended up re-terminating a new jack and called it a day.

I stumbled on this thread and decided to give it a go again although I wasn't sure if the casing was large enough to fit an MMCX connector in. I had to order another set of female MMCX connectors since the pack I had used for the SCL4s would have been too tall to fit on the end. I manged to open the case using the instructions here then used a 7/64" drill bit to widen the hole where the wire enters the case by hand, soldered new wires to the MMCX connectors and the pad, and super-glued the MMCX connector to the widened hole that I had made. Before I glued, I checked that the wiring was correct by attaching a set of MMCX cables to confirm that the driver was working. A 3/32" bit might have been enough for the smaller connectors I bought while preserving more of the thickness of the casing to help prevent it from breaking from wear and tear, but it seems to be holding OK so far.

When I tried to pack the first one back together, the wires I had used were a bit too long, and as I was cramming it in there, I must have damaged the PCB. When I attached a cable to it again, it produced no sound. I trimmed off some wire and re-soldered, but I then experienced what others described with the sound coming through when the flimsy flap was at certain angles but not others. After playing around with it a bit, I noted (as others have) that if I touched the exposed wire to the set of solder points further in, music would play. Instead of melting the plastic to access it, I "pushed" a bit of solder to try to bridge the two solder points, and that seems to have worked without (purposely) damaging the casing. I used less wire to start with on the other earpiece, so that one worked with no trouble.

er6i-crop.jpg


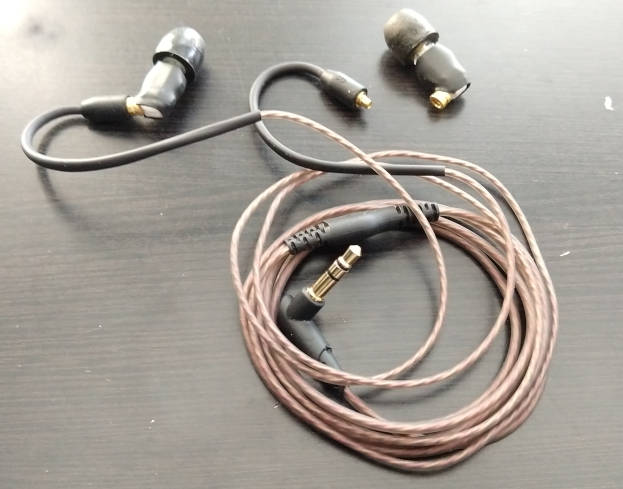
So now I have a pair of ER-6i (and SCL4/E4C!) with MMCX connectors so that the cable can be replaced or swapped out for one with volume controls, mic, Bluetooth, etc. If the cable becomes an issue again, I can keep replacing it as long as the drivers keep going. I'll get another straight (i.e. no ear hook / memory wire) cable eventually as I prefer that for the ER-6i.
 

Users who are viewing this thread

Back
Top