My DIY planar headphones (WIP)
Aug 2, 2020 at 7:41 PM Post #16 of 25
I mean honestly, I could try that D-shaped sorta thing that MrSpeakers has, I think that looks quite nice. The only reason I'm going with this rectangular design is because, well, the AR-H1s look amazing and I wanted to copy them. Well, not just carbon-copy, but it's influenced the design a whole bunch. If anything though, any ergonomic downfalls this design has can be helped with some custom earpads.

Also, just a mild update, I'll be trying proper branded toner transfer paper instead of the knock-off stuff that I bought on eBay, and if that doesn't work I'll be trying actual photoresist film. If I use the latter I'll be modifying my method of getting a flat film surface, instead of using paper I'll back it with an acrylic slab so I can apply all the liquids needed without fear of the film lifting off and wrinkling even more.
Lets call it an "homage". An homage can still be badass in the watch world. You can try with color variatons also
 
Aug 11, 2020 at 9:37 PM Post #17 of 25
Another mild update! So basically, I said I had bought some photoresist film and was wondering when it would arrive.. I found it in the saved section of my amazon basket. Oops! So now that has actually been ordered and will be arriving soon.

Instead, I chose to finally wire up the little Starving Student tube amplifier that I used to teach myself PCB design basics.
1597195528892.png

There is the schematic I used. It is basically just Dsavitsk's schematic but I moved some stuff around and added labels to make it look like I had actually done something useful.

1597195863479.png
1597195828844.png

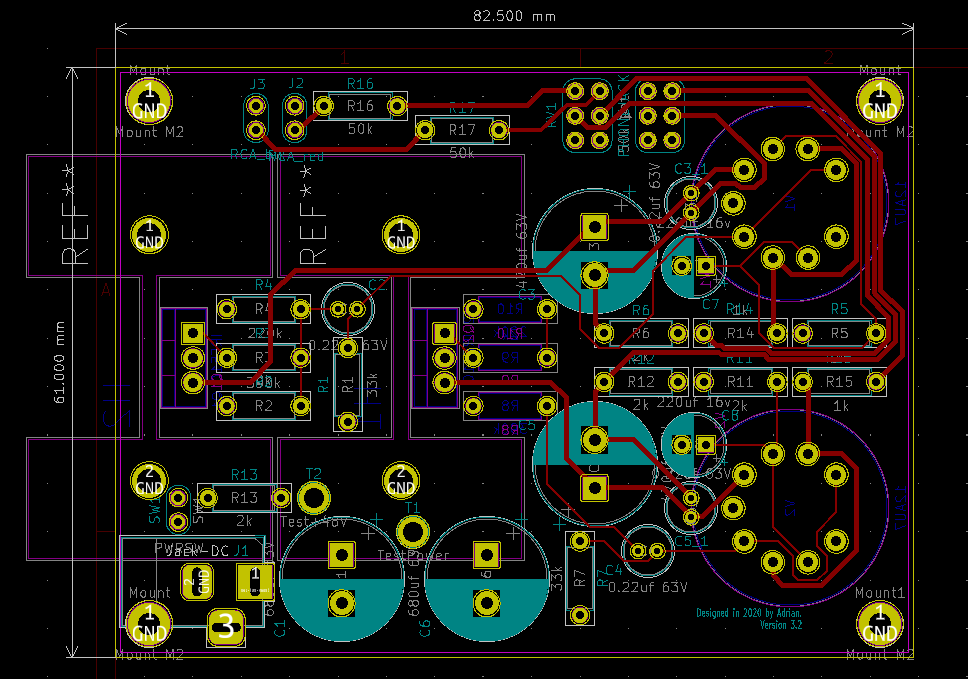
So I turned that schematic into that. I think it looks neat though I'm plenty sure I've made many mistakes. Too bad, I already have the boards.

1597195927021.png


I love oshpark's purple colour :smile: And since I already had all the components, I started to populate the board.

1597195996882.png
1597196063332.png

Tube sockets were next, as was the pot, the headphone jack, the barrel jack and a switch. Those I decided to use wires instead of directly mounting on the PCB to give me options when mounting the PCB and all that. When that was done, I did the first smoke test. Nothing exploded! Or so I thought. One of the MOSFETs had quit and that had resulted in the left channel just not working and all that. (Also in the picture you'll notice I wired the pot wrong. That was a quick fix). So, now I'm waiting for a new set of MOSFETs because I foolishly didn't order spares as well.

The headphones are still being worked on! Just.. Slowly. Need to get the photoresist film and make that work with the mylar film, then I need to figure out etching and all that. Hopefully that works. If not, well, maybe I'll just try drawing out my coils! In the meantime, I think I can also work on making my KSC75s have a detachable cable and, well, making cables for that. Maybe I could do the same for my K612 Pros! But, I think I shouldn't bite off more than I can chew.
 
Aug 12, 2020 at 3:54 PM Post #19 of 25
The headphones are still being worked on! Just.. Slowly. Need to get the photoresist film and make that work with the mylar film, then I need to figure out etching and all that. Hopefully that works

If the mylar is coated, you may be able to get away with electrolytic etching

a few zap zaps at 100 or so watts via salt solution can etch a few microns in no time ⚡
 
Last edited:
Aug 12, 2020 at 10:48 PM Post #20 of 25
If the mylar is coated, you may be able to get away with electrolytic etching

a few zap zaps at 100 or so watts via salt solution can etch a few microns in no time ⚡
Yeah, it is an aluminised mylar. I think I'm going to try regular ferric chloride etching first - I don't see why that wouldn't work. But this could be a cool science experiment on the side! The trouble right now is getting a functional etch resist on the film itself.
 
Aug 31, 2020 at 2:15 PM Post #21 of 25
Sorry for the lack of activity! Going to be moving house soon for uni things, so that's been going on. And also I finished up the little Starving Student amp - it works wonderfully!
For now though, goals are going to be attempt to make the drivers a few more times with various methods and hope for the best.
 
Feb 26, 2021 at 2:04 AM Post #22 of 25
any more progress ?
 
Jul 1, 2021 at 10:27 AM Post #24 of 25
Hello, i do have kind the same problem to etching the mylar, the best choice for you could be using a 3d printer plotter, where you put a permanet pen in the place of the hot end, convert your drawning to 3d object and put as a single layer in the printer, my friend from Netherlands try it and worked, but you may need to try various type of pen.


Users who are viewing this thread

Back
Top