L0rdGwyn's DIY Audio
Feb 21, 2020 at 12:37 PM Post #121 of 6,804
Moving right along...

Started putting together the power supply yesterday evening. Rather than freezing my a$$ off in my garage (20F outside), I wired what I could indoors without soldering and made all of the necessary preparations for the morning. Got up at the crack of dawn too excited to keep sleeping, and went out to get to work.

Well no doubt my work last night shaved off a huge chunk of time, still took me a solid four hours! But lo and behold, the power supply is working perfectly :ksc75smile:

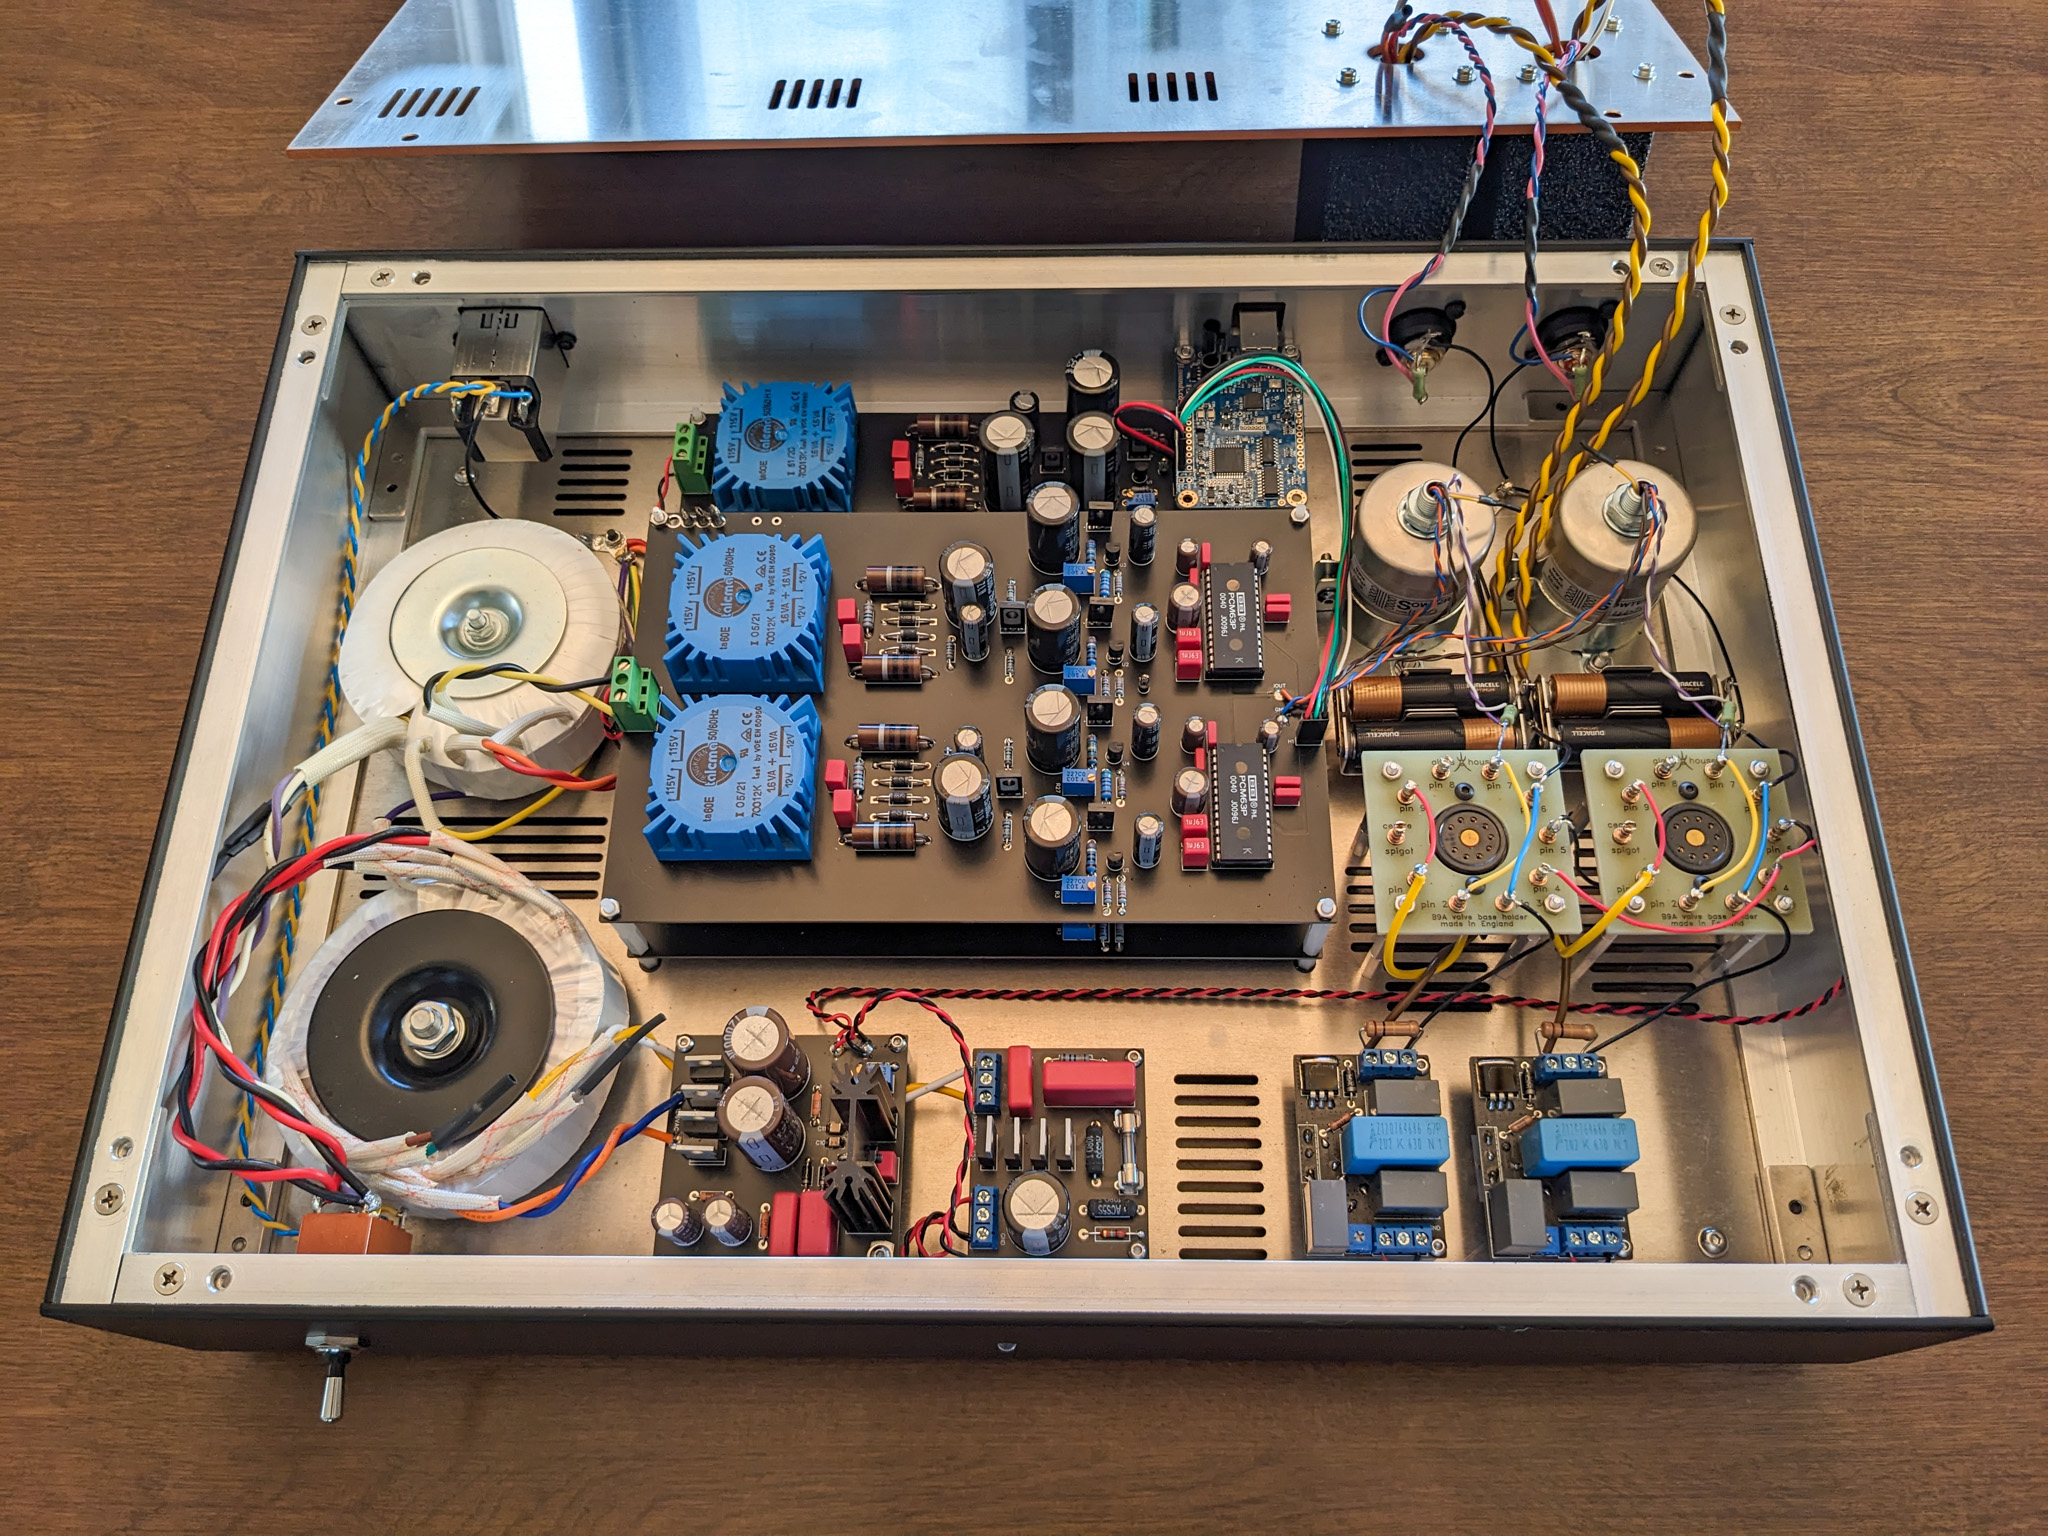
Here is the interior post power supply implementation. I also cleaned things up a bit, I'm a bit of a perfectionist (which means making work where there really is none).

IMAG1856.jpg

Here is a closer look at the completed rectifier socket. You can see a pair of Vishay HEXFRED diodes have been added to complete the hybrid SS-tube full-wave bridge rectifier. The red wiring is the HT or B+ AC from the mains transformer. The resistor across the terminals of the 10uF resevoir cap is a bleeder to discharge the capacitors when the amp is turned off. I knew it was going to be busy, hopefully I never need to change anything on this socket, I will cry.

IMAG1858.jpg

Up in the corner near the IEC outlet are two pairs of wirewound resistors. These are serving a few different purposes in the power supply, but mainly they drop the ~420V B+ that is being sent to the driver tube CCS boards down to ~315V for the output tubes. The tradeoff of course is heat, but they are appropriately rated and are tucked away as far as possible from the caps. The values may need to be adjusted in the final design to dial in the output tube B+. We'll see how good my math was when the amp is complete and the final voltages are checked.

IMAG1860.jpg

In the meantime, to ensure everything was functioning as intended I picked up a pair of 5kohm 50W resistors to act as dummy loads for the supply. They approximate the load it will see from the tubes, and they are doing it quite well!

In this photo, I have one multimeter connected to each channel, getting near perfectly matched voltages. This is with the Mullard FW4-500, 320.5V for the output tubes. With the Marconi-Osram U18/20, seeing ~315V, and with the Fivre 5Z3 ~305. Will have to keep the large voltage drop in mind when using the 5Z3 in this amp. I am aiming for 315V B+ for the output tubes which results in 250V on the plates. These resistors may have approximated my tube load better than I expected.

I also measured the B+ off the 100uF cap at ~430V, which will be sent to the driver CCS boards.

IMAG1852-2.jpg

So there you have it, power supply done. Very satisfying to have done so much planning and have everything going off without a hitch.

We are rounding the corner now, this amp is very close to being done. Just need to do the signal wiring, which is relatively simple, then wait for these output transformers to arrive from Sweden :) the amp is getting heavier and heavier, it is going to be an absolute beast when the OPTs are in.
 
Last edited:
Feb 21, 2020 at 2:15 PM Post #124 of 6,804
Beautiful work. Really impressed!

Thanks, Chris :)

One of my favorite threads on headfi

Wow, I'm flattered! Glad it has been entertaining. When the amp is done I plan to do a series of measurements too: FFT, Bode plot, THD vs. frequency, square wave, etc., so hopefully I will still have something interesting to post about when it is finished.

In other news, today I received a final power tube to round out my collection, the French-made Visseaux 6A5G. Other than Sylvania, Visseaux was the only other manufacturer of this tube, likely under Sylvania licensing, as I've mentioned before.

I am hoping the Sylvanias sound better, these were not cheap, but if my previous experience with Visseaux is any indicator, that will not be the case. My poor wallet...beautiful tubes though.

IMAG1861.jpg IMAG1865.jpg IMAG1866.jpg
 
Feb 22, 2020 at 5:36 PM Post #125 of 6,804
Alright, yet another update. Once I get started on this stuff, I can't stop until the job is done! This amp is now 90% complete.

Worked on the input wiring today as well as the tube sockets. Here is the updated interior:

IMAG1870.jpg

First, the inputs. The wiring is shielded 24 AWG silver-plated copper. I soldered ground wires to each individual shield so they could be grounded at one end. This will reduce the liklihood of any hum on this low-signal wiring and reduce the noise floor of the amp (in theory). I keep saying this project is going to get easier, I think it will be easy when it is done :beyersmile: every step has its challenges.

IMAG1873.jpg IMAG1875.jpg

Next I did the driver tube sockets. Because they are CCS loaded, the cathode resistor does not necessarily need to be bypassed, so these simply have a cathode resistor. It is the big blue one, a fancy schmancy Riken carbon film (now discontinued), surely these will take the amp over-the-top :) who knows, but they sure look nice! I've also used Riken for the set resistors on the CCS boards. 100ohm grid stopper resistors are Allen Bradley carbon composition, 470kohm grid leak are Kiwame carbon film. I've said it before, but the coupling caps are Miflex KPCU-02 poly/paper in oil.

IMAG1872.jpg

And last but not least, the output sockets. Man space was tight, getting these parts in was a PITA, but we made it work. Cathode resistor is a 750ohm Kiwame carbon film and the bypass caps are Audio Note Kaisei non-polar. Grid stopper and grid leak resistors are the same as the driver sockets.

IMAG1874.jpg

Now all that is left on this amp is the output wiring. I may save it all for when the output transformers arrive in about a week (it is going to be a long week), we will see. I will be going out of town for a short vacation next weekend, so the amp may not be done until the first week of March, assuming the transformers arrive by then.

By the way, I don't think I ever showed the rear panel I/O. Here it is, German WBT RCA sockets, WBT binding posts. The switch on the left is a Goldpoint to change from speaker to headphone output.

IMAG1877.jpg

Okay, might be all I have for a week or more, sure hope these transformers get here soon, I'll try not to think about it every...waking...moment...:L3000:
 
Last edited:
Feb 23, 2020 at 4:06 PM Post #126 of 6,804
I guess when I said "might be all I have for a week", I lied. Just one more thing! I decided I would knock out the output wiring, I would be very sad to have to do it when the transformers arrive. I want to be able to just wire them up and go.

Another interior photo, this is pretty much what the end result will look like, just a few extra wires run from the output tubes/130uF caps to the OPTs, then back in to the Goldpoint switch.

IMAG1892-2.jpg

Here is the switch wiring in the back corner. Looks complicated but it is very simple. The OPT leads will connect to the "common" connection points of each switch pole, then two outputs to the headphone jacks and speaker binding posts. The headphone jacks and negative binding posts are grounded, such that the transformer secondary is grounded in case of a primary to secondary short. Trying my best not to kill anyone here :ksc75smile: I will also have some 470ohm resistors across the OPT secondaries to protect the transformers from open circuits.

IMAG1882.jpg

Here is the headphone out wiring. The 4-pin XLR and TRS jacks are wired in parallel. What are those Kiwame resistors? They are similar to a resistor network that would be implemented to use headphones on a speaker amplifier. They are in parallel with the headphone drivers. Why do this? The output transformers will then essentially see the same (or very similar) load at all times no matter what impedance headphone is plugged in. 9.1ohm in parallel with my 300ohm ZMFs = 8.9ohm load on the transformer, which will translate to ~3700ohm load for the output tubes (the transformers will be wired for a 3300ohm primary and 8ohm secondary). I may play around with different values, a higher load will translate to less distortion, less power as well, but this amp will already be way overkill for headphones power-wise, so upping the resistance may improve the sound a bit.

IMAG1883.jpg

Here is a bonus photo of some tubes that will be used in this amp: Mullard FW4/500 rectifier, Philips E424N drivers, and Visseaux 6A5G powers. My cat Freddy decided to jump in the pic, he can't believe it's almost done either.

IMAG1886.jpg

Okay, that is really it until the transformers get here, should be very simple to put them in when they do, then I can get right to some quick confirmatory measurements, then hopefully get listening :)
 
Last edited:
Mar 8, 2020 at 10:32 AM Post #127 of 6,804
Still no sign of the LL1620 OPTs. To keep from going mad (or a sign of descent into madness?) I've been working on another design. I started it just to keep busy, but it looks like it is likely going to happen.

In light of adding new projects, as well as the measurements I plan to publish, I've repurposed this thread and renamed it. Rather than having multiple threads, I am just going to continue this one with other tube audio projects I pursue. You've been warned!

Anyhow, it is premature to post the schematics and whatnot, but the new amp I am working on will be a 6J5 input 45 output parafeed design. For those unfamiliar, parafeed is a variation of a single-ended output amplifier. It is still class A1, the major difference is the AC and DC components of the output stage are separated.

In a typical SET design, the output tube DC plate current must pass through the primary winding of the output transformer. In order to prevent core saturation of the OPTs, it must have an air gap, which lowers the inductance of the transformer, which means poor low frequency response. This necessitates very large OPTs for single-ended designs.

In parafeed (AKA parallel feed), the DC plate load for the output tube is provided by either a plate choke (a more conventional parafeed design), or a constant current source. The AC output of the tube is coupled to the output transformer via a capacitor, typically a high-quality film capacitor given it is directly in the signal path. Here are some diagrams from Tube CAD showing each.

https://www.tubecad.com/2014/09/blog0308.htm

Conventional single-ended triode output:

SET.png

Parafeed output (this design is plate choke loaded, as opposed to CCS):

Parafeed.png

Another note on the parafeed schematic above: the grounded end of the OPT is connected to the cathode of the output tube. This wiring is known as "ultrafeed", the advantage here as I understand it is the cathode is seeing the AC signal from the input loop and output loop in equal magnitude but opposite phase. The current is then cancelled, preventing cathode degeneration and the need for a cathode resistor bypass capacitor (although Tube CAD has still drawn the capacitor here). Spice model agrees, one less electrolytic in the signal path.

So why use a CCS loaded parafeed over single-ended output? Here are some of the advantages:
  • Can use an ungapped output transformer, meaning higher inductance, better low-end frequency response, and smaller
  • High power supply rejection ratio (i.e., rejection of power supply noise/hum)
  • Power supply capacitor is no longer in the signal path > smaller, easier to design power supply! :)
  • The subsonic LC resonance of the parafeed capacitor and OPT primary inductance is sometimes used to "tune" and optimize the low end frequency extension
Here are some disadvantages:
  • Additional capacitor in signal path - quality is key for good sound - giant, expensive film capacitors
  • For CCS loading - inefficient power supply, given more than twice the plate voltage is necessary to get full peak-to-peak swing out of the power tube (this is less of an issue with plate choke loading, as the choke can supply additional voltage via inductance)
So anyway, my plan as of right now is to build a CCS loaded 6J5 input, CCS loaded 45 output parafeed headphone amp. Currently working on schematic drafts, optimizing my Spice model, drafting chassis layout, etc. etc. but I will just leave it there for now as it is all subject to change.

Obviously I am still learning about this topology and compiling resources, so @Tjj226 Angel or anyone else, if I have mispoken on any part, please feel free to correct me.

The wait continues...
 
Last edited:
Mar 10, 2020 at 9:10 AM Post #128 of 6,804
I guess when I said "might be all I have for a week", I lied. Just one more thing! I decided I would knock out the output wiring, I would be very sad to have to do it when the transformers arrive. I want to be able to just wire them up and go.

Another interior photo, this is pretty much what the end result will look like, just a few extra wires run from the output tubes/130uF caps to the OPTs, then back in to the Goldpoint switch.

IMAG1892-2.jpg

Here is the switch wiring in the back corner. Looks complicated but it is very simple. The OPT leads will connect to the "common" connection points of each switch pole, then two outputs to the headphone jacks and speaker binding posts. The headphone jacks and negative binding posts are grounded, such that the transformer secondary is grounded in case of a primary to secondary short. Trying my best not to kill anyone here :ksc75smile: I will also have some 470ohm resistors across the OPT secondaries to protect the transformers from open circuits.

IMAG1882.jpg

Here is the headphone out wiring. The 4-pin XLR and TRS jacks are wired in parallel. What are those Kiwame resistors? They are similar to a resistor network that would be implemented to use headphones on a speaker amplifier. They are in parallel with the headphone drivers. Why do this? The output transformers will then essentially see the same (or very similar) load at all times no matter what impedance headphone is plugged in. 9.1ohm in parallel with my 300ohm ZMFs = 8.9ohm load on the transformer, which will translate to ~3700ohm load for the output tubes (the transformers will be wired for a 3300ohm primary and 8ohm secondary). I may play around with different values, a higher load will translate to less distortion, less power as well, but this amp will already be way overkill for headphones power-wise, so upping the resistance may improve the sound a bit.

IMAG1883.jpg

Here is a bonus photo of some tubes that will be used in this amp: Mullard FW4/500 rectifier, Philips E424N drivers, and Visseaux 6A5G powers. My cat Freddy decided to jump in the pic, he can't believe it's almost done either.

IMAG1886.jpg

Okay, that is really it until the transformers get here, should be very simple to put them in when they do, then I can get right to some quick confirmatory measurements, then hopefully get listening :)
really looks nice Kenan
 
Mar 10, 2020 at 9:32 AM Post #129 of 6,804
Thanks, Joe! Still on OPT watch, getting pretty antsy...already have had some "hmm, maybe I should have done XYZ thing differently" thoughts, but hey, it's the first one, probably should give myself some leeway. I'll update here when the transformers arrive, really hoping by this weekend.
 
Mar 10, 2020 at 12:03 PM Post #130 of 6,804
The Lundahl transformers were the parts I had to wait the longest for when Mischa was building the V6 "Thunder".
 
Mar 10, 2020 at 12:16 PM Post #131 of 6,804
Yeah end of Feb came and went, but nothing to do but wait it out. Been keeping busy working on this other design. Parafeed has many quirks, there is always more to learn. I'm compiling a trove of online DIY tube resources as I go too, realized when I was looking up the same resources a dozen times I should probably start keeping track of this stuff.

Maybe I will publish a DIY tube resources page here on Head-Fi if one doesn't already exist, I haven't checked. Much of this information is very scattered, you may find a diyAudio thread from 2005 with a link to a white paper for the exact question you are trying to answer and...the webpage no longer exists. I feel like I need to preserve this stuff LOL what happens if some of this knowledge is lost?! Maybe I'm crazy, it probably isn't an issue for electrical engineers, but I'm going to keep my own archive at least.
 
Last edited:
Mar 10, 2020 at 1:20 PM Post #132 of 6,804
Yeah end of Feb came and went, but nothing to do but wait it out. Been keeping busy working on this other design. Parafeed has many quirks, there is always more to learn. I'm compiling a trove of online DIY tube resources as I go too, realized when I was looking up the same resources a dozen times I should probably start keeping track of this stuff.

Maybe I will publish a DIY tube resources page here on Head-Fi if one doesn't already exist, I haven't checked. Much of this information is very scattered, you may find a diyAudio thread from 2005 with a link to a white paper for the exact question you are trying to answer and...the webpage no longer exists. I feel like I need to preserve this stuff LOL what happens if some of this knowledge is lost?! Maybe I'm crazy, it probably isn't an issue for electrical engineers, but I'm going to keep my own archive at least.

Have you been in contact with Kevin? If so, has he been in contact with lundahl?
 
Mar 10, 2020 at 1:58 PM Post #133 of 6,804
Maybe I will publish a DIY tube resources page here on Head-Fi if one doesn't already exist, I haven't checked. Much of this information is very scattered, you may find a diyAudio thread from 2005 with a link to a white paper for the exact question you are trying to answer and...the webpage no longer exists. I feel like I need to preserve this stuff LOL what happens if some of this knowledge is lost?! Maybe I'm crazy, it probably isn't an issue for electrical engineers, but I'm going to keep my own archive at least.

If you're looking for an old webpage that is no longer hosted, plug it into the WaybackMachine here to see cached pages going back many years: https://archive.org/
 
Mar 10, 2020 at 2:08 PM Post #134 of 6,804
Have you been in contact with Kevin? If so, has he been in contact with lundahl?

I exchanged emails with him a little over a week ago letting him know I would be out of town last week, followed up when I returned and also emailed on something unrelated yesterday, haven't heard back. I assume he hasn't received them yet, maybe a hold up I customs? If they aren't stateside by this weekend, I may have to start bothering him more aggressively.

If you're looking for an old webpage that is no longer hosted, plug it into the WaybackMachine here to see cached pages going back many years: https://archive.org/

Hey thanks! I'll have to seek out the pages I couldn't access again and see if it works :) another issue I have come across is old photos containing schematics/diagrams/etc. no longer being hosted, making the written information more or less useless.
 
Last edited:
Mar 10, 2020 at 2:33 PM Post #135 of 6,804
I exchanged emails with him a little over a week ago letting him know I would be out of town last week, followed up when I returned and also emailed on something unrelated yesterday, haven't heard back. I assume he hasn't received them yet, maybe a hold up I customs? If they aren't stateside by this weekend, I may have to start bothering him more aggressively.


Hey thanks! I'll have to seek out the pages I couldn't access again and see if it works :) another issue I have come across is old photos containing schematics/diagrams/etc. no longer being hosted, making the written information more or less useless.

Im wondering if there isn't a supply chain issue on lundahls side of things. The whole world right now is a bit bottle necked.
 

Users who are viewing this thread

Back
Top