


This video shows the golden "lip" on the driver. The question is how this adapter is attached to the inside of the driver. It can be seen that covers the back tuning holes.Maybe, could be the adapter is for extra security but the lip may still hold. Depending on the cover.
Worst case 3-4 dots of e8000 glue would also do the job and still be easily removable.
You are using an out of date browser. It may not display this or other websites correctly.
You should upgrade or use an alternative browser.
You should upgrade or use an alternative browser.
DIY Earbuds
- Thread starter gwompki
- Start date
assassin10000
Headphoneus Supremus
This video shows the golden "lip" on the driver. The question is how this adapter is attached to the inside of the driver. It can be seen that covers the back tuning holes.
Yeah, the problem is that is a rendering and is probably not 100% true to the actual product. So it's tough to really say.
In other news I couldn't resist anymore and ordered those 14.8mm 120Ω beryllium drivers.
Themilkman46290
1000+ Head-Fier
Yeah, that's what I was talking about, the adapter is made for 15.4mm but the housing looks like it's considerably smaller..This video shows the golden "lip" on the driver. The question is how this adapter is attached to the inside of the driver. It can be seen that covers the back tuning holes.
I am sure it can be glued but that would change the amount of inner space, it may put the driver too close to the tuning baffle or cover the driver holes, or eliminate the space needed to mount the driver itself..
But if anyone tries it, I am sure we are fairly curious
I was thinking to destroy one driver and mount some of my favorite 400ohms in it, but me and the wife are doing renovations so who knows if and when I might try (so far I have been boycotting Ali express, I am mad at the rich, pangolin and bat eating Chinese "upper class" for the economic and health crisis around the world, not to mention the late hungry panda)
Anyway, it's an interesting solution for sure. Currently, I’m more attracted to ISN Audio Rambo 2
assassin10000
Headphoneus Supremus
Of course 2 days after I order another pair of drivers, mostly due to my impatience, these show up.

Gotta make/modify some shells and try them out.

Gotta make/modify some shells and try them out.
Last edited:
assassin10000
Headphoneus Supremus
Whoops. Forgot I had pre-made some shells, with connectors and leads ready to go.

14.8mm 40Ω Titanium 'bass' drivers.
Initial impressions (<15 minutes play time): a bassy, warmer sound signature with some mid-bass punchiness. Mids & highs are a half step back compared to the low end. Reminds me of the K's LBB to some degree. Time for some burn-in.

14.8mm 40Ω Titanium 'bass' drivers.
Initial impressions (<15 minutes play time): a bassy, warmer sound signature with some mid-bass punchiness. Mids & highs are a half step back compared to the low end. Reminds me of the K's LBB to some degree. Time for some burn-in.
Last edited:
Keep us updated on this speakerWhoops. Forgot I had pre-made some shells, with connectors and leads ready to go.
14.8mm 40Ω Titanium 'bass' drivers.
Initial impressions (<15 minutes play time): a bassy, warmer sound signature with some mid-bass punchiness. Reminds me of the K's LBB to some degree. Time for some burn-in.
") I think the bassy sound signature is caused by the white cotton on speaker + reduced venting due to mmcx.
I think the bassy sound signature is caused by the white cotton on speaker + reduced venting due to mmcx.assassin10000
Headphoneus Supremus
Keep us updated on this speaker
Will do. I'm hoping the Ti diaphragm needs some burn in to settle. I'd like a tad more sub-bass and a little less mid-bass, as well as the mids/highs to come a little more forward.
Actually those would both cause LESS bass.
Generally speaking:
Less vent/airflow = less bass.
More vent(airflow = more bass.
Venting is about the same as the rear port (the normal stem one) is still completely open and I can slightly open it up with a round precision file if needed.
Last edited:
In my experience white cotton or anything really on the speaker directly, reduces the midrange around 1khz, and emphasizes midbass/lowmids and upper mids.Will do. I'm hoping the Ti diaphragm needs some burn in to settle. I'd like a tad more sub-bass and a little less mid-bass, as well as the mids/highs to come a little more forward.
Actually those would both cause LESS bass.
Generally speaking:
Less vent/airflow = less bass.
More vent(airflow = more bass.
Venting is about the same as the rear port (the normal stem one) is still completely open and I can slightly open it up with a round precision file if needed.
Somewhat related thing on shell venting after covering it with tuning foam, but it depends greatly on the shell and the placement and treatment of the new vents. If the venting is insufficient than of course it kills bass. If it's too much or is not covered properly than of course is dark and soft, like when you don't put any tuning on the vents.
What I meant is that in my experience, adding more venting basically gives you more headroom to play with, it relaxes mids and increases midbass if you leave it open yes, but then you can add more foam on the vent to flatten the sound signature out. With too few vents you can't get rid of the sharp v sound, you are locked into either bassy or anemic sound. I'll create a graph for you.
Now, if you open more airflow through the stem than of course it also acts as a bass booster (I just did bass port mod in this fashion I'll share it later) , I'm speaking about opening holes directly above the speaker on classic shells. Not much experience on pk shells though, I need good 14.8 speaker first. BTW, how did you preserve the airflow if the connector blocks the stem? I don't see on the picture.
Last edited:
assassin10000
Headphoneus Supremus
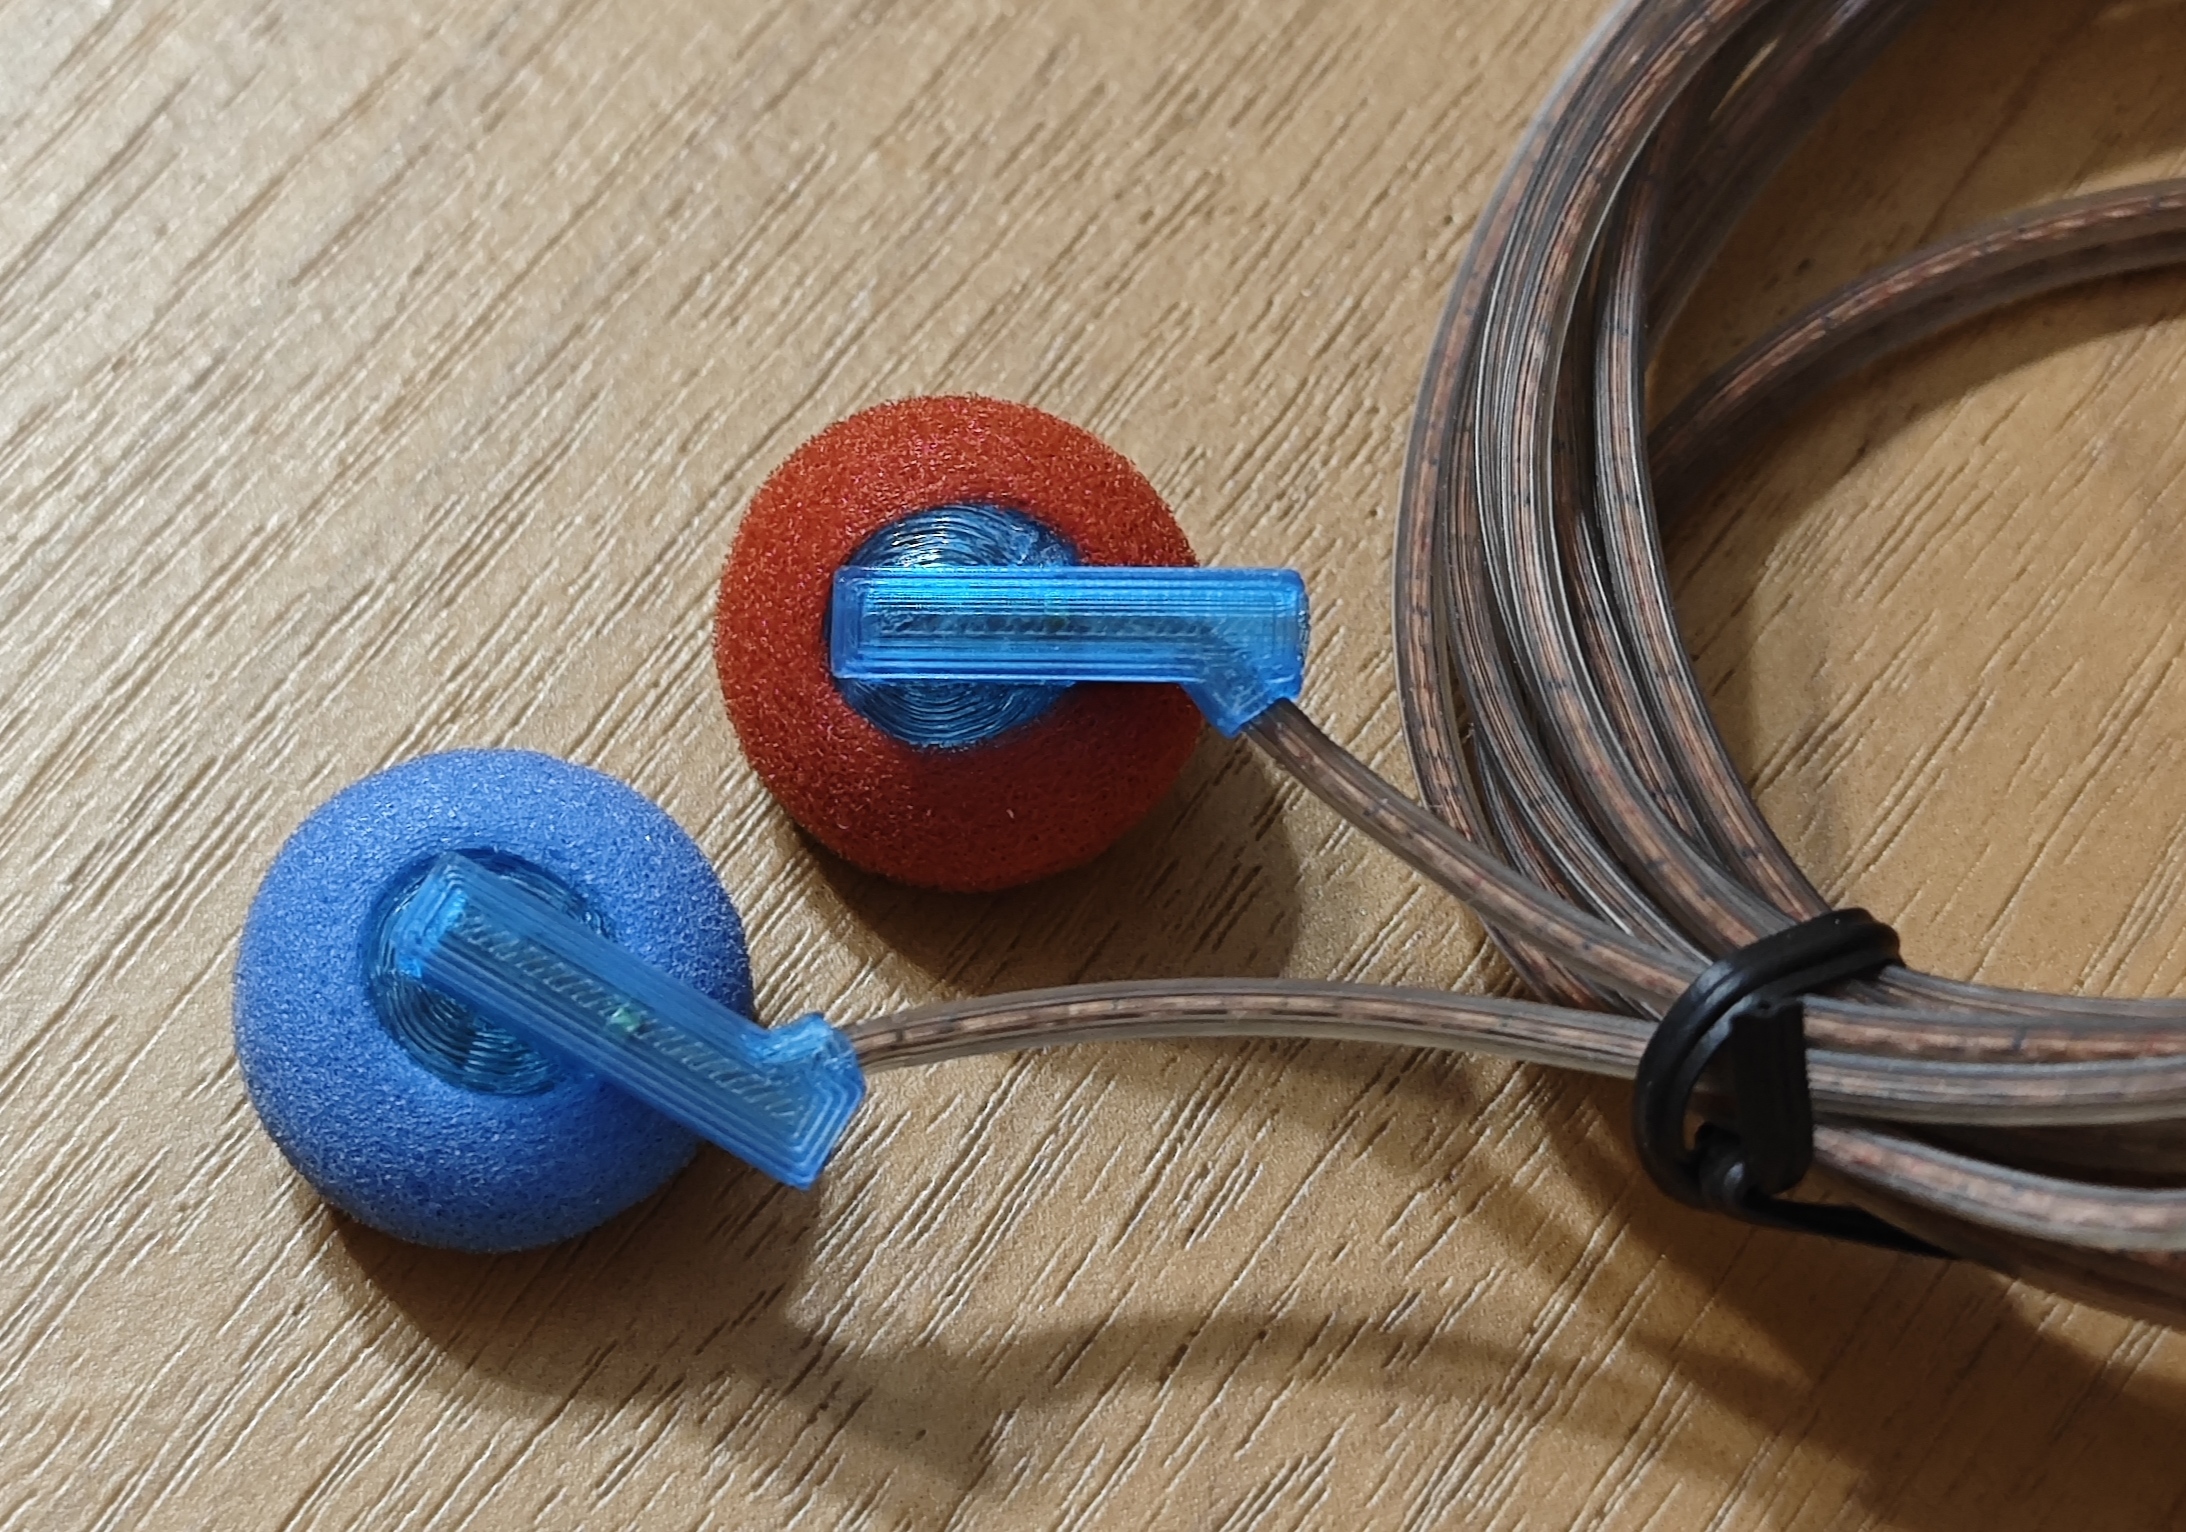
BTW, how did you preserve the airflow if the connector blocks the stem? I don't see on the picture.
The MMCX is next to the port. I have to re-center the hole before tapping it for the MMCX.
Also when I epoxy them I don't go all the way around the rear, which allows airflow over the MMCX. Just like it would be if a cable knot was there.


Themilkman46290
1000+ Head-Fier
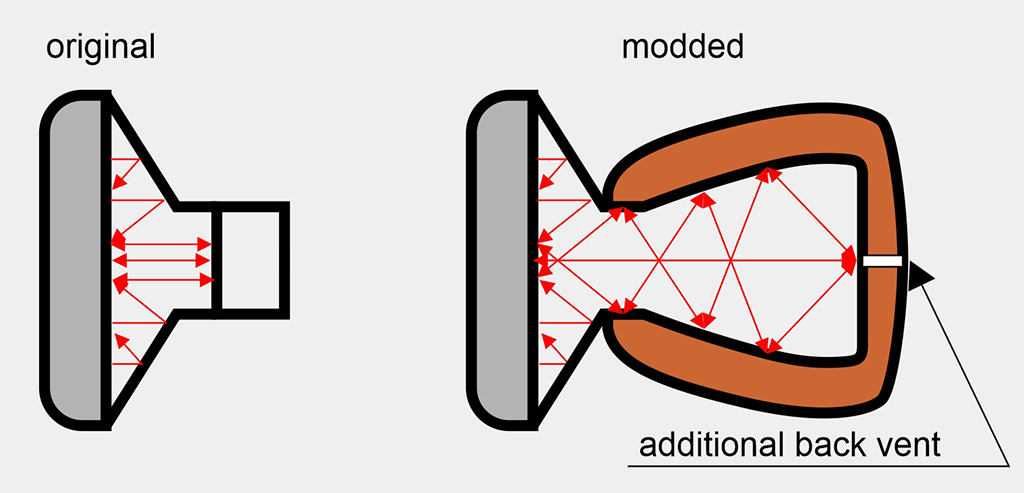
Hey, thanks for explaining your design, I have similar metal shells so I gave it a try, using a larger wood peice, and I have to say, your right, it definitely opens up the sound, I am going to try different woods and slightly different shapes and sizes but thanks for putting up your research, very helpful.Nope. By enlarging inner space you will reduce mid-high because the reflection of the sound wave is not the same, it's slower. Also, you will get a more spacious sound.
Resonance in the wood chamber is also present which gives a little flavor to the sound signature. In short original shell simulate "closed-back" sound and modded
(with large cavity) "open-back" sound


I made a 1.5 mm hole in the back and covered it with different tuning papers (I keep the used tuning papers for times like this) covering the whole completely gives more sub bass but eats up some of the mids, more open gives more mid bass and sweetens up the mids, I am now using a bit of y3
Last edited:
Hey, thanks for explaining your design, I have similar metal shells so I gave it a try, using a larger wood peice, and I have to say, your right, it definitely opens up the sound, I am going to try different woods and slightly different shapes and sizes but thanks for putting up your research, very helpful.
I made a 1.5 mm hole in the back and covered it with different tuning papers (I keep the used tuning papers for times like this) covering the whole completely gives more sub bass but eats up some of the mids, more open gives more mid bass and sweetens up the mids, I am now using a bit of y3
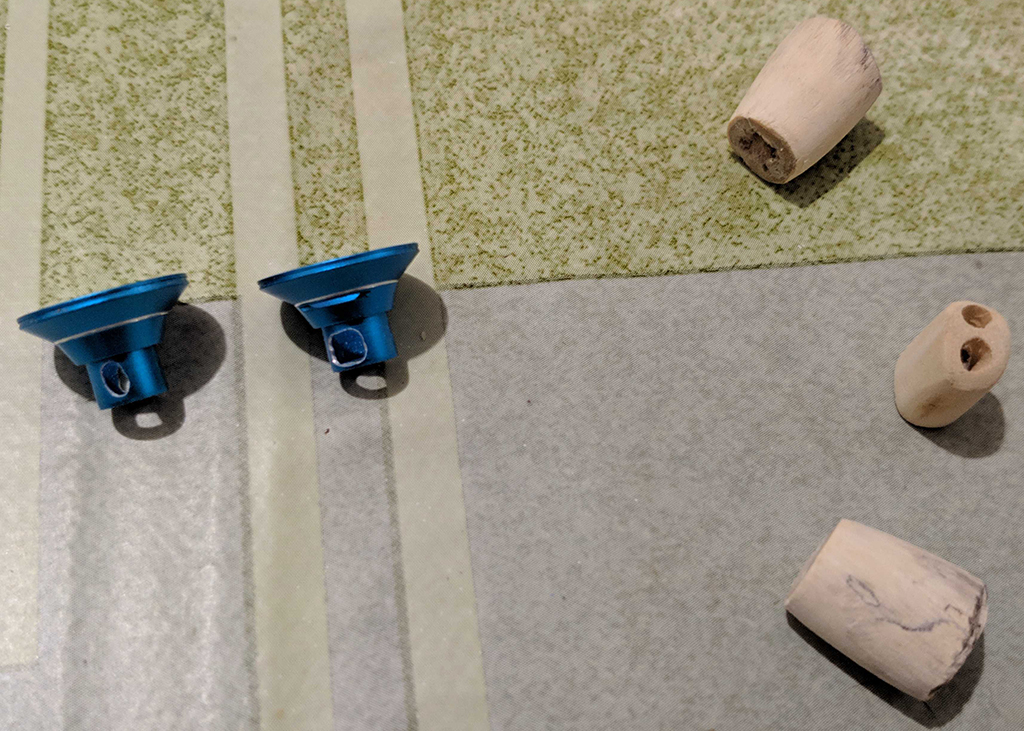
1.))) Last week I tried to make a pole holder from hazelnut wood for a metal shell. I was unlucky because when I drilled a large hole where a metal shell passes,
a wooden pole cracked. Maybe if I have a little more patience I'll try again
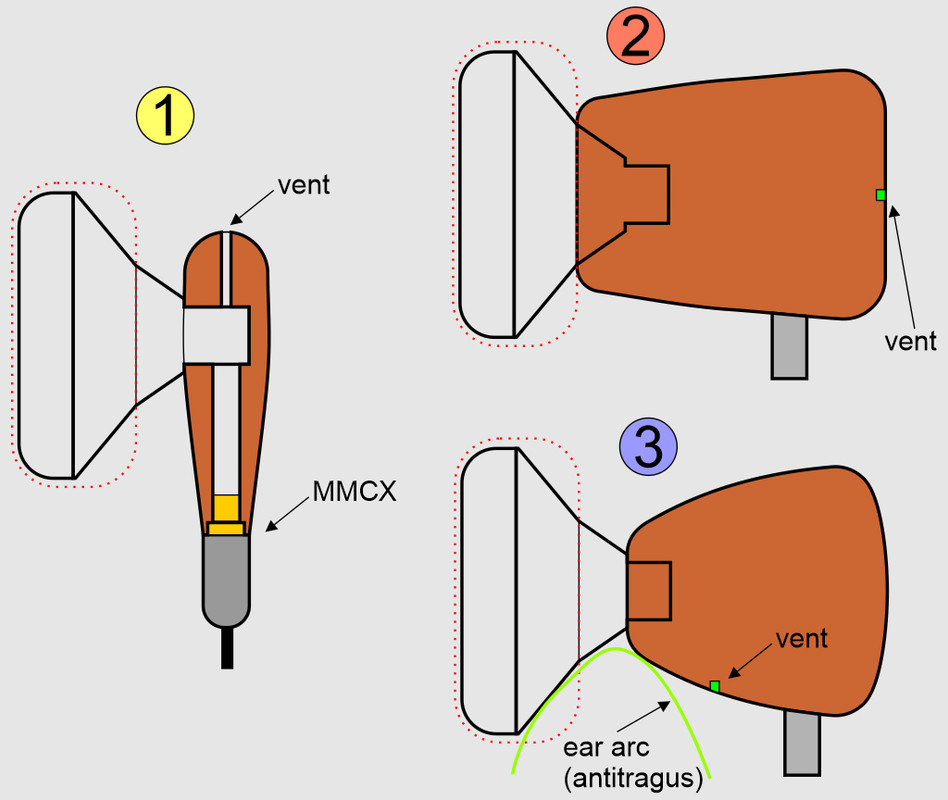
Similar concept have KBEAR Knight, REECHO RC ONE, Rambo 2 (not the movie), etc. The vent at the top is inspired by Onkyo E700M
In the meantime, I prepared the shells. In the picture below you can see the top-bottom holes that I drilled, and on the left shell there is a small hole on the top in the shape of a capsule (for the top vent), and on the right picture, you can see a square hole that is on the bottom (for wires).
I also started preparing cherry-wood shells for some future projects and a small Y-splitter.
2.))) I see your design a little vague because of the angle of the camera, but this is how I see it (illustration no.2).
BTW I really like your "RAW" design, especially the colors

3.))) My first concept was similar to yours, back vent and bigger shell, but I decided to change it to be more ergonomic by reducing the size to follow
the arc shape of antitragus. The vent position is changed also (on the bottom side of the shell)
I don't know but for me, wood " sweetens " the overall sound. I love to use it because it gives an unpredictable effect of course in a positive sense.
It can be good or bad, but the most important thing is that there are a lot of different types of wood to choose from.
Plastic and metal, on the other hand, are predictable in terms of resonance.
Last edited:
captione
100+ Head-Fier
Hey guys, I'm back from finishing my projects. Good to see this thread being more informative, the past replies had been really helpful.
So I finished 4 pairs of totally diy'ed/assembled earbuds (and one broke from extensive tweaking) and few experiments and reshelling on existing earbuds, especially the Monk Plus Lite. I'll just put the descriptions, details, pictures and other things in a spoiler to keep things short.
I have 3 other tweaks and reshells with other earbuds (MS16s, VE Monk, Awei ES10 drivers) but I will exclude them since they didn't made a drastic change or made only a slight improvement. I'll post them when experimentation makes a good difference.

Impressions: Warm and sparkly, very dynamic, very impressive clarity, gets very loud.
Notes: Good build with good results ootb without any tweaking, pretty much ready to go. I had a hiccup when changing the faceplate though, since the drivers are glued shut, but I successfully swapped without any problems.

Impressions: A lean, balanced, more sweeter brother of the 64ohms titanium plated, retains the sparkle but a bit strident in that part for complex songs.
Notes: Like its big brother, the 64ohms, this was also pretty good ootb. Need no retuning (maybe next time, I'm gonna fix the upper region performance)

Impressions: Very warm and midcentric, almost strident, lacks in separation.
Notes: This was a pain in the ass to work with, especially with my first time, but it was also very fun and easy to tweak with, that is until you take off the driver's thin vent cover and cuts off the thin wire connecting to the coil. It was very depressing but I guess it's part of learning.
I'm gonna salvage the faceplates and put in PS4 earbud drivers in it since it fits in 14.8mm faceplates.


Impressions: Very warm, very good bass response with a bit of upper mid peak
Notes: This took the shortest time to assemble. I originally put foams under the three vents of the wood shell but it made the whole signature less warm and the balance of the bass and upper mids made the vocals glare lol, so I removed the foam underneath it. I let the shell resonate since it's actual wood, I'm glad I spent a couple more for these shells vs. the more cheaper plastic looking one. Just gotta fix the upper mid glare and this would be much more amazing.

Impressions: Very lean almost neutral, cold tonality. Upper mid-lower treble focus. Clarity is INSANELY good. Bass is well dosed compared to non modded/reshelled.
Notes: This was a pain in the ass too, broke two faceplates for this to work and fit the smaller drivers in an angle that I want, but the results are amazing, it's almost a different earbud from the original lol, except the upper mid is clearly showing its roots although not glaring. Just by thinking how I should fit a horseshoe foam in the driver turned this into one of the biggest surprises last week lol. Four Tet's Dialogue and Ryo Fukui's Scenery sounds amazing on this one.
This has been a really good experience for me. Looking forward to another DIY build!
So I finished 4 pairs of totally diy'ed/assembled earbuds (and one broke from extensive tweaking) and few experiments and reshelling on existing earbuds, especially the Monk Plus Lite. I'll just put the descriptions, details, pictures and other things in a spoiler to keep things short.
I have 3 other tweaks and reshells with other earbuds (MS16s, VE Monk, Awei ES10 drivers) but I will exclude them since they didn't made a drastic change or made only a slight improvement. I'll post them when experimentation makes a good difference.
Impressions: Warm and sparkly, very dynamic, very impressive clarity, gets very loud.
Notes: Good build with good results ootb without any tweaking, pretty much ready to go. I had a hiccup when changing the faceplate though, since the drivers are glued shut, but I successfully swapped without any problems.
Impressions: A lean, balanced, more sweeter brother of the 64ohms titanium plated, retains the sparkle but a bit strident in that part for complex songs.
Notes: Like its big brother, the 64ohms, this was also pretty good ootb. Need no retuning (maybe next time, I'm gonna fix the upper region performance)
Impressions: Very warm and midcentric, almost strident, lacks in separation.
Notes: This was a pain in the ass to work with, especially with my first time, but it was also very fun and easy to tweak with, that is until you take off the driver's thin vent cover and cuts off the thin wire connecting to the coil. It was very depressing but I guess it's part of learning.
I'm gonna salvage the faceplates and put in PS4 earbud drivers in it since it fits in 14.8mm faceplates.
Impressions: Very warm, very good bass response with a bit of upper mid peak
Notes: This took the shortest time to assemble. I originally put foams under the three vents of the wood shell but it made the whole signature less warm and the balance of the bass and upper mids made the vocals glare lol, so I removed the foam underneath it. I let the shell resonate since it's actual wood, I'm glad I spent a couple more for these shells vs. the more cheaper plastic looking one. Just gotta fix the upper mid glare and this would be much more amazing.
Impressions: Very lean almost neutral, cold tonality. Upper mid-lower treble focus. Clarity is INSANELY good. Bass is well dosed compared to non modded/reshelled.
Notes: This was a pain in the ass too, broke two faceplates for this to work and fit the smaller drivers in an angle that I want, but the results are amazing, it's almost a different earbud from the original lol, except the upper mid is clearly showing its roots although not glaring. Just by thinking how I should fit a horseshoe foam in the driver turned this into one of the biggest surprises last week lol. Four Tet's Dialogue and Ryo Fukui's Scenery sounds amazing on this one.
This has been a really good experience for me. Looking forward to another DIY build!
Congrats man! Really nice work. I see you struggled a little but on the other hand, it paid off. That is the charm of this hobby.Hey guys, I'm back from finishing my projects. Good to see this thread being more informative, the past replies had been really helpful.
So I finished 4 pairs of totally diy'ed/assembled earbuds (and one broke from extensive tweaking) and few experiments and reshelling on existing earbuds, especially the Monk Plus Lite. I'll just put the descriptions, details, pictures and other things in a spoiler to keep things short.
I have 3 other tweaks and reshells with other earbuds (MS16s, VE Monk, Awei ES10 drivers) but I will exclude them since they didn't made a drastic change or made only a slight improvement. I'll post them when experimentation makes a good difference.
Impressions: Warm and sparkly, very dynamic, very impressive clarity, gets very loud.
Notes: Good build with good results ootb without any tweaking, pretty much ready to go. I had a hiccup when changing the faceplate though, since the drivers are glued shut, but I successfully swapped without any problems.
Impressions: A lean, balanced, more sweeter brother of the 64ohms titanium plated, retains the sparkle but a bit strident in that part for complex songs.
Notes: Like its big brother, the 64ohms, this was also pretty good ootb. Need no retuning (maybe next time, I'm gonna fix the upper region performance)
Impressions: Very warm and midcentric, almost strident, lacks in separation.
Notes: This was a pain in the ass to work with, especially with my first time, but it was also very fun and easy to tweak with, that is until you take off the driver's thin vent cover and cuts off the thin wire connecting to the coil. It was very depressing but I guess it's part of learning.
I'm gonna salvage the faceplates and put in PS4 earbud drivers in it since it fits in 14.8mm faceplates.
Impressions: Very warm, very good bass response with a bit of upper mid peak
Notes: This took the shortest time to assemble. I originally put foams under the three vents of the wood shell but it made the whole signature less warm and the balance of the bass and upper mids made the vocals glare lol, so I removed the foam underneath it. I let the shell resonate since it's actual wood, I'm glad I spent a couple more for these shells vs. the more cheaper plastic looking one. Just gotta fix the upper mid glare and this would be much more amazing.
Impressions: Very lean almost neutral, cold tonality. Upper mid-lower treble focus. Clarity is INSANELY good. Bass is well dosed compared to non modded/reshelled.
Notes: This was a pain in the ass too, broke two faceplates for this to work and fit the smaller drivers in an angle that I want, but the results are amazing, it's almost a different earbud from the original lol, except the upper mid is clearly showing its roots although not glaring. Just by thinking how I should fit a horseshoe foam in the driver turned this into one of the biggest surprises last week lol. Four Tet's Dialogue and Ryo Fukui's Scenery sounds amazing on this one.
This has been a really good experience for me. Looking forward to another DIY build!
At least, you mastered transparent shells build
assassin10000
Headphoneus Supremus
Keep us updated on this speaker
Took them off burn-in after 100 or so hours, there wasn't as much change as I'd like. Still a warm, punchy signature. The mid-bass still sounds a bit boomy or intrusive with foams on (I used offset donut foams).
Because of that, I pulled the foams off and the boominess disappears, mid-bass punch is tamed and the mids/highs are now presented in a more forward fashion. Upper mids/lower treble almost becomes fatiguing and is borderline too much for me (can easily be fixed with EQ, but for the sake of giving impressions I listened without EQ). Definitely a driver to use without foams IMO.
When it comes to IEM's I prefer a sound sig that is somewhat harman like, but with 1-3db less upper mids/lower treble and a bit less bass by 2-3 db that tapers into the lower mids a bit smoother (ie: my mh755/mh750 I pull about -3db at 31/62 hz and -1.5 db around 125hz via eq).
That being said with no foams the bass is still decent in quantity until it reaches into the sub-bass (50-60hz and below), these drivers start picking up around 30-33hz when I did a sweep and the bass is fairly level from 35h40hz up. In other words bass rolls off around 30-33hz.
Bass/mid-bass and lower mids are good but the upper mids/lower treble is a bit harsh if I turn the volume up above my average listening volume (low for most). So if I was in a somewhat noisy place, out and about or when driving/commuting it may be fatiguing/too harsh. When sitting at home or in a quiet environment they are ok.
Last edited:
Users who are viewing this thread
Total: 13 (members: 0, guests: 13)
