the Pimeta-V2 thread
Feb 13, 2015 at 7:27 PM Post #571 of 651
So, I ordered my parts, but I messed up just a tiny bit...
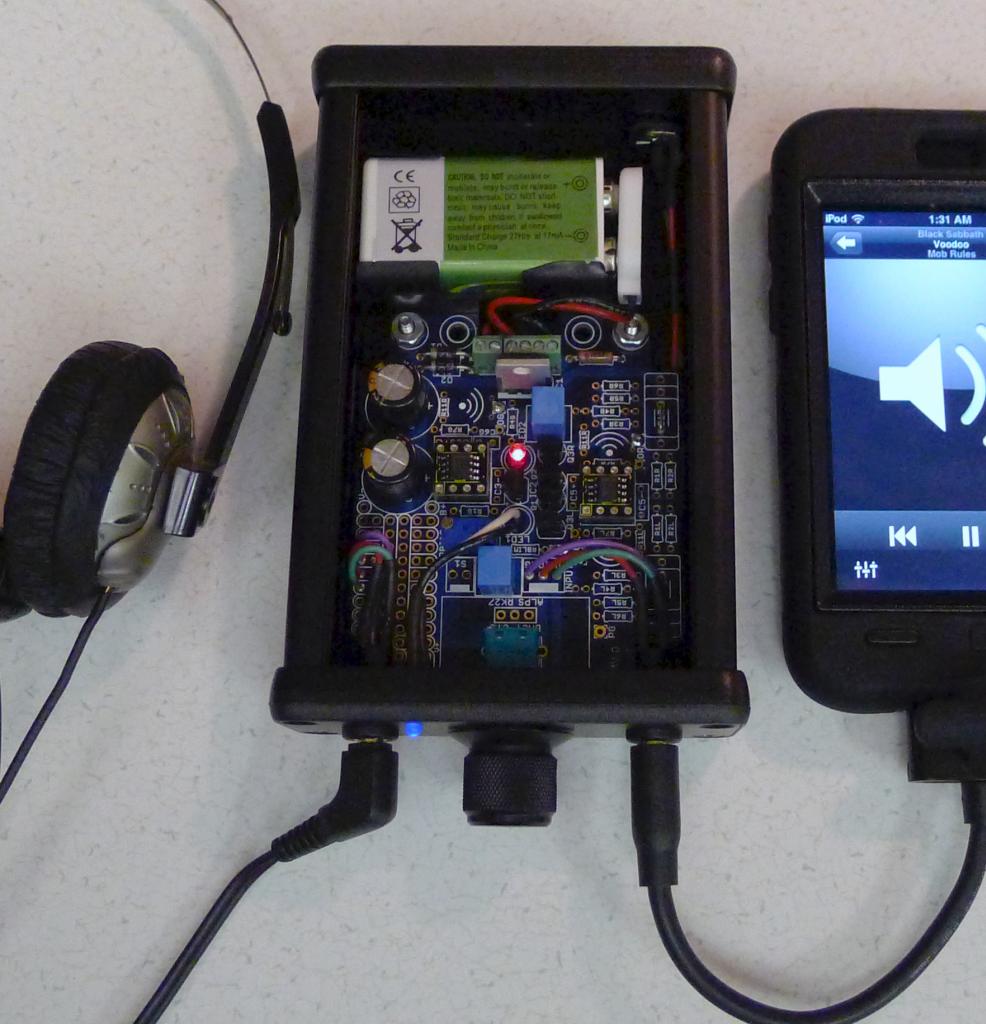
I went for the 2x 4xAAA holder battery option and the Serpac H65 enclosure (no access, b/c I wanted the translucent grey and didn't see the need for access once the amplifier was built). Unfortunately, without the board test-fitted, there's no way that the battery holders will fit and the enclosure close, and with the board in, the holders cover up the on-board battery and wall power connectors.
I ordered this holder, for reference.
What holder should I order so that the batteries fit well in the case? You claimed in an earlier reply that:
 
If you're just itching to use the 2-battery input feature on the board, have you considered using two 4xAAA cell holders? That's not a lot bigger than a single "9V" NiMH, but will run a lot longer, and only strings 8 cells in series, which is what you get in the 9.6V flavor of NiMH "9V" battery.

But I can't seem to find a way to arrange the batteries, holder or not, that allows me to fit all 8 AAA batteries into the case with the board.
 
Finally, just as a sanity check: Is it OK to run the board off of wall power without batteries? I got a 12V source to charge the batteries with, and just wanted to make sure that I read the guide right. The estimated voltage of the combined batteries is 9.6V.
 
Feb 13, 2015 at 11:01 PM Post #572 of 651
 I messed up just a tiny bit...

 
I hope by that you mean "I didn't read the datasheet," rather than "I took a vague comment by some guy on the Internet as a physical dimension specification." :)
 
I just measured an actual 9V battery and a 4xAAA holder similar to the one you point to, and a single 4xAAA holder is about 35% larger than a single 9V battery. Two such holders would be 171% larger, but I was responding to your post where you talked about 2x9V, so that's still just 35%. 2x9V won't fit into a Serpac H65, either.
 
Is 35% "a lot?" It depends on your application. I can think of several good cases that I'd call small, which would fit a PIMETA v2 board and 2x4xAAA.
 
What holder should I order so that the batteries fit well in the case? 

 
If you must use the H65 case, I'd tell you to go with a single 9V NiMH.
 
If you want 8xAAA, you need a larger case, period.
 
Incidentally, I see only one other post from you in this thread, and it doesn't even mention the Serpac H65. I don't see how you got from my comment to the thought that 2x4xAAA should work in the Serpac H65. The PIMETA v2 doesn't only work in that enclosure.
 
 Is it OK to run the board off of wall power without batteries?

 
There's a whole section in the docs on this very topic.
 
Feb 13, 2015 at 11:45 PM Post #573 of 651
   
I hope by that you mean "I didn't read the datasheet," rather than "I took a vague comment by some guy on the Internet as a physical dimension specification." :)
 
I just measured an actual 9V battery and a 4xAAA holder similar to the one you point to, and a single 4xAAA holder is about 35% larger than a single 9V battery. Two such holders would be 171% larger, but I was responding to your post where you talked about 2x9V, so that's still just 35%. 2x9V won't fit into a Serpac H65, either.
 
Is 35% "a lot?" It depends on your application. I can think of several good cases that I'd call small, which would fit a PIMETA v2 board and 2x4xAAA.
 
 
If you must use the H65 case, I'd tell you to go with a single 9V NiMH.
 
If you want 8xAAA, you need a larger case, period.
 
Incidentally, I see only one other post from you in this thread, and it doesn't even mention the Serpac H65. I don't see how you got from my comment to the thought that 2x4xAAA should work in the Serpac H65. The PIMETA v2 doesn't only work in that enclosure.
 
 
There's a whole section in the docs on this very topic.

Alright, sorry for my misreading, haha. For some reason, I assumed that your comment applied for the H65, because that's the standard enclosure. I also thought you were talking about the 2x 4xAAA being the same size as a 9V instead of 2x9V just because I wasn't thinking.
 
Thanks for your help! I'll keep the AAA for another project and buy a NiMH 9V locally with holder.
 
Feb 18, 2015 at 10:16 PM Post #574 of 651
Hat's off to Tangent for releasing the ExpressPCB files for the PPA V1 and Pimeta V1. The ExpressPCB files for these projects are now available, as well as those of the PPA V2 which has been the case for a decade or so.
 
Visit the project pages below to download the ExpressPCB files.
 
PPA V1: http://tangentsoft.net/audio/ppa/amp/
 
PIMETA V1: http://tangentsoft.net/audio/pimeta/
 
PPA V2: http://tangentsoft.net/audio/ppa/amp2/
 
It is possible to have these files converted for use with your own PCB mill or a professional service other than ExpressPCB. To do so, follow this guide below to convert them to generic Gerber and NC drill files. In summary, this guide will describe the process of opening the PCB files in ExpressPCB, printing them to a PDF with a virtual PDF printer, and finally converting them to Gerber and NC drill files in Windows via Command Prompt using the Perl-based program pdf2gerb. Before beginning, you must read the following terms and conditions.
 
OBLIGATORY WARNING:
 
Before proceeding, please note that there is absolutely no warranty or guarantee that these steps will work correctly for everyone in all circumstances. None of these steps have been approved, tested or even encouraged, formally or informally, by the original creator of these PCB files, Tangent, and any semblance of such is purely coincidental and should be promptly disregarded.
 
Even after following these steps to the letter, you may still encounter errors or inaccuracies which are specific to your physical computer build, your operating system and program installations, and/or your PCB fabrication process leading to undesirable or even hazardous results. By choosing to follow these steps, you formally agree that (a) you realize that Tangent has neither endorsed nor condoned the use of any of these steps and that (a) the author of this guide, Hifihedgehog, is not liable for any and all injuries, damages and losses of any and all physical or monetary value you may experience during the course of this procedure.
 
If you knowingly and of a sound mind agree to these terms and conditions, read on.
 
To begin with, you will need to obtain and install the software which will be used in this guide. The software components which have been tested and have been found to work are below. Please install them using only the default settings during the installation process.
 
1. BullZip PDF Printer Community Edition
http://cdn.bullzip.com/download/pdf_free/Setup_BullzipPDFPrinter_10_10_0_2307_FREE.exe
 
2. ExpressPCB
http://www.expresspcb.com/ExpressPCBBin/ExpressPCBSetup.exe
 
3. Strawberry Perl 
Note: Only use this older build which is linked below. In testing, the latest builds have been found to be incompatible with pdf2gerb.
http://strawberryperl.com/download/5.12.1.0/strawberry-perl-5.12.1.0.msi
 
4. pdf2gerb
Extract the contents of this archive to its own folder, taking note of its location for future reference. 
http://github.com/swannman/pdf2gerb/zipball/master
 
After installing each of these programs, first open a PCB file in ExpressPCB. To do this, run the program ExpressPCB and go to File, Open. Once in the file management window, navigate to where you have your PCB file located. Select the file and press Open. Having opened the PCB file successfully, you should see a populated PCB blueprint in the middle of the main program window.
 
Now, go to File, Print. In the Print layout pop-up window which should appear, you will select two options. Note that we will be repeating these steps in a moment with one slight modification. First, in the Printer drop-down menu, select Bullzip PDF Printer. Second, under Layers to print, check Top copper layer. Having selected these two options, press OK. In the screen which should soon appear, specify the filename and location of the PDF and save it. Save it in the same folder location as where your pdf2gerb.pl file was extracted. For the purposes of this guide, you will be naming it top.pdf.
 
Now, to repeat the process with the one slight modification mentioned earlier. Perform the same steps just performed to print, only this time, under Layers to print, only check Bottom copper layer and name the file bottom.pdf and place it in the same folder as the other PDF.
 
Finally, for the last round of steps. Open command prompt with administrator privileges (i.e. right click on the program Command Prompt and select Run as Administrator). Type the command cd c:/the/path/to/your/folder, replacing the generic file path c:/the/path/to/your/folder with the actual folder path to gerb2pdf.pl and your two pdf files and press Enter. Next, enter the command perl pdf2gerb.pl top.pdf bottom.pdf and press Enter.
 
Once the process has completed, go to the folder where your PDF files and pdf2gerb.pl are located. If the conversion was successful, you should find five newly created files there--four Gerber .grb files and one NC Drill .txt file. If so, congratulations! Be sure to verify their accuracy and precision with a Gerber viewer such Gerbv (available for download here: http://downloads.sourceforge.net/project/gerbv/gerbv/gerbv-2.6.1/gerbvinst-2.6.1.exe ) before using them for fabrication.
 
Feb 18, 2015 at 10:22 PM Post #575 of 651
Finally finished my PV2!
I opted to switch the default Serpac enclosure with something a bit more... sturdy, since all my components blatantly refused to fit in the serpac and full pocketable mobility wasn't of prime importance.
Pics to follow, but here are the basic specs:
-Default ADZ8620/8610 Opamp pair
-2 Panasonic 1000uF Electrolytic rail caps
-1mA Class-A Bias Current
-Slightly oversized WIMA Film caps for C4 (lol)
-2x 4xAAA 9.6V Battery Bank (over 2K mAh!)
-Somewhat eye-catching case
-Jumpered input caps, as the amp is only used with high-end sources (AMB y2, Fiio X3)
 
Pics to follow fairly soon. This thing is crazy. It was even able to power my HiFiMan HE-4 at a good, loud volume at about the 12o'clock position with no bass distortion, which was a hugely pleasant surprise. The sound with the AD opamps is a little bit too forward for my taste, but I use a hybrid amp with 12BH7 tube as my primary amp, so my perspective is a bit skewed. Makes me wish that I had thought ahead and bought DIP adapters and sockets, but NBD.
 
Thanks Tangent!
 
Feb 19, 2015 at 5:05 AM Post #576 of 651
  OBLIGATORY WARNING:

 
Do not taunt Happy Fun Ball.
 
 Open command prompt with administrator privileges 

 
Seriously??
 
What possible justification can there be for that?
 
Sorry, pdf2gerb, but no. You will not be getting Admin privs on my box just to translate a file from one format to another.
 
Be sure to verify their accuracy and precision with a Gerber viewer such Gerbv 

 
I've recently been trying to learn KiCad. For the most part, I'm missing Eagle pretty hard, but I think I may be switching from gerbv to KiCad's gerbview, if only because gerbv can be cranky to build on OS X. Building KiCad is a pain, too, but it's at least on a popularity upswing, so there is plenty of help online for pushing past problems.
 
  Finally finished my PV2!

 
Yay!
 
 The sound with the AD opamps is a little bit too forward for my taste

 
Plenty more fish in that sea.
 
Feb 19, 2015 at 1:24 PM Post #577 of 651

ROFL. I think my ribs will be sore for the next week! XD
 
Actually, the agreement is more along these lines:
 
http://youtu.be/W9hkGqH2D8c?t=6m4s


Seriously??
 
What possible justification can there be for that?
 
Sorry, pdf2gerb, but no. You will not be getting Admin privs on my box just to translate a file from one format to another.
 

No, it's even worse than that. The cherry on top of it all is that to run any Perl program with Strawberry, you have to run it as an Administrator. That obligatory warning includes any unforeseen interdealings with the NSA you may have from any carefully hidden payloads.


I've recently been trying to learn KiCad. For the most part, I'm missing Eagle pretty hard, but I think I may be switching from gerbv to KiCad's gerbview, if only because gerbv can be cranky to build on OS X. Building KiCad is a pain, too, but it's at least on a popularity upswing, so there is plenty of help online for pushing past problems.


I should try my hand at KiCad on a more permanent basis. I remember trying it and liking it a lot on my older system before switching to my Surface Pro 2. Open source programs with a strong community are always the bee's knees, anyway.
 
Feb 20, 2015 at 12:37 AM Post #578 of 651
As promised, pics:


I will attest, the battery connector is a little bit messy, but it was the best solution I have right now (as I don't have a molex connector for that part of the board.)
The batteries are charging right now on the trickle charger. I ensured that all contact points match up. The upper 9V connector looks wrong just because the orientation got reversed when the connector "jumped over," so to speak. (Black became the V+, Red became common).
The AAA banks are adhered using double sided tape, while the knob and jacks are all nutted on. The potentiometer is held in place by the board, which is held in by two screws that were melted into the plastic, as to not be visible from the bottom of the case.
Everything seems to be working fine! I don't have my official charger yet, so I'm currently using a charger rigged up from a barrel adapter of the right size soldered (after checking orientation) to the outputs of an old 12V outputting monitor PSU.
 
Feb 20, 2015 at 12:43 AM Post #579 of 651
  As promised, pics:


Which case exactly is this? It looks like a water resistant one I haven't seen before. I am actually using a V1 board for my next build because that is the only thing that is cost effective these days. That case there you are using would be about the right size for me if I ever wanted to go the buffer stacking route.
 
Feb 20, 2015 at 1:09 AM Post #580 of 651
It's a Pelican case, I'm not sure of the exact model number. I'd look it up right now, but I'm currently working on a writeup for this, as I'm entering the amp in a contest (not stating that I designed it, but a contest for assembling and writing about an electronics kit design that someone else created, if that makes sense).
It's in the micro series, I believe. 101 maybe?
And it is (was) waterproof. However, that rubber rim you see used to be a distinct rubber boot that lined the entire inner bottom half of the enclosure. Everything except what you see was removed to accommodate the board. I also had to drill 4 total holes for external hookups, and the 3.5mm jack holes had to be dremeled out from the inside so that the jacks could sink in and have their threads show through on the other side.
Where can you get V1 boards? I haven't seen V2s anywhere, and I kinda want to build a desktop-optimized PIMETA now lol.
 
Feb 20, 2015 at 3:35 AM Post #581 of 651
  It's a Pelican case, I'm not sure of the exact model number. I'd look it up right now, but I'm currently working on a writeup for this, as I'm entering the amp in a contest (not stating that I designed it, but a contest for assembling and writing about an electronics kit design that someone else created, if that makes sense).
It's in the micro series, I believe. 101 maybe?
And it is (was) waterproof. However, that rubber rim you see used to be a distinct rubber boot that lined the entire inner bottom half of the enclosure. Everything except what you see was removed to accommodate the board. I also had to drill 4 total holes for external hookups, and the 3.5mm jack holes had to be dremeled out from the inside so that the jacks could sink in and have their threads show through on the other side.
Where can you get V1 boards? I haven't seen V2s anywhere, and I kinda want to build a desktop-optimized PIMETA now lol.

As I posted earlier, you can now get the board files for all of Tangent's projects, sans the PIMETA V2 due to its cost-prohibitive four-layer design. In other words, last I checked, the cheapest and most reliable service I could find for four-layer boards, ITEAD, required a minimum of 10 boards at $99 plus about $12 shipping and handling. And, from what I have been told, they do throw in two boards or so extra free of charge if you ask real nicely for it.
 
So at this point, we would have to organize a group buy to pull off getting more PIMETA V2 boards. Due to the Objective2 hype which has swamped the portable amp builder's market, this is a lot harder than it sounds. Then, we would have to figure in the costs of shipping the boards to everyone individually once the group's chosen buyer received the goods. It would probably come out to $12 to $15 a board once we factored in USPS First Class shipping. Alternatively, we could also get 50 made for about $140 plus about $20 shipping and handling. That's a boatload of boards, but probably the better route to go if we were doing a group buy. Personally, I have never organized a group buy before, but I would be willing to head it up since I have about five years of event organization under my belt which is pretty closely related.
 
Feb 20, 2015 at 3:51 AM Post #582 of 651
   
Where can you get V1 boards? I haven't seen V2s anywhere, and I kinda want to build a desktop-optimized PIMETA now lol.

 
About the board I had made: it is only 25 cents a square inch at my university shop, but there isn't any solder mask included with the service and the copper was etched on a bare minimum basis. My board still looks pretty darn cool, but I have one final thing to take care of. A new guy, green around the gills and fresh on-the-job, overcharged me and forgot to finish cutting the board. Like this:


Guess where I am heading early in the morning to get a few minor PCB and price woes sorted out. 
 
Feb 20, 2015 at 7:24 AM Post #583 of 651
Here are the Gerber files I just converted for the PPA V2 and the PIMETA V1. I inadvertently found out that the PPA V1 ExpressPCB files Tangent uploaded to his site are ones to the PPA V2. We will have to wait on those before I can convert them into Gerber files. As always, there is zero warranty and you risk life and limb all at your own expense. :)
 
PIMETA V1 Gerber files: http://1drv.ms/1CS4jOj
PPA V2 Gerber files: http://1drv.ms/1LkwpYG
 
Feb 20, 2015 at 4:13 PM Post #584 of 651
Try the PPA v1 ExpressPCB files now.  I don't have ExpressPCB installed right now, and don't especially want to install it just to check whether this is the right version. :)
 
Feb 20, 2015 at 4:24 PM Post #585 of 651
  Try the PPA v1 ExpressPCB files now.  I don't have ExpressPCB installed right now, and don't especially want to install it just to check whether this is the right version. :)

Well, I was a bit trigger happy.  They are half-way right where they count. The PCB file, the important one, is right now with the socketed buffers and all but the schematic file isn't. 
 

Users who are viewing this thread

Back
Top