the Pimeta-V2 thread
Apr 26, 2011 at 8:47 AM Post #332 of 651
It looks like it.
 
Why do you want to do that? It won't sound as good. The compensation is that it will draw less power if you leave the bandwidth pin floating. Is that what you're after?
 
Apr 26, 2011 at 9:20 AM Post #333 of 651


Quote:
It looks like it.
 
Why do you want to do that? It won't sound as good. The compensation is that it will draw less power if you leave the bandwidth pin floating. Is that what you're after?


aahh..so in the datasheet, BW stands for bandwidth
 
no, i am after the supply voltage range, because 4x aaa batteries is the maximum allowed space in my serpac h65.
 
why did you use BUF634 in pimeta v1, then? i saw the schematic in pimeta v1 and the BW pin is not connected anywere, either..*i'm thinking to use the BUF634 SOIC version
 
Apr 26, 2011 at 6:19 PM Post #334 of 651
http://tangentsoft.net/audio/pimeta2/history.html
 
Apr 28, 2011 at 1:00 PM Post #336 of 651
Hi,
 
I just assembled a PIMETA v2 but it doesn't work right. I'm using this 24V wallwart and the LEDS light up.
 
However all 3 buffers are getting very hot within a few seconds of operation while the opamps stay at normal temperature.
I hooked up headphones against the documentation advice and found out that one of the channels works while the other doesn't. I jiggled some of the components to look for bad connections and discovered that when pushing down the ALPS RK27 pot the second channel comes in. There are also some crackling sounds when touching the pot.
 
Is it likely that the buffers overheating can be caused by a defective pot or that i broke a pin on the pot while soldering it?
 
I have almost no experience with soldering but it looks like I put everything together pretty good. I will take some measurements and pictures later to aid the debugging.
 
Apr 28, 2011 at 10:52 PM Post #337 of 651
The pot may be bad, but I can't see a way it can cause the buffers to get hot.
 
Yes, pics, definitely.  Both sides.
 
Apr 28, 2011 at 11:39 PM Post #338 of 651
Alright, IE9 is giving me some crap trying topost this, but I came across the Audio GD PSU09 board today, and was wondering how it would work for the Pimeta? http://www.audio-gd.com/Pro/diy/PSU09/PSU09EN.htm
 
Could one wire up this board, with 2 torroidal transformers, and then output the V+, GND, and V- lines directly to the Pimeta, eliminating the need for the power-section of the original board schematic? This would require shorting the two output grounds on the Audio GD board, is that possible? This would be for a desktop implimentation of the Pimeta, and I was thinking that a dedicated transformer with board might be more effective and efficient than a wallwart type supply.
 
Apr 28, 2011 at 11:42 PM Post #339 of 651
 
Yes, it turns out it's 2 separate issues. The pot is good but I had a peculiar problem with it. I can't see very well under it but it seems like there are some metal elements sticking out besides the actual 6 pins. The metal parts from the bottom of the pot are touching the holes on the board for the smaller pot. It was shorting one of the channels.
 
I don't know how to desolder the pot and I didn't want to cut the pins to investigate so I stuck a piece of plastic underneath and that seems to fix it. Now I have 2 clear channels but all 3 buffers still get very hot.


Apr 29, 2011 at 12:44 AM Post #340 of 651
 
My PIMETA v2 plays music but the buffers get very hot within a few seconds. I have almost no experience with building amps so I'm posting pictures and the components I used hoping that you guys can spot what I'm doing wrong much faster than I can debug it. I visually inspected all solder joints and they look OK to me but I could try to get a close up of some parts if needed.
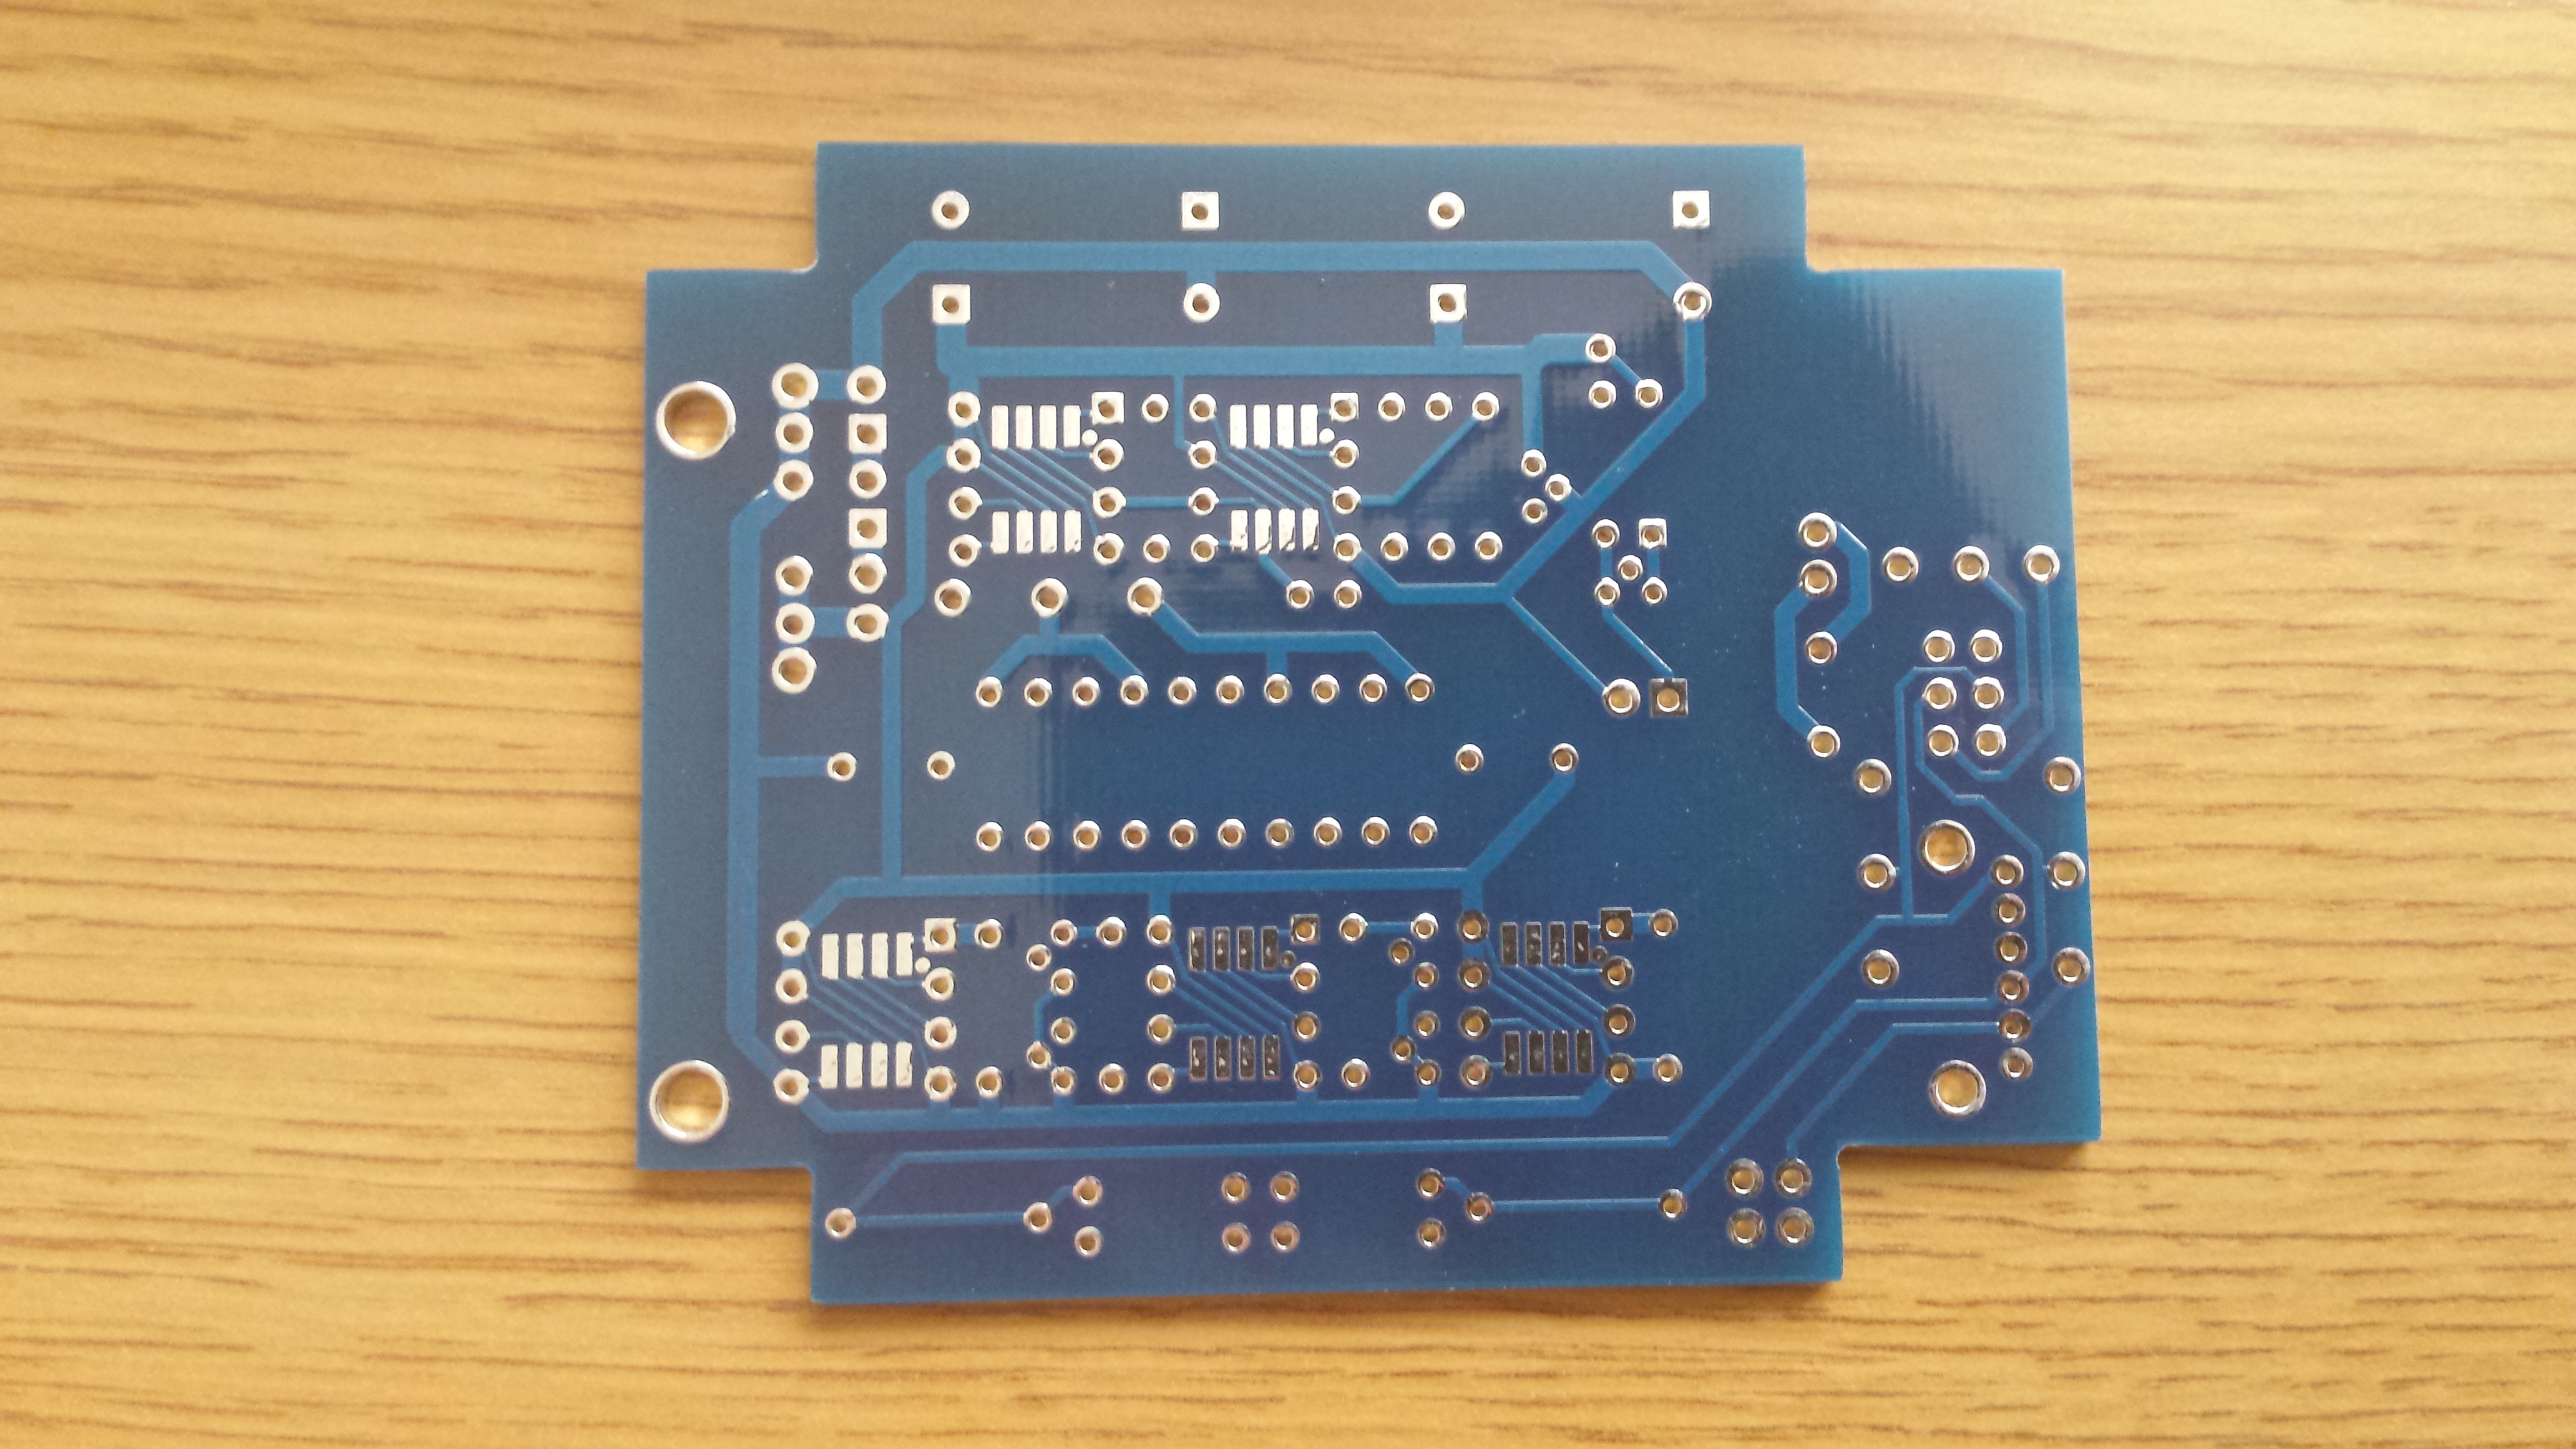
 

top
I didin't realize those red caps are so bulky until they arrived. They fit OK though.
 

bottom.
I really wish I used headers for all wiring. I tried soldering twisted copper wires from the power supply wires directly to the board and they eventually ended up touching and throwing sparks. There are burn marks on the board but I think it's OK.
 

side.
I wanted to make C6 replacable so I "hacked" the header you see on the left from an old 28pin DIP socket. For the moment I'm using 10pF caps for C6.


I followed the suggested values on the schematic for the most part. The only deviations I chose were 10pF for C6 and .12uF for C1, C3 and C5.
Here is a list of the components I used:
 
- power supply 1 24V VDC 1A linear regulated 2.1mm  jameco
 
- R1L/R  2  4.32 KOhm .4W 1%   digikey PPC4.32KYCT-ND
- R1G  1  = R1
- R2  2  499 kOhm 1/4W 1%   digikey 499KXBK-ND
- R3  2  1 kOhm .1%    have it
- R4L/R  2  4.75 kOhm 1/4W 1%   digikey RNF14FTD4K75CT-ND
- R4G  1  = R1
- R5  2  3.32 kOhm 1/4W .1%   digikey RNF14FTD3K32CT-ND
- R6  2  = R2
- R7  3  100 Ohm .5W 1%    digikey PPC100XCT-ND
- R11  3  = R5
- RBIAS  1  5K trim pot    digikey 3296W-502LF-ND
- RBLIM 1  1 kOhm .1%    have it
- RCCS  not used
- RLED 1  10 kOhm     have it
- C1  2  .12 uF 1% 50V    digikey p3874-nd
- C2  3  470 uF 20% 25V    digikey 493-1553-nd
- C3,C5  4  = C1
- C4  2  6.8 uF     webshop
- C6G-L-R 3  10 pF 5%    digikey 490-3678-ND
- LED1,2  2  3.7V digikey 404-1175-ND
- D1,2  1 (D1)  diode     digikey 1N4001FSCT-ND
- Q1 1  PNP transistor    digikey 2N5087
- Q2-4 4  NPN transistor    digikey 2N3904BU
- IC1    - not used
- IC2  1  TLE2426 rail splitter   digikey 296-1994-ND
- BUF*  3  LMH6321MR buffer   newark LMH6321MR
- OPALR  1  AD8620 dual sm    digikey AD8620ARZ
- OPAG  1  AD8610 single sm   digikey AD8610ARZ
- vol pot 1  50 K     webshop
- input  1  3.5mm .125" 3way   digikey CP1-3513-ND
- output  1  6.35mm .25" 3way   digikey SC1317-ND


Apr 29, 2011 at 5:14 PM Post #341 of 651
Well, my homemade pimeta v2 is up and running! I used the v2's L and R channels plus the v1's ground channel, all with BUF634s in WB mode. Opamps are OPA827s. Nice sound quality, a clear improvement from my OPA1612a powered CMOY. It's a good match to my SR850s.
 
Anyway, I'm having a little problem, I think it has to do with the PSU I designed. It's a dual voltage one, 220v AC -> 15+15v AC. I'm converting those ±15v AC to DC with a 4 diode bridge, then filtering with 3 1000uF 63v caps and then it gets regulated with a LM7815+LM7915 pair. The regulated output is then filtered with 2 1000uF 50v caps (the rail caps in the schematic), after that comes the v2's class A biasing circuit, and after all that the 6 bypass/high speed caps, as per the v2's PSU schematic. The only thing missing is the TLE2426 since I have a real ground here. The problem is, I think there's a grounding issue...
 
When the PSU is plugged and feeding the amp, I can hear a faint "scratching" hum in the background. When music is playing nothing gets hot, so everything's working fine. When I unplug the PSU and the amp goes on only with the capacitors' reserve current until they get depleted, that scratching hum is gone, the background is pitch black as it should be. 
 
It's not a PSU problem since I was using it with the CMOY; ±15v to the opamp's V±, and its ground connected to where the virtual ground point should be (between the caps and the 4.7k resistors, which I removed). Pitch black background with the CMOY, but not with this homemade PIMETA v2. 
 
What could be the problem? Is there something I'm hooking up the wrong way? Thanks.
 
 
EDIT: I probably have a bad pot. When it's at maximum volume that scratching sound is almost gone, but if it's not, it gets a lot more noticeable, apart from the fact that one channel sounds louder than the other at anything other than max volume. But as I've just said, when I unplug the PSU that sound is gone for the time the capacitors hold their charge. I'll change the pot and report back..
 
EDIT2: I'm now using another source to try the amp.. my x-fi (I was using my nokia 5800 before). The pot is still doing its weird stuff but the faint scratching noise is now mixed with hiss. Now when I unplug the PSU, the hiss is still there until the caps run out of juice. Interesting.. That's the noise of my sound card. It's bad :/ but it's badly amplified since I have to use the pot at 100% volume to keep it from producing a stronger scratching noise. I'll change it tomorrow..
 
Apr 29, 2011 at 10:39 PM Post #343 of 651
Unfortunately I'm not using that well built pot. Just using parts from the local electronics shop just to get this amp going. Probably in the future I'll get higher quality parts.
 
 
I've solved my problem!!! I had two 1000 uF 50v caps after the LM7815 and LM7915 outputs in order to filter the regulated voltage. I decided to remove them (due to having read somewhere that having caps after regulators defeats their purpose) and solder some 4.7 pf ceramic caps I had as spares on the regulators' legs, between ground and their outputs. After that I took the CMOY's 10k pot and 100k input resistors and changed the 50k pot and 470k resistors I had on my homemade PIMETA... and almost all of that scratching humming noise is gone! There's still a liiittle bit, but to hear that I have to stop all music and listen to background noise. At least it's listenable now..
 
I'll see what other changes I can do to my PSU to improve its performance with the PIMETA. Really solid amp! I love it :D
 
EDIT: I think the regulators are shot somehow... I hooked up this PSU to this pimeta when I was half way through building it.. somehow I managed to solder the three TO220 BUF634s backwards :facepalm: when this happened, I remember hearing the regulators! They were doing this very same scratching sound but I could hear it... they got very hot too. After getting new buffers and putting them in the correct orientation, that didn't happen and of course everything's working fine. But when I turn on the PSU I hear the regulators do that sound.. for a second, then they go silent. Probably they're broken (although their outputs are correct, voltage wise) and feeding electronic noise to the pimeta.. which translates into that (now) very quiet noise. I'll get a new pair of 7815+7915 and see if that solves the remaining noise.
 
EDIT2: Well, I added two 6.8 uF nonpolar electrolytic caps as input bypasses on both regulators, one on each. All that scratching noise is GONE! 
biggrin.gif
 the regulators were fine after all.. okay guys, I'm off to enjoy some music on this excellent amp. I'll post pictures of the mess later, I'll have to get/design a case for this but that'll have to wait since university exams aren't far away. 
 
May 1, 2011 at 10:37 PM Post #344 of 651
Help,

I can't figure out why the buffers of my PIMETAv2 get really hot. If I plug earphones there is sound playing.
I measured the V+ and V- voltage to the chips, also the AC signal from the input, the chips to the output and it seems consistent with what I am expecting. I can't measure the current because I don't have an ammeter. I put up pictures and the components I used in the previous post.

I'm at a loss and I don't know what else to check. Any ideas?

Here is what I get when I trace the power. Pin1 of the buffers is labeled as V- on the schematic but I'm getting pin4 instead. Is that normal?
DC = 24.42
IG-OPAG4 = -11.77
IG-OPAG7 = 11.84
IG-OPALR8 = 11.83
IG-OPALR4 = -11.77

IG-BUFG1 = 1.1
IG-BUFG4 =- 11.77
IG-BUFG5 = 0
IG-BUFG7 = 11.84

IG-BUFL1 = 1.1
IG-BUFL4 =- 11.77
IG-BUFL5 = 0
IG-BUFL7 = 11.84

IG-BUFR1 = 1.1
IG-BUFR4 =- 11.77
IG-BUFR5 = 0
IG-BUFR7 = 11.84

 
May 2, 2011 at 3:37 PM Post #345 of 651
Quote:
I can't figure out why the buffers of my PIMETAv2 get really hot.

 
It would be good if you could define "really hot".
 
The LMH6321 does run fairly warm. Maybe it's fine, and you're just expecting that the chip should run cool to the touch.
 
Do you have a cooking thermometer? Even that rough a measurement would help.
 
Quote:
If I plug earphones there is sound playing.

 
What's the DC offset on the output?
 
 
Quote:
I can't measure the current because I don't have an ammeter.

 
Are you sure? Only the cheapest sort of DMM doesn't have at least a coarse 10A measurement feature.
 
 
Quote:
I put up pictures and the components I used in the previous post.

 
The silence means no one has seen a problem with either. That's no guarantee that all is well, but usually simple mistakes get noticed pretty quickly.
 
 
Quote:
Pin1 of the buffers is labeled as V- on the schematic but I'm getting pin4 instead. Is that normal?

 
Yes, the schematic was wrong. I've fixed it.
 
Your measurements look sane, too.
 
The fact that the power rails aren't sagging under the load of a burning chip makes me question whether they're having a problem after all. A DC offset check will help decide that.


Users who are viewing this thread

Back
Top