The DIY'rs Cookbook
Jul 23, 2018 at 10:47 PM Post #1,291 of 1,974
Yeah it should be a great speaker amp as long as it is HIGHLY efficient.
This amp can easily be configured to run on 45's or 2A3's with an easy internal change to accommodate the change.
So with the 45 the power is ≈1.6watts while the 2A3 cranks out a whopping ≈2watts of raw ground pounding power.

And yeah cables are NOT a problem.
In fact I just ordered my 1st set of SE rca cables, for the 1st time in decades.
Of course let the modding begin…

JJ
 
Last edited:
Jul 23, 2018 at 11:54 PM Post #1,292 of 1,974
Yeah it should be a great speaker amp as long as it is HIGHLY efficient.
This amp can easily be configured to run on 45's or 2A3's with an easy internal change to accommodate the change.
So with the 45 the power is ≈1.6watts while the 2A3

And yeah cables are NOT a problem.
In fact I just ordered my 1st set of SE rca cables, for the 1st time in decades.
Of course let the modding begin…

JJ
Color me confused. Are we talking monoblocks (separate chassis in every way for left and right) or dual mono in one chassis, sharing nothing. I've had both true monoblocks and "alleged" dual mono for speakers through the years. Kinda like the tweaky idea of true monoblocks for cans with a volume control in each. Regardless, I'm enthused, and will be watching!
 
Jul 24, 2018 at 12:04 AM Post #1,293 of 1,974
You can keep it balanced coming in with some balanced to singled ended/balanced input transformers for a matching set at Edcor is about 32 bucks. I know you love keeping balanced
 
Jul 24, 2018 at 12:23 AM Post #1,294 of 1,974
Color me confused. Are we talking monoblocks (separate chassis in every way for left and right) or dual mono in one chassis, sharing nothing. I've had both true monoblocks and "alleged" dual mono for speakers through the years. Kinda like the tweaky idea of true monoblocks for cans with a volume control in each. Regardless, I'm enthused, and will be watching!
You're right this isn't true monoblocks as in 2 chassis's as they both will share a common chassis.

And each will have its own MOAR knobs and other controls (off/standby/on) etc.

But it is still in the dev. stage of inception.

JJ
 
Jul 24, 2018 at 4:26 AM Post #1,295 of 1,974
Color me confused. Are we talking monoblocks (separate chassis in every way for left and right) or dual mono in one chassis, sharing nothing. I've had both true monoblocks and "alleged" dual mono for speakers through the years. Kinda like the tweaky idea of true monoblocks for cans with a volume control in each. Regardless, I'm enthused, and will be watching!
You're correct the end result will all be in one chassis not 2, so dual mono in one chassis.
The amount of real estate needed for the amp itself is minuscule, the power supply will take up much more room.
But there will be 2 PSU's and 2 separate amplifier circuits.

This layout will tend to significantly reduce the impact that the PRT (Phase Reversal Tweak) can make, since both channels will be completely independent and completely separated.

But the amp circuits will be tweaked for the 45 tubes and 1.6watts of class A should be more than enough for my 800's.

And speaking of my 800's…
My 'B' set are settling in quite nicely.
I keep hearing 'new' aspects to the music I am very familiar with.
Which is always a very good sign.

JJ
 
Jul 24, 2018 at 4:32 AM Post #1,296 of 1,974
You can keep it balanced coming in with some balanced to singled ended/balanced input transformers for a matching set at Edcor is about 32 bucks. I know you love keeping balanced
That is one option I'm considering, and may start out with, but I'm leaning towards using a TVC (Transformer Volume Control) as it solves several design issues all at the same time.

And the cool factor is off the charts (as is the price).
And I received the vintage 45's already, them'r purddy tubz.

JJ
 
Last edited:
Jul 29, 2018 at 10:31 PM Post #1,297 of 1,974
So the amp was built over 2 days with all of the wiring done on friday.
pic #1845
before 45.pdf

Then saturday it made it's formal unveiling at the HeadFi meet
pic 1846
after 45.pdf


So for being a slap dash amp made of 'spare'/parts bin major components (all the big iiiiiirrrrrrnnnnn) and a few spare 'well used' tubes (6SN7's and a 5R4) along with a new set of EH matched 2A3's it sounds really pretty good all things considered.

We wanted to NOT experiment on the vintage (1938) 45's I have, which will be incorporated into the next generation amp we build, even though during the meet we did modify the circuit just a tad and tried the 45's but only to see if they were functional and that how the circuit responded to the 2 types of output tubes.
This info will be incorporated into the next iteration where we apply the 'correct' transformers (power, chokes, filament, input and output) and dial in ALL of the parameters such as voltage swing, current delivery, inductance, internal resistances, and a whole host of other design parameters.

The saga of the 45 project continues.

JJ
 

Attachments

  • before 45.pdf
    1.4 MB · Views: 0
  • after 45.pdf
    1.2 MB · Views: 0
Last edited:
Jul 30, 2018 at 12:29 AM Post #1,298 of 1,974
Ahhh, the sight and smell of solder smoke at the Seattle Public Library. :ksc75smile:
 
Jul 30, 2018 at 2:21 AM Post #1,299 of 1,974
But of course,,,,,, and for those discerning few, the piquant aromatic contributions that only a quality solder can make.

Audiophile approved no less, and no snakes were harmed in the manufacture of this snake oil free product.

How much better can you get?

JJ hahahahahahahahahaahha
 
Aug 9, 2018 at 7:16 AM Post #1,300 of 1,974
Aug 14, 2018 at 4:12 AM Post #1,301 of 1,974
So I've been working on the layout of my BIG iiiirrrrnnnnnn amp and here is the latest version, that will undoubtedly change and change again.
And be different yet again after the build.

This is a pdf and is 'large' so you may want to zoom out to see the whole thing.

45 amp layout-6.pdf

JJ
 

Attachments

  • 45 amp layout-6.pdf
    37.3 KB · Views: 0
Aug 27, 2018 at 4:58 AM Post #1,302 of 1,974
The HD-800 a headphone ahead of its time.
And the ‘need’ for modifications, common assumptions, and my different approach and results.

Part 1
https://www.head-fi.org/threads/the-diyrs-cookbook.781268/page-84#post-14269778


Part 2


So let me start this off by looking at those measurements I posted previously, again.
This series of measurements were made with my Gen-4 ‘A’ set and my new/used very lightly modded ‘B’ set of HD800’s.
The 3rd set was another set of hardwired 800’s with an inner fidelity trapazoid & ring felt/foam cover mod installed, which can be thought of as a ‘base line’ of sorts.


The first 3 graphs re-tell the tale of the sequence of my explorations, by starting off with the added dampening (plus being hardwired), then next back to stock with a better cable (and protective screens on the outside of the driver cover removed), and then a full gen-4 mod.
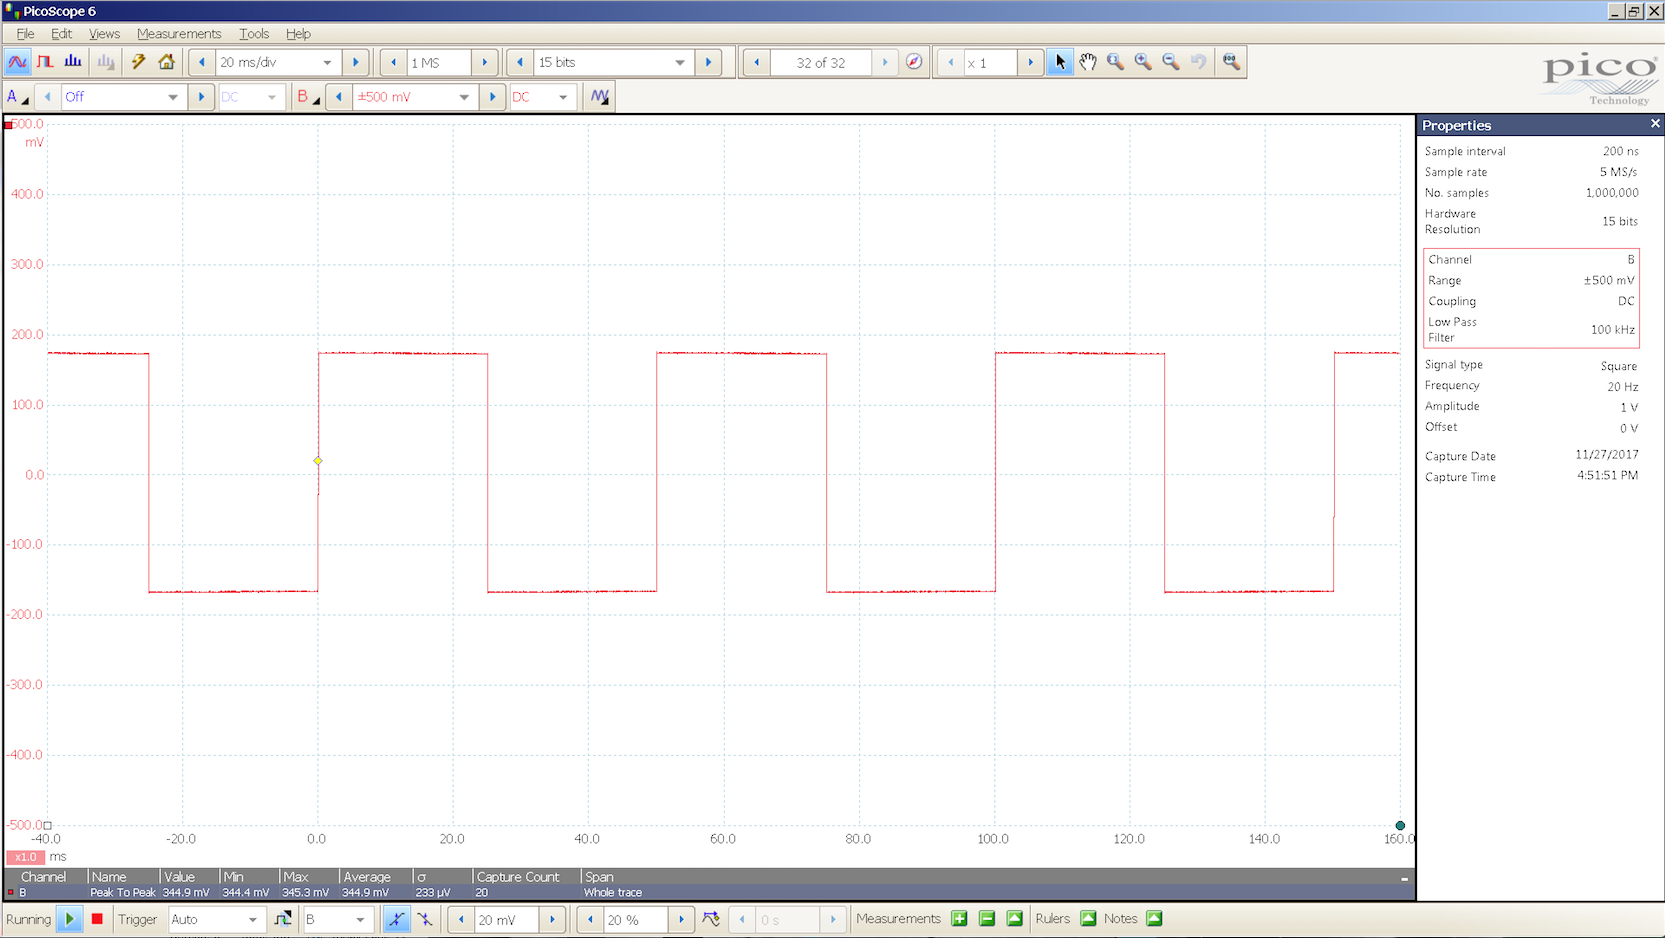
The last graph is the input wave form that the 800's are fed.
These examples are rough/early, response graphs, and I’m planning on a more thorough series of graphs which will make it easier to see the results this approach yields.
Note: a graph of a fully ’stock’ set of 800’s has even more overshoot than the 3rd graph shown here.

But first an analysis of the 3 graphs.

The top graph is my Gen-4 800's.
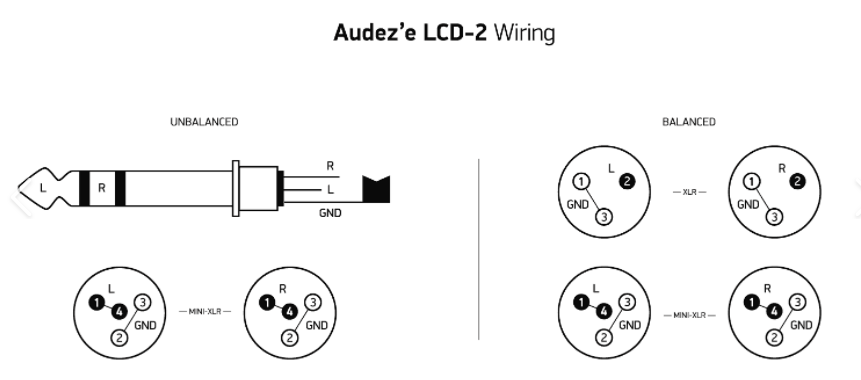
This set has already dealt with the trapezoid and protective screens on the outside of the driver, the inner dust covers have both been removed, they are hardwired with a SAA balanced cable and a rhodium 4pin XLR connector.

The middle graph was my early 'B' set of 800's that had minimal mods that include a cryo'd set of mondo gauge balanced cables that also has a rhodium 4 pin xlr connector, and the driver cover screens and dust covers had been removed.

The bottom graph is a near stock set of 800's with the inner fidelity mod, that have been hardwired as well.

One way to interpret these graphs is to follow the line (the trailing edge) that descends off to the right, and extend it up and to the left, until it reaches the leading edge of the original square wave signal.
In essence you are compressing the way the leading edge ‘looks’, because these graphs are using the highest degree of magnification available, which in turn makes them look ugly.
But this zoomed in view does show us the actual response of the driver when told to go from ‘at rest’ (0), to an arbitrary displacement and then stop and stay there, followed of course by returning back to the rest position to wait for the next cycle to repeat.
Notice, when you compare these 3 different responses, how that trailing edge line changes it's relative position (height above the x axis) with respect to each other, and to what a square wave should look like.

IOW the amount of overshoot during the Initial Leading Edge Response (ILER) has been reduced as shown and in contrast to the change to the final displacement’s offset (height) from rest.

Another thing to notice is the total amount of resonant activity the driver makes before it stabilizes and doesn’t ‘wiggle’ any more as time progresses.
IOW not only how fast does the diaphragm stop wiggling, but also what the accumulation of all the wiggling adds up to, as shown.
Think, all of the area under all of those wiggles, combined, as an indication of generated acoustical energy.
This is an indication of the change to the amount of created acoustic energy where none is supposed to be in the first place.

This is a key aspect in helping all of the C3 elements (Cohesive, Coherent, Coupling) become even further refined, along with several other previously described improvements to the overall SQ.

And during this project, once I zeroed in on this key aspect of performance that I found to be important, I tried to ascertain why this tendency to design in this overshoot, this deviation away from ‘ideal’, or at least a close approximation, is so common and used to the degree that it is.
Because there must be some benefit, but thus far I have not heard from anyone just what this benefit truly is, nor have I heard any reason that makes any sense to me at all.
But then asking the factory would probably not be a very fruitful approach.
However I may have stumbled over the reason for this, but I’ll need more time to evaluate just what I have truly stumbled over.

And with what I was hearing (Gen-4) and even more so now with Gen-5&6 , pretty much my primary motivation to take this to these latest levels (Gen-5&6) is just curiosity, because I’ve got a bad case of SuperDuperSuperGlue (my 800’s are glued to my head and I don’t even want to take them off) and a bunch of my other ‘colorful’ descriptors apply as well (HB&W, T3, REALNESS etc.).

So my results at maximizing the 800’s involves tweaking the entire system that drives them,
AND taming that ILER waveform to more closely match the input step waveform.
This approach also deals with the dreaded tLFF, (the Listener Fatigue Factor) and tweaks the associated parameters with wonderful and surprising results.

DANGER!!! DANGER!!!!
YOUNG WILL ROBINSON DANGER
So this modification project has a few caveats and among them is…
We are fussing with the basic design of the 800’s and as such there is NO BACKUP, NO SAFETY NET of ANY kind!
DO this at YOUR OWN RISK!!!!!!
This will VOID your Warranty!!!!!!!!!!
If you screw up there is NO BACKUP other than yourself!!!!!!!!!!!
While repair parts are available they can be expensive (a set of drivers costs ≈$240 +S&H) and are usually backordered to Germany, think weeks)!!!!!!!!!!!!

IOW this modification requires a degree of commitment and responsibility on the owners part to assume ALL RESPONSIBILITY for the implementation of these mods.
Caveat Emptor, indeed!

Since this is getting long already I’ll end this 2nd part and resume in Part 3

End Part 2

JJ
 

Attachments

  • PicoScope Gen4 'A' set.png
    PicoScope Gen4 'A' set.png
    399.7 KB · Views: 0
  • PicoScope 'B' set .png
    PicoScope 'B' set .png
    397 KB · Views: 0
  • PicoScope AB 2nd set IF mod .png
    PicoScope AB 2nd set IF mod .png
    396.5 KB · Views: 0
  • PicoScope Square wave .png
    PicoScope Square wave .png
    428.3 KB · Views: 0
Last edited:
Sep 2, 2018 at 4:30 AM Post #1,303 of 1,974
So here is the latest iteration of my BIG iiiiiirrrrrrrnnnnnn amp.
I'm currently favoring this layout as it has the greatest separation of the analog section from the power supply.

It still has a ways to go yet.

45 amp layout-10.pdf

And a big thanks to TomSix for the dual choke idea to feed the 6J5's.
The more we thought about it the more sense it made and we realized it was a welcome addition in keeping with the design intent of this amp.

JJ
 

Attachments

  • 45 amp layout-10.pdf
    36 KB · Views: 0
Last edited:
Sep 10, 2018 at 7:10 AM Post #1,304 of 1,974
Yet another progress report on the BIG iiiirrrrrrnnnnnn amp.
So yesterday we started drilling holes, laying out the pieces, most of which have arrived.

IMG_1863.jpg

Drilling 8) 2.5" holes with a hole saw and hand drill is definitely a 2 man job and a major PIA.

And yes it has morphed yet again (re-located most everything), and expanded (back to 24"x12"), and has a few more parts (now with 8) 2.5"x5" PSU filter caps, instead of a measly 6. hahahahahahahahaha

Which is up from our original 3 for the proof of concept breadboard.
IMG_1846.JPG


and the underside
IMG_1845.JPG


I'll have more pics as the build continues.

JJ
 
Sep 16, 2018 at 5:33 AM Post #1,305 of 1,974
BIG iiiiirrrrrrnnnn Update 9/16/18

So over the last 5 days (and counting) the amp has been built and is running and even at this early stage of development is on par with my tweaked ROK amp.
By that I mean some sonic aspects are better for one or the other amp, as are the weaknesses, and some are shared by both such as the extreme bottom end reach that the ROK's has WAY down low, as it is in full evidence this early on.
And at this point in the dev cycle (tweaking the operating parameters) reaching this goal so early is a major confirmation of the designs capabilities.

And one of the potential long term goals, way down the road, is to not use ANY electrolytic caps anywhere, especially directly or indirectly (bias circuits) in the audio path.
This is a major undertaking because the bias circuits for the 45 and 6J5 tubes both have bypass caps in the hundreds of µfd's which would add 12 more of those huge non electrolytic caps for a total of 20 of them. This would add ≈9” of length to the existing length (24”) just for all of those 20 caps.
Of course other suitable lower voltage non-electrolytic caps could be used but they ALL tend to be 'large'.

An example, the 45 tubes are capacitor coupled to the parafeed output xfmrs, via 4.7µfd 800vdc Mundorf "supreme evo", (I call it the hockey puck, for a reason).

And fortunately there might be a way to use interstage xfrms with the parafeed output xfmrs, but that research project is for another day.

Now to get the rest of the circuit dialed in and run in balance, so the full magic can come thru.

Here are a few pics of the amp as it was being built.

And note, what you are seeing is the amp upside down so we can get access to all the circuitry.
In fact the only parts of the amp that will be visible on top will be the 8 filter caps, the 4 tubes and 3 small xfmrs and the 2 volume controls and 2 xlr inputs.

Today we added the plate chokes for the 6J5 tubes and dialed in the filament voltages and B+.

And running the 45 tubes upside down is not recommended so the amp is only on for testing and I’m using a pair of ‘nearly matched’ tubes for testing with the vintage 45 tubes still safely tucked in their bed, waiting for their debut.


The power supply mostly done
IMG_1886.jpg

and the glamor shot

IMG_1891.jpg

and operating
IMG_1895.jpg

There is more to come…

JJ
 

Users who are viewing this thread

Back
Top