THE DIY HEADPHONE STAND THREAD
Mar 19, 2011 at 10:49 PM Post #766 of 3,874
The second one is crazy, not to sure about the knife....
 
 
Mar 21, 2011 at 2:01 PM Post #767 of 3,874
Thought I would add mine to the mix. The base is done in Cherry, the vertical posts are Walnut, and the actual arm is Mahogany. Everything was done by hand, using a saw, plane and chisel, and the whole thing was sealed using a gel varnish. Forgive the crappy headphones on the stand, they were all I had on hand for the pics.
 
Mar 21, 2011 at 4:34 PM Post #768 of 3,874
hey hey, that design looks familiar.
 
Mar 21, 2011 at 10:55 PM Post #769 of 3,874


Quote:
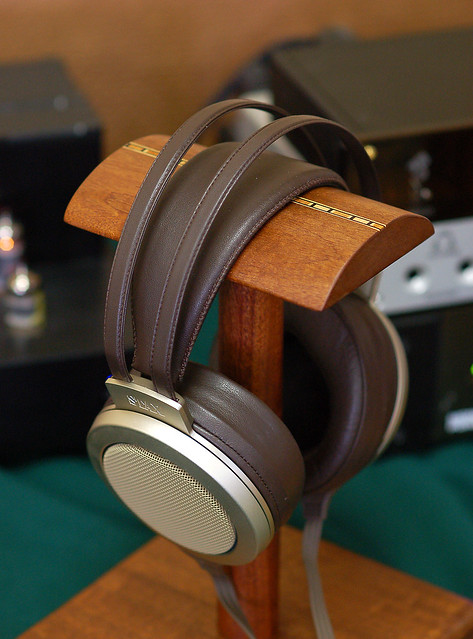
I made this with the LCD-2's in mind because I didn't want to hang them, considering their weight. I knew if they were hung for even short periods of time, the headband pad would become permanently compressed. Also, the amount of contact in general is very minimal, which is good for the shape of the ear pads and headband pad.


I still have to add some sort of fabric surface on the metal cabinet pull, but this was a very cheap design and looks quite nice. Almost like an LCD-2 display case!


couldn't you use a bar with a huge thing of foam around it to protect it?
 
Mar 22, 2011 at 3:31 PM Post #771 of 3,874
I made my own with no wood at all.
 
My favorite way to make things like this...Head to Home Depot and grab some copper pipe. Play legos for a little while and get something into shape. Buy it, build it at home, shine it up, done.
 
They look brilliant. I love copper.
Quote:
i have no prior woodwork knowledge. can't make my own :frowning2:


Mar 22, 2011 at 11:05 PM Post #774 of 3,874


Quote:
That's REALLY pretty...
 
My better half is into crafts...maybe I can hint at something for our anniversary. Hmm....


I know.Thanks.
It actually looks better in person


Mar 23, 2011 at 9:44 PM Post #776 of 3,874
Thought I would add mine to the mix. The base is done in Cherry, the vertical posts are Walnut, and the actual arm is Mahogany. Everything was done by hand, using a saw, plane and chisel, and the whole thing was sealed using a gel varnish. Forgive the crappy headphones on the stand, they were all I had on hand for the pics.


Nicely done! Something really satisfying when you do something yourself

Cheers,
Al
 
Mar 23, 2011 at 9:57 PM Post #778 of 3,874


Quote:
Quote:
hey hey, that design looks familiar.


Hey towert,

I owe you big time on the inspiration department too. How are you and your dad doing with the business?

Al


smile.gif

Thanks Al.  That really makes me happy to hear that you were inspired by something that I did / made.
 
My dad doesn't work on them in the winter, so he hasn't worked on any in a long time.  The weather is just starting to get nice enough to open windows, so he should be getting back into it shortly.
 
I personally had a need for a single headphone stand (instead of the double we usually make), so I built one last week.  My first time playing with inlay.  This weekend I'll take better pictures of it, but here's it at the NY meet last Saturday:


I wanted the top smaller so I could fit a dust cover over it (electrostatics don't like dust).
 
I've shown my dad this, and he may try making a few.
 
Mar 24, 2011 at 1:12 AM Post #780 of 3,874


Quote:
Nice work. You continue to amaze me with your craftsmanship. Did you make an acrylic cover to go overtop?


Thanks.
That's another thing I've been kicking around in my head, but at the moment I haven't built one.  I'm just using a little stax headphone cover.
 

Users who are viewing this thread

Back
Top