SE846 Filter mod
Aug 15, 2019 at 8:17 PM Post #211 of 251
The vent tube I have aligned parallel to the earphone tube and terminatesoutside of the threaded connection entirely, so it’s venting parallel to the earphone tube from canal to atmosphere, but in the configuration I had, damper and heat shrink, it would also have been venting the entirety of the speaker box configuration due to not using the sealing arrangement of the Shure filter insets

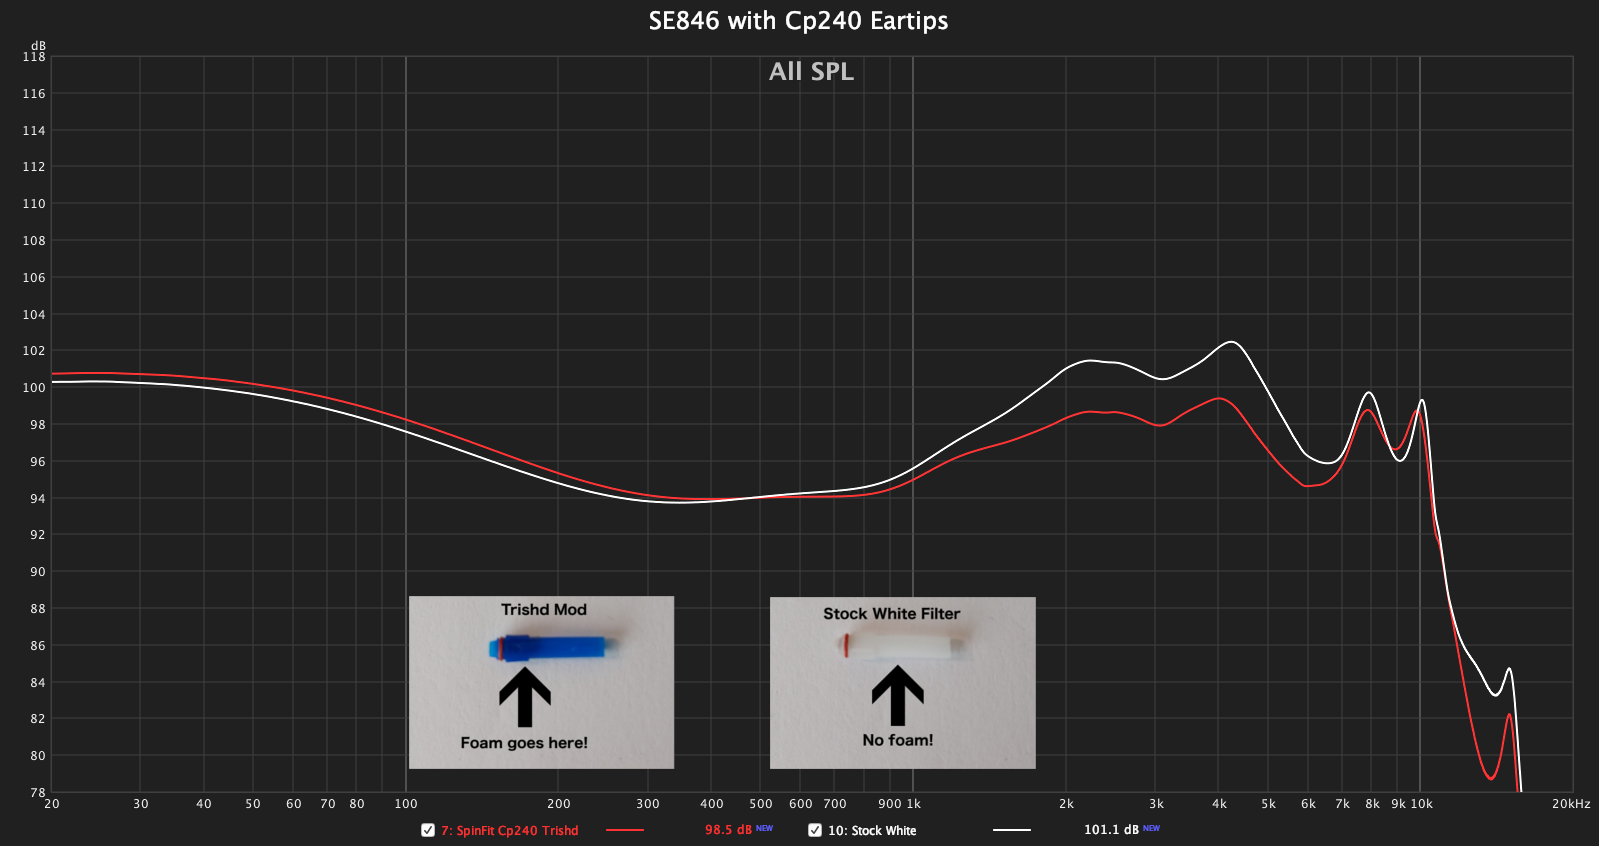
From about 15 minutes with the green filters in a stock Shure filter inset, the sound is noticeably different, and for the better - this is definitely the sound I was after the entire time.
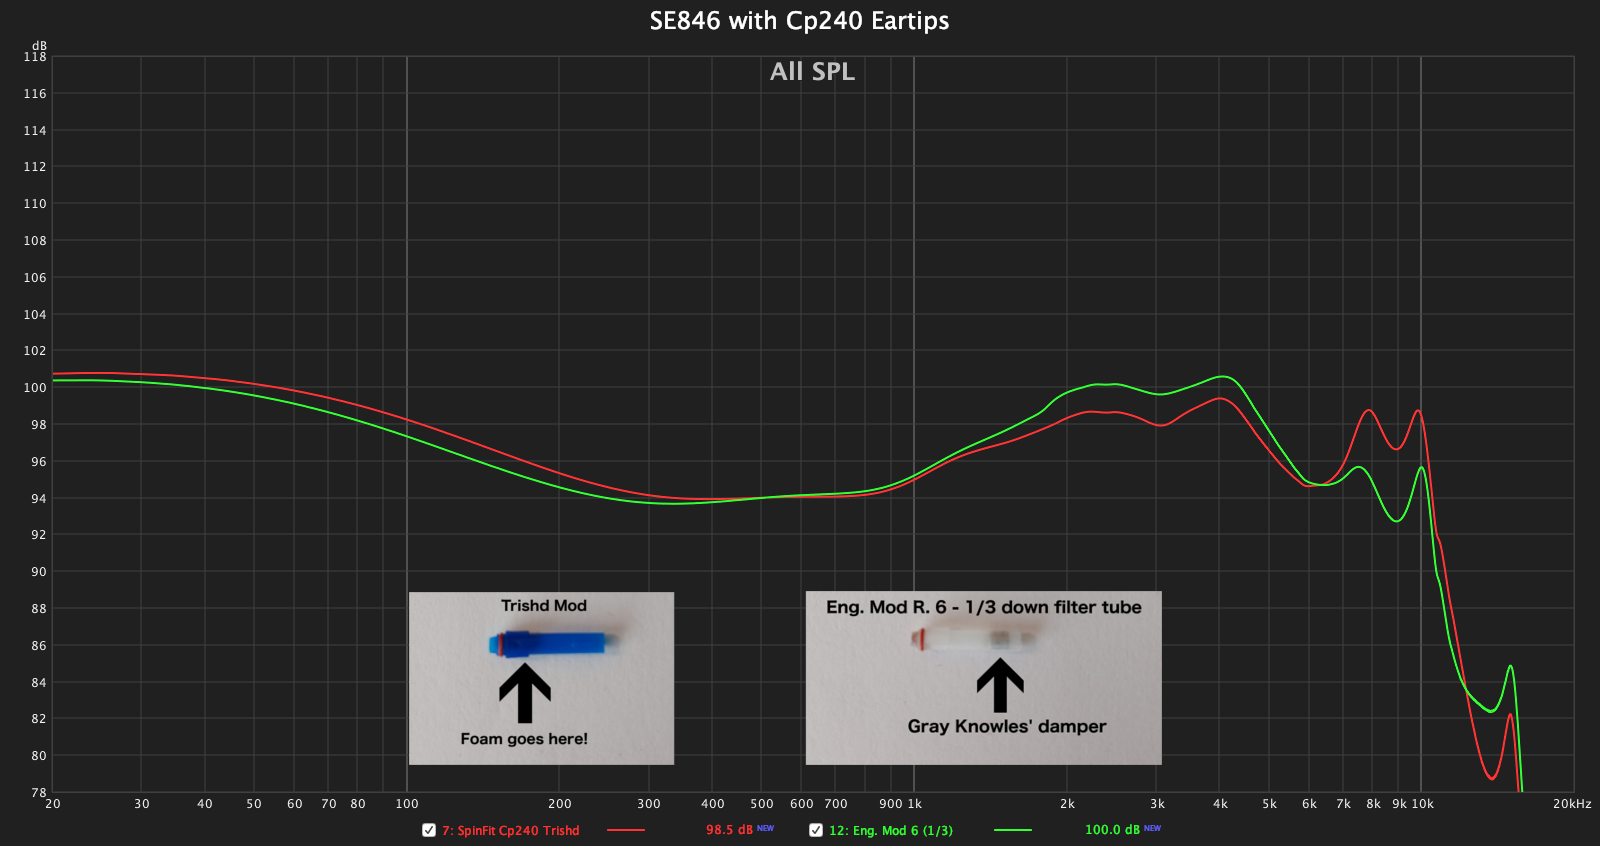
I’d need more listening time with them to be sure, but the 8-10k peak was very very offputting and I’ve only just noticed it from its absence, and I tried a number of combinations of knowles damper, diameter or total number of metal vent tubes etc to remedy this previously but returning the internal arrangement to stock state, and then using a knowledge damper purely for the filter effect is definitely the way to go.

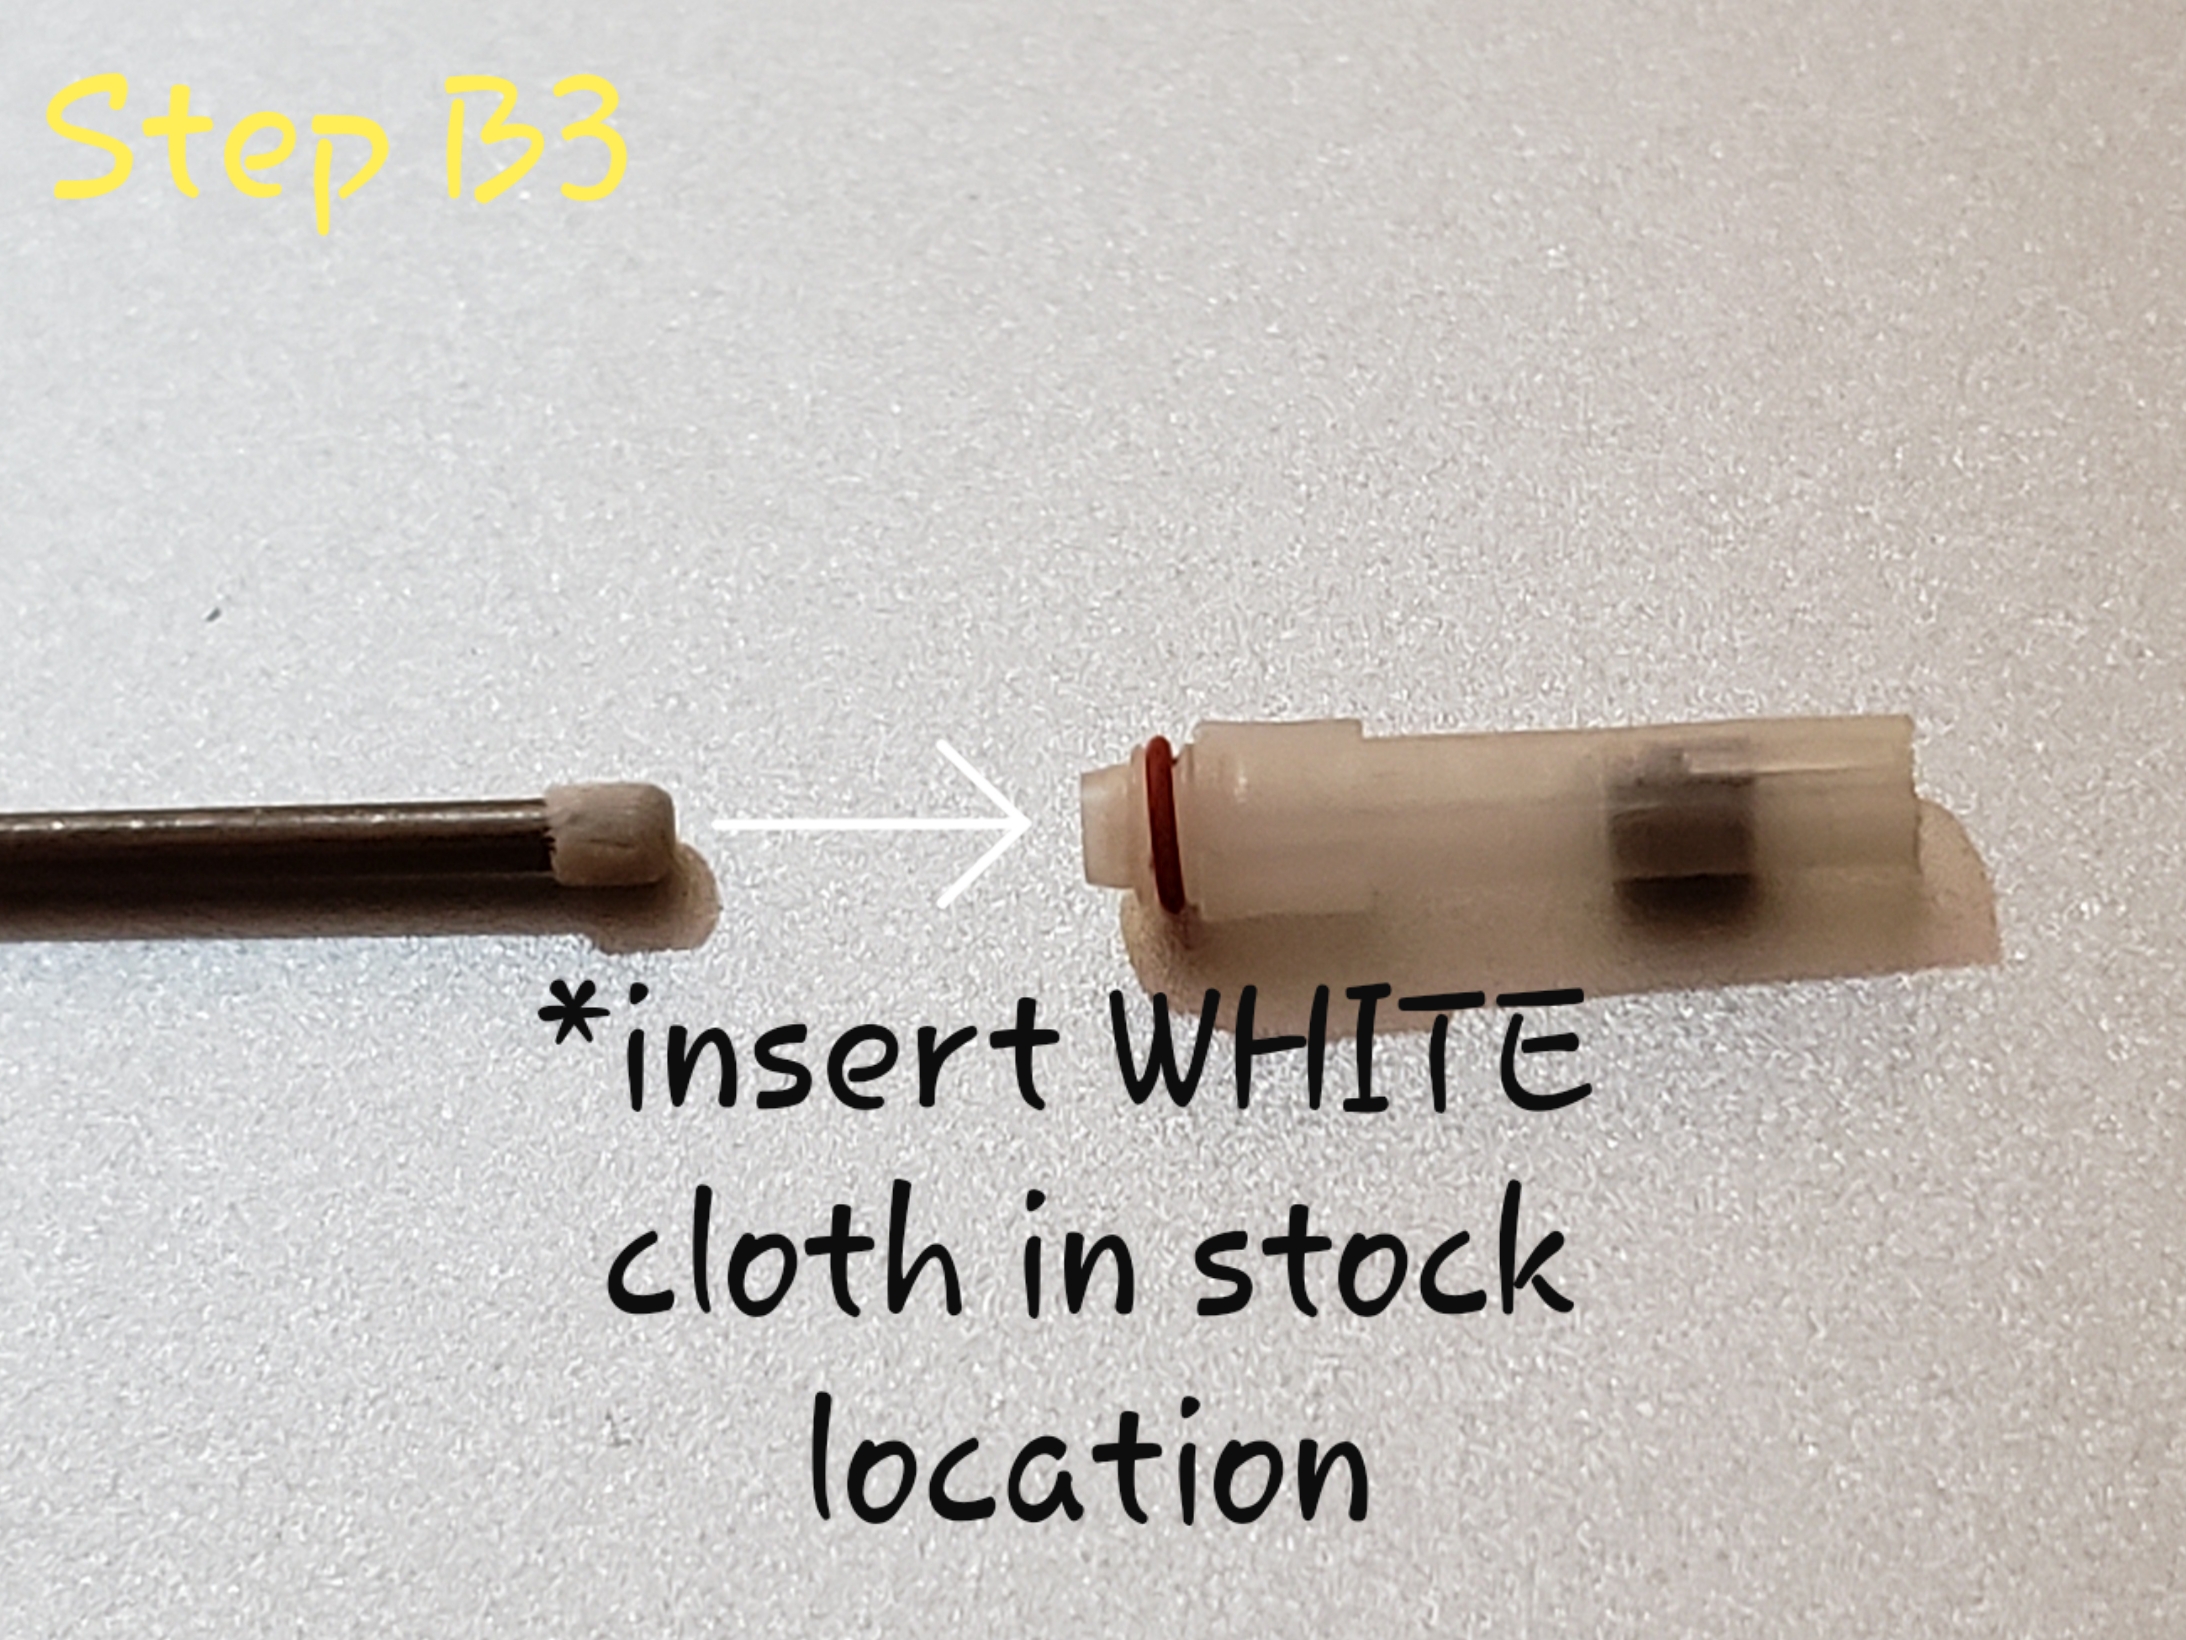
As far as size goes, my callipers aren’t useful for a measurement, but inserting them into the filter inset was a very tight squeeze, so I think it’s reasonable to assume they are the same size as what you had ordered.

I'm glad you like it! This is encouraging since your're the second person that has tried this mod and liked it. The green Knowles filter in the Shure filter tube is a solid configuration that can stand up on its own. But if at any point you feel like its just a hair too bright try the second part of the mod. I updated post 202 with that information.
 
Aug 19, 2019 at 9:43 PM Post #212 of 251
After a few days with green filter I still like it...alot actually...but curiosity is a funny thing.

It seems like every filter, no matter the resistance, benefits from a little bit of foam close to the end of the nozzle to tame some of the sibilance. It seems that 1/8" from the end of the nozzle is a strategic position.

So what if the stock filter element was moved to this position and made weaker? Oh yes, one more filter mod coming your way. This one is wild though..

You start by gutting the stock filter ...and then fill it with 30 minute epoxy.

HUH ?!?

Stay tuned for the rest of the steps...
 
Last edited:
Aug 21, 2019 at 5:41 PM Post #213 of 251
"Engineer Mod" FINAL REVISION UPDATED OCTOBER 20, 2019

Special thanks to @csglinux for:

  1. The pivotal design idea of maintaining stock filter location and adding another one in series.
  2. Getting me thinking about an alternate way or removing an installed filter barrel now that pushing it out was no longer an option (see pictures)
Revision 6 (Final Revision) is being divided into Version A and Version B. Version B is STRONGLY RECCOMENDED over version A. Version A was a successful experiment ... but Version B is better and lets you forget you're listening to IEMs.
  • Ver. A (High Resistance) USE WHITE INSERT:
    • Inlet: BROWN cloth
    • Outlet: GRAY barrel 2.2mm - 2.5mm deep (Correct depth is VERY important)
  • Ver. B (Low Resistance) USE BLUE INSERT:
    • Inlet: WHITE cloth
    • Outlet: GRAY barrel 2.2mm to 2.5mm deep (Correct depth is VERY important)
20190925_225924.jpg

Tools and Parts List:
Shown are the steps to recreate "Engineer Mod" Ver. A. If Ver B is desired simply perform these steps to a BLUE insert...just remember to pull out the foam pieces from the BLUE insert.) After many hours with both and feedback from the community I recommend Version B. It really is a superior configuration, especially if used with foam eartips.

20190925_230340.jpg

ALL DRILLING DONE BY HAND!

20190925_231045.jpg

INSERT IS INSERTED IN NOZZLE TO PREVENT EXPANSION WHILE DRILLING

20190925_231200.jpg

20190925_231408.jpg

START WITH 2.0MM BIT AND DRILL BOTH INSERTS... THEN REPEAT PROCESS WITH 2.05MM BIT... AND FINALLY WITH 2.1MM BIT.

NOTE: If you jump from 2.0mm to 2.1mm you will most likely rip the filter apart...I learned that lesson the hard way!


20190925_232016.jpg

20190925_233110.jpg

20190925_233206.jpg

20190925_233833.jpg

20190925_234307.jpg


IF YOU GO TOO FAR AND NEED TO REMOVE BARREL:

20190911_151203.jpg

20190911_151312.jpg

I
gnore the dual barrel design. This picture was taken with a previous revision. However this method of removing filter barrels by pulling them out still applies.

20190911_151744.jpg

20190911_152458.jpg


Attachments

  • Vent.jpg
    Vent.jpg
    175.3 KB · Views: 0
  • 20190925_235327.jpg
    20190925_235327.jpg
    620.7 KB · Views: 0
  • 20190925_235709.jpg
    20190925_235709.jpg
    1.8 MB · Views: 0
  • 20190925_235949.jpg
    20190925_235949.jpg
    1.6 MB · Views: 0
Last edited:
Aug 21, 2019 at 6:03 PM Post #214 of 251
... and so it starts, only instead of 30 minute epoxy I'm going to instead use Silicone caulking. I will keep updating this post wiith more steps as I go.

This mod is based on a gut feelling / theory of mine. My goals in this mod are the following:
  • Use as little dampening material as possible in the most stratetegic position possible.
  • Go from a plastic diameter-shifting chamber to a silicone constant-diameter one. The stock chamber starts at 1.5mm, then restricts down to 1.0mm, and then widens to 1.7mm but in the shape of a D. The rebored chamber will be 1.5mm from start to finish and silicone-lined.
  • Placement of a Brown Knowles filter towards the end of the filter tube so as to allow a weaker filter to work more efficiently. Due to the shape of the dampeners (O-like) and the shape of the tube ( D-like), some modification are in order.

STEP 1 - Carefully push out the cloth filter (notice the color, more on this later) out of your white filters using a paperclip with a blunt end.


STEP 2 - Drill a 1/16" hole in the tip of the Silicone Caulking tube.


STEP 3 - Line up the end of the now empty white filter tubes with the hole you just created and fill both tubes full of silicone.


STEP 4 - Use two 1/16" drill bits and insert the non-sharp end in the O-ring side of the filter tubes. Depth should be about where the tube gets thicker (its not important that this is precise). You're only creating a stop for the silicone. After wiping the extra from the tip of the plastic tubes, stick the drill bits in a piece of cardboard like shown and wait for them to dry. After about 20 minutes remove the drill bits so the silicone can dry faster by getting air from both sides.
Ok, I guess I'm intrigued to see part 2, because from part 1, I predict the FR is as follows:
caulk.png

:wink:
 
Sep 2, 2019 at 1:34 PM Post #221 of 251
Many thanks to @unispeed for mailing me a couple of his "engineering modded" filters. These were white filters with the built-in Knowles fabric damper at the bottom removed, but with a separate damper added near the opposite end (near the open/IEM end of the filter tube). @unispeed has made an interesting discovery with Knowles dampers that can actually fit inside the original filter tube. It does make for a more repeatable mod, since you can control the type and exact position of the damper. The net result looks to be something a little brighter than the trishd mod, which is included here (in blue) as a reference point in comparison to the two (1kOhm and 680Ohm) dampers:

unispeed1.png


You can control exactly where the damper sits, so you can move it farther down the filter tube. Here's the effect (rough distance in mm from the open end of the filter tube):
us_1k.gif


One interesting and possibly challenging thought... What if you kept the original Knowles dampers in the white filter tube? Getting another damper in (and increasing its depth down the tube) might be possible, but how would you pull it out again, since you wouldn't be able to push it out from the other side? :wink:
 
Sep 2, 2019 at 2:41 PM Post #222 of 251
Many thanks to @unispeed for mailing me a couple of his "engineering modded" filters. These were white filters with the built-in Knowles fabric damper at the bottom removed, but with a separate damper added near the opposite end (near the open/IEM end of the filter tube). @unispeed has made an interesting discovery with Knowles dampers that can actually fit inside the original filter tube. It does make for a more repeatable mod, since you can control the type and exact position of the damper. The net result looks to be something a little brighter than the trishd mod, which is included here (in blue) as a reference point in comparison to the two (1kOhm and 680Ohm) dampers:


You can control exactly where the damper sits, so you can move it farther down the filter tube. Here's the effect (rough distance in mm from the open end of the filter tube):


One interesting and possibly challenging thought... What if you kept the original Knowles dampers in the white filter tube? Getting another damper in (and increasing its depth down the tube) might be possible, but how would you pull it out again, since you wouldn't be able to push it out from the other side? :wink:

Thanks for the visual data! Now, that's an idea! If done this way you would have to pull the filter barrel out. I think either Sonion or Knowles have a tool for that. I started to get the feeling that I needed to have 2 dampers when I found myself having to compromise on depth. Deeper tamed the mids and gave more highs. Shallower tamed the highs but gave the mids too much of a boost. Revision 5 is based on 2 dampers but they are still very much to the other side of the insert. When I tried it with 2 whites in serial the result was more sub bass, less pronounced upper mids, and more controlled highs... at least to my ears. BTW, the original post has been updated with Revision 5. @csglinux just when you though you could keep up with my filter mods and now there is another one. I'll get some "updated" inserts coming your way... :wink:
 
Sep 3, 2019 at 10:21 AM Post #223 of 251
@csglinux I was able to slow down your .gif file enough to see what was going on. It seems that outlet diameter is not the only thing that is affecting the shift you originally spotted in the Knowles filters. At a depth of 8mm (basically where the stock filter sits?) the shift disappears altogether. So at this point its clear to me that an acoustic resistance, even if small, is needed at this critical location.
So this is what I'm gonna do:
  • Take a stock white filter and still gut it but this time I wont remove the shelf that holds the stock cloth in place (now there is another change in diameter that might be affecting that shift..hmmm)
  • Replace the brown cloth with a gray cloth, sans barrel of course
  • Then continue with the rest of the mod from the outlet side.
This would mean that each insert actually has 3 filters but since they are all grays the final resistance would be 360x3 so 1080 ohms which is very acceptable. Even though the filters are all the same, due to their location each one would be progressively more powerful. The barreled filters would still be adjustable, you would just need to sacrifice the inlet filter if you ever wanted to push them out. At $1.30 a piece that's not a huge sacrifice.

Hey, thanks again for the idea!
 
Last edited:
Sep 4, 2019 at 10:55 AM Post #224 of 251
I tried a variation of what you described in the previous post, basically taking advantage of removing the “internal vent” by filing down the spacer, using a white cloth from the Knowles filter at the standard location on the stock tube, and then a brown 1000ohm knowles filter at the end, offset by about 3mm. The net resistance should equate to the green knowles cloth, fully externally venting the sound without including the BA chamber vent that exists when using a standalone knowles filter.

Despite the same rough resistance (1680 vs 1500) The sound is far more suited to my tastes, though only after I used the vent mod I’ve previously shown on page 14, it’s a more clear mid-forward presentation while keeping the bass I would normally add via EQ. It’s the first time I’ve not needed nor wanted any extra EQ, and probably the best I’ve experienced as far as sound stage and separation go.

I definitely think you’re on the right track using some acoustic resistance in the stock position and further EQ via additional filters toward the opposite end, though I can’t conceive why, I imagine it’s a similar effect to what was discovered in the trishd mod, perhaps with extra control of the filters instead of attenuating foam?

I’d be really keen to experiment with this “vented engineer mod” against your engineer mod version 6, in the previous post. I think somewhere in this round of experimentation lies the “holy grail” sound we all seem to be converging on
 
Sep 4, 2019 at 1:12 PM Post #225 of 251
I tried a variation of what you described in the previous post, basically taking advantage of removing the “internal vent” by filing down the spacer, using a white cloth from the Knowles filter at the standard location on the stock tube, and then a brown 1000ohm knowles filter at the end, offset by about 3mm. The net resistance should equate to the green knowles cloth, fully externally venting the sound without including the BA chamber vent that exists when using a standalone knowles filter.

Despite the same rough resistance (1680 vs 1500) The sound is far more suited to my tastes, though only after I used the vent mod I’ve previously shown on page 14, it’s a more clear mid-forward presentation while keeping the bass I would normally add via EQ. It’s the first time I’ve not needed nor wanted any extra EQ, and probably the best I’ve experienced as far as sound stage and separation go.

I definitely think you’re on the right track using some acoustic resistance in the stock position and further EQ via additional filters toward the opposite end, though I can’t conceive why, I imagine it’s a similar effect to what was discovered in the trishd mod, perhaps with extra control of the filters instead of attenuating foam?

I’d be really keen to experiment with this “vented engineer mod” against your engineer mod version 6, in the previous post. I think somewhere in this round of experimentation lies the “holy grail” sound we all seem to be converging on

So you basically have a stock blue filter (white cloth) with revision 1 of my mod + the external vent. The standard mod is already mid-forward with the removal of the stock cloth at the inlet. By having the white cloth at the inlet you will be taming the mids a bit but then adding them back with the vent. Of course all those variables together might have a different result than what I just described.

To address what you said about using the foam at the end vs using filters... well, no 2 foams are the same length and adding insult to injury, they are not all positioned in the same place when you get them from Shure. So in reality everyone is hearing something slightly different when they are talking about "stock filters" and that's with everything else being the same. That is not so if using the Filter barrels. The cloths that we refer to as dampers actually come from the medical field. They were originally designed to filter particles in blood and that is why a Sonion Brown cloth will sound pretty much like a Knowles brown cloth which will sound like a Shure Stock white filter (brown cloth). The quality control here is extremely high and the results can be duplicated almost exactly when using the depth-tool outlined a few threads up.

Interestingly a White (680) cloth with foams in front of it can sound more bassy than a Brown (1k) cloth with nothing in front of it. I think there is a lesson to be learned here and its why Revision 6 is employing smaller resistances but placing them in strategic locations. What I'm trying to do is get close to the same bass response of the Trishd without loosing the high mids and the "air" gains in the 15-16k region. It may not be possible but that's what I'm shooting for with my current revision.
 
Last edited:

Users who are viewing this thread

Back
Top