Modifying the Xiang Sheng 708B [56K!!!!]
Aug 4, 2008 at 3:47 AM Post #181 of 223
I was thinking if all this modding is worth the time and cost of components - may add up to be almost same or even more than the cost you've saved by not buying from Woo or RSA.

Looking at the incredible workmanship in your photo, you must find much pleasure & satisfaction in modding.
 
Aug 4, 2008 at 4:41 AM Post #182 of 223
Quote:

Originally Posted by sonq /img/forum/go_quote.gif
I was thinking if all this modding is worth the time and cost of components - may add up to be almost same or even more than the cost you've saved by not buying from Woo or RSA.


Make a parts list, and see what the upgrade parts cost is to build an amp like this using parts of the same "grade" as is found in a Woo, singlepower, mccalister, decaware, or RSA amp.

According to the "mot" rules, DIY'ers are not allowed to assign a price to hourly labor, and must sell their work purely at parts cost. If you would like to ignore that, the labor rate is $25/hour based on what I guess a solder tech who can probably solder better than you gets paid. If it takes you 2 hours to unstuff and repopulate this board you have it bad or are likely P2P'ing the amp which is not required if you use parts of similar quality as mentioned above, and should only account for $50.

Now then we have the finished product, with a base price of $120 which is about the average used price for the amp , the upgrade parts costing about $75, and $50 of labor (which we should not even count, but I am initiating a premptive strike.) This is just a hair under $250!

As far as SQ is concerned, this is a very subjective matter. Try it against something from RSA at the $250 price point used LOL. Hornet M FTW! Im not sure if any of the woo amps ever sell in the $250 range, I dont think they do.
 
Aug 4, 2008 at 4:59 AM Post #183 of 223
The 708B is a true sleeper. Earlier in this thread, it was noted that this is almost a clone of the MJ amp, which is very highly regarded

Modded, the SQ rivals the 336 and beats the figaro, both within striking price range

Not the same league and performance level as my woo 3+, however
 
Aug 14, 2008 at 12:56 AM Post #184 of 223
For several months now I've had to apply leftward pressure to the the end of my headphone cord while it is plugged into the 708B in order to hear the left channel. The problem is not with my cord. Recently, the left channel has stopped working entirely. Any suggestions? How difficult is replacing the jack input, and what reasonable options are avail?
 
Aug 17, 2008 at 12:31 AM Post #185 of 223
Quote:

Originally Posted by Stephen_Ri /img/forum/go_quote.gif
For several months now I've had to apply leftward pressure to the the end of my headphone cord while it is plugged into the 708B in order to hear the left channel. The problem is not with my cord. Recently, the left channel has stopped working entirely. Any suggestions? How difficult is replacing the jack input, and what reasonable options are avail?


it might not be the jack itself, but the front aluminium plate. it seems to 'drift' forward a bit and cause the plug to not be able to be fully inserted into the jack. try fixing that first.
the jack itself is not hard to replace, the real challenge is either finding a jack with the same pinout or an open jack that's long enough to fit through the aluminium panel.
 
Sep 22, 2008 at 9:46 PM Post #186 of 223
i just fell in love with my 708b all over again. i replaced the crappy wima film caps today(mine weren't the mentioned 400v 220nF but 630v 220nF, they must've run out of 400v) with some cheapy Evox 400v 220nF($.25 a piece) caps i got at a local electronics store, and even THESE are a ton better than the wimas. i highly recommend that everyone do this if you haven't already, like i said, even my cheapo caps are better than the wimas they used. the evox caps sound a bit more airy and natural, and i actually found that they calmed down the outrageous bass a bit and extended the high end a bit more.

and just to reiterate:
[size=medium]SPEND A DOLLAR AND REPLACE THE WIMA CAPS!!![/size]
 
Oct 2, 2008 at 1:17 AM Post #187 of 223
This evenings festivities involved replacing the plate "resistors of sound quality" on the input/gain tubes with constant current sources.

For quite some time I have been using the stock 33k ohm resistors here with a LED cathode bias and everything was pretty good, but why not mess around with perfection? In my amp, the 33k resistors put about 105-110V on the plate of the input tube which agrees with the voltage in the headwize MJ article. As I have been researching the 6DJ8 I have come to realize that it is a fairly dinky bit of metal and decided that running the output tubes at rated power (per section!) may not be the best idea anyone has had in a while.

I used 10m45 CCS made a few calculations for the resistor value and got VERY close to my desired result.

I took this opportunity to reduce the current in the gain stage by about 10% (from 2.2ma to 2ma) which reduced the plate voltage on the gain tube a few volts, and since the plate voltage is "echoed" through the output stage the current in the output stage dropped a little too! My choice to reduce current in the gain stage comes with the fear of less linearity, but my thought process says that the CCS loaded tube at a slightly less linear operating point is MORE linear than the resistor loaded gain tube.
 
Oct 2, 2008 at 11:17 AM Post #188 of 223
Finally, an update to my little XS headphone amp (previously mentioned in despatches here in this post).
Looks the same on the outside, right?
bb82bf2fbc.jpg

But there's been a few changes on the inside. PS board has been mounted edgewise (and runs cooler as a result). Bleeder resistors added to the PS caps. New wiring. New headphone jack. New RCA's. ALPS volume control ($8!!). 3 new output tubes (PS are still original). Blue output caps are probably Philips. Other caps are EROMAK (gold), plain-jane Mundorf (white - very neutral, we like them), Russian PIO (green), and I'm blowed if I can remember what the black cap with the red ends is (maybe a Wima?).
9978ac89fb.jpg

And here's an overhead shot:
712a954eab.jpg

And a close-up of the changes at the front:
2255af84dc.jpg

And the crossfeed circuit (which we have to mount outboard, as it just doesn't seem to work properly when we tried to mount it in the chassis):
821192f9f1.jpg


James did all the work, I just scrounged around for some of the parts. He may be able to answer any of the complex questions this might arise...

Sound, well it's still pretty fat at the bottom end, but much better controlled and very lacking in distortion. Top end is much better then previous. The mids were always quite good and we have only minor gains there. Volume control is about 12 o'clock for 'quite loud now, as against 8 o'clock previously.

About $100 spent on parts, of which about $50 made it into the chassis. James spent countless hours playing around with the set-up and had numerous insights into how he's going to build his own headamp.
 
Oct 15, 2008 at 7:15 AM Post #189 of 223
I'm thinking of adding in another 6DJ8 as a buffer, using one triode for each channel.
Schematic as follows:


xs708bschematic2120vaudvz8.jpg


Ideas? Comments? Suggestions?
 
Jan 7, 2009 at 6:15 PM Post #190 of 223
Hi! I've been following this thread as a lurker for some time, and went to the trouble of importing a xiang sheng 708B and all the parts needed for modding from hificollective- thing is it took so long to get here that i can't be bothered anymore and i have another pre! I've put everything on eBay as one auction so if anyone's interested in doing this project then have a look, it's going cheap at the moment.

Fraser
 
Jan 10, 2009 at 2:30 AM Post #191 of 223
nikongod,

So how did the CCS affect the SQ? In the end which way do you prefer: res/cap bypass, LED, or CCS? Would you mind posting some pics of this latest addition when you get a chance.


Cloth Ears,

What size uF output caps are you using? I'm wondering how much deep bass I've been missing with my paltry 7.6 uF caps. I'm hesitant to go back to electrolytic and big films are expensive so I've just left em alone for the time being. How do you feel about the SQ and presentation of your modded amp now that it's been a while?


Random Murderer,

Did you ever play around with adding a buffer stage? I've often wondered how well balanced the push/pull output stage of this amp is in the first place. I think focusing on that might help the "drive" of this amp. Now that I have my o-scope back I want to take a look and see how bad things are in this amp. Optimizing the component values will be my next step with this project.
 
Jan 10, 2009 at 5:11 AM Post #192 of 223
Quote:

Originally Posted by dcheming /img/forum/go_quote.gif
nikongod,

So how did the CCS affect the SQ? In the end which way do you prefer: res/cap bypass, LED, or CCS? Would you mind posting some pics of this latest addition when you get a chance.


The CCS&led in the gain stage improved detail overall, and (sadly in the opinion of some im sure...) made the amp less "tooby". Its still not the ultra-hard sound of a "lots of global feedback" monster, but its not the typically tubey sound the amp once was.

For the gain stage there is NO question, I prefer it with CCS plate-loading & LED bias. For the output stage, I think things are still "up in the air" as far as what to do. I originally used a 2V LED to bias but the sound did not improve as much as I had hoped. I replaced the 2V LED with 1.7V which improved the sound, but im now running AT the rated power of the tubes.

My gut-instinct is that the 2V LED is not as good for this purpose as the 1.7V one. I cant test, but I assume that the 2V led has a higher AC impedance than the 1.7V, which could actually over-ride the whole reason I used it! The solution would be to use 2*1.7V LEDs for 3.4V OR rebuild the gain-stage (again) to get a different output voltage which allows me to use 1*1.7V LED. There is no way a 3.4V bias voltage will allow enough current with a 6dj8, so Im going to rebuild the gain-stage when I become motivated. Motivating me is the hardest part...

OOH, I re-adjusted the plate resistors in the output stage to HIGHER than what the "optimization" calculations would sugjest on the hope that output impedance comes down a few ohms. I dont need all the current or voltage that it can swing with the lower values.

Quote:

Originally Posted by dcheming /img/forum/go_quote.gif
Did you ever play around with adding a buffer stage?


The output of the amp is a buffer.
Quote:

I've often wondered how well balanced the push/pull output stage of this amp is in the first place. I think focusing on that might help the "drive" of this amp. Now that I have my o-scope back I want to take a look and see how bad things are in this amp. Optimizing the component values will be my next step with this project.


Check out the head-wize MorganJones article.
Regal mentioned the possibility of "just" dropping the values in from that, which was the inspiration and source of the values i used. It requires some alterations to the gain stage cathode resistor value, but its totally doable.
 
Jan 10, 2009 at 5:57 PM Post #193 of 223
Quote:

Originally Posted by dcheming /img/forum/go_quote.gif
Random Murderer,

Did you ever play around with adding a buffer stage? I've often wondered how well balanced the push/pull output stage of this amp is in the first place. I think focusing on that might help the "drive" of this amp. Now that I have my o-scope back I want to take a look and see how bad things are in this amp. Optimizing the component values will be my next step with this project.


the amp already has a buffer stage, but i was contemplating putting in another buffer for the hell of it.
never got around to it. instead, i decided i'm happy with the amp the way it is(6x4, 2x 6dj8, jan 5670w, led biasing, full resistor replacement, custom crossfeed on the phone output), but i may cap-roll it.
 
May 16, 2009 at 12:05 PM Post #194 of 223
I'll revive this thread and see how many of its previous contributors are still out there.
biggrin.gif


About 6 months ago I ordered a Xiang Sheng 708B on eBay and have since then upgraded the power cord and its 3 main tubes to military grade Russian ones, which have all improved the sound substantially. I had two other DIY tube amps, but sold them, because the XS was so much better.

Now, I was looking into options for a further upgrade, and in stead of looking for a different amp, I remembered this thread and have read it completely. I have now decided I will give these mods a try. To that effect, I first needed to refresh my soldering skills. I haven't touched an iron for 25 years, the last time I was still a teenager, so I ordered one on Ebay, got it today and will start practicing a bit before I do anything serious with it.

I didn't want to ask any really silly newbie questions, so I already did a lot of research on my own on the internet, but I don't know a whole lot (actually very little) about electronics and circuits.
confused_face_2.gif


I have looked into the subject of audiophile components, like capacitors and resistors, but before I decide on my budget and place an order, I have some questions, and I was hoping some of you are willing to help me out with the questions I didn't manage to find an answer to online:

1) I have read somewhere that some components can be damaged during the soldering, and I also read that it's better to do it fast and hot, than less hot and too slow. I'm afraid that if I order some pretty costly components I inadvertedly damage them through my lack of experience in soldering. Can you give me some tips, or things I particularly have to observe?

2) I have read that the two small input capacitors can be removed altogether if the source output DC is low enough. Now, I've read a bit about the dangers of DC offset, but how do I measure this? I have also obtained a multimeter on eBay, so I'll be able to measure, but how and where, and should all equipment be connected and on, or even playing? I have no idea.

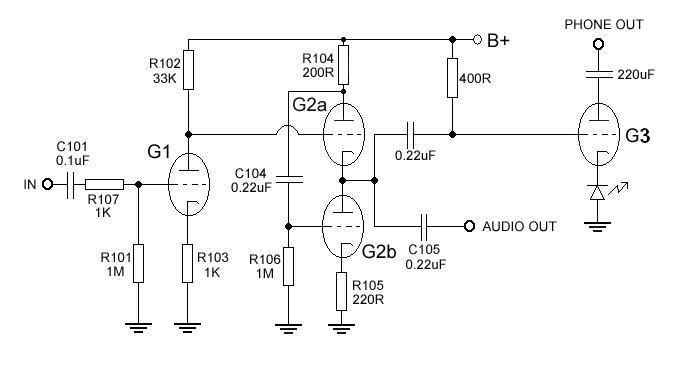
3) Having read in this thread that some of you discovered that certain component values were different from the ones listed at the start of this thread, I decided to check that and discovered the following discrepancies:
  1. main filter bypass caps are 22 uF in stead of 33 uF
  2. the coupling and preamp out caps are rated at 250V in stead of 400V
  3. The power supply resistors are placed differently and have completely different values: R1 has 400R in stead of 1K and R2 has 15K in stead of 2K, which leads me to my next question
Are these values different because of the 220V power in stead of the 110V? Or could it be that the manufacturer changed these values to give the tubes a lower voltage, as some of you have been trying to do?

I know some of you have put in higher value resistors here in order to lower the B+ voltage. What about these totally different values I have in my model? And some of you also mentioned taking the additional measure of inserting a very low value resistor in front of one of the tubes to lower the tube voltage. Where is this tube voltage measured, and where would I need to insert this resistor? I have 233V power myself, If I would leave this as is, would this too high voltage influence the sound, or just the life expectancy of the tubes?

I know these are a lot of questions, but I'll be grateful if anybody can help me along a bit.
I'm kind of feeling like a kid again and can hardly wait to get started.
bigsmile_face.gif
 
May 16, 2009 at 8:45 PM Post #195 of 223
1) capacitors and resistors are pretty hardy in regards to soldering. the sensitive components are usually ICs and/or transistors.
2) to measure DC offset, turn on your source and amp, let them warm up, and play sound/music through them. set your multimeter to DC and put the positive on the input and the negative on the ground. ideally, the value will be 0, but it is rarely so, so we use input caps to filter out the DC.
3) your different values could be a result of the 220V mains, but it's likely you just have a different revision. my amp is the 110V version and my values are different from everyone else.
 

Users who are viewing this thread

Back
Top