


dhruvmeena96
Headphoneus Supremus
if somebody is working with RAF-32873
Zobel circuit
C=10.31 uF
R=27.5 ohms
Series Notch
C=12 uF
L=0.3mH(Make sure that inductor are resistive, so reduce resistor value in accord of inductor)
R > 22 ohm (increment by 1 mOhm till you get the damping effect, or can stick with this)
Parallel notch(still not recommended, ruins the sound profiling)
C=150.15 uF(in series with driver)
R=2.65 ohm(parallel)
L=3.75 mH(Parallel, calculation required so 2.65 ohm is maintained in parallel, to tough)
Twin T notch(Not recommended, to powerful in damping criteria)
Band Stop(Bad and not really good for distortion figures, and is hard to control in BA behavior)
Front expansion
courtesy of @IvanNOON
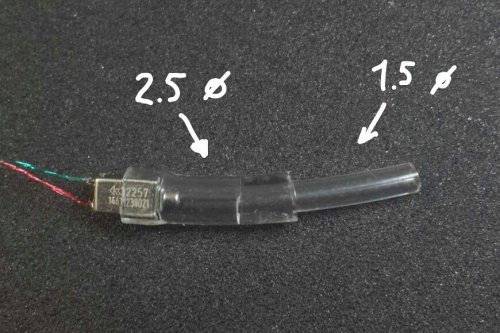
2.5mm tube in 4mm length(resonator)
1.5mm tube in remaining length or a folded Libby horn 3mm(Recommended, for High res sound)
If not using horn, just the tube, use a SWFK or WBFK to boost treble area
SWFK Zobel(Just forget about this)
C=126uF(LoL)
R=7.8ohm
No dampers required(don't use one, not recommended)
Zobel circuit
C=10.31 uF
R=27.5 ohms
Series Notch
C=12 uF
L=0.3mH(Make sure that inductor are resistive, so reduce resistor value in accord of inductor)
R > 22 ohm (increment by 1 mOhm till you get the damping effect, or can stick with this)
Parallel notch(still not recommended, ruins the sound profiling)
C=150.15 uF(in series with driver)
R=2.65 ohm(parallel)
L=3.75 mH(Parallel, calculation required so 2.65 ohm is maintained in parallel, to tough)
Twin T notch(Not recommended, to powerful in damping criteria)
Band Stop(Bad and not really good for distortion figures, and is hard to control in BA behavior)
Front expansion
Good luck, man. Here's something that might be helpful:
RAB fits perfectly into 2.5mm ID tubing. Might work for the front resonator.

courtesy of @IvanNOON
2.5mm tube in 4mm length(resonator)
1.5mm tube in remaining length or a folded Libby horn 3mm(Recommended, for High res sound)
If not using horn, just the tube, use a SWFK or WBFK to boost treble area
SWFK Zobel(Just forget about this)
C=126uF(LoL)
R=7.8ohm
No dampers required(don't use one, not recommended)
.jpg")


