TensorFlow v2.5 (non-alpha, yay!) for Arm64 (Apple Silicon) M1 Macs is available.
Updated the instructions... Enjoy!
1. Install Xcode from app store, Xcode Command Line Tools should install,
if not, open terminal and install with: $ xcode-select --install
2. Check for latest version of Miniforge3 at
https://github.com/conda-forge/miniforge#download
Download the file for arm64 (Apple Silicon).
3. Launch terminal and navigate to directory where you saved "Miniforge3-MacOSX-arm64.sh" file.
Example: If you saved to your User Downloads directory
$ cd ~/Downloads
4. Install Miniforge3:
$ bash Miniforge3-MacOSX-arm64.sh
You must accept the licensing agreement to continue the installation.
5. After complete installation, you are prompted to initialize Miniforge3.
Do you wish the installer to initialize Miniforge3
by running conda init? [yes|no]
[no] >>> yes
6. Python 3.9 is default for Miniforge installation. AutoEq requires python 3.8.
Next create a virtual environment and install python 3.8.
(base) MAC_Name:~ Username$ conda create --name autoeq_venv python=3.8 pillow matplotlib pandas scipy tabulate libsndfile
Activating virtual environment.
(base) MAC_Name:~ Username$ conda activate autoeq_venv
Terminal prompt changes to:
(autoeq_venv) MAC_Name:~ Username$
TIP: To deactivate a conda virtual environment use:
$ conda deactivate
NOTE: In the normal AutoEq setup instructions you would create and activate a venv directory within the AutoEq directory.
With Miniforge3 you will be creating and activating a venv directory within ~/miniforge3/envs directory.
7. Installing dependencies outside of conda-forge
$ conda install -c bricew soundfile
8. Installing TensorFlow v2.5
$ conda install -c apple tensorflow-deps
$ python -m pip install tensorflow-macos
8a. Optional installation of tensorflow-metal PluggableDevice to accelerate training with Metal on Mac GPUs.
$ python -m pip install tensorflow-metal
NOTE: I tried running AutoEq EQ passes with tensorflow-metal installed and with it not installed.
I could not tell for sure, but it seemed that EQ passes with tensorflow-metal installed were marginally faster.
Just know that AutoEq will work either way.
9. Verifying AutoEq.
$ cd ~/AutoEq
$ python autoeq.py --help <<-- This is only a minimal verification!! AutoEq help may be displayed even if setup is a little wonky.
It's better to run a full EQ graph pass.
Here's an example for true verification from
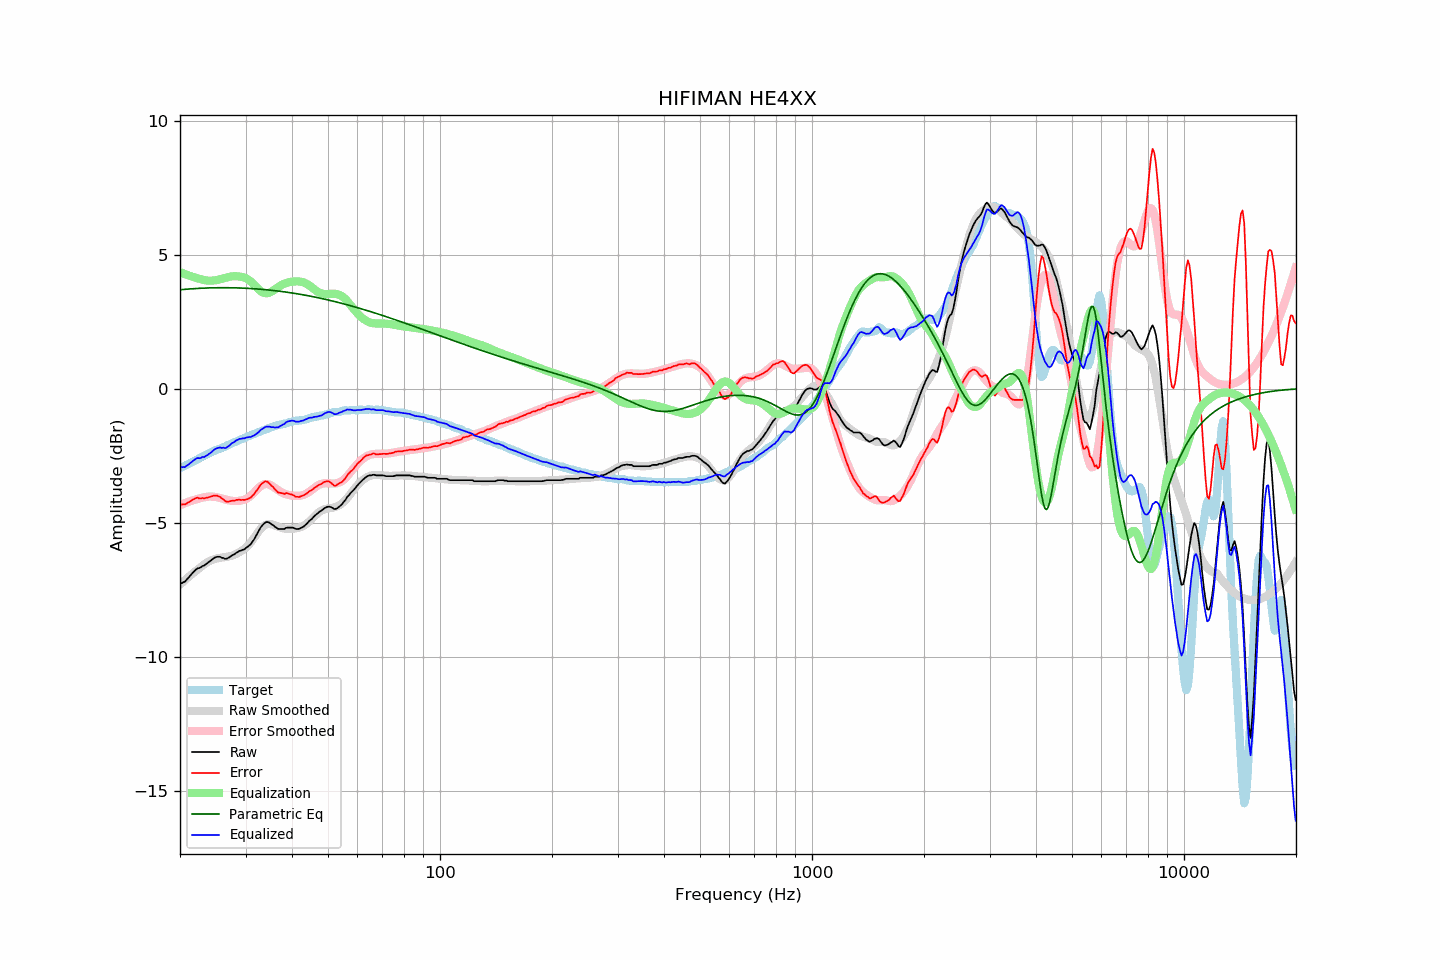
https://github.com/jaakkopasanen/AutoEq#equalizing-individual-headphones :
Equalizing Sennheiser HD 650 and saving results to my_results/HD650:
$ python autoeq.py --input_dir="measurements/innerfidelity/data/onear/Sennheiser HD 650" --output_dir="my_results/HD650" --compensation="measurements/innerfidelity/resources/innerfidelity_harman_over-ear_2018_wo_bass.csv" --equalize --bass_boost=4 --show_plot --convolution_eq --fs=44100,48000
10. Keeping conda updated.
$ conda update conda --all