Jul 19, 2023 at 5:43 PM Post #211 of 2,987
I post on AS.
If you formulate your questions, I can ask him for more information, and clarifications.
Q 1: Was he referring to star grounding the chassis/earth grounding of all components or signal grounding?

Q 2: How is he recommending this be accomplished? If the earth ground from the wall is already being split off from say a PLC to all other parts of the system, wouldn't the ground potential already be very close in relation to one another?
 
Jul 19, 2023 at 5:47 PM Post #212 of 2,987
I would. Use a pure copper binding post and wire it to the star point for earth ground. From star point you will have 4 ground leads, one to each of the three outlets and one to binding post for the ground box.

As an aside, I have not used the Schuko outlets but have two of the Maestro. The Maestro outlets do not look like much, but sound very natural and uncolored.
Here is another way to do this, earth ground to the copper binding post. From the copper binding post it splits to the three AC outlets. Just use a non-solder copper binding post like in the pic.

1689803250820.png
 
Jul 19, 2023 at 5:56 PM Post #213 of 2,987
Jul 19, 2023 at 6:05 PM Post #214 of 2,987
I would. Use a pure copper binding post and wire it to the star point for earth ground. From star point you will have 4 ground leads, one to each of the three outlets and one to binding post for the ground box.

As an aside, I have not used the Schuko outlets but have two of the Maestro. The Maestro outlets do not look like much, but sound very natural and uncolored.
Thanks, appreciated!
 
Jul 19, 2023 at 10:47 PM Post #215 of 2,987
DIY ground box - removable locking lid mod

Here is a mod I am using to keep the lid locked in place but is removable. Inexpensive and easy to do. Can be retrofit after box is already built. Finished pic shows a retrofit I did to test it. All parts were purchased at Home Depot (hardware store). Many of the parts and tools most people probably already have at home.

PARTS LIST:
-
One stainless steel or brass bolt - Length needs to be long enough, and size just needs to be not too small diameter. I used a #6 4 thread bolt. Will need one spare to thread the holes in wood to accept the bolt. I originally wanted to make it look nicer with thumb screw. In the end decided it is easier to just use a bolt with a Philips head so it would be easy to loosen and tighten. You can use a stainless or brass wood screw but will not loosen or tighten as easily as a bolt. I am using stainless or brass because they are not magnetic.

- Stainless steel or brass washer to fit the above bolt. I used a #6 brass washer. Washer is to protect the lid wood finish.

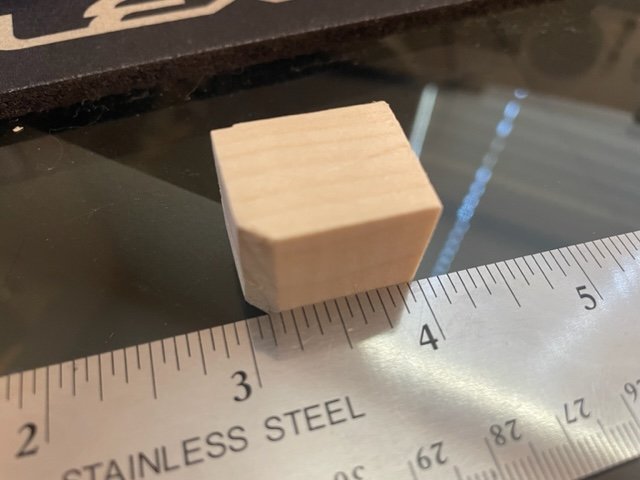
- Small piece of hardwood. I purchased a 12" long, 3/4" x 3/4" square piece of hardwood for $1.20. Cut them in 1" length long pieces with a handsaw and miter box.


TOOLS and Misc. Required
-
Wood glue

- Small piece of sand paper. Use to smooth the 3/4" x 3/4" wood piece edges and to rough up the sides to be glued. Also use to rough up inside of the box to be glued. Grit is not important, any 120 - 320 grit will do.

- Hand drill or drill press. I used an electric hand drill.

- Phillips screw driver to hand fasten when project is complete.

- Wood drill bit slightly smaller in diameter than the bolt. This is so you can thread the hole to accommodate the bolt threads.

- Paper towel and isopropyl alcohol or acetone. Used to clean up any excess glue and to clean surfaces to be glued together.

- One small wood clamp. I purchased the one in the pic for $1 at Home Depot

- Small piece of card board. This is used between the clamp and the exterior side of the box the clamp is touching. To prevent marring of the box surface, see pic.

INSTALL PROCESS:

STEP 1 - Prepping the wood: Cut wood 1" in length. Then notch one corner. Need to notch corner to clear the glue at the corners that reinforce the box. Using sand paper, rough up the two sides that will be glued and clean up the edges. Also using sand paper, rough up the portion of the interior of box that will be glued. Use the isopropyl alcohol and paper towel to clean surfaces of the wood piece and box corner that will be glued.

STEP 2 - Installing the wood piece: Spread wood glue on the two sides of the wood block that will be touching the inside of the wood box. Line up the wood piece flush to a corner you want it installed. Should be lined up slightly below the bottom of the lid, so lid will close. You want to make sure the wood piece will not obstruct the lid from closing. Once the wood piece is lined up where you want it, press and hold in place for a few seconds so it stays. Now hold the small card board piece on the outside of the box to protect the surface and place the clamp in place like in the pic. Leave clamp on for 30 mins to and hour. Will need 24 hours to dry before next step.

STEP 3 - Drilling hole in wood pieces: This is when you decide where to install the bolt. I suggest around middle of the wood piece installed into box, see pic. Once you decide where to install the bolt, using hand drill or drill press you drill a hole on the lid first. Take lid off of box and drill the hole. Then install lid back into box. Hold lid in place, slide drill bit into lid hole and slowly drill hole in the wood piece inside box.

STEP 4 - Threading hole in wood pieces: This part is easy. Remove lid from box. Take a bolt and insert into lid hole from the top where the bolt will be installed. Using the hand screw driver, just start turning clockwise and will screw/thread into the wood. If while turning it feels too tight, unscrew bolt. With the drill and bit, slide bit into hole. Using light force, slightly ream the edges of the hole, to make slightly larger. You will have to do the same to the hole in the wood piece inside box. Now just screw the bolt into the lid. Do the same to the hole in the wood piece inside box. If you want to make it even smoother to tighten and loosen, you can screw the bolt in and out of the lid and wood piece. Do this a few times using the hand powered drill outfitted with the Philips bit.

STEP 5 - Installing bolt and washer: With hand screw driver, screw bolt with washer into lid until flush with bottom of lid. Should be able to slide the lid back on. Now just screw the bolt down and will hold the lid solidly in place.

Hope the above is clear, any questions just ask.
 

Attachments

  • Modding GB for locking lid 6.jpg
    Modding GB for locking lid 6.jpg
    96.4 KB · Views: 0
  • Modding GB for locking lid 1.jpg
    Modding GB for locking lid 1.jpg
    65.8 KB · Views: 0
  • Modding GB for locking lid 2.jpg
    Modding GB for locking lid 2.jpg
    84 KB · Views: 0
  • Modding GB for locking lid 3.jpg
    Modding GB for locking lid 3.jpg
    92.1 KB · Views: 0
  • Modding GB for locking lid 4.jpg
    Modding GB for locking lid 4.jpg
    96.8 KB · Views: 0
  • Modding GB for locking lid 5.jpg
    Modding GB for locking lid 5.jpg
    74.1 KB · Views: 0
  • Modding GB for locking lid 7.jpg
    Modding GB for locking lid 7.jpg
    65.8 KB · Views: 0
Jul 20, 2023 at 12:10 PM Post #216 of 2,987
Jul 20, 2023 at 12:34 PM Post #217 of 2,987
His reply answered my first question. I hope when anyone is going to signal ground all of their gear together, whether star grounded or not, they first make sure that all of the component's signal ground are earth/chassis grounded. Most are, but not all. I have at least one such component. As I understand it or was told, many higher end components are also designed this way.

Thanks for posting the question on that board.
 
Jul 20, 2023 at 8:10 PM Post #218 of 2,987
DIY ground box - removable locking lid mod
Here is an update with bolt and drill bit matching.

Earlier went to hardware store and got more stainless steel bolts and washers. A wood drill bit (like in pic) of 1/8" and #6 bolt and washer work perfectly together. 3/4" length bolts also work perfectly. Twelve bolts and 50 stainless steel washers were $9.58 including tax at Home Depot.
 

Attachments

  • Modding GB for locking lid 8.jpg
    Modding GB for locking lid 8.jpg
    79.5 KB · Views: 0
Jul 21, 2023 at 4:30 PM Post #222 of 2,987
My 3.7 kg Al GB came with this plug. I ordered it with an RCA plug so I did not quite expected this, but it does make sense as only this part is used for ground?
1689962125333.png
Will work. IMHO not optimal because the solder degrades performance.
 
Jul 21, 2023 at 6:24 PM Post #223 of 2,987
I would say The Mundorf supreme solder takes like 2-3 weeks of burn-in when used on grounding cables and "digital" burn-in is different from "analog" . I moved some of my grounding cables from analog to the digital grounding after 3 weeks of burn-in and they were raw and ugly... only after 10 days or so on digital they got fully cooked ..Amazing , I thought they were fully conditioned from 3 weeks use on analog ...
 
Jul 21, 2023 at 11:09 PM Post #224 of 2,987
I've been looking into EMF/EMI shielding paint for grounding boxes. The one linked earlier was a bit pricey. Here is the best deal I've found so far, Stewart Macdonald Conductive Shielding Paint. It's the same as an Amazon listing that was one of the highest reviewed in its class, but at an even better sale for the next 3 days. We'll just need to see about shipping because the former offer was free. Looks also like much better value than many of the others that were incredibly small quantities like 1/2 ounce versus this at 8 oz. Anyone tried this type before?

https://www.stewmac.com/electronics/shielding/conductive-shielding-paint

Interestingly one of the comments on this paint solution in general is that it works "almost as good as copper foil tape", at least regarding guitars. I've already had a go at partial shielding boxes with copper foil. Maybe I should do one or more entire boxes (all sides) with copper foil first to see if that may be even better. Anyone tried that?

Another option - Faraday shielding fabric. eBay for instance has a great variety. And as a plus, these are not permanent... Maybe we'll start a "ground box shielding rolling" thread, LOL! 🤣

https://www.ebay.com/sch/i.html?_nkw=EMF+shielding+fabric&_trksid=p4432023.m4084.l1313
 
Jul 21, 2023 at 11:36 PM Post #225 of 2,987
I've been looking into EMF/EMI shielding paint for grounding boxes. The one linked earlier was a bit pricey. Here is the best deal I've found so far, Stewart Macdonald Conductive Shielding Paint. It's the same as an Amazon listing that was one of the highest reviewed in its class, but at an even better sale for the next 3 days. We'll just need to see about shipping because the former offer was free. Looks also like much better value than many of the others that were incredibly small quantities like 1/2 ounce versus this at 8 oz. Anyone tried this type before?

https://www.stewmac.com/electronics/shielding/conductive-shielding-paint

Interestingly one of the comments on this paint solution in general is that it works "almost as good as copper foil tape", at least regarding guitars. I've already had a go at partial shielding boxes with copper foil. Maybe I should do one or more entire boxes (all sides) with copper foil first to see if that may be even better. Anyone tried that?

Another option - Faraday shielding fabric. eBay for instance has a great variety. And as a plus, these are not permanent... Maybe we'll start a "ground box shielding rolling" thread, LOL! 🤣

https://www.ebay.com/sch/i.html?_nkw=EMF+shielding+fabric&_trksid=p4432023.m4084.l1313
Would be super cool if you or someone can compare a box with and without the shielding. I have tried and tried and cannot come up with a way to improve a ground box with shielding of any kind, so far. But have not tried shielding paint yet.
 

Users who are viewing this thread

Back
Top