


Interesting find by one of my DIY friends from Earbuds Anonymous - this is the page of the manufacturer of 19hz-21khz speaker series. Lost of technical details, of course I don't understand the chinese on the images, but translated what I could with google translate. Even includes a full DIY earbud assembly guide as well, like how to solder, how to use horseshoe foam etc. plus all of the variations and specs of the 19-21 lineup. https://m.1688.com/offer/41517409413.html?ptow=113d26e7c9a
You are using an out of date browser. It may not display this or other websites correctly.
You should upgrade or use an alternative browser.
You should upgrade or use an alternative browser.
DIY Earbuds
- Thread starter gwompki
- Start date
captione
100+ Head-Fier
Dang, that's a good find!Interesting find by one of my DIY friends from Earbuds Anonymous - this is the page of the manufacturer of 19hz-21khz speaker series. Lost of technical details, of course I don't understand the chinese on the images, but translated what I could with google translate. Even includes a full DIY earbud assembly guide as well, like how to solder, how to use horseshoe foam etc. plus all of the variations and specs of the 19-21 lineup. https://m.1688.com/offer/41517409413.html?ptow=113d26e7c9a
We need to go to that factory to tune this bad boy. We can also make some metal cases along the way.Interesting find by one of my DIY friends from Earbuds Anonymous - this is the page of the manufacturer of 19hz-21khz speaker series. Lost of technical details, of course I don't understand the chinese on the images, but translated what I could with google translate. Even includes a full DIY earbud assembly guide as well, like how to solder, how to use horseshoe foam etc. plus all of the variations and specs of the 19-21 lineup. https://m.1688.com/offer/41517409413.html?ptow=113d26e7c9a
 .I'm sure they have good tools
jayeyeanne
New Head-Fier
What sorta paint did you use?Finally reshelled my VE Monks Plus to a shell with an additional vent to the other stem hole. In no surprise, it increased the bass and somehow made the upper mid/lower treble almost strident. Putting a cotton ball to the stem hole made it less, and soundstage really increased by depth. Didn't glue the cotton in place because I wanna experiment on dampening materials for this shell.
I also recabled my Headroom MS16s and swapped the cable from my EMX500. This was a pain in the ass just dismantling those metal strain relief (or is it? Idk), I almost wrecked the EMX500 wire dismantling it. I also used the wire from my VE Monks for my EMX500, and made some worthwhile modifications.
Yeah I know the paintjob is kinda botched but it reminds me of this meme and I think it's pretty epic:
captione
100+ Head-Fier
I used a sloppy amount of red nail polish and painted the inside of the transparent shell and thinned it up with a bit of acetone. Only used it because i wanna cover up the nasty scrapes when I sanded off some parts of the shell tbh.What sorta paint did you use?
Nice ideaI used a sloppy amount of red nail polish and painted the inside of the transparent shell and thinned it up with a bit of acetone. Only used it because i wanna cover up the nasty scrapes when I sanded off some parts of the shell tbh.

Edit: Peacock Audio use same technique for IEM. They paint resin shells from inside with multiple colors
Last edited:
willyboyaudio
100+ Head-Fier
Hi friends, I built this some time ago, but just found the time to share some photos. These are the 19-21 drivers, I bought three pairs to find an exact matched-impedance pairs. 
They sound quite similar to my Elibuds Sabia V7, with better detail on the 19-21. Thanks robar for sharing this discovery. I can see no problem having this as my go to driver.
I have to say that this driver is not very robust and will not tolerate much heat from soldering. Initially I built them with black housing, and I thought, it's boring. I decided to go with white housing. I pried open as I normally do (see photo below from 3 weeks ago ) and they just went kaput. The wire, being rather thick, gives some resistance when pulling out, but I was surprised to see the drivers just split open. Yoke and the pole piece came apart. I've never experienced this before with my builds and mods. Thought I'd share that with you here. Take care!


They sound quite similar to my Elibuds Sabia V7, with better detail on the 19-21. Thanks robar for sharing this discovery. I can see no problem having this as my go to driver.
I have to say that this driver is not very robust and will not tolerate much heat from soldering. Initially I built them with black housing, and I thought, it's boring. I decided to go with white housing. I pried open as I normally do (see photo below from 3 weeks ago
) and they just went kaput. The wire, being rather thick, gives some resistance when pulling out, but I was surprised to see the drivers just split open. Yoke and the pole piece came apart. I've never experienced this before with my builds and mods. Thought I'd share that with you here. Take care!


P.S. This is an actual repair job, not just for photo purposes. I'll be back with more pics.


Attachments

Last edited:
willyboyaudio
100+ Head-Fier
Interesting find by one of my DIY friends from Earbuds Anonymous - this is the page of the manufacturer of 19hz-21khz speaker series. Lost of technical details, of course I don't understand the chinese on the images, but translated what I could with google translate. Even includes a full DIY earbud assembly guide as well, like how to solder, how to use horseshoe foam etc. plus all of the variations and specs of the 19-21 lineup. https://m.1688.com/offer/41517409413.html?ptow=113d26e7c9a
Thanks robar. I think we're quite familiar with this series of drivers. They have green, red, and purple dots. I just learned that the purple dot has titanium film. I attach the comparison graph for our convenience.

Last edited:
Thanks for sharing your experience, I'm glad you like this driver tooHi friends, I built this some time ago, but just found the time to share some photos. These are the 19-21 drivers, I bought three pairs to find an exact matched-impedance pairs.
They sound quite similar to my Elibuds Sabia V7, with better detail on the 19-21. Thanks robar for sharing this discovery. I can see no problem having this as my go to driver.
I have to say that this driver is not very robust and will not tolerate much heat from soldering. Initially I built them with black housing, and I thought, it's boring. I decided to go with white housing. I pried open as I normally do (see photo below from 3 weeks ago

") I haven't experienced any problem with my speakers so far, soldered them in and out a couple of times with no damage. I was super careful though, so according to your warning, I'll keep this habit
I haven't experienced any problem with my speakers so far, soldered them in and out a couple of times with no damage. I was super careful though, so according to your warning, I'll keep this habit  I'm really interested in the titanium 32ohm version, and also regular the steel mesh variant.I really like the fit of my steel mesh N50 speaker + mx500 shell build, it almost makes alternative shells unnecessary as I can confidently walk around with this without the earbud getting loose all the time.
 I have a couple ideas in mind, but I didn't have the time lately (plus the glue is still in transit), will share stuff as soon as I get to create something interesting
I'm thinking about fixing the transparent dp100 shells for example, they sound midcentric and a bit muddy compared to my preferred shells in stock form. My guess is that they have too much venting, the sound is definitely similar to an overdone drill mod. Maybe blocking some openings would yield a more powerful and interesting sound,.
Last edited:
jayeyeanne
New Head-Fier
Hello everyone! I recently re-discovered the joy of earbuds for a rather silly reason: I believe my left ear hole is smaller than my right, so the bass response with IEMS tend to be heavier on my left if I do not adjust the fit. For earbuds, I just "hang" them in my ear and they just do what they do, nice and easy. Went back again to the Qian69 and ended up ordering a couple more widely recommended ones (RY4S UE, Snow Lotus 1.0+ and Tingo TC200).
Then I discovered this entire rabbit hole of DIY, driven by the curiosity of whether I could fix my mum's broken bluetooth earphones by recabling. I successfully fixed it, which gave me the confidence to start doing DIY. Now I have a Koss Porta Pro with in-line mic, and a MH755 with a proper cable length. Last night I built my very first earbuds using DIY MX500 drivers. With stock horseshoe foam, the highs were a little sibilant. From some trial and error, I found that cutting away one end of the horseshoe and leaving 1 circular shell vent exposed tamed the treble, bringing it close to RY4S UE that I adore very much.
I'm so very glad to have come across this thread where there has been so much very useful information to guide a newbie through this rabbit hole thanks all of you! I have another 6 DIY earbuds in the pipeline, and will be tabulating my impressions of the various drivers along with what tuning I have done. In the meantime, may all of you stay safe, stay healthy and solder on!
Then I discovered this entire rabbit hole of DIY, driven by the curiosity of whether I could fix my mum's broken bluetooth earphones by recabling. I successfully fixed it, which gave me the confidence to start doing DIY. Now I have a Koss Porta Pro with in-line mic, and a MH755 with a proper cable length. Last night I built my very first earbuds using DIY MX500 drivers. With stock horseshoe foam, the highs were a little sibilant. From some trial and error, I found that cutting away one end of the horseshoe and leaving 1 circular shell vent exposed tamed the treble, bringing it close to RY4S UE that I adore very much.
I'm so very glad to have come across this thread where there has been so much very useful information to guide a newbie through this rabbit hole
thanks all of you! I have another 6 DIY earbuds in the pipeline, and will be tabulating my impressions of the various drivers along with what tuning I have done. In the meantime, may all of you stay safe, stay healthy and solder on!Hi guys did anyone here tried to make earbud out of an iem with single DD, like did anyone try to make earbud out of blon 03 iem, if not will it work and sound good?
I think that blon03 use 10mm DLC driver, so U can try with some shell (nozzle head) for 10-11mm driver. This driver is tuned for closed-shell, probably even if you put thisHi guys did anyone here tried to make earbud out of an iem with single DD, like did anyone try to make earbud out of blon 03 iem, if not will it work and sound good?
driver in some small "flat head" shell like Docomo or "Airpods"-like sound will not be the same.
For this model, I use this driver. For tuning this I spend double the time than with standard MX500 or PK models, but it wort it.
captione
100+ Head-Fier
That's pretty amazing, how did it sound?I think that blon03 use 10mm DLC driver, so U can try with some shell (nozzle head) for 10-11mm driver. This driver is tuned for closed-shell, probably even if you put this
driver in some small "flat head" shell like Docomo or "Airpods"-like sound will not be the same.
For this model, I use this driver. For tuning this I spend double the time than with standard MX500 or PK models, but it wort it.
It's sounds very balanced You can see frequency graph on Ali for this driver. But needs some twicking for sure. I will post later making ofThat's pretty amazing, how did it sound?

This build is my first attempt to assemble and tune small 10mm driver. I already have a few small earbuds in my collection:
- JBL T290 (metallic sound with harsh treble)
- MSUR C210 (beryllium 8mm driver with overwhelming bass and lack of treble)
- QKZ AK1 (graphene driver - solid sound)
- RY20 (boomy bass with recessed mids)
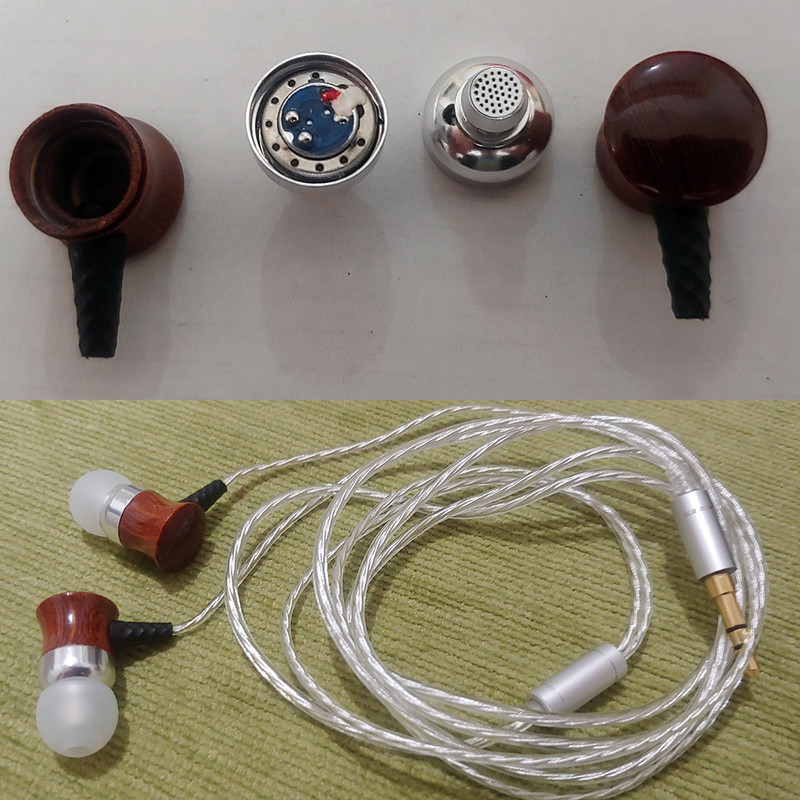
The goal of this project was to achieve a balanced sound. My favorite designs are MEZE earbuds so I decided to use metal-wood combo for the shell.
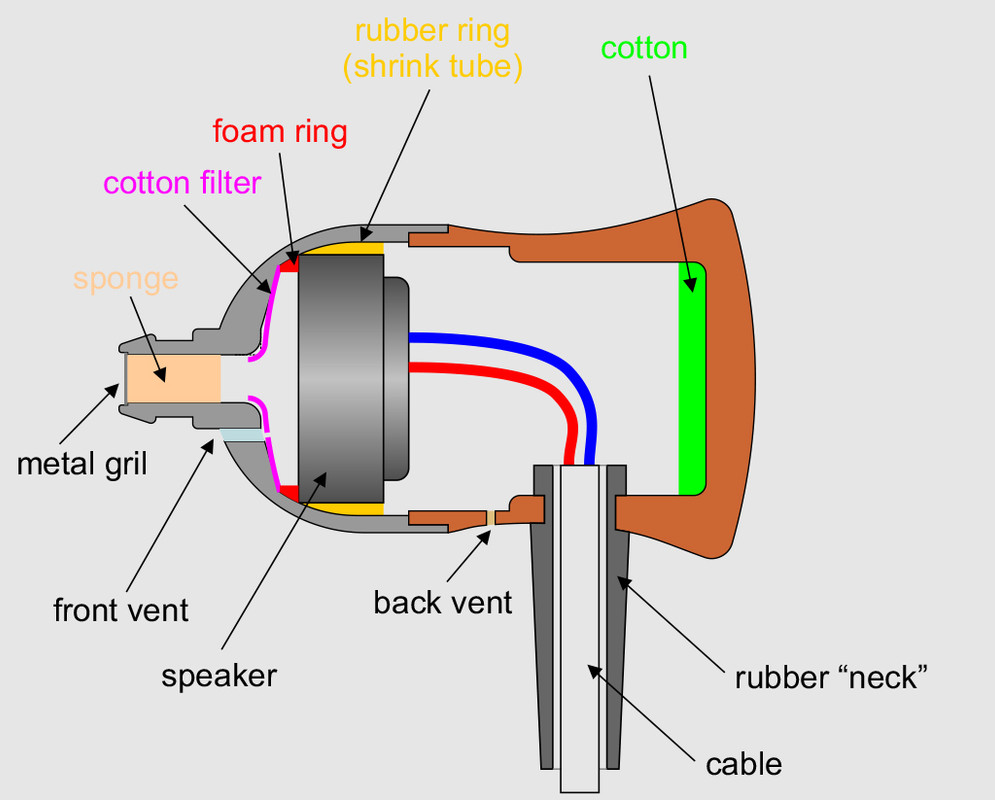
This is the section of the shell. The original shell did not have a front vent.
Below, I will briefly explain my process.
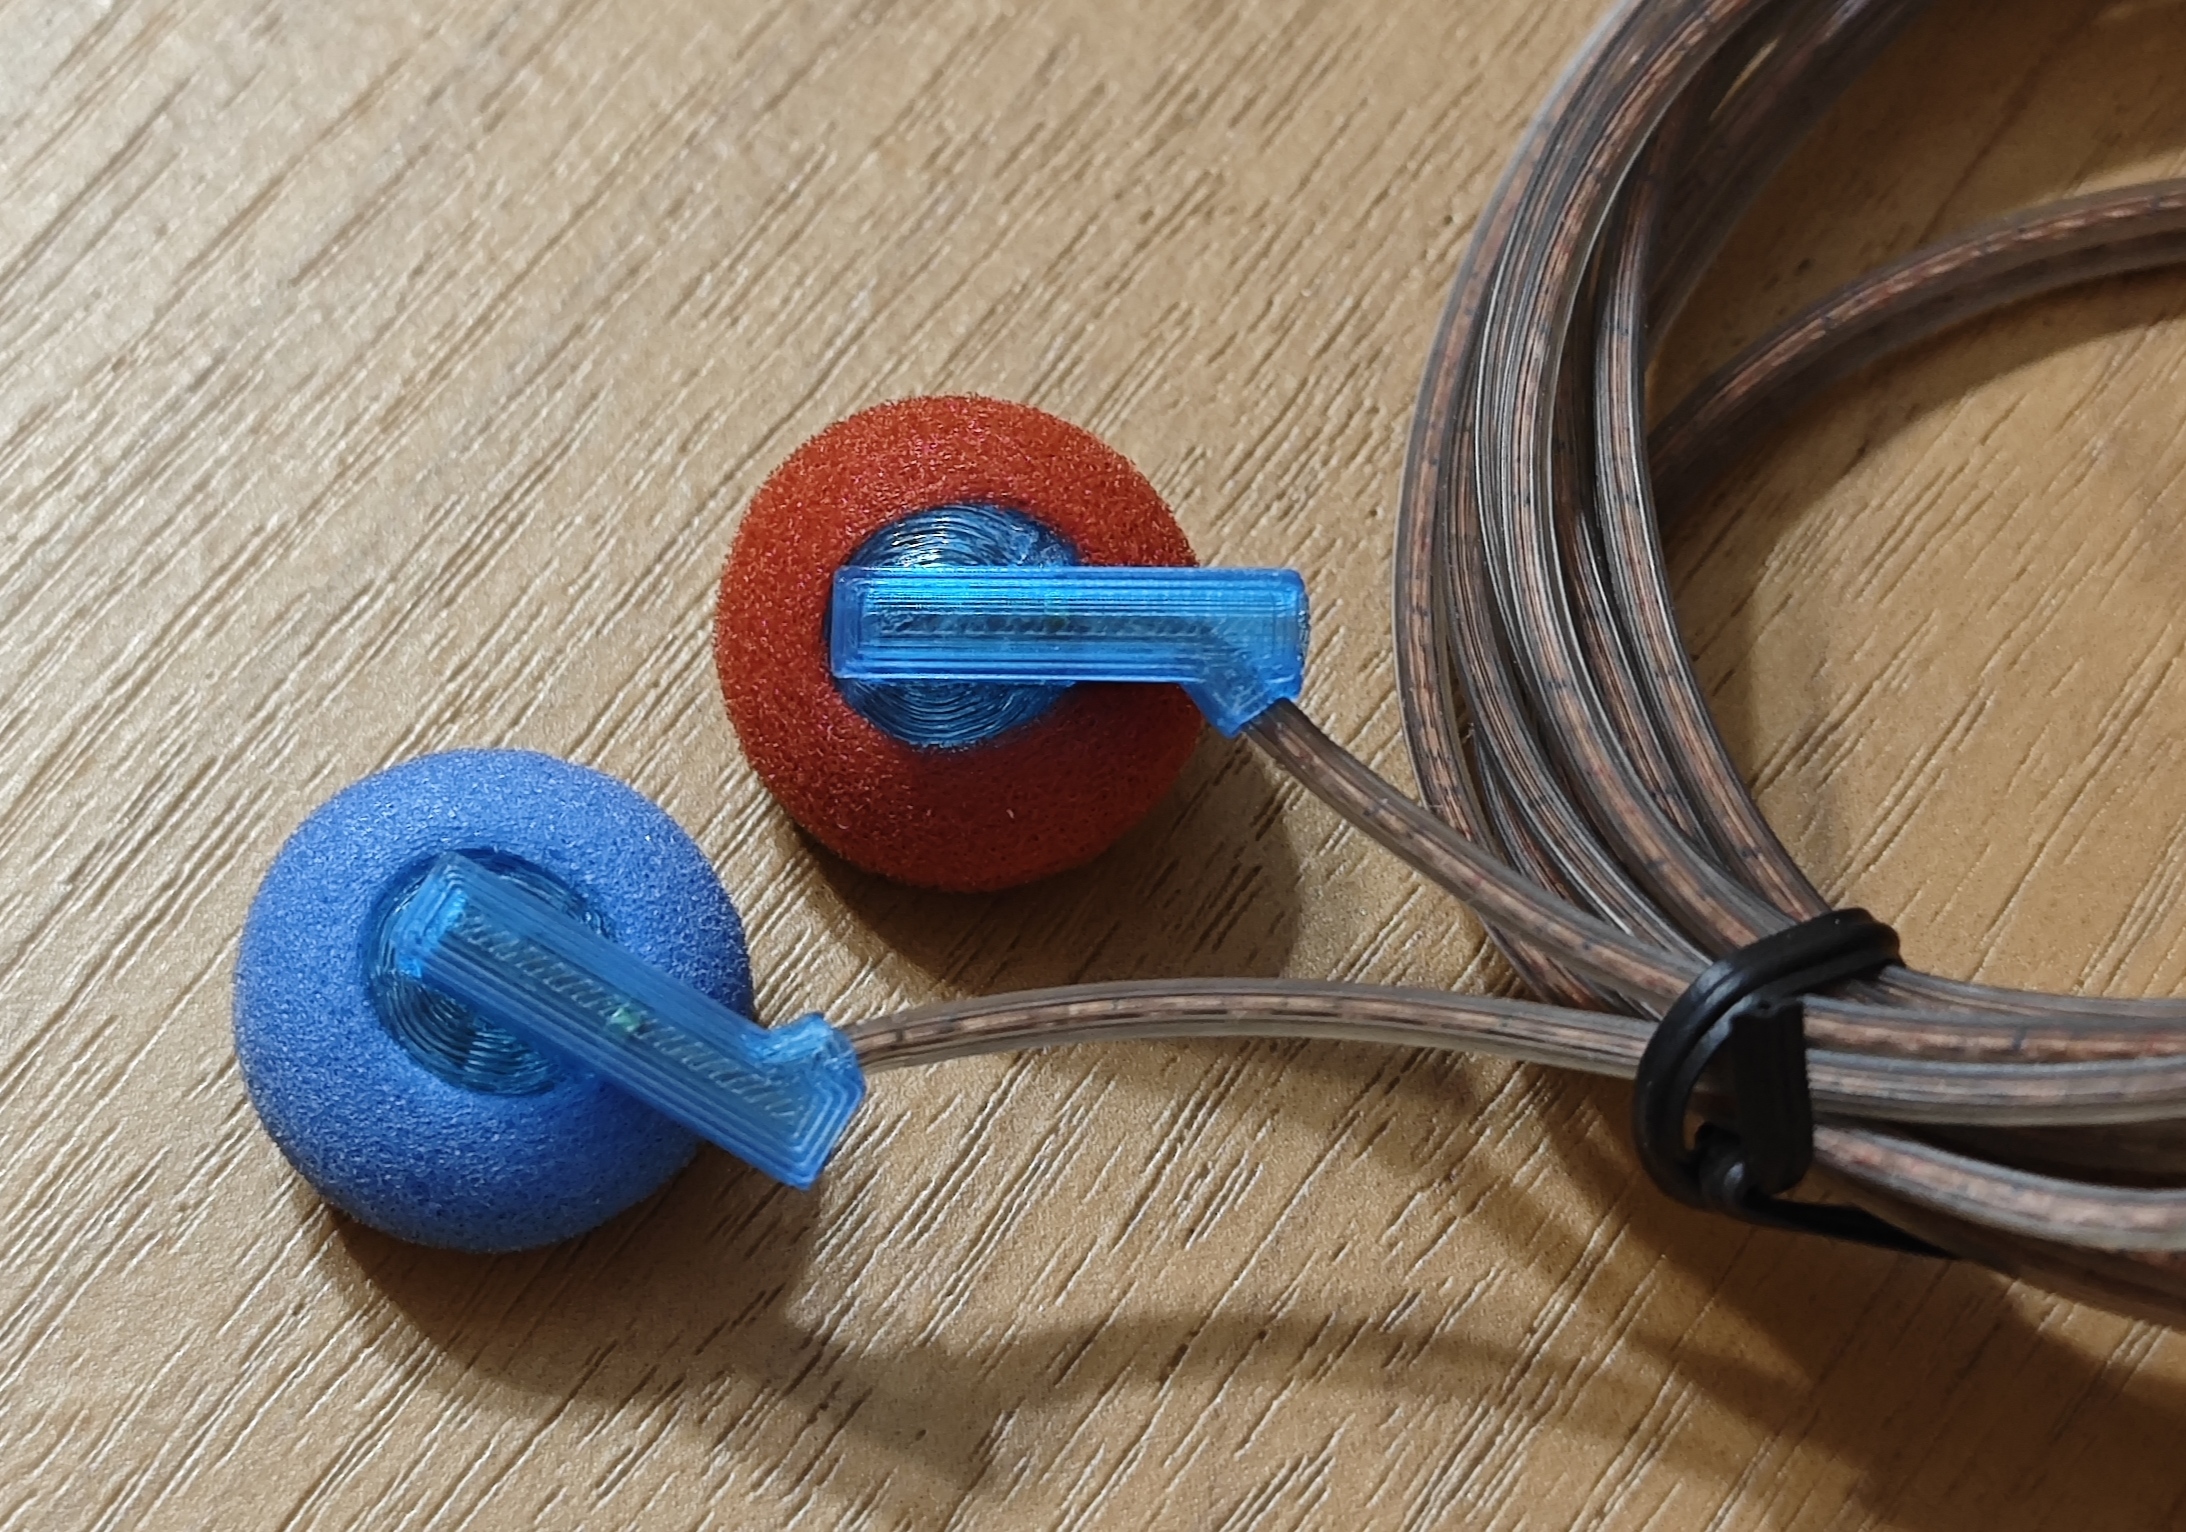
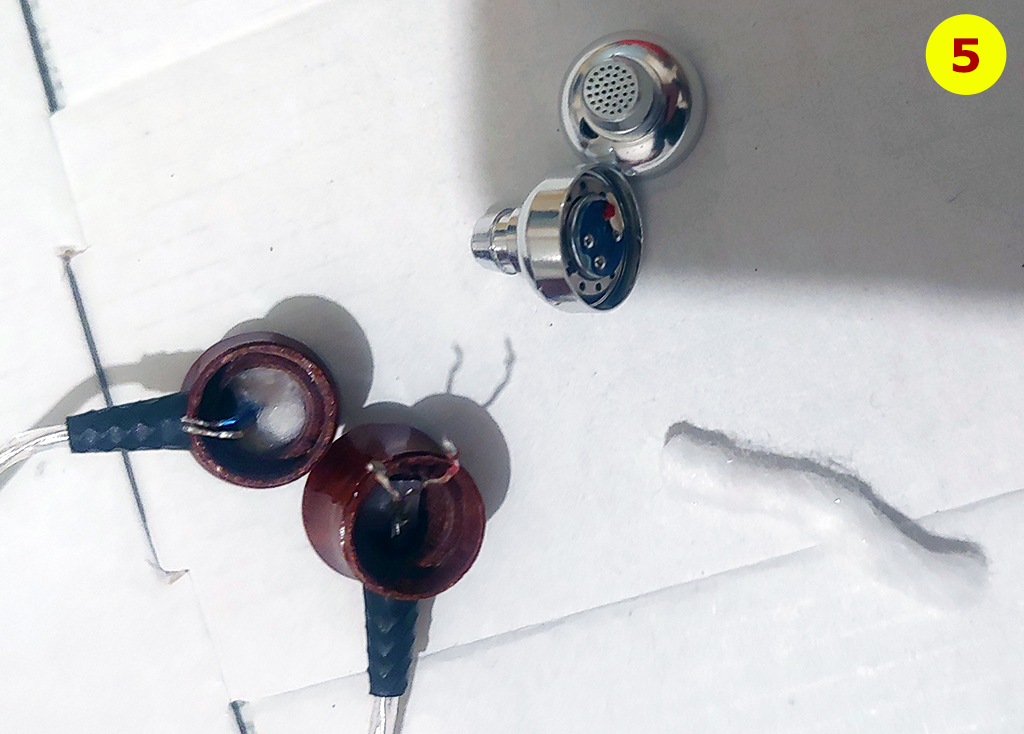
1.Comparison between 15.4mm Titanium 640hm, 14.8mm PK2 and 10mm (9.2mm diameter) Titanium 48ohm drivers
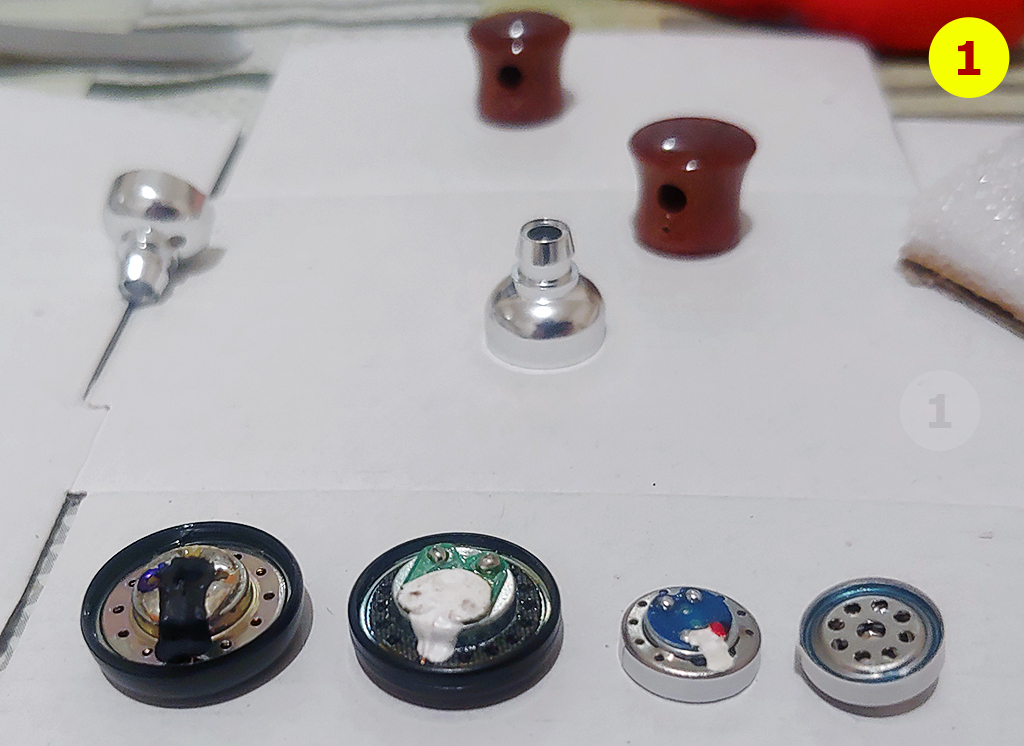
2.Closer look of the shell parts
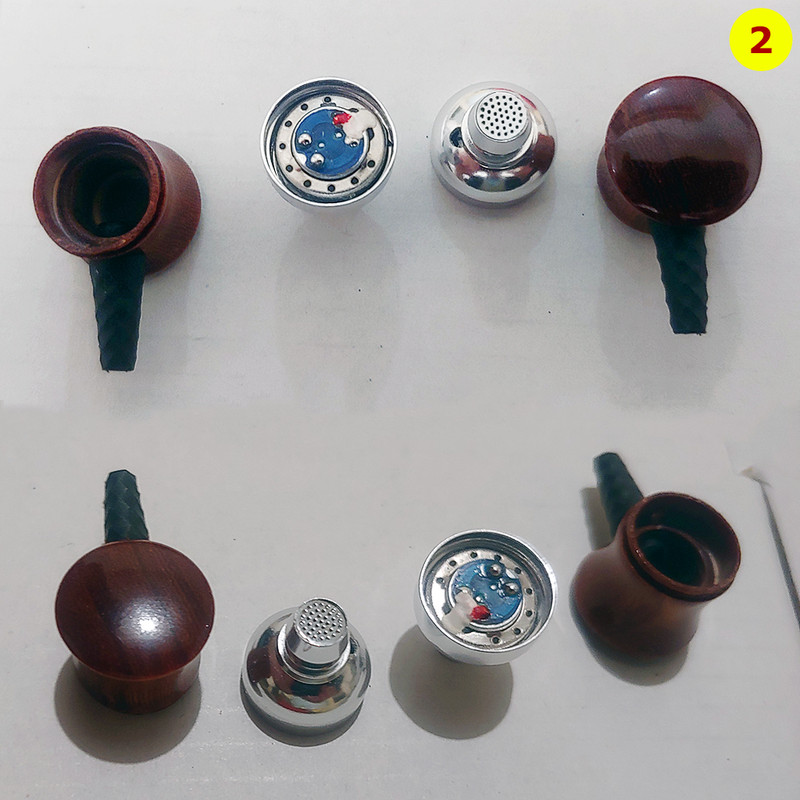
3. First of all, I drill front vent, next to the nozzle. From the inside, I use a file tool to remove sharp edges at the entrance of the nozzle.
Front vent reduces the pressure created in front of the driver and this way you can control the quantity of the bass.
The smaller diameter of the hole increase bass and larger diameter relaxes the bass.
Existing back vent is too small so I decided to widen the opening a bit. This vent affects also bass (less than front one) and sound-stage and eliminates closed sound.
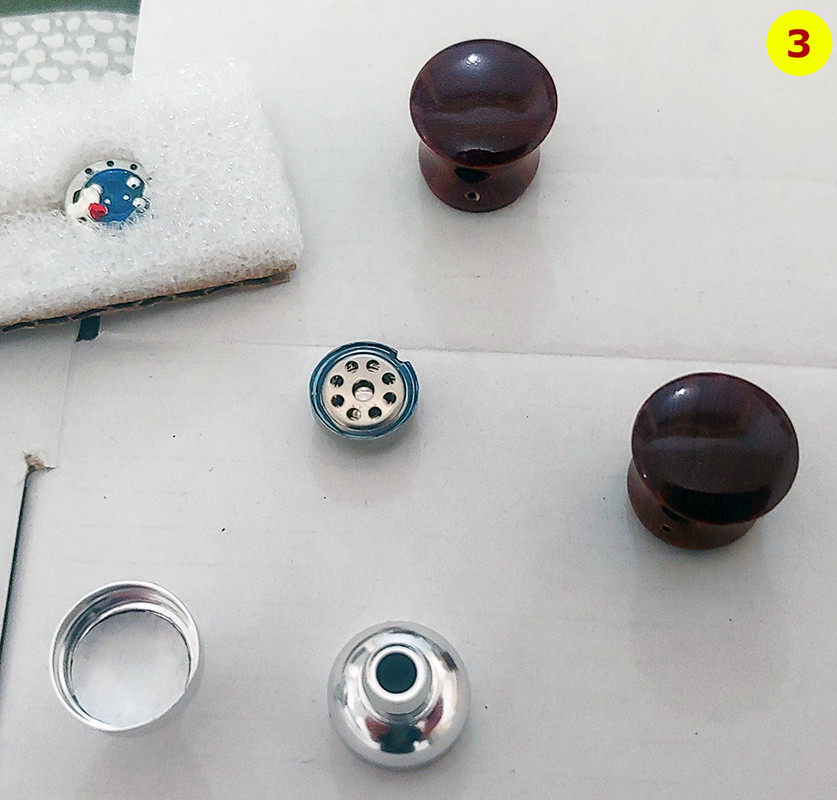
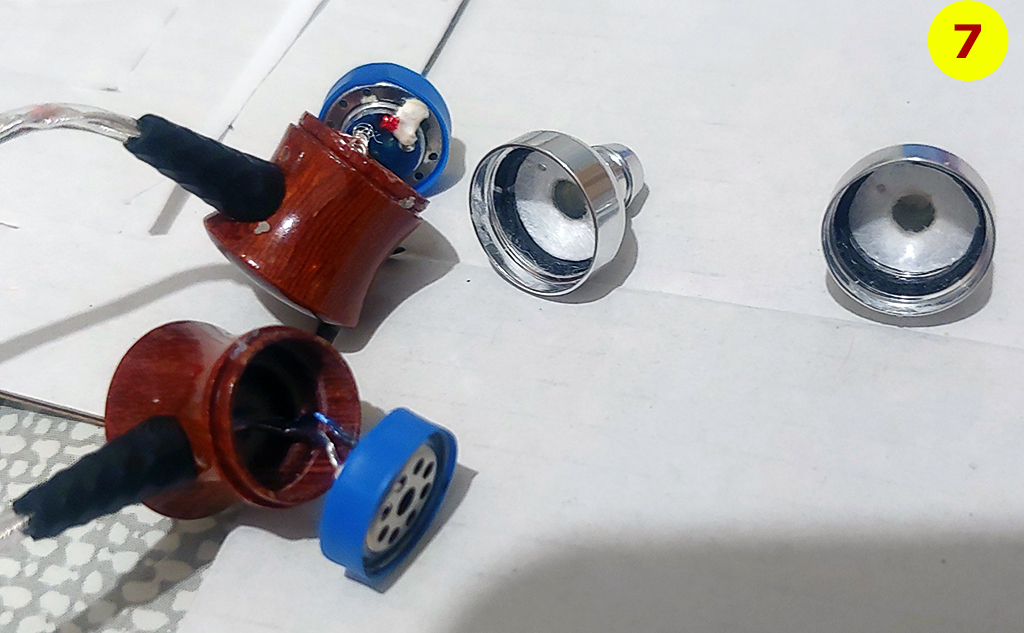
4. In the frontal inner part of the shell, I added a cotton filter to reduce a bit reflective of the sound, then I punched one larger opening for the nozzle and one small
for the front vent. This can be clearly seen in image 7. The black ring, which is also seen here, is the double-side duct tape foam (1mm) on which the speaker rests and makes a small gap between the shell and driver. That way the driver can breathe and avoids the congested sound.
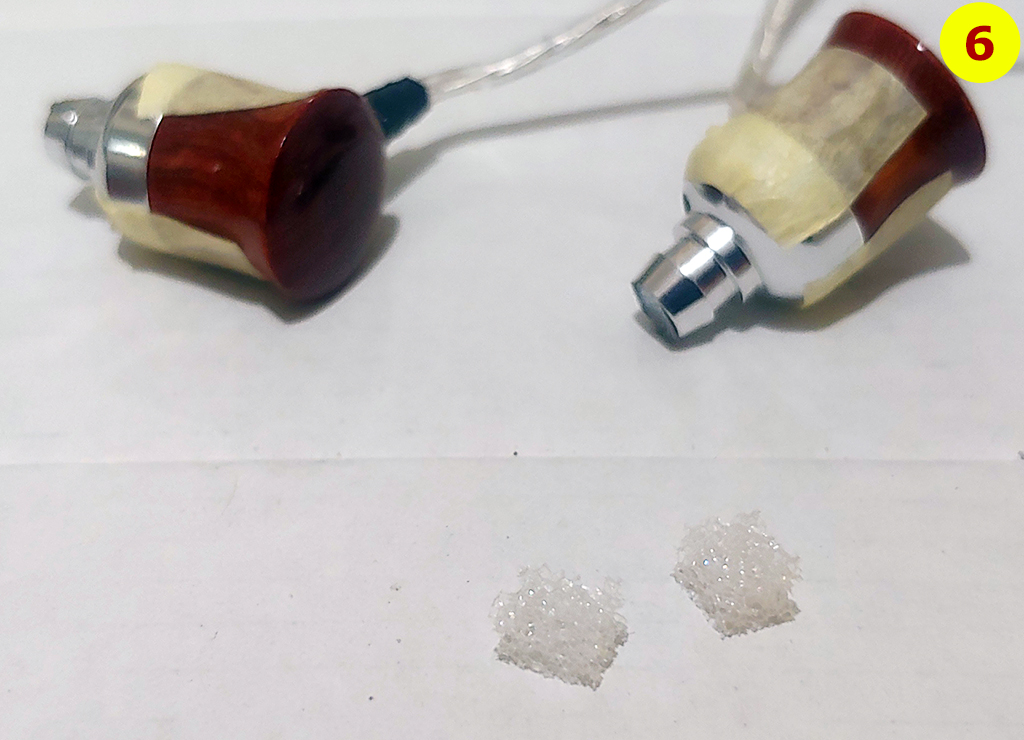
5. The cavity of a wooden shell is filled with a small amount of cotton to reduce a bit the cavity size and mitigate sound reflection from the back.
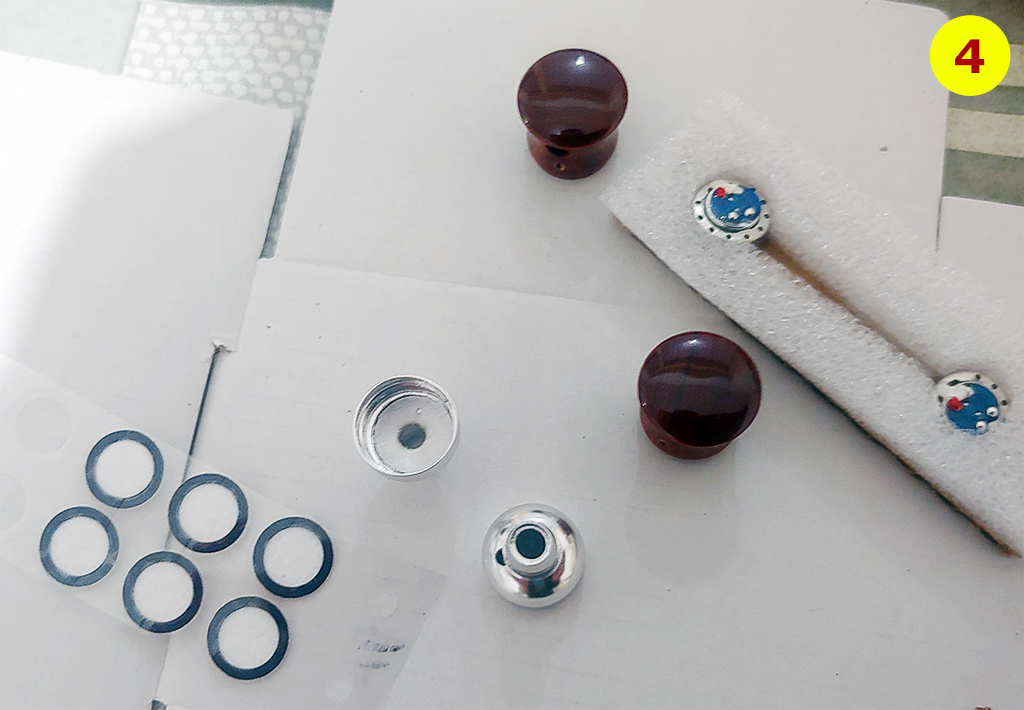
6. Inside the nozzle, I added small pieces of sponge to tame down the treble. For the final version, I remove these filters because treble is "settled down" after burn-in.
7. Because driver diameter is 9.2mm I added a blue shrinking tube to increase the diameter. The rubber also serves here to dampen vibration.
After all of that, I can tell that this DIY model can easily "cast a shadow" over models in my collection mentioned above.
It is obvious that this driver really has potential and works well with this shell
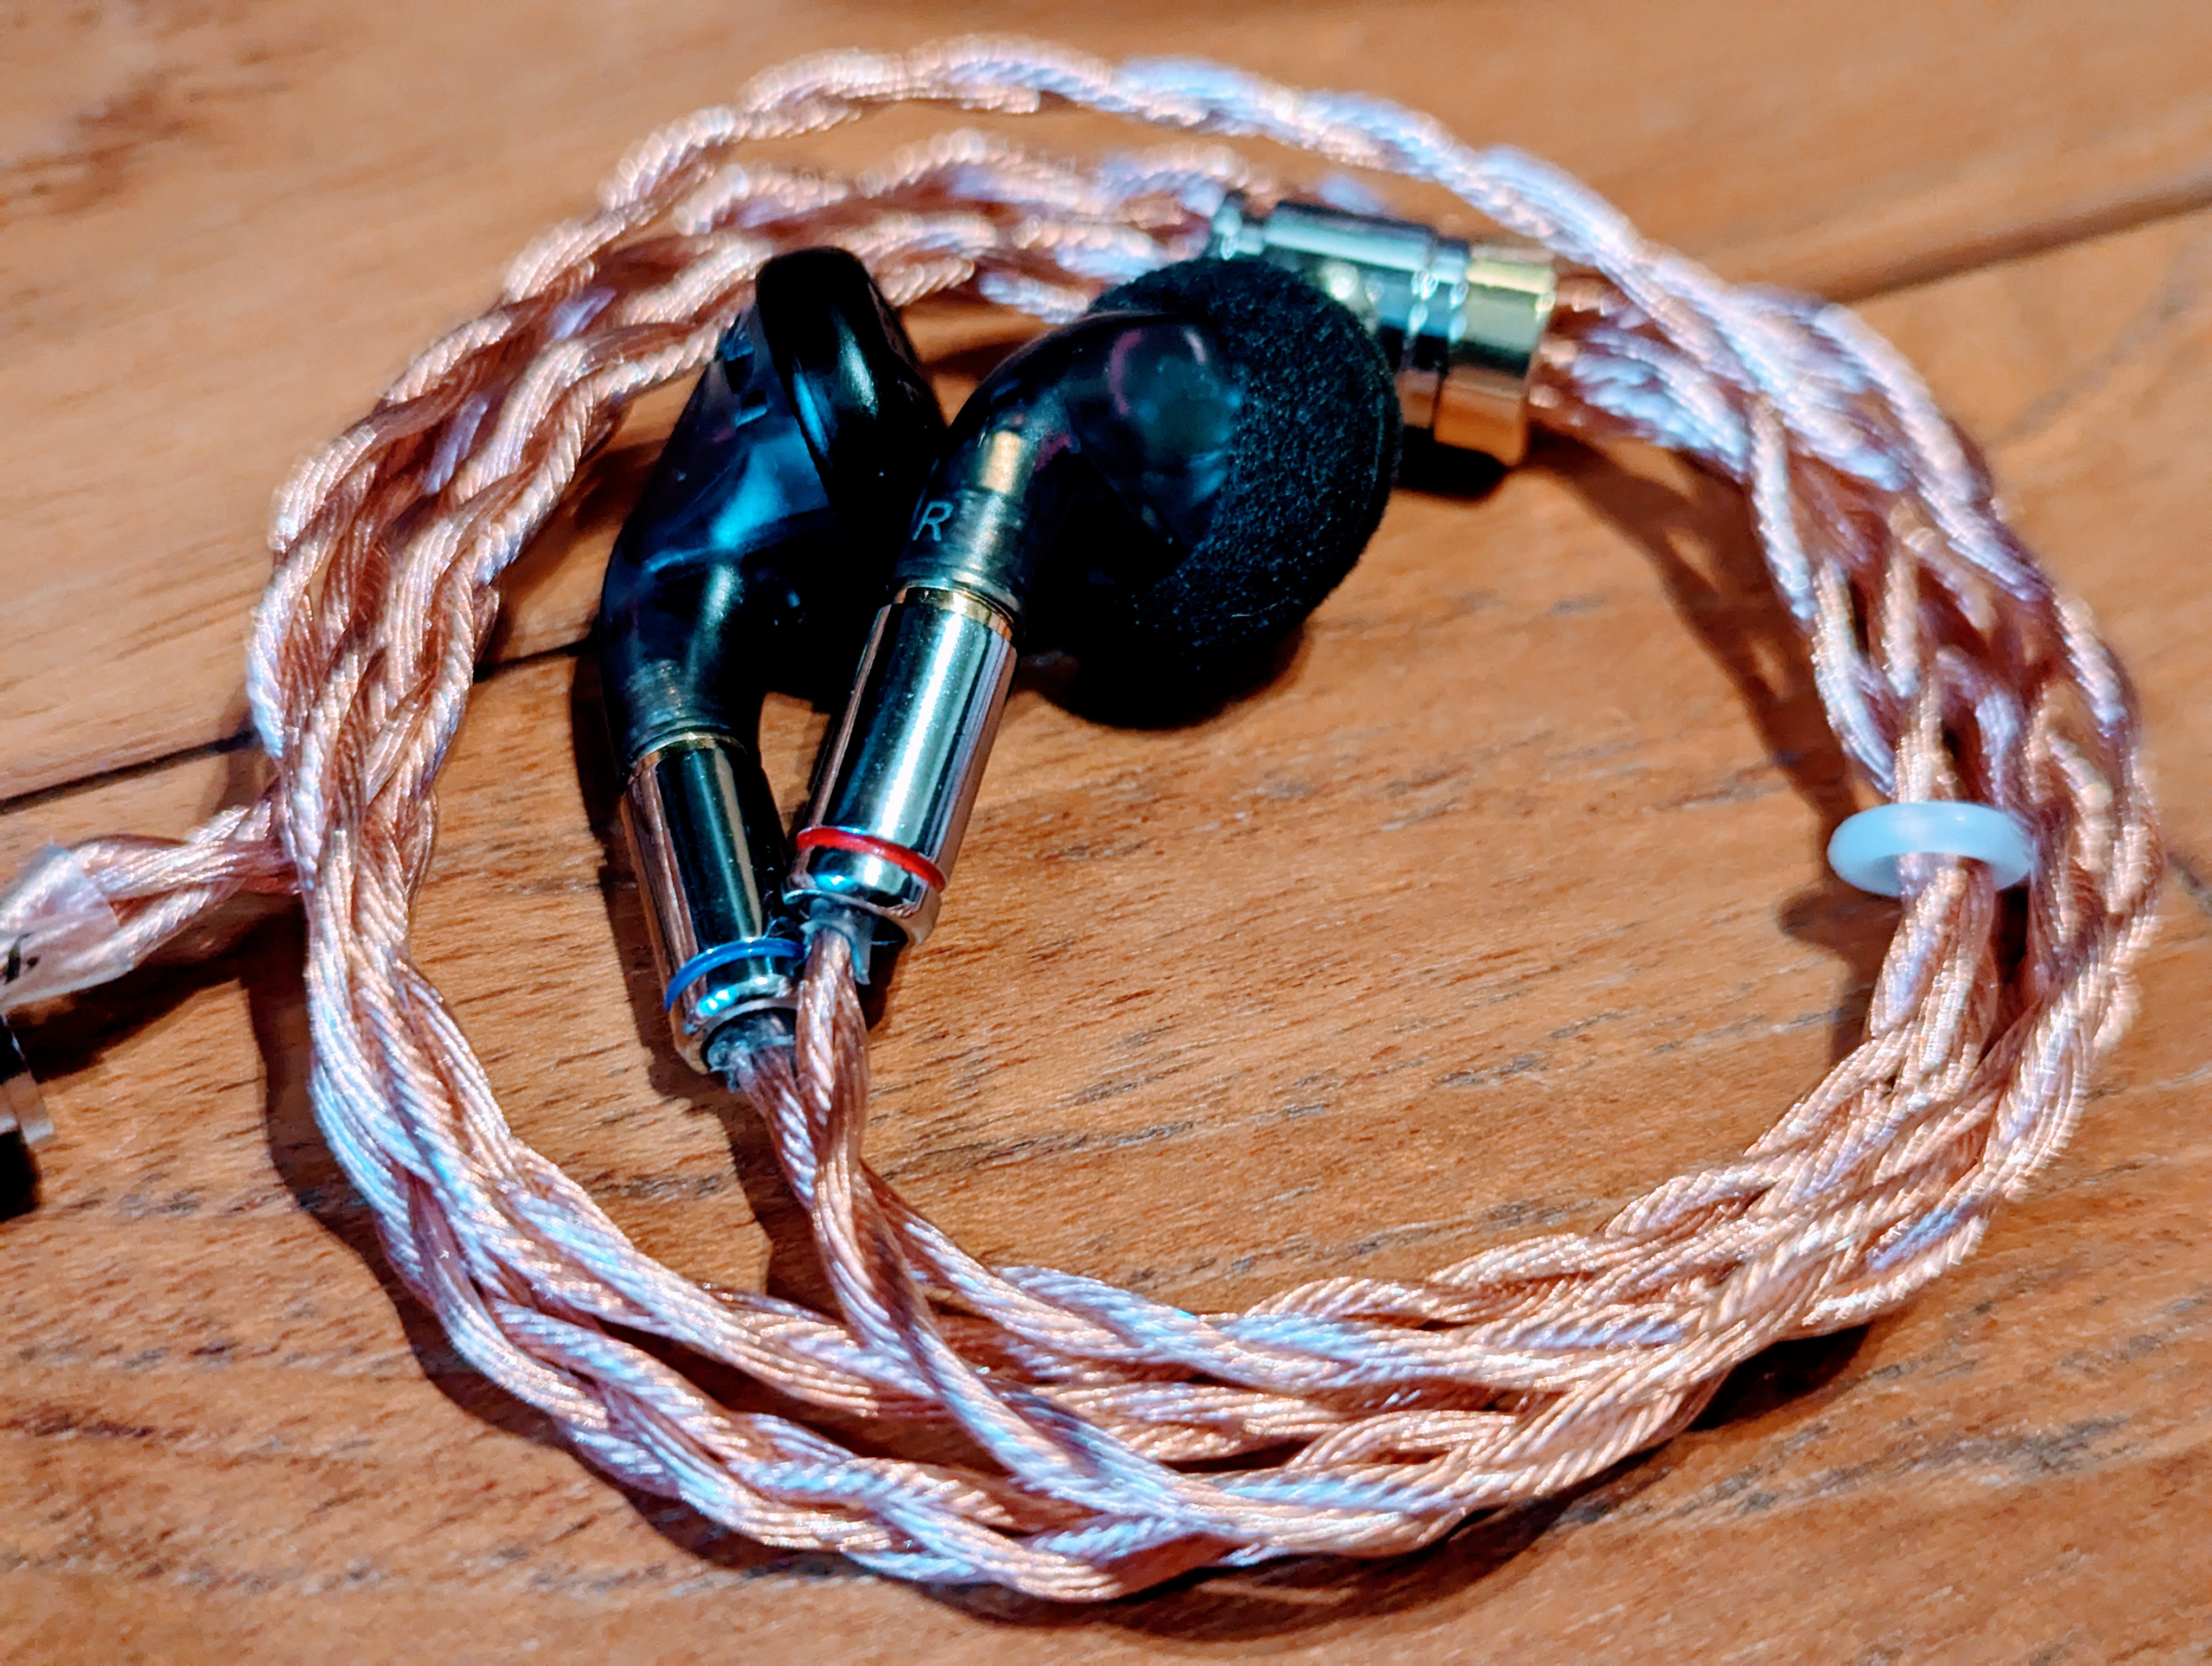
Final look

- JBL T290 (metallic sound with harsh treble)
- MSUR C210 (beryllium 8mm driver with overwhelming bass and lack of treble)
- QKZ AK1 (graphene driver - solid sound)
- RY20 (boomy bass with recessed mids)
The goal of this project was to achieve a balanced sound. My favorite designs are MEZE earbuds so I decided to use metal-wood combo for the shell.
This is the section of the shell. The original shell did not have a front vent.
Below, I will briefly explain my process.
1.Comparison between 15.4mm Titanium 640hm, 14.8mm PK2 and 10mm (9.2mm diameter) Titanium 48ohm drivers
2.Closer look of the shell parts
3. First of all, I drill front vent, next to the nozzle. From the inside, I use a file tool to remove sharp edges at the entrance of the nozzle.
Front vent reduces the pressure created in front of the driver and this way you can control the quantity of the bass.
The smaller diameter of the hole increase bass and larger diameter relaxes the bass.
Existing back vent is too small so I decided to widen the opening a bit. This vent affects also bass (less than front one) and sound-stage and eliminates closed sound.
4. In the frontal inner part of the shell, I added a cotton filter to reduce a bit reflective of the sound, then I punched one larger opening for the nozzle and one small
for the front vent. This can be clearly seen in image 7. The black ring, which is also seen here, is the double-side duct tape foam (1mm) on which the speaker rests and makes a small gap between the shell and driver. That way the driver can breathe and avoids the congested sound.
5. The cavity of a wooden shell is filled with a small amount of cotton to reduce a bit the cavity size and mitigate sound reflection from the back.
6. Inside the nozzle, I added small pieces of sponge to tame down the treble. For the final version, I remove these filters because treble is "settled down" after burn-in.
7. Because driver diameter is 9.2mm I added a blue shrinking tube to increase the diameter. The rubber also serves here to dampen vibration.
After all of that, I can tell that this DIY model can easily "cast a shadow" over models in my collection mentioned above.
It is obvious that this driver really has potential and works well with this shell
Final look
Last edited:
Users who are viewing this thread
Total: 8 (members: 0, guests: 8)
