Bravo Audio - funny looking little tube amps
Feb 17, 2010 at 6:00 PM Post #631 of 2,720
quick question, ive got a sylvania 7308 tube in my indeed (same thing as bravo basically) and compared to the stock tube the sylvania will make changing volume scratchy. ie when you move the volume adjuster i get a scratching sound. and with the stock chinese tube there is not noise just smooth volume adjustment... anybody who knows more than me about this kinda stuff id be interested in understanding why this happens. thanks!
 
Feb 17, 2010 at 9:16 PM Post #632 of 2,720
Quote:

Originally Posted by acvtre /img/forum/go_quote.gif
The bravo v2 is just arrived and I want tweak it as much as I can. First of all I'd like to try some valves and change some capacitors. What would you suggest to buy?
Sencodly I would change the pot with a better one and with more ohms, such as the 50kohm blu alps. Is it a good idea?


This web page has all the information you need on the 12AU7 tube for audio.

12AU7 Tubes in Stock

You can change the coupling capacitors to something better. Read the Bravo and Indeed discussion threads there's a lot of information there. The thing to note with the Bravo (at least the V1) is that there isn't any extra space between the volume pot and the input jack for a larger capacitor so you are stuck with the 12.5mm diameter caps unless you get creative.

The Bravo comes with an Alps pot I thought, I'm not sure why you want "more ohms".

good luck
 
Feb 17, 2010 at 9:59 PM Post #633 of 2,720
Hey guys I just made the discovery that when the amp is cold the caps see over 20V!! Once it's warmed up they see only around 13-14V.

So I've since replaced them with some 1000uF 50V Panasonic FC caps I had laying around.

When the amp is cold tomorrow morning I'll try to measure the max the caps see when warming up...25V should be fine but I'll double check.
 
Feb 17, 2010 at 10:24 PM Post #634 of 2,720
Quote:

Originally Posted by gurusan /img/forum/go_quote.gif
Hey guys I just made the discovery that when the amp is cold the caps see over 20V!! Once it's warmed up they see only around 13-14V.

So I've since replaced them with some 1000uF 50V Panasonic FC caps I had laying around.

When the amp is cold tomorrow morning I'll try to measure the max the caps see when warming up...25V should be fine but I'll double check.


I put 25v 1000 uf Panasonic FC's in my Bravo.

Digi-Key - P10278-ND (Manufacturer - EEU-FC1E102)
 
Feb 19, 2010 at 4:09 PM Post #635 of 2,720
Finally finished my mods to the Bravo.

I ended up doing quite a bit to it, and I'm pretty happy with the way it came out. I had to get pretty creative to fit everything, so I re-cased it, too.

I could have built a new amp from scratch with everything I ended up doing, but *shrug* - it was fun to do, so it's all good.
atsmile.gif


Mods:
------
Replace trimmer pots with higher quality Bourns trimmers
Replace PS cap with Nichicon 10K uF 35v
Replace two small ceramic caps with Wima .22uF film caps
Replace output coupling caps with 1000uF 35v Elna Silmic II
Bypass coupling caps with Wima .22uF film caps
Clean-up and re-flow all solder joints
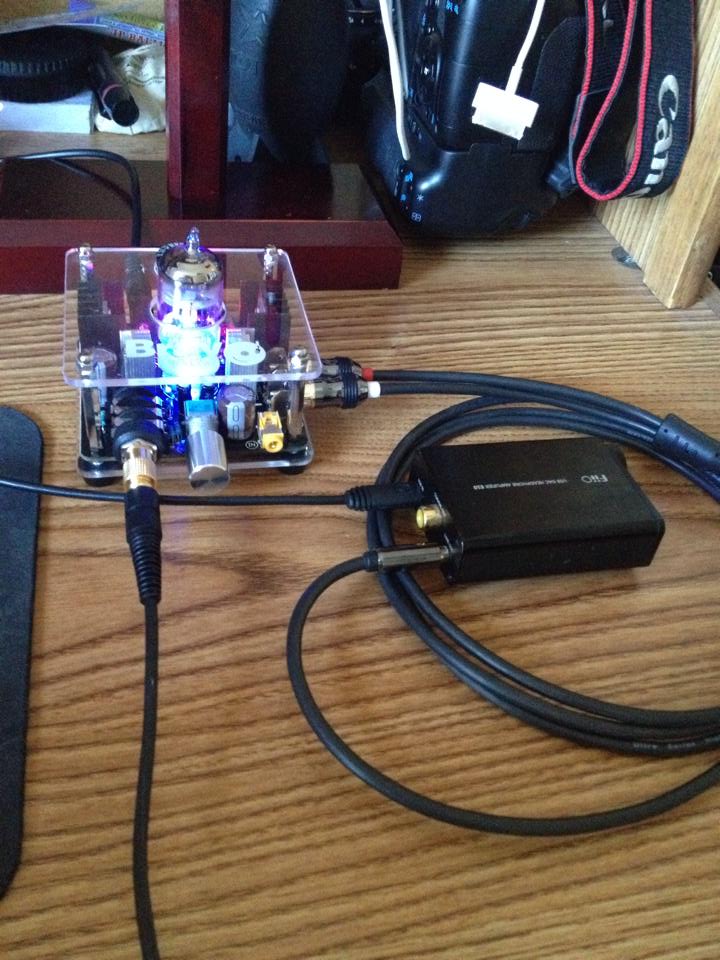
Re-case amp in a Mac Mini shell
Replace volume pot with small SMD stepped attenuator
Re-place/re-locate DC power Jack
Replace/re-locate power switch
Replace/re-locate inputs / outputs
Add access port with test points on rear of case for easy biasing measurement

In addition, I'd already bought a 24v 2.4A linear regulated power supply on eBay a few weeks back, figuring I could use it for the Bravo and other things, so I cased that up and am using that to power it.

I have to say, the original solder joints on the amp were garbage. It looks like the power supply and ouput coupling caps were replaced either at the factory or by the eBay seller. They'd lifted 3 of the solder pads and the joints themselves were really poor quality. Took a bit of work to fix that up, but all residual noise I was getting from the amp prior is now gone.

The Mac Mini case was an old G4 mini shell that I found cheap. I thought it would make a good base, adds some weight so the amp doesn't slide around the desk, and has plenty of room to let me mount some of the caps (the Elnas are HUGE compared to the original caps) and do the wiring underneath the board while still letting the amp sit on top for cooling/display. Without the original plexi cover, the amp runs a bit cooler, too.

Plus, I sort of have a thing for re-using/re-designing existing things when I do my casework. I think there's some extra fun/challenge in getting it all to fit together without looking too much like a hack job.

Initial impressions - cleaner, quieter, zero channel imbalance at any volume, no more odd noises/static as it was previously prone to do. I need to spend some more time listening to it, but so far I'm really liking what I hear.

In any event... on with the pr0n:

bravo_front_left.jpg


bravo_front_right.jpg


bravo_rear_left.jpg


bravo_rear_right.jpg


bravo_top_left.jpg


-Mike
 
Feb 19, 2010 at 4:20 PM Post #636 of 2,720
Quote:

Originally Posted by mhamel /img/forum/go_quote.gif
Finally finished my mods to the Bravo.

I ended up doing quite a bit to it, and I'm pretty happy with the way it came out. I had to get pretty creative to fit everything, so I re-cased it, too.

I could have built a new amp from scratch with everything I ended up doing, but *shrug* - it was fun to do, so it's all good.
atsmile.gif


-Mike


Awesome work! Any chance of pics showing the guts?
 
Feb 19, 2010 at 8:22 PM Post #639 of 2,720
Great work there Mike, seeing this makes me realise how small those mac minis are.
 
Feb 20, 2010 at 5:54 AM Post #641 of 2,720
Another mod you can do to these that will increase sound quality, is to upgrade the mosfet to one with a lower input capacitance, like the IRF510

I replaced the mosfet on mine with another LM317 (a voltage regulator
atsmile.gif
- but you need to bend a pin on it) and it sounds surprisingly good, with much better (crisper) highs
 
Feb 20, 2010 at 2:58 PM Post #642 of 2,720
Thanks all... it was definitely a fun project. :)

As for the guts, I will try to get a few shots. Due to the way the Mac case goes together, it's kind of tight in there, so I don't know how well they'll work. I should have taken pics before I did the final assembly.

-Mike
 
Feb 21, 2010 at 2:45 AM Post #643 of 2,720
Quote:

Originally Posted by upstateguy /img/forum/go_quote.gif
Hey Mike

Very nice, very creative.
beerchug.gif


USG


You mean very nice, very curious don't you? lol
 

Users who are viewing this thread

Back
Top