Any opinions / reviews on Gemtune APPJ PA1502A
Jan 12, 2020 at 5:31 PM Post #781 of 876
Hi greinedo, nice work!

I will reply to you as I have that APPJ, and there are only one or two people left on this thread now, partly because of the age of the amp and it has had several new versions since then, (which I'm rather sorry about)!

Glad you like the amp, it is pretty amazing! I am continually being shocked by it, even now after about 10 years of ownership!

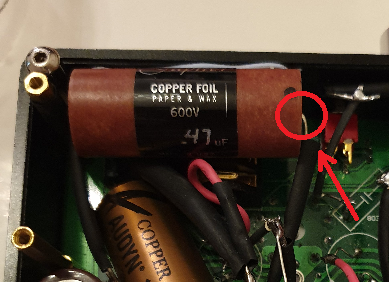
The Jantzen caps you used look to be fine, the right values to boost bass performance and the cathode caps at 1000uF will give power a boost to avoid clipping and improve transient response, given that this is a relatively low power amp, (which is not a problem because low power often means clean power). Together with the bypasses to boost the faster treble frequencies is what is needed here.

I found burn in time improved the soundstage airiness and clarity especially, but for the Jupiter and Kaisei caps I have put in they need into the hundreds of hours before I really started to notice it big time.

The upgrades are really worth it for this little baby amp.


Changing the pot has been mentioned but as far as I know nobody has actually done it due to the lack of space, and if you're not getting any problems it's best left. As the amp is autobiasing you can't adjust it by any other means. Digital volume seems a fine compromise.


Good work on the DAC, did you make the speakers too?

Let us know your impressions through your speakers after more burn in time, I am interested to know as mine are only 87db but are absolutely stunning quite frankly!

Also any questions about tubes etc., but there is a lot about that back in the thread.


Still here, with the cap mod & original amp. Enjoying it as much as first day. After trying a whole host of tubes (earlier in the thread) settled on the 14N7 as driver & the unbeatable 6BG6G coke bottle
power tubes. Spacing very tight but works fine. Shame they changed the design, mine's a keeper.
 
Jan 12, 2020 at 6:50 PM Post #782 of 876
Still here, with the cap mod & original amp. Enjoying it as much as first day. After trying a whole host of tubes (earlier in the thread) settled on the 14N7 as driver & the unbeatable 6BG6G coke bottle
power tubes. Spacing very tight but works fine. Shame they changed the design, mine's a keeper.

Hi DavidK35, good to hear from you again, hope your granddaughter is letting you use your headphones once in a while lol!

The amp looks awesome!

Yes I don't see why they changed it, how can they improve on perfection.
:).
 
Jan 13, 2020 at 12:39 AM Post #783 of 876
Still here, with the cap mod & original amp. Enjoying it as much as first day. After trying a whole host of tubes (earlier in the thread) settled on the 14N7 as driver & the unbeatable 6BG6G coke bottle
power tubes. Spacing very tight but works fine. Shame they changed the design, mine's a keeper.
I’m a happy owner of both the speaker APPJ amp, a Miniwatt N3, and the headphone one that is in the title of this thread. I use Psvane EL84s and 12XA7 with my PA0901A which gives it very high resolution and a really warm rich treble. I’m pleased to say that the amp is still available, it is called the TubeCube 7 for $180:

https://www.tubedepot.com/products/tubecube-7-stereo-vacuum-tube-amplifier
 
Jan 13, 2020 at 2:31 PM Post #784 of 876
Hi DavidK35, good to hear from you again, hope your granddaughter is letting you use your headphones once in a while lol!

The amp looks awesome!

Yes I don't see why they changed it, how can they improve on perfection.
:).


Yes, she does now & then LOL. When I play through loudspeakers she likes to adjust her position and stand dead centre in the sweet spot, instinctively knowing
about the "stereo" effect.
 
Jan 13, 2020 at 3:48 PM Post #785 of 876
Pretty sure its triode. I was impressed that you had no problems with your upgrade!

Today, I placed an external potentiometer, when he came, and finally, it seems a bit better. Music is by comparison a very little dry without any pot. Then, with my wife we listen complete old Persuasive Percussion Vol 2 - Enoch Light, and it was huge music in the living room ! So realistic.
I made a mistake while ordering. Original pot was 10k, now it's 50.


external-pot.png
 
Jan 20, 2020 at 9:35 AM Post #786 of 876
My turn to mod my second APPJ
Fingers crossed

20200120_104413.jpg


Clean up the board
And managed to fill it up
20200120_215611.jpg

But there is a continous hum coming from the left channel

It doesn't change when i move the volume pot
 
Last edited:
Jan 20, 2020 at 5:27 PM Post #787 of 876
Hi jekjek!

I will have a proper look when I have time but for now I need to know a couple of things:

Does the amp work despite the hum?
It looks like you cut the legs of the original caps? That's ok.
When you soldered the new caps did you take the top off the chassis as well as the bottom? If you take the top off you should be able to see if the solder points look good and that the round copper pads have not come off with too much heat or pressure. If they look ok we will assume the circuit is ok for the moment.
Did you fit the cathode caps the right way around with the negative as shown in this pic the white band at the bottom in this pic which I have borrowed from another member:


I must give a warning never to touch anything inside while it is switched on or for about half an hour after you switch off to allow the caps to discharge.

Until the amp is working properly I wouldn't keep it switched on for too long!

I'll get back to you when I have time :).

Edit: The only way to check the circuit properly is with a digital multimeter such as this: https://www.amazon.co.uk/Neoteck-Multimeter-Resistance-Voltmeter-Laboratory/dp/B01N9TRQI1/ref=sr_1_2_sspa?crid=NCNFJ31YDC8I&keywords=digital+multimeter&qid=1579559632&sprefix=digital+mul,aps,229&sr=8-2-spons&psc=1&spLa=ZW5jcnlwdGVkUXVhbGlmaWVyPUEzRjNNWlJaOEZVMlFWJmVuY3J5cHRlZElkPUEwNTYwNjUxUlRPTkJKUzVaTlFRJmVuY3J5cHRlZEFkSWQ9QTAxMDQzOTEyM0JDSE9PM1ozV1k0JndpZGdldE5hbWU9c3BfYXRmJmFjdGlvbj1jbGlja1JlZGlyZWN0JmRvTm90TG9nQ2xpY2s9dHJ1ZQ==

You can then check the solder points with other connections in the same trace - with the amp off - and if they have continuity as measured by the DMM then you know the connection is ok!
 
Last edited:
Jan 20, 2020 at 6:27 PM Post #788 of 876
Where I've marked in red it is possible from what I can see that the round pads might be damaged, the others look ok. The way to tell is by looking closely at the solder points to see if the pads have come away partially from the board, preferably with the solder removed so you can see better. Where I've marked in blue there are 2 points that are connected along the green trace. If you had a multimeter you could check these 2 points for continuity. If the meter shows continuity you can be fairly sure that the solder points are good and therefore the circuit is good there. If there is no continuity then there is a break in the circuit and it needs to be fixed.

upload_2020-1-20_23-20-55.png


When you've looked at your soldering let me know if you think there is a problem there and we can take it from there. Look at the bottom of the PCB as in the pic, and also look at the same points from the top of the amp because these need to be good too.
 
Last edited:
Jan 20, 2020 at 10:13 PM Post #789 of 876
Where I've marked in red it is possible from what I can see that the round pads might be damaged, the others look ok. The way to tell is by looking closely at the solder points to see if the pads have come away partially from the board, preferably with the solder removed so you can see better. Where I've marked in blue there are 2 points that are connected along the green trace. If you had a multimeter you could check these 2 points for continuity. If the meter shows continuity you can be fairly sure that the solder points are good and therefore the circuit is good there. If there is no continuity then there is a break in the circuit and it needs to be fixed.


When you've looked at your soldering let me know if you think there is a problem there and we can take it from there. Look at the bottom of the PCB as in the pic, and also look at the same points from the top of the amp because these need to be good too.

Thanks baron
Despite the hum, the amplifier works fine
I can almost accept it as it does not interfere with the music
I get fuller body music with this setup than what i get with the previous capacitors (wimas and panasonic)

I will continue to troubleshoot it this weekend and if I'm not able to resolve this, i might have to send it tube amp repair guy

The hum was on the same level despites of the volume change
 
Jan 21, 2020 at 12:48 AM Post #790 of 876
I connect a jumper cable highlighted in red because i yanked out the lead in the earlier mod
but I didnt have any humming back then

i will try to move one of the jupiter capacitor away from the yellow transformer and will see if the humming continues

upload_2020-1-21_13-44-19.png
 
Jan 21, 2020 at 5:56 AM Post #791 of 876
Thanks baron

I will continue to troubleshoot it this weekend and if I'm not able to resolve this, i might have to send it tube amp repair guy

No worrries

Yes do that, or a TV repairman, or anyone who can troubleshoot PCB's.

I get fuller body music with this setup than what i get with the previous capacitors (wimas and panasonic)

Yes, you have a set of top capacitors there so the amp will be elevated to top level status. Jupiters are excellent for realism and the Nichicons will increase bass definition as well as sharpness and boost power. You will notice the sound improving more and more as the amp burns in.


Despite the hum, the amplifier works fine

If you notice anything that's not right such as burning, fluctuating sound, sound imbalance between left and right etc., switch off immediately. You have such a nice choice of components now I would hate to see anything nasty happen.

I'm assuming that you have connected those 2 points indicated by the red line with wire, because the trace was damaged. Yes that looks right according to that trace

I can't emphasise enough that a DMM would be very handy to check these things yourself.

Also, very important, those components will be exposed at the bottom of the amp. This is extremely dangerous because, if you're like me fumbling with the amp's volume in the dark you will be exposed to very high voltage so I would close that however you see fit.

I think you might be fairly new to this so I will prepare a checklist later of things to do.
:).
 
Jan 21, 2020 at 12:06 PM Post #792 of 876
Hey jekjek!

Just checked your pics of your mods and it looks to be good!

From what I can see you've got the cathode caps in the right way round, also the bypasses look to be correct (negative to negative from bypass to cathode cap). Nice work!

Your soldering is much improved over the last time LOL!

From what I can see everything looks good, but it can be difficult to check for faults.

Check the wiring is not touching anything metal, also check no wires are broken, including other wires on the inside. I had a wire from the inside to the transformer break.
Check the soldering is secure
Check the joints are good and not loose
The make sure there is no loose bits of solder lying around on the PCB.

A final check would be to check the solder joints you did for continuity with other connections in the same trace on both sides of the PCB with a DMM, this would reveal any problems you can't see. I think this is the most likely thing to go wrong because any damage to the connections on the PCB is difficult to see.

Let me know if everything is alright after your next check.
:).
 
Last edited:
Jan 24, 2020 at 10:59 AM Post #793 of 876
This morning the tube amp repair guy call me up and asked to repair the amp myself..
I am a bit puzzled by his request thus i went over his place and he showed me one of the jupiter caps was picking up the buzz from the transformer. He asked me to repair it myself
Lol
So this is how the amp looks like now after another rearrangement
20200124_213707.jpg


The hum on the left side is gone now but some faint hum is coming on the right side
Looks like I'm going to be busy this weekend
 
Jan 24, 2020 at 12:51 PM Post #794 of 876
he showed me one of the jupiter caps was picking up the buzz from the transformer.

Since it is not polarized, reversing the coupling cap usually said to help.

One lead of the cap is usually connected to the outer area of cap.
Some ppl like to connect that outer shield lead to driver tube, so the power tube input gets the inner part of the cap.

I have no comment about it as I have not tested that.

The hum on the left side is gone now but some faint hum is coming on the right side
Looks like I'm going to be busy this weekend
Yep..

The story with this amp, is that in stock form, the bottom lid closes all the way, and effectively shields the power supply section, which is a "switching" PSU .
So you can try to help with shielding if you like, by moving caps away and/or covering the PSU section, but be careful not to short anything out with any added metal.
 
Last edited:
Jan 24, 2020 at 3:14 PM Post #795 of 876
I bought some new coupling caps for this amp (clarity CMR), to see if I can help increase the soundstage.

Here is a funny pic for you.
Expensive driving cheap!
Nice.
:)
20170412_180551.jpg
For the 1502 model, Most of the good tubes on my amp are a bit forward with the exception of the Gold Lion KT66, which runs hotter than the rest..

:)
 
Last edited:

Users who are viewing this thread

Back
Top