


kingpage
1000+ Head-Fier
- Joined
- Apr 26, 2010
- Posts
- 1,182
- Likes
- 44
It's been more than a year since I modified my Creative Aurvana Live! (CAL!), you can read the thread here.
This time I will use a similar approach to make the already quite neutral HM5 even flatter and better.
I am not the first person to modify the HM5 headphone; several people have done mods to their FA-003/HM5. In this thread, not only will I describe to you what particular mods I intend to use, I will also explain the rationale behind my approach as well as provide you with some objective results by way of measurements.
I measured my stock HM5 soon after I received it in the mail. The measurements were rough as I have stated there, because I measured both ears at the same time and the seal wasn't ideal. There was no "rig" to speak of.
For a long time (not really, only 5 months), I have been very satisfied with my stock HM5. That's why I have been reluctant to make any changes to it, but my audiophile side got the better of me. So, it's time to make some upgrades of my own. After I gave it some thoughts, I made up my mind in terms of what mods I would use on the HM5.
This a measuring rig made out of a shipping box. It's simple.

The mic used is a Panasonic WM-61A. It's a electret/condenser capsule that's used in many entry-level measurment mics. It's flat enough for my purpose even without proper filtering and amplification (or calibration).
DAC/amp is FiiO E10. NwAvGuy has measured it thoroughly, and it's truly high fidelity. Frequency response is within [size=x-small]+/- 0.1 dB. Go to his blog if you want more details.[/size]
My laptop's mic-in has hum issues. ADC (Analog to Digital Converter) is Music Fairy USB card, cheap and low quality. Here's the FR and impulse response of the ADC. All the measurements are adjusted for ADC's FR variation (esp. the bass roll-off), unless specified otherwise. The impulse response, on the other hand, might not be too meaningful...

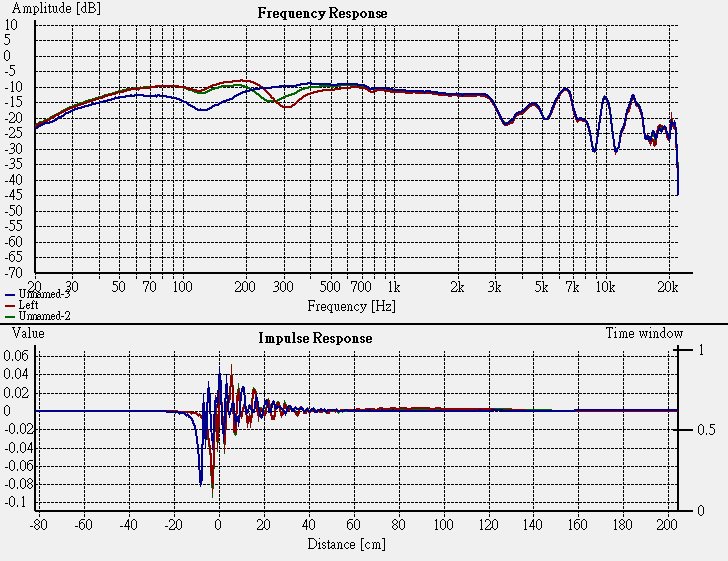
Here's the FR graph for stock HM5.

Explanation of how to use Dynamat


I originally wanted to put a big chunk of Dynamat on the cups, but it could be too heavy for HM5s. The felt on the earcup already acts like DynaXorb, so I don't believe replacing it with other sound absorbing materials will make a difference. Not to mention, the felt is kind of glued onto the cups. Unlike the mods I did for CAL!, I only put Dynamat behind the drivers as shown below. The weight increase is noticeable. I imagine the wooden cups would still be quite a bit heavier.


Based on information about DIY speakers or speaker modding, people would put materials inside wooden enclosure to get rid of reflection/resonance, etc. Perhaps, wooden cups (without sound absorption such as using felt) aren't a good idea for headphones after all. Another thing people in the DIY community do is stuff polyfill (e.g. from pillows) in their speakers or headphones. For speakers, the polyfill is supposed to confuse the drivers into thinking that the enclosure/box is bigger than it actually is. Although cup size is not usually discussed among headphone enthusiasts, I suspect something similar is in action here. Enclosure size is far more important in speakers than headphones, but because of limited room area people usually stuff their speakers rather than make their speakers infinitely larger.
The trick is not to stuff too much and tease out the polyfill to make it nice and loose. The photo is not doing a great job to show you the little amount I have used. In reality, it's not that much. It must be the lighting and the white filter behind the phlyfill, which gives the illusion of a lot.

The next thing I wanted to modify is the vents of the HM5s. There are two vents on each cup. They are very small and hard to locate at first; they are located at the rears of the cups - the place where the headband is holding the earcups. I believe those are the headphone equivalent of speaker bass reflex ports, which are installed in speakers to enhance bass response and allow more air to move. Some have had success with covering partially the vents of HM5. From the measurements I made back in January, I also stated that covering the vents completely would eliminate the 300Hz dip. Due to the lack of a rig, the previous measurement was't too reliable in showing changes in the lower frequency. The following graph illustrates much better than before effects of the vents on the FR of HM5. (this is the only graph without compensating for ADC variations, ADC is responsible for most of the bass roll-off)

The red line is stock whereas the blue line is when both vents are fully covered (with sticky tape). The green line is what happens when you only cover half of each vent. Based on this experiment, I decided to cover only the front vent for each earcup, which turned out to achieve pretty much the same results as covering half (green line). The next photo shows you how the front vent is covered with a little Dyanamat. But you can use anything you have available for that.

Here is the measurements of the fully-modded HM5 and stock HM5, side by side.

The most obvious difference is that the upper bass/lower midrange is now more linear as a result of the vent mod. However, it's not immediately obvious what the two other modifications have done to SQ. I'd probably need a cumulative spectral decay plot, square wave and distortion graphs to see more clearly and quantitatively the improvements brought about by the Dyanamat mod and polyfill mod. I feel the modded HM5 sounds fantastic and better than stock, but YMMV. I think bass is tighter and slightly deeper; the soundstage is as big as before if not bigger, yet more realistic; the flatter response lets more details and treble to come out, etc.
Update: Replaced blurry photos with new ones in this post. There's been some minor adjustments to the mods I did. Here's the post that describes those mod changes, and it also includes the frequency response measurements of HD 25-1 II and Beats Solo for comparison. Below is HM5's final version mod results vs first version mod results.

This time I will use a similar approach to make the already quite neutral HM5 even flatter and better.
I am not the first person to modify the HM5 headphone; several people have done mods to their FA-003/HM5. In this thread, not only will I describe to you what particular mods I intend to use, I will also explain the rationale behind my approach as well as provide you with some objective results by way of measurements.
I measured my stock HM5 soon after I received it in the mail. The measurements were rough as I have stated there, because I measured both ears at the same time and the seal wasn't ideal. There was no "rig" to speak of.
For a long time (not really, only 5 months), I have been very satisfied with my stock HM5. That's why I have been reluctant to make any changes to it, but my audiophile side got the better of me. So, it's time to make some upgrades of my own. After I gave it some thoughts, I made up my mind in terms of what mods I would use on the HM5.
This a measuring rig made out of a shipping box. It's simple.
The mic used is a Panasonic WM-61A. It's a electret/condenser capsule that's used in many entry-level measurment mics. It's flat enough for my purpose even without proper filtering and amplification (or calibration).
DAC/amp is FiiO E10. NwAvGuy has measured it thoroughly, and it's truly high fidelity. Frequency response is within [size=x-small]+/- 0.1 dB. Go to his blog if you want more details.[/size]
My laptop's mic-in has hum issues. ADC (Analog to Digital Converter) is Music Fairy USB card, cheap and low quality. Here's the FR and impulse response of the ADC. All the measurements are adjusted for ADC's FR variation (esp. the bass roll-off), unless specified otherwise. The impulse response, on the other hand, might not be too meaningful...
Here's the FR graph for stock HM5.
Explanation of how to use Dynamat


I originally wanted to put a big chunk of Dynamat on the cups, but it could be too heavy for HM5s. The felt on the earcup already acts like DynaXorb, so I don't believe replacing it with other sound absorbing materials will make a difference. Not to mention, the felt is kind of glued onto the cups. Unlike the mods I did for CAL!, I only put Dynamat behind the drivers as shown below. The weight increase is noticeable. I imagine the wooden cups would still be quite a bit heavier.
Based on information about DIY speakers or speaker modding, people would put materials inside wooden enclosure to get rid of reflection/resonance, etc. Perhaps, wooden cups (without sound absorption such as using felt) aren't a good idea for headphones after all. Another thing people in the DIY community do is stuff polyfill (e.g. from pillows) in their speakers or headphones. For speakers, the polyfill is supposed to confuse the drivers into thinking that the enclosure/box is bigger than it actually is. Although cup size is not usually discussed among headphone enthusiasts, I suspect something similar is in action here. Enclosure size is far more important in speakers than headphones, but because of limited room area people usually stuff their speakers rather than make their speakers infinitely larger.
The trick is not to stuff too much and tease out the polyfill to make it nice and loose. The photo is not doing a great job to show you the little amount I have used. In reality, it's not that much. It must be the lighting and the white filter behind the phlyfill, which gives the illusion of a lot.
The next thing I wanted to modify is the vents of the HM5s. There are two vents on each cup. They are very small and hard to locate at first; they are located at the rears of the cups - the place where the headband is holding the earcups. I believe those are the headphone equivalent of speaker bass reflex ports, which are installed in speakers to enhance bass response and allow more air to move. Some have had success with covering partially the vents of HM5. From the measurements I made back in January, I also stated that covering the vents completely would eliminate the 300Hz dip. Due to the lack of a rig, the previous measurement was't too reliable in showing changes in the lower frequency. The following graph illustrates much better than before effects of the vents on the FR of HM5. (this is the only graph without compensating for ADC variations, ADC is responsible for most of the bass roll-off)
The red line is stock whereas the blue line is when both vents are fully covered (with sticky tape). The green line is what happens when you only cover half of each vent. Based on this experiment, I decided to cover only the front vent for each earcup, which turned out to achieve pretty much the same results as covering half (green line). The next photo shows you how the front vent is covered with a little Dyanamat. But you can use anything you have available for that.
Here is the measurements of the fully-modded HM5 and stock HM5, side by side.
The most obvious difference is that the upper bass/lower midrange is now more linear as a result of the vent mod. However, it's not immediately obvious what the two other modifications have done to SQ. I'd probably need a cumulative spectral decay plot, square wave and distortion graphs to see more clearly and quantitatively the improvements brought about by the Dyanamat mod and polyfill mod. I feel the modded HM5 sounds fantastic and better than stock, but YMMV. I think bass is tighter and slightly deeper; the soundstage is as big as before if not bigger, yet more realistic; the flatter response lets more details and treble to come out, etc.
Update: Replaced blurry photos with new ones in this post. There's been some minor adjustments to the mods I did. Here's the post that describes those mod changes, and it also includes the frequency response measurements of HD 25-1 II and Beats Solo for comparison. Below is HM5's final version mod results vs first version mod results.

 . It didn't feel right, so I reverted to stock.

