


Hello! I'm currently modding a pair of grado sr80's and am having difficulty liberating it's drivers from the housing. I've already removed the cups, and tried to use a cutting knife to slice off the adhesive holding the drivers in place, but i just broke the blade of the knife doing that instead. Are there any other feasible ways of doing that? I tried searching up the senngrado thread but there's pretty much no info on it there.
You are using an out of date browser. It may not display this or other websites correctly.
You should upgrade or use an alternative browser.
You should upgrade or use an alternative browser.
The Mod Collective: Bring all your full sized headphone mods here.
- Thread starter Cruelhand Luke
- Start date
Slater
Headphoneus Supremus
Hello! I'm currently modding a pair of grado sr80's and am having difficulty liberating it's drivers from the housing. I've already removed the cups, and tried to use a cutting knife to slice off the adhesive holding the drivers in place, but i just broke the blade of the knife doing that instead. Are there any other feasible ways of doing that? I tried searching up the senngrado thread but there's pretty much no info on it there.
Xacto is the ticket friend

Slater
Headphoneus Supremus
If that's the case, flawed technique is most likely the culprit.
Not surprising.
The very tip of Xacto blades are weak. I’ve broken thousands of Xacto tips just like that. The issue is the tip can’t be used to pry like a crowbar. The tip can only be used in an up and down sawing or poking motion (in addition to obviously cutting by dragging the blade).
Surgical blades are more flexible and don’t break like that.
Anyways, to break the glue around drivers, I take a new blade, and go around the perimeter poking the blade down a bit, then moving to the next spot and repeating.
So like on a clock, I would poke through the glue at 12 o’clock, then 1 o’clock, then 2 o’clock etc all the way around until the glue was cut all the way. Then I would use something OTHER than the Xacto blade to gently pry the driver up (there’s usually a bit of residual glue still holding some sections of the driver, but it does pry out). If the Xacto blade is used in that last prying step, snap goes the blade!
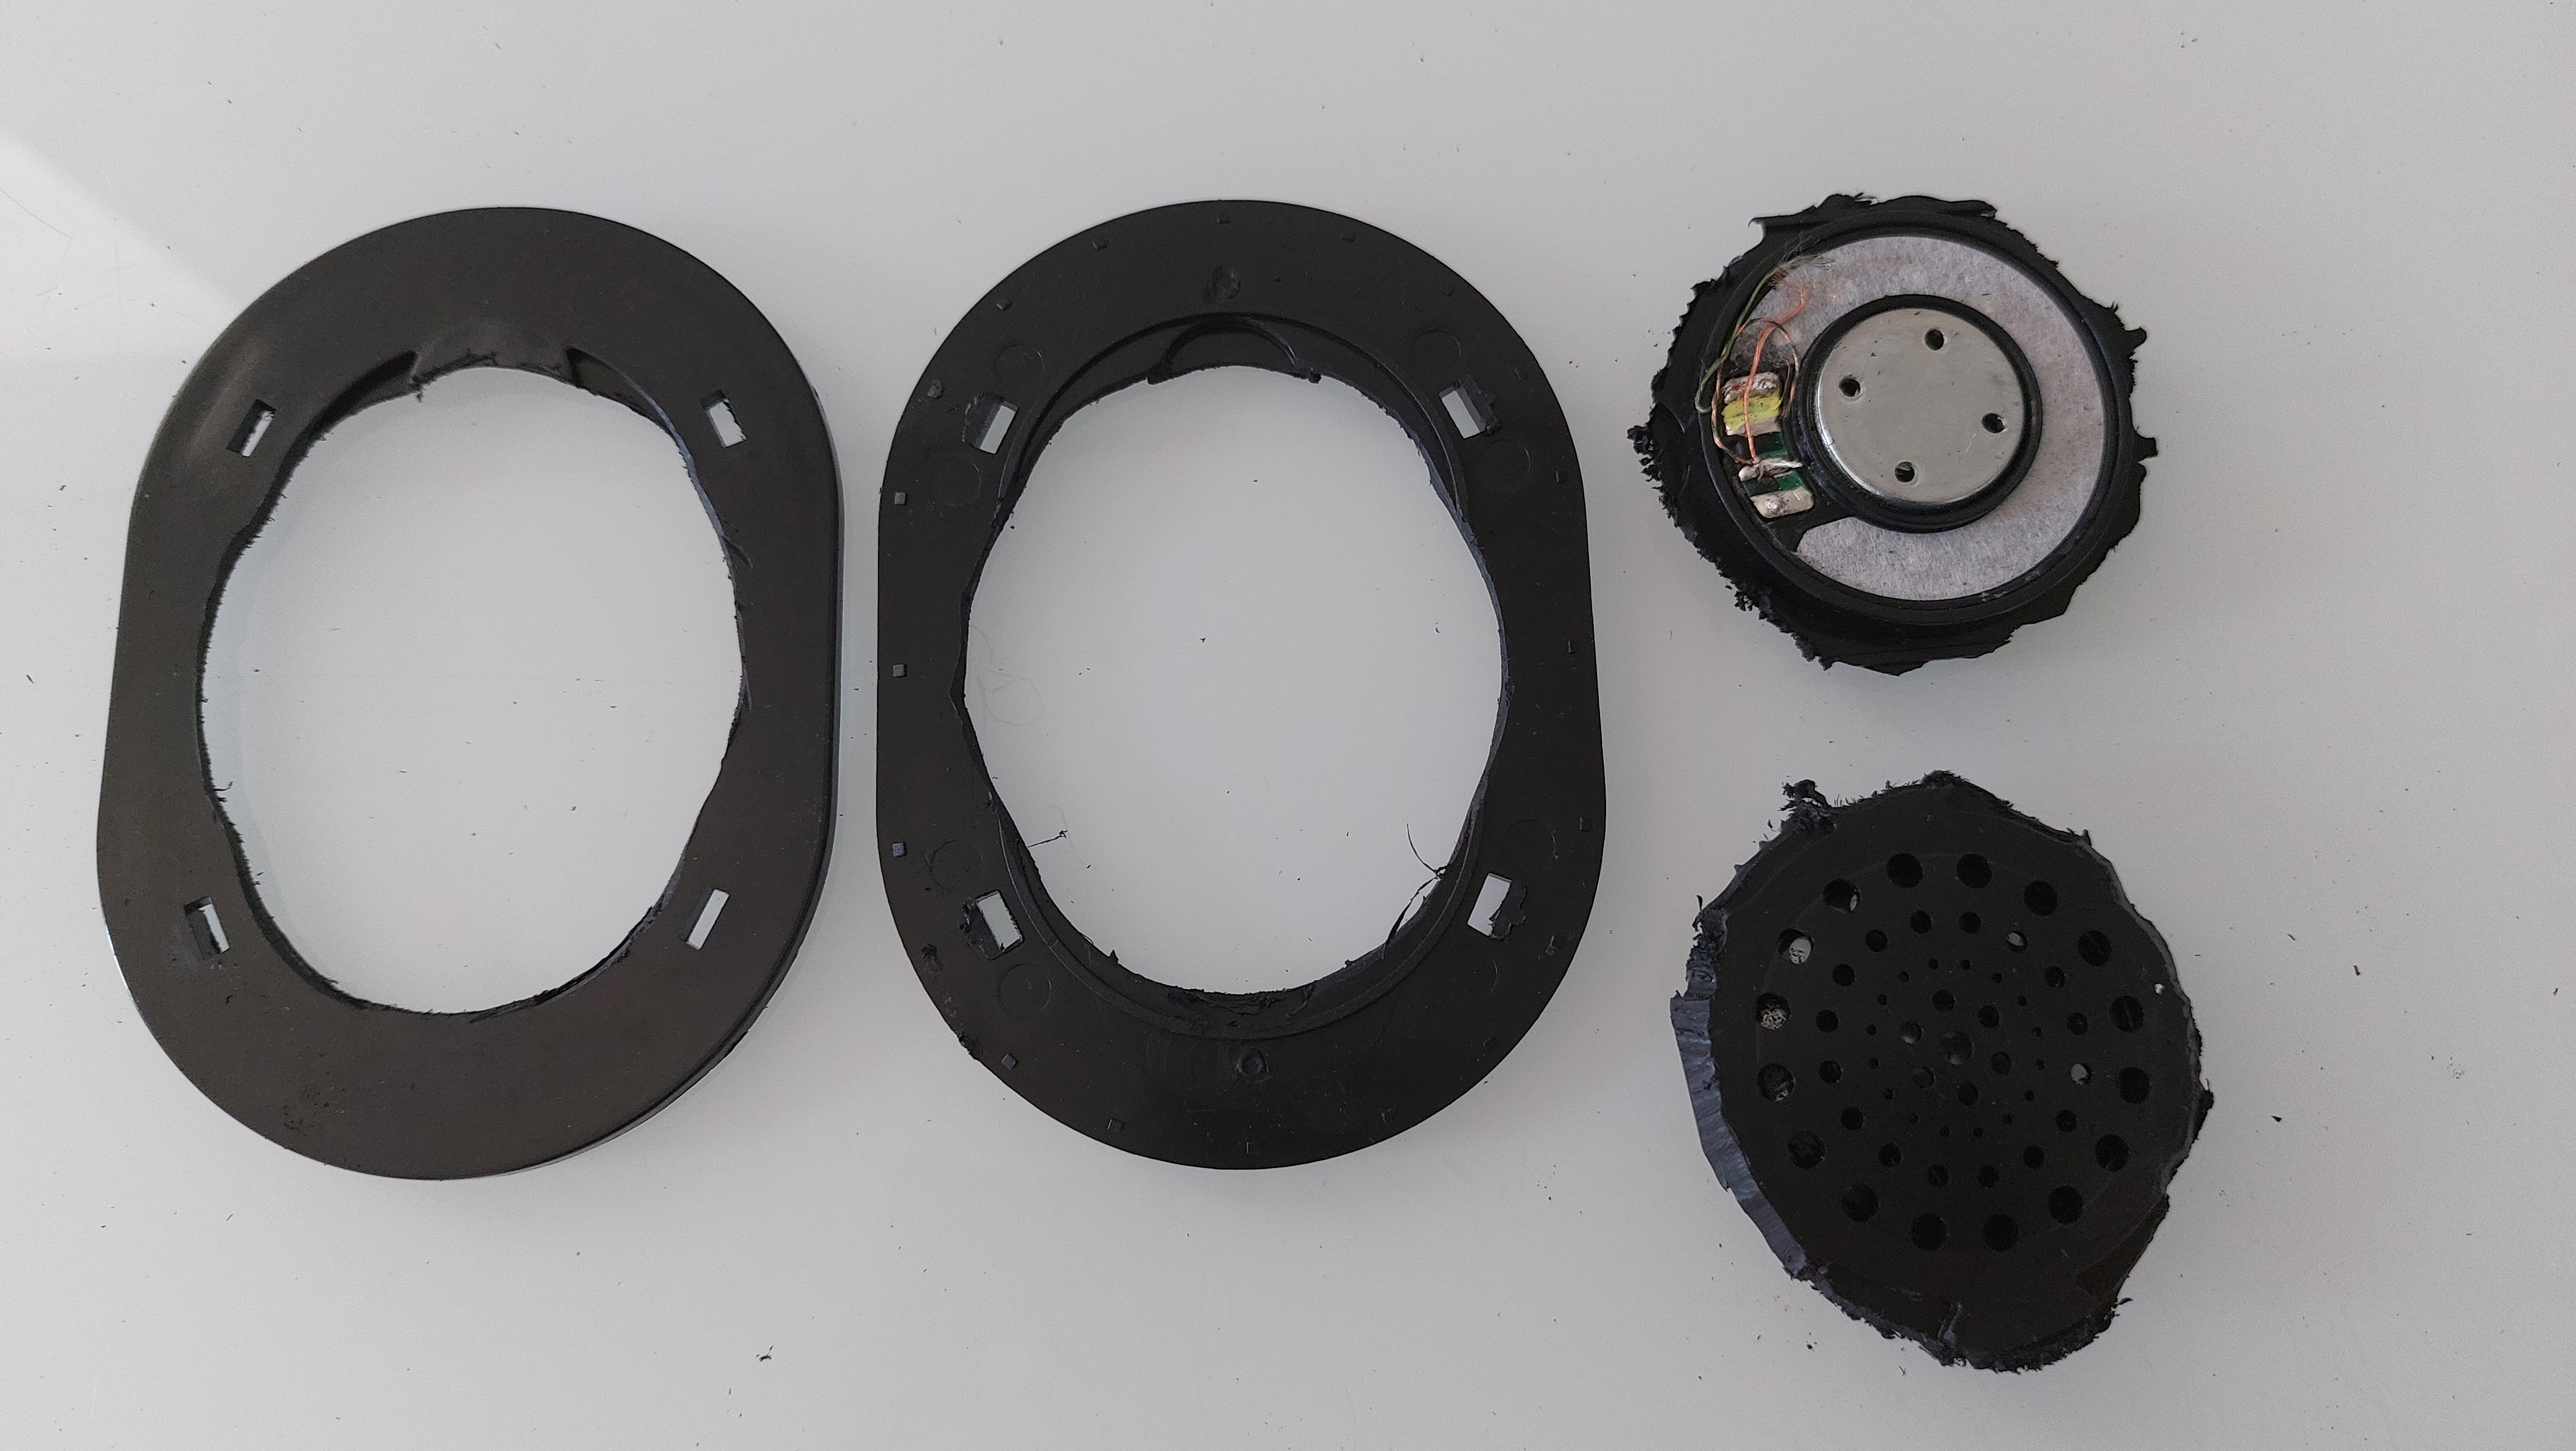
Also, looking at your photo, the driver may be glued from the back not the front. What’s the other side of that driver assembly look like?
Last edited:
Cruelhand Luke
Headphoneus Supremus
You have to bang it out. I'll try and find the thread where I read about the technique...there is an old locked thread that has an insane amount of Grado information.Hello! I'm currently modding a pair of grado sr80's and am having difficulty liberating it's drivers from the housing. I've already removed the cups, and tried to use a cutting knife to slice off the adhesive holding the drivers in place, but i just broke the blade of the knife doing that instead. Are there any other feasible ways of doing that? I tried searching up the senngrado thread but there's pretty much no info on it there.
Cruelhand Luke
Headphoneus Supremus
I haven't "liberated" my drivers, so I can't tell you exactly how to do it, but it involves carefully malleting the drivers out.
The other option is to cut it out of the housing, destroying the housing in the process...which is only recommended if you are replacing the cup and the driver housing.
What mods are you trying to do on yours? I just did a whole Grado project, so all the info is fresh in my mind.

The other option is to cut it out of the housing, destroying the housing in the process...which is only recommended if you are replacing the cup and the driver housing.
What mods are you trying to do on yours? I just did a whole Grado project, so all the info is fresh in my mind.

Cruelhand Luke
Headphoneus Supremus
here's the cutting method:
this is how I liberate drivers, because I dotn have clamps or much tools, I only used a cutter. Dont expect the liners to be reused though


I cut the inner shell in 4 or more different places and then pull the pieces, some times they just fell. in one case I did 2 cuts and half of it fell down by it self.
in this case, the driver had the front plastic already cut off.
here is a comparison with a very old MS1 driver (middle 90s) that recently died on me, and a new SR80 driver, ignore the solder plasters, these have been into several projects:


this is how I liberate drivers, because I dotn have clamps or much tools, I only used a cutter. Dont expect the liners to be reused though

I cut the inner shell in 4 or more different places and then pull the pieces, some times they just fell. in one case I did 2 cuts and half of it fell down by it self.
in this case, the driver had the front plastic already cut off.
here is a comparison with a very old MS1 driver (middle 90s) that recently died on me, and a new SR80 driver, ignore the solder plasters, these have been into several projects:


Cruelhand Luke
Headphoneus Supremus
I haven't found it yet, but the pounding out method I mentioned was basically to take a large socket (like the kind you would use for wrenching on your car) the same size as the diameter of the driver, but smaller than the housing, then you clamp it in a vice and pound it out with a rubber mallet.
Cruelhand Luke
Headphoneus Supremus
Here's the original post I was thinking of:
OK, the real reason that I came back to the thread tonight wasn't to talk about Bill's cups. Instead, I want to talk about liberating Grado drivers. We've had discussions on hammers, chisels and even sharpened mini screwdrivers to get the drivers separated from the small plastic cup. There's another method that I've figured out - and, it preserves the little plastic cup in the event you ever need to reverse this modification. What is the secret? Brute Force. Yes, brute force. First of all, you set the back cups of the drivers on a soft cloth on your workbench. The driver with the screening should be facing up. With a clean 1 1/4" socket, you set it on the front surface of the driver. You then get your rubber mallet out and smack it about 5 times. Wham-O! The driver is liberated and the mini cups can be put away with your other headphone parts pile in the event you need them in the future.
it's actually found in this thread:
https://www.head-fi.org/threads/sr60-mod.508459/page-313#post-7561600
Not surprising.
The very tip of Xacto blades are weak. I’ve broken thousands of Xacto tips just like that. The issue is the tip can’t be used to pry like a crowbar. The tip can only be used in an up and down sawing or poking motion (in addition to obviously cutting by dragging the blade).
Surgical blades are more flexible and don’t break like that.
Anyways, to break the glue around drivers, I take a new blade, and go around the perimeter poking the blade down a bit, then moving to the next spot and repeating.
So like on a clock, I would poke through the glue at 12 o’clock, then 1 o’clock, then 2 o’clock etc all the way around until the glue was cut all the way. Then I would use something OTHER than the Xacto blade to gently pry the driver up (there’s usually a bit of residual glue still holding some sections of the driver, but it does pry out). If the Xacto blade is used in that last prying step, snap goes the blade!
Also, looking at your photo, the driver may be glued from the back not the front. What’s the other side of that driver assembly look like?
You have to bang it out. I'll try and find the thread where I read about the technique...there is an old locked thread that has an insane amount of Grado information.
I haven't "liberated" my drivers, so I can't tell you exactly how to do it, but it involves carefully malleting the drivers out.
The other option is to cut it out of the housing, destroying the housing in the process...which is only recommended if you are replacing the cup and the driver housing.
What mods are you trying to do on yours? I just did a whole Grado project, so all the info is fresh in my mind.

here's the cutting method:
this is how I liberate drivers, because I dotn have clamps or much tools, I only used a cutter. Dont expect the liners to be reused though
I cut the inner shell in 4 or more different places and then pull the pieces, some times they just fell. in one case I did 2 cuts and half of it fell down by it self.
in this case, the driver had the front plastic already cut off.
here is a comparison with a very old MS1 driver (middle 90s) that recently died on me, and a new SR80 driver, ignore the solder plasters, these have been into several projects:
I haven't found it yet, but the pounding out method I mentioned was basically to take a large socket (like the kind you would use for wrenching on your car) the same size as the diameter of the driver, but smaller than the housing, then you clamp it in a vice and pound it out with a rubber mallet.
Wow thanks for the help guys! I got way more information than i was expecting. I'm planning to exchange the stock drivers with the sennheiser px-100's, as well as install a custom wood cup and possibly new gimbals/headbands. I've pretty much made this my passion project for the next few months to work on, as i've gotten bored of making dozens of earbuds for friends and family.Here's the original post I was thinking of:
OK, the real reason that I came back to the thread tonight wasn't to talk about Bill's cups. Instead, I want to talk about liberating Grado drivers. We've had discussions on hammers, chisels and even sharpened mini screwdrivers to get the drivers separated from the small plastic cup. There's another method that I've figured out - and, it preserves the little plastic cup in the event you ever need to reverse this modification. What is the secret? Brute Force. Yes, brute force. First of all, you set the back cups of the drivers on a soft cloth on your workbench. The driver with the screening should be facing up. With a clean 1 1/4" socket, you set it on the front surface of the driver. You then get your rubber mallet out and smack it about 5 times. Wham-O! The driver is liberated and the mini cups can be put away with your other headphone parts pile in the event you need them in the future.
it's actually found in this thread:
https://www.head-fi.org/threads/sr60-mod.508459/page-313#post-7561600
Moving on to the un-liberated drivers though. i do plan on keeping the housing, as i at the moment do not really know where to source an new driver housing, i'm also trying to keep costs low because i'm just a student and don't have much cash to work with. I see what you did with the driver housing, and i really cant bear to do that to mine, sorry
 . There's a video guide showing around showing the dude using an x-acto knife to carefully incise the adhesive by gently pushing it into the tiny gap between the housing and the driver, which was the technique that slater mentioned and i (carelessly) follow that does not destroy the housings. I'm gonna be making another attempt once i get a new blade for my knife.
I really appreciate the effort and help that you guys gave me. This makes me love this particular subset of the community so much, and you guys are part of it.
Here's the video, timestamped. I noticed that he broke a chunk of the knife too, so i guess i just need more elbow grease to get it done.Wow thanks for the help guys! I got way more information than i was expecting. I'm planning to exchange the stock drivers with the sennheiser px-100's, as well as install a custom wood cup and possibly new gimbals/headbands. I've pretty much made this my passion project for the next few months to work on, as i've gotten bored of making dozens of earbuds for friends and family.
Moving on to the un-liberated drivers though. i do plan on keeping the housing, as i at the moment do not really know where to source an new driver housing, i'm also trying to keep costs low because i'm just a student and don't have much cash to work with. I see what you did with the driver housing, and i really cant bear to do that to mine, sorry
I really appreciate the effort and help that you guys gave me. This makes me love this particular subset of the community so much, and you guys are part of it.
As to smacking it out of the housing with a mallet... that seems easier but i'll it try if i manage to find the appropriate tools to work with.
Cruelhand Luke
Headphoneus Supremus
1) that destroyed housing is not my handy work, I would not have butchered it so.Wow thanks for the help guys! I got way more information than i was expecting. I'm planning to exchange the stock drivers with the sennheiser px-100's, as well as install a custom wood cup and possibly new gimbals/headbands. I've pretty much made this my passion project for the next few months to work on, as i've gotten bored of making dozens of earbuds for friends and family.
Moving on to the un-liberated drivers though. i do plan on keeping the housing, as i at the moment do not really know where to source an new driver housing, i'm also trying to keep costs low because i'm just a student and don't have much cash to work with. I see what you did with the driver housing, and i really cant bear to do that to mine, sorry
I really appreciate the effort and help that you guys gave me. This makes me love this particular subset of the community so much, and you guys are part of it.
2) If you are going to try to dig them out with a knife, I recommend you heat up the cups with a hair dryer or some other type of heat source (I have a halogen shop lamp that gets INTENESLY hot that I use to heat mine) you don't need to over do it and melt stuff, just get it warmed up so you can push the glue around a little more easily.
3) did you already buy the sennheiser drivers? If not, I would actually recommend you save the money and perform the other mods first...the stock drivers are actually pretty darn good.
4) welcome aboard! if you do your research and are careful with your choices, you can build yourself some really nice looking/sounding headphones and not break the bank.
5) @Slater is a headphone modding sensei, follow his lead and you will do well my friend.
Slater
Headphoneus Supremus
1) that destroyed housing is not my handy work, I would not have butchered it so.
2) If you are going to try to dig them out with a knife, I recommend you heat up the cups with a hair dryer or some other type of heat source (I have a halogen shop lamp that gets INTENESLY hot that I use to heat mine) you don't need to over do it and melt stuff, just get it warmed up so you can push the glue around a little more easily.
3) did you already buy the sennheiser drivers? If not, I would actually recommend you save the money and perform the other mods first...the stock drivers are actually pretty darn good.
4) welcome aboard! if you do your research and are careful with your choices, you can build yourself some really nice looking/sounding headphones and not break the bank.
5) @Slater is a headphone modding sensei, follow his lead and you will do well my friend.
That video you posted shows the method nicely! You have to be super careful with the knife though. One accidental slip and you’re going to the ER to get stitches.
Also, great point on the heat! Getting the glue warm will definitely help by softening it up. You just gotta be real careful. It’s a fine line between getting warm and overheating (to where you are melting plastic and risking damage to the driver).
I would personally use a hair dryer on low. That’s pretty hard to screw up.
I will also mention that I do not have experience with these Grado models. I have never heard of a headphone that had drivers that needed to be hammered out with a hammer. With that said, I don’t see why my method wouldn’t work on it though.
Most drivers I have experience with are glued in. There’s a paper thin gap between the driver itself and the headphone baffle. This is where the glue will be, and where the Xacto knife will work it’s magic.
In the past I’ve also used a wood burning tool on some particularly evil and stubborn glue.
Most of the wood burning tools have interchangeable tips, and 1 of the tips is an Xacto blade tip (also known as a hot knife). My wood burning tool also has an adjustable temperature control. So I can set the heat to be just enough to cut through the glue, but not so hot it cuts through the plastic. You still have to use the up and down ‘sawing’ method I spoke of previously. And you still have to be careful not to snap the Xacto blade.
The big advantage of the hot knife method, is it takes care of the heat part at the same time.
This video does a good job of showing/explaining it:
Last edited:
Cruelhand Luke
Headphoneus Supremus
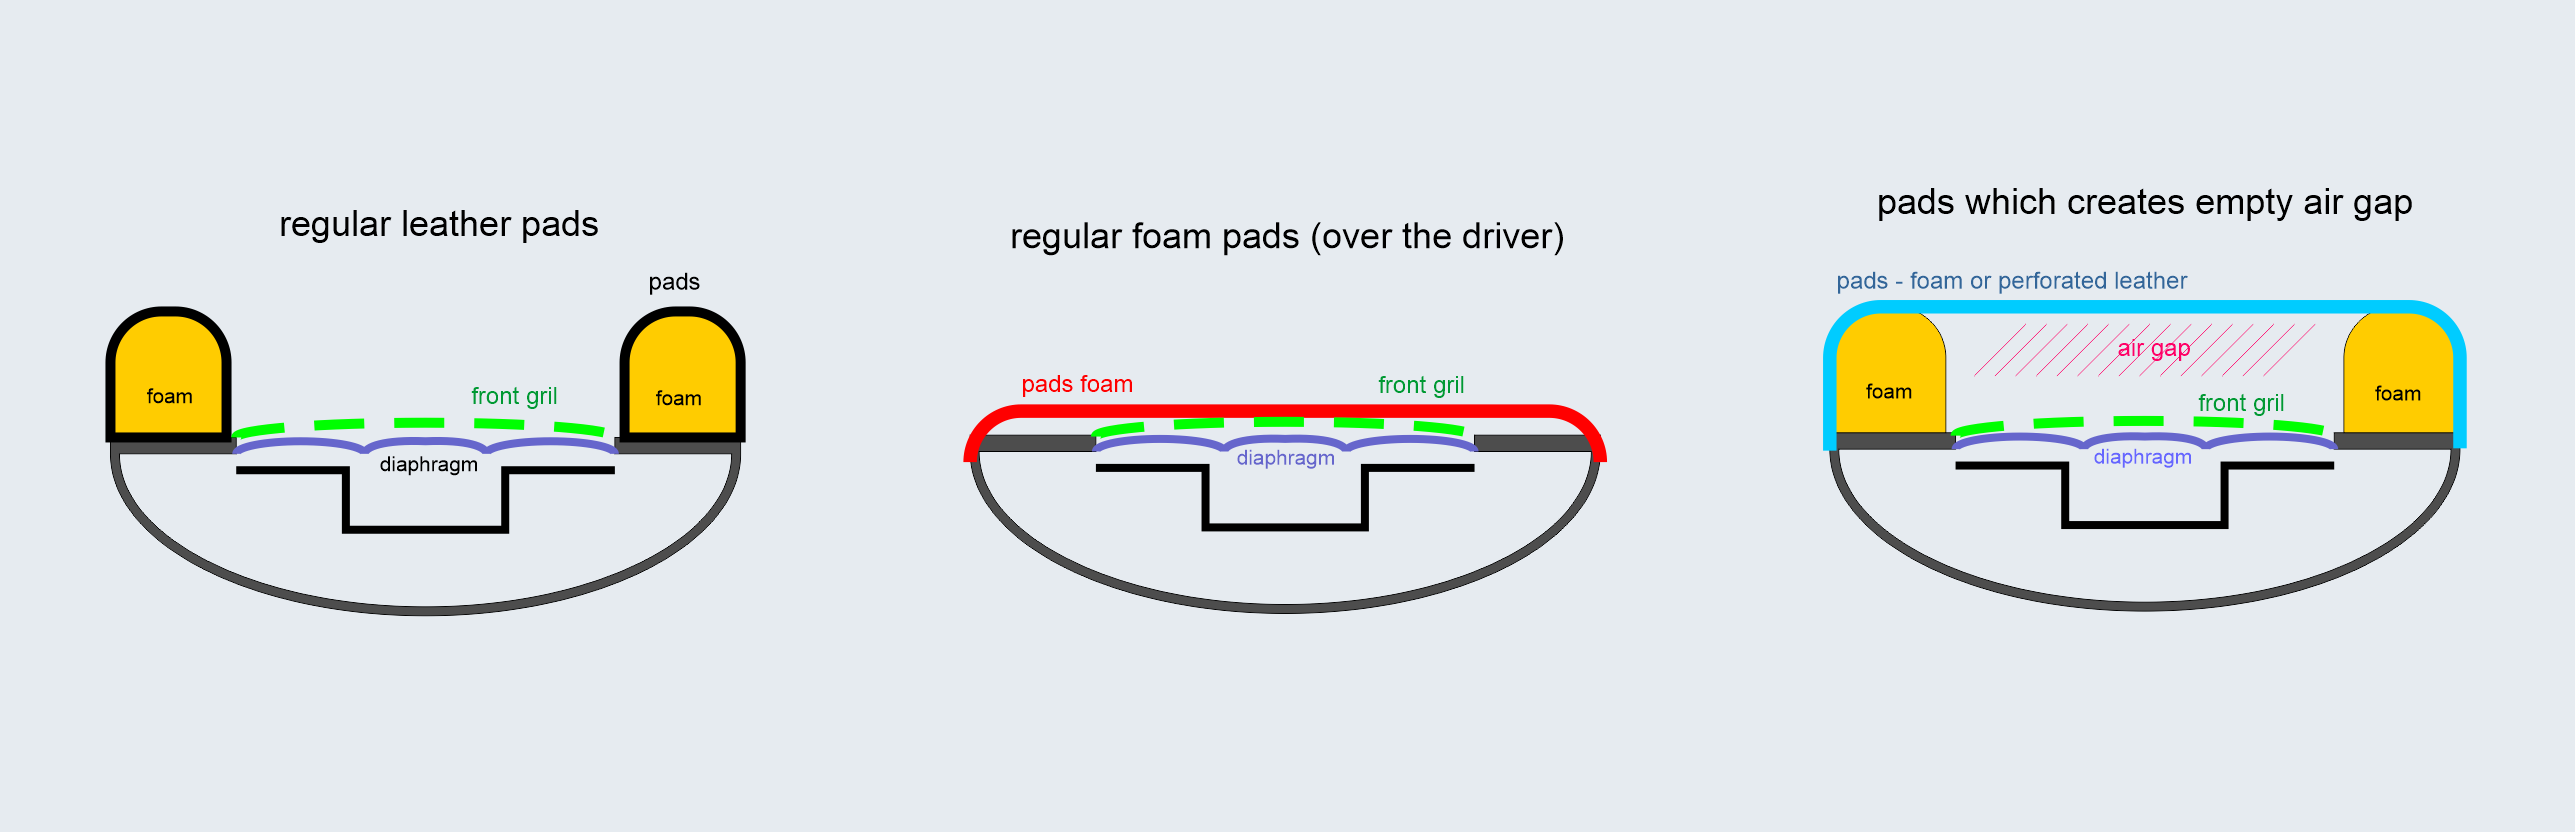
Here's a list of my mods so far: Senitek hybrid pads (an HM5 type pad) velcro added to the pads, foam backer rod inside the lip of the pad, blutack on the backs of the drivers, thin cloth between the driver and the cup.
here's what the bluetack looks like:

I bought a scarf at the thrift store for $1.50 and cut an oval out and placed it inside the cups:

The bluetack is still slightly visible, so I may paint the back of the bluetack black, I bought some fingernail polish for the purpose, but I need to do it at a time when I can let them sit and dry for a while, and ain't nobody got time for that right now, I'm trying to listen to them!

Users who are viewing this thread
Total: 6 (members: 0, guests: 6)
