The Mod Collective: Bring all your full sized headphone mods here.

Feb 1, 2018 at 8:30 AM Post #46 of 531
Your mod was a bit unclear, but now i think i get the jist of it. You choke the driver a tad for less excursion to bring the lower end down a few notches right? B/C it looks like the tape covers 66% of the breathable sticker on back of magnet + 2 other tiny holes.
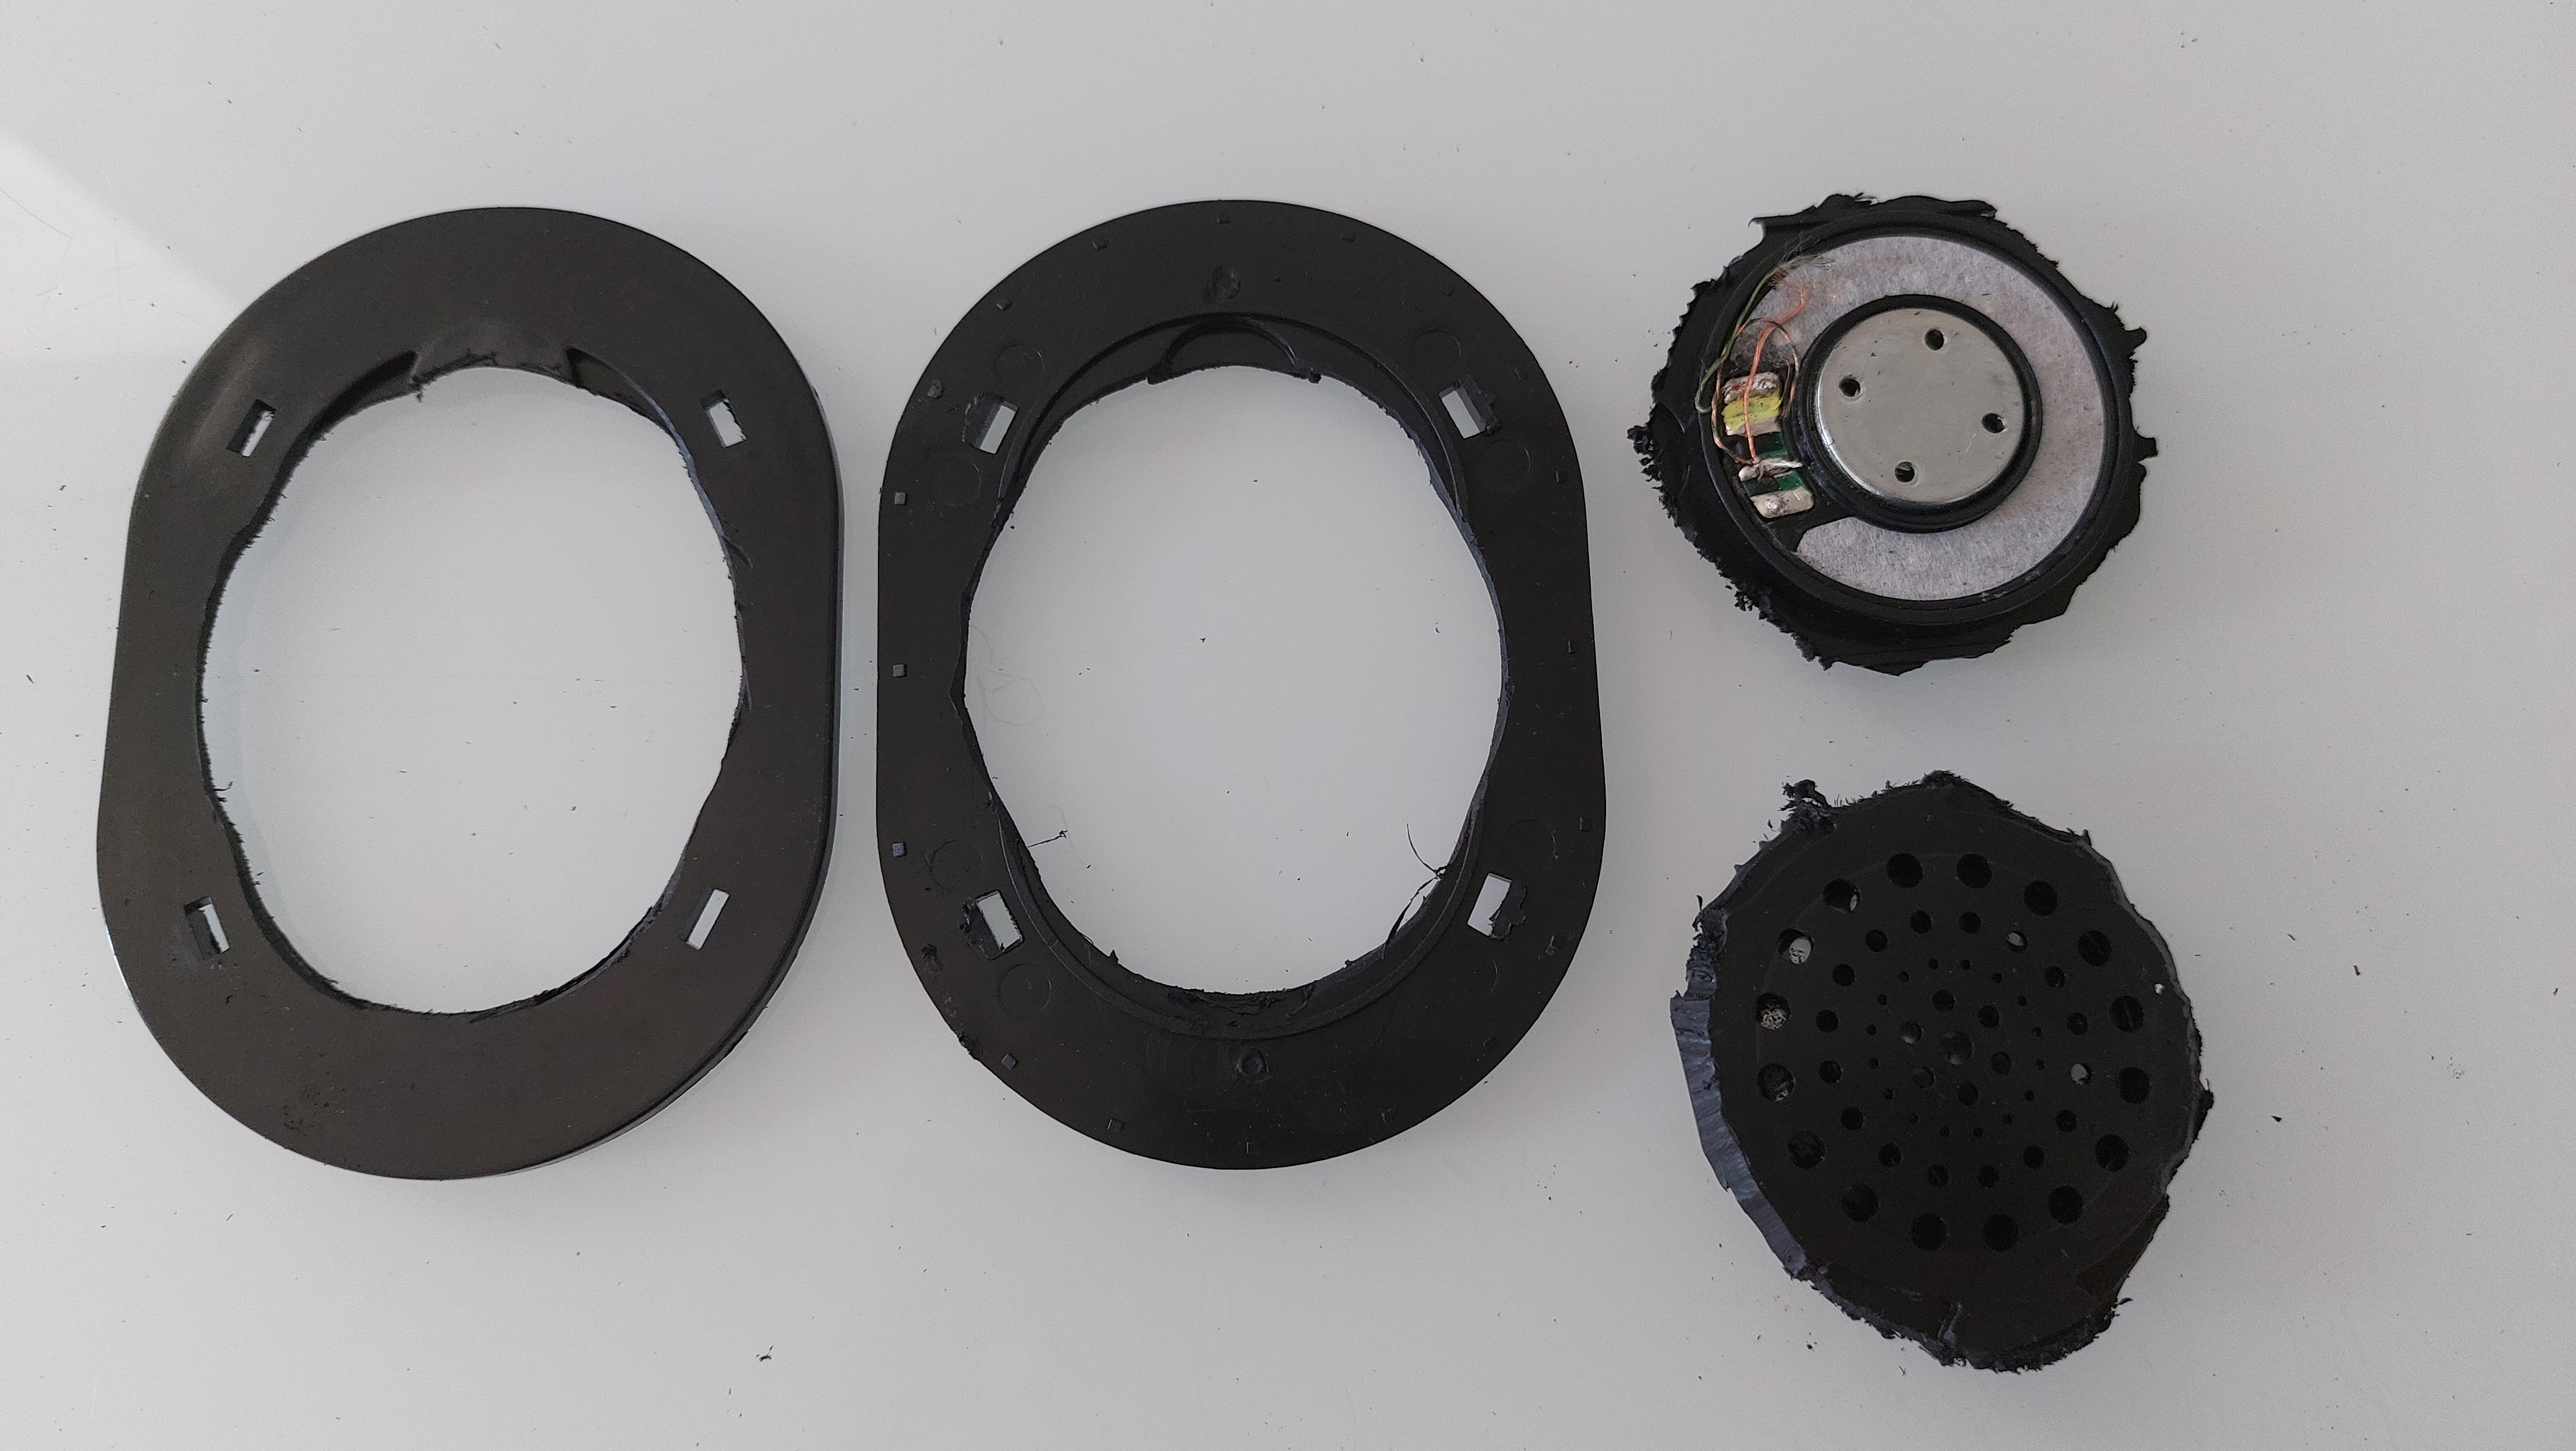
Yeah sorry, I was intending on redoing the mod with stickers soon after I had posted that, but got sidetracked with building a new PC and other stuff. Yes, the mods are pretty much entirely restrictive. I made a new measurement of the different levels that restricting the center port results in:
CAL Hole Variation.png

The percentile of the port covered starts at 90% because anything less than that was close enough to entirely open, so didn't really add much value. Its the last tiny adjustments that make a huge difference. I had also removed the backing paper at this point as constantly re-sticking the tape was slowly wearing it down anyway. The 9k chasm is a phasing issue, and isn't really audible in terms of a massive dip.

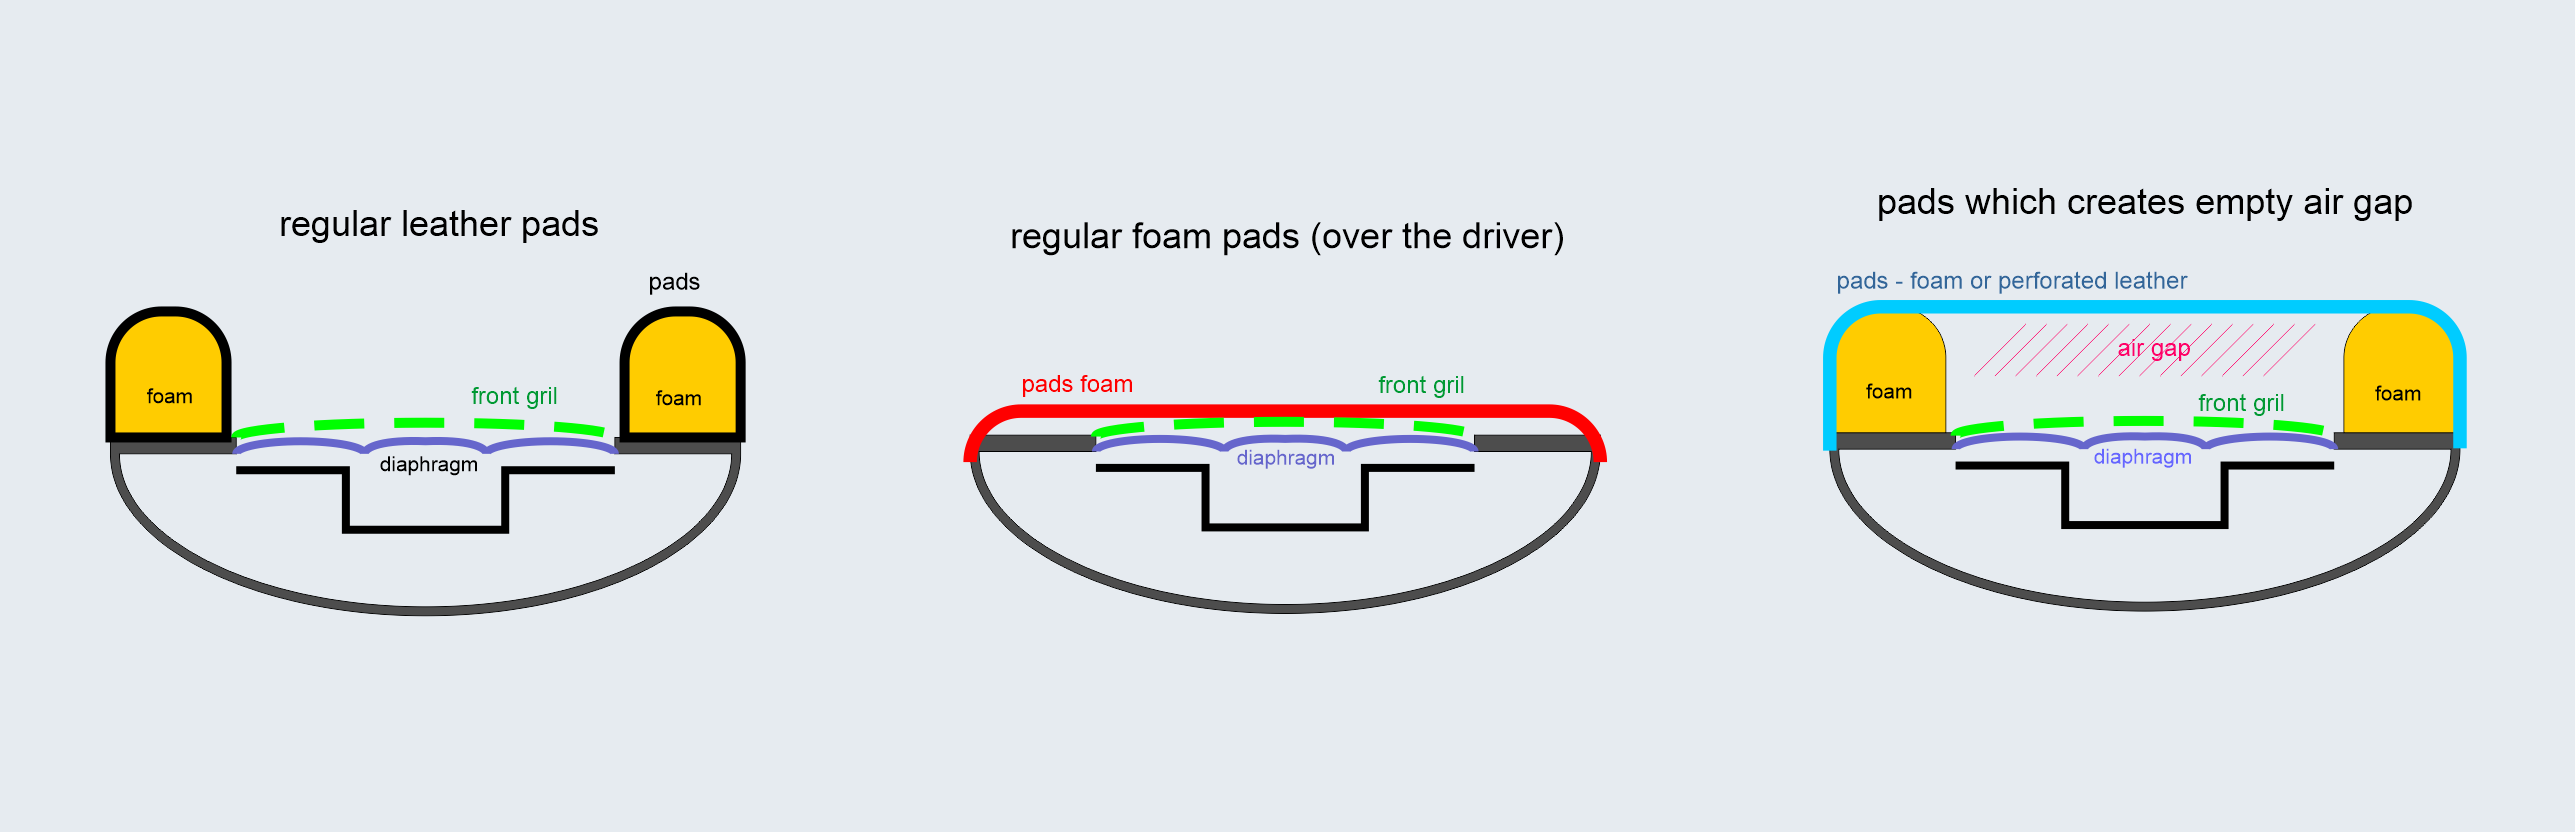
The graphs look promising, though the treble elevation will more likely than not need some foam mods in front of driver (for even flatter response). Unless you feel the mods behind driver fix it with the clear tape?

Frontwave damping on the CAL actually kind of emphasises the midrange dip unfortunately. It does fix some of the phasing issues though. That said, I haven't played around too much as the pads are quite annoying to re-attach, and do seem to be wearing around the lip from doing so, so I'd like to avoid it if possible.
CAL Frontwave damping test.png


Also to note, all "CALMOD" measurements are slightly different to the previous measurements in the first post I made. Partially due to the fact I'm now using REW as ARTA decided to not work on my new PC, and a few pieces of tape had fallen off so I had to replace them, which varied a bit. These measurements are all done on a flatplate too, so don't take them as gospel by any means.
 
Feb 8, 2018 at 10:13 PM Post #47 of 531
1) patty around the driver= a NO for this headphone. Change the sound for the worst and make the bass distort and high even harshed.

Just got a pair of the SIVGA SV005 headphones by mistake from Amazon. Visually these look identical to the Bosshifi B7 headphones. They've allowed me to keep them so I decided to take them apart. I believe the reason the putty around the driver did not work for you is on my driver assembly there are vent holes around the driver (not just on the back of it). If you are going to use putty around the driver for mass loading you have to make sure you expose these vent holes.
 
Feb 24, 2018 at 8:03 PM Post #48 of 531
Been a while, but I finally got around to finishing documenting how to do the open back CAL mod. Sorry for being lazy lol.
Anyway, it's super simple. Get two ~15mm circle adhesive stickers and cut them in half. Tape and anything else sticky also works as long as its roughly the same size. We're mostly just changing porting anyway. Stick them over the holes that are covered in this image:
calmod.jpg

The center hole is pretty hard to get right, so you'll need to play with moving it around to get it exactly right. Nothing I can say will allow you to get it easily. Just pure trial and error. The center hole is pretty much the deciding factor of how much bass warmth you'd like, so play with it as much as you want. The rest are mostly just adjusting linearity and other stuff like that, and can pretty much just be completely covered.
That's it. Leave the back off if it wasn't clear. Any impressions/opinions on the mod are welcomed and greatly appreciated.
 
Feb 24, 2018 at 11:03 PM Post #49 of 531
Been a while, but I finally got around to finishing documenting how to do the open back CAL mod. Sorry for being lazy lol.
Anyway, it's super simple. Get two ~15mm circle adhesive stickers and cut them in half. Tape and anything else sticky also works as long as its roughly the same size. We're mostly just changing porting anyway. Stick them over the holes that are covered in this image:

The center hole is pretty hard to get right, so you'll need to play with moving it around to get it exactly right. Nothing I can say will allow you to get it easily. Just pure trial and error. The center hole is pretty much the deciding factor of how much bass warmth you'd like, so play with it as much as you want. The rest are mostly just adjusting linearity and other stuff like that, and can pretty much just be completely covered.
That's it. Leave the back off if it wasn't clear. Any impressions/opinions on the mod are welcomed and greatly appreciated.

Thx :D had decent results. A little more bass (centre sticker gap like 10% more than you). Cleaned things up more than i expected covering the three little holes. The only real flaw (though relative in general and not necessarily fatal) is its sub-bass is not as tight/impactful (has to be eq'ed up a bit IMO) to say its Denon/Fostex 50mm brothers. Still, bass is good. Its naturalness is not perfect. Fatigue free, All-rounder fun lightweight can.
 
Feb 28, 2018 at 10:18 PM Post #50 of 531
Yo. I got bored and decided to see what would happen when I re-closed the CALMOD.
I wasn't expecting this..
CALMOD Open Vs Closed.png


So flat. Sounds pretty damn close to that too. Does close in the staging and bring the decay back to what the stock CAL! would be, but you also get back more of the bass impact, and with a flatter FR than stock. I like this a lot. I'd also again like to point out that the 9k canyon is a phase issue and how REW handles it. I hear it as nowhere near as severe, and ARTA measures also back that up. Treble is actually relatively flat overall.
 
Mar 10, 2018 at 10:47 PM Post #51 of 531
I'm back, again..
Hopefully the final iteration of the CALMOD, this time with both open and closed variations.
CALMOD OPEN V CLOSED V13.png

CALMOD V13.jpg

Pretty much the same as the old CALMOD in terms of what I modded, but with some key minor adjustments. I switched to bluetack entirely other than the center port, as the sticker halves weren't sticking to the paper properly, and made the "blobs" as small as possible, as blocking anything but the actual holes had negative effects. I played with the center hole a bit more, but again this is mostly down to preference. I found ~95%-98% seems to be about right, but you're best to just play with it until you find your perfect level. The last actual change I made was to add some dense open cell foam into the cup for the closed version. It didn't make a major change in overall sound sig really, but it improved the phasing issues and treble linearity. You can see this effect when comparing the open graph to the closed. The closed and the open variations are both the same, other than the closed having open cell foam, and the cup obviously re-attached. Once again, i'd like to point out the 9k canyon isn't audible like that. Overall, treble is peaky, but linear as an average.
 
Mar 10, 2018 at 11:55 PM Post #52 of 531
Attn owners of the ISK MDH9000 and it's many clones (Akai Project 50X, Marantz MPH-2, LyxPro HAS-30, Freeboss MDH9000).

I have completed a few mods that you may be interested in.

1. Tuning paper mod
The stock tuning paper is extremely restrictive, and very little passes through it. This mod allows a more spacious sound. You have to be very careful not to poke the driver diaphragm when perfoming this mod. I used the very tip of an xacto knife, and carefully trimmed each circle. You could also maybe poke each hole out with a philips screwdriver, and peel the paper away with tweezers. But I repeat, you MUST BE CAREFUL not to poke the driver diaphragm when perfoming this mod. I wish you could just peel or scrape the tuning paper off in 1 big piece, but the whole thing is held on with some sort of evil mutant glue, and the tuning paper doesn't peel at all (it must be trimmed off).


2. Locking cable elimination mod
This eliminates the cable lock, allowing the use of any 3.5mm cable that is slim enough to fit inside of the hole (for example, a Beats cable). Note that you will still be able to use the stock locking cables as well. This mod just gives you the flexibility to use any cable that physically fits.
  • On the L earcup, remove the earpad and remove the (4) screws that hold the cup together.
  • Remove the (2) screws that hold the little circuit board down, and lift the circuit board out of the way.
  • Remove the (2) screws that hold the locking mechanism down, and remove the plastic locking mechanism piece.
  • If you look at the plastic locking mechanism, you’ll see the (2) small plastic locking tabs (on the top and bottom). Break both of them off using pliers, a screw driver, or some sort of pokey-pokey tool (like a scratch awl). The plastic is very brittle, and the tabs will break off with little effort.
  • Reinstall the locking mechanism back on and secure it with the (2) screws.
  • Reinstall the circuit board back on and secure it with the (2) screws.
  • Make sure a regular, non-locking 3.5mm cable plugs in smoothly. If for some reason it doesn't that means you didn't break off the locking tabs completely. Go back and double check, and correct the issue until a regular, non-locking 3.5mm cable plugs in smoothly.
  • Put the cup back together and secure it with the (4) screws.
  • Put the earpad back on.


3. Semi-open mod (stealth venting)
One of the reasons why the soundstage in these cans is so good is because the cup has a number of hidden vent holes. If you look at the 12-o'clock position on each cup, you will see (7) tiny vent holes inside of a small "groove". I took this idea and extended it, adding holes completely around the cup, also hidden inside of the groove. The result was an even wider soundstage than before, and additional sub bass extension that is much deeper than the stock version.
  • On each earcup, remove the earpad and remove the (4) screws that hold the cup together.
  • Put a piece of tape over the vent hold on the driver magnet, to prevent debris from falling into the vent hole.
  • Using a small drill bit (ie the same size as the existing (7) vent holes in the 12-o'clock position), drill additional holes inside of the groove, all the way around the driver cup. Space the holes a few mm apart (use the (7) stock vent holes as a guide to about how far apart to space the new vent holes). Note that you will have to skip a few sections where you won't be drilling any holes, such as the (4) cup mounting screw posts, the (2) yoke mounting blocks, and the aux cable area (I've indicated these with arrows in the 1st photo below).
  • Blow all of the plastic chips away using your breath, canned duster air, a brush, etc.
  • Make sure all of the holes are clean and free of loose hanging plastic pieces (that could later fall off and get inside of the driver). This process took quite a bit of time, as it's critical to make sure every last tiny loose plastic piece is cleaned up and accounted for.
  • Once you are pleased with the results, remove the tape from the driver magnet.
  • Put the cups back together, and replace the (4) screws.
  • Put the earpads back on.
  • Repeat the procedure on the other side.


4. Semi-open mod (grille mod)
One of the reasons why the soundstage in these cans is so good is because the cup has a number of hidden vent holes. If you look at the 12-o'clock position on each cup, you will see (7) tiny vent holes inside of a small "groove".

I took this idea and extended it to it's maximum conclusion, replacing the alumium name plate with an open mesh grille. The result was an even wider soundstage than the #3 mod above, an increase in sub bass quantity, AND further sub bass extension (than the #3 mod above). WoW!!

You may be asking yourself, "how can Slater do #4 without knowing what effect #3 had?" Simple, I taped the small hidden vents closed before completing mod #4. You won't need to do this, as you'll either do mod #3 OR mod #4 but NOT both. I only had to do this because when tuning and developing mods you often do extra stuff, make mistakes, go back and undo things you;ve already done, etc as you play "what if" with the tuning.

These 50mm drivers seem to really like a lot of air to breathe, and I found the sound of the #4 mod to be even better than the #3 mod. I think it also looks cooler as well!
  • Drill a few 1/8" holes in the stock badge, in approximately the same locations as you see in the photo below. This is important, because there is a very specific 'gap' in the cup directly behind the badge that will allow you to grab the badge with pliers. If you drill in the wrong spots, you will miss this gap. I've indicated this in the photos below (ie where the yellow highlighter is). Also, drill only through the aluminum plate. Do NOT drill all the way through the plastic behind the plate, as you risk drilling into the driver! You will be able to feel when you are through the alumium plate (at which point immediately stop drilling).


  • Now take pliers and pull off the badge. It's held on pretty strongly with glue around the edges, but keep trying and it will eventually pry off. You can also see the "gap" in the below 2 photos, which is basically a recessed "outer ring". It is this recessed area that gives the pliers the room to grab the aluminum badge.


  • Now that you have the badge removed, you are going to remove the plastic material as indicated below. I used a cutting disc on my Dremel, and cleaned up the hole with a Dremel sanding drum. Be sure to leave a small amount of material (ie a "lip" or "ledge"), so that the grille has something to rest on. In other words, don't grind your hole flush all the way to the very edge. Go a few mms smaller, so there's a "ledge" for the grille to sit on. Make sense?


  • Once your hole is ready, take your grille material (cut to fit perfectly into the hole where the badge was), and lay it down into the hole. The grille will rest on the "ledge" you left.
  • The grille needs to be exactly 42mm diameter. You can buy 42mm grilles on ebay (for $2/pair) that will drop right in as a friction fit, and won't even need glue. Or you can buy a larger grille and cut it down to fit. I've seen the grilles in black, white, silver, chrome plated, or you can spray paint the grille any color you want before installing. On ebay or Aliexpress, just search for any of the follwing terms: 1" tweeter grille, 1" speaker dust grille, 42mm tweeter cover.
  • If your grille requires it (for example isn't a friction fit), secure the grille with 3-4 strategic drops of clear epoxy or Lazer Bond UV glue. For example, 4 tiny drops at 12, 3, 6, and 9 o'clock, or 3 tiny drops arranged like a triangle (you can use the 3 triangle decorations on the stock cup as a guide of where to center the drops).
  • Once the adhedsive is dry, blow all of the plastic chips and debris away using your breath, canned duster air, a brush, etc. It is critical that all debris is removed from the cups, to prevent any from getting inside of the driver. The inside of the bottom cup and the inside of the top cup (where the driver is) shoud be spotless before continuing.
  • Once you are pleased with your results, remove the tape from the driver magnet.
  • Put the cups back together, and replace the (4) screws.
  • Put the earpads back on.
  • Repeat the procedure on the other side.
Here's the final result:

 
Last edited:
Mar 18, 2018 at 11:35 AM Post #53 of 531
Not a sound affecting mod but an utility one. I fixed the Beyerdynamic DT440, DT660, DT860 problem with cracking headband issue by discarding the original headband and adapting a DT770 headband for these.

I was curious about Beyerdynamic DT860 but knew about the headband problem so I decided against buying them even when they were at around $80 for 2nd hand/display headphones. Instead, I waited for someone to sell a DT860 with broken headband for less and finally got it last week for $30. I wasn't sure if a DT770 headband could be adapted for DT860 but figured that if it can't, I would still have a pair of drivers that I could use for a project.

So this is what I got:

163898f4fa5d613d4d8311445a615a79_big.jpg


As you can see, both sides were broken, the owner did some patchwork on one and then the other side broke at the pivot.

I had a spare DT770 headband (complete with cushion, forks, cups and cables), I got a few of those for less than $20 a piece some time ago for DIY projects.

The 2 main problems were:

1. DT860 cup is about 2 mm wider than DT770/880/990 cup so the connectors that attach cups to the fork had to be adapted a bit. Luckily it can be done by cutting a bit of plastic off the base of the hinge so that the hinge can get deeper into the hole in the cup. I also cut off the small distances (that's a small round bit that you can see on top of the connectors in the pic below).

This pic shows the part of the DT860 fork with the hinge (left), DT770 connector with hinge adapted for DT860 cup (center) and DT770 connector with hinge before adapting (right).

897aeba1bfe4f7143b5f255fe75e4837_big.jpg


2. The headband wire connecting the right cup to the left cup runs through the fork and enters the cup through the hinge in DT860, but in DT770 it enters through an opening on top of the cup. No such opening in DT860, not possible to run cable through the fork and hinge when using a DT770 headband. I considered drilling holes in the DT860 cups (like the ones in DT770 cups) but decided against it after looking at the inside of the cup. I ran the wire through the grille instead. The wire I used is a bit thinner than DT770 wire to fit through the grille. Internal dampening with its frame had to be taken out to expose the grille from the inside of the cup, and then put back in after the wire was fitted.

The pic shows how the wire enters the cup.

b909c948d0c970cdfda8658c0ede26ab_big.jpg


And the view of the interior, dampening material already back in.

88ea18b0234efb69224701ecf28c0506_big.jpg


I also had to replace the cable, because the plug turned out to be bad. I used the cable that came with the DT770 headband. Removing the original cable from the DT860 cup was not easy, but doable.

So here's a $50 Beyerdynamic DT860 with DT770 headband:

726ada88745bbdeca16544262af67c62_big.jpg


81b3df3f38945e80ef227cdfd61bef92_big.jpg
 
Last edited:
Mar 18, 2018 at 9:17 PM Post #54 of 531
1-7506 mobile.jpg
I removed the cable on my Sony MDR7506 and soldered in a female 3.5 plug.
I think this would make for an awesome Massdrop one off. I am using Phillips Fidelio L2 pads and the L2 one button mic cable.
This is a great portable headphone: light weight, comfortable, secure fit, foldable into a small package, extremely durable.
The original pads are lackluster and the cable was a nuisance, but if they marketed it in this format for $100 it would be great buy.
 
Mar 18, 2018 at 9:47 PM Post #55 of 531
Not a sound affecting mod but an utility one. I fixed the Beyerdynamic DT440, DT660, DT860 problem with cracking headband issue by discarding the original headband and adapting a DT770 headband for these.

I was curious about Beyerdynamic DT860 but knew about the headband problem so I decided against buying them even when they were at around $80 for 2nd hand/display headphones. Instead, I waited for someone to sell a DT860 with broken headband for less and finally got it last week for $30. I wasn't sure if a DT770 headband could be adapted for DT860 but figured that if it can't, I would still have a pair of drivers that I could use for a project.

So this is what I got:

163898f4fa5d613d4d8311445a615a79_big.jpg


As you can see, both sides were broken, the owner did some patchwork on one and then the other side broke at the pivot.

I had a spare DT770 headband (complete with cushion, forks, cups and cables), I got a few of those for less than $20 a piece some time ago for DIY projects.

The 2 main problems were:

1. DT860 cup is about 2 mm wider than DT770/880/990 cup so the connectors that attach cups to the fork had to be adapted a bit. Luckily it can be done by cutting a bit of plastic off the base of the hinge so that the hinge can gets deeper into the hole in the cup. I also cut off the small distances (that's a small round bit that you can see on top of the connectors in the pic below).

This pic shows the part of the DT860 fork with the hinge (left), DT770 connector with hinge adapted for DT860 cup (center) and DT770 connector with hinge before adapting (right).

897aeba1bfe4f7143b5f255fe75e4837_big.jpg


2. The headband wire connecting the right cup to the left cup runs through the fork and enters the cup through the hinge in DT860, but in DT770 it enters through an opening on top of the cup. No such opening in DT860, not possible to run cable through the fork and hinge when using a DT770 headband. I considered drilling holes in the DT860 cups (like the ones in DT770 cups) but decided against it after looking at the inside of the cup. I ran the wire through the grille instead. The wire I used is a bit thinner than DT770 wire to fit through the grille. Internal damping with its frame had to be taken out to expose the grille from the inside of the cup, and then put back in after the wire was fitted.

The pic shows how the wire enters the cup.

b909c948d0c970cdfda8658c0ede26ab_big.jpg


And the view of the interior, damping already back in.

88ea18b0234efb69224701ecf28c0506_big.jpg


I also had to replace the cable, because the plug turned out to be bad. I used the cable that came with the DT770 headband. Removing the original cable from the DT860 cup was not easy, but doable.

So here's a $50 Beyerdynamic DT860 with DT770 headband:

726ada88745bbdeca16544262af67c62_big.jpg


81b3df3f38945e80ef227cdfd61bef92_big.jpg


One of the greatest mods ever :D
 
Mar 18, 2018 at 10:40 PM Post #56 of 531
DT860 deserves a good headband. Glad it worked. Buying an entire DT770 headband from Beyerdynamic would probably cost too much, but I see DT770s with bad drivers quite often, so it's possible to get a used one cheap if you're patient. I think an old Beyer headband (like DT531 has) could be adapted too, but I didn't have a spare one to try. Also, that would require making a cable entry hole in the right cup, the old Beyerdynamic headphones were all dual entry (Y type cable).
 
Mar 18, 2018 at 11:08 PM Post #57 of 531
DT860 deserves a good headband. Glad it worked. Buying an entire DT770 headband from Beyerdynamic would probably cost too much, but I see DT770s with bad drivers quite often, so it's possible to get a used one cheap if you're patient. I think an old Beyer headband (like DT531 has) could be adapted too, but I didn't have a spare one to try. Also, that would require making a cable entry hole in the right cup, the old Beyerdynamic headphones were all dual entry (Y type cable).

What is your experience on the 440/660/860. Do you have any impressions to share, as well as how they compare to the more famous "entry level dt line (770/880/990) and any other beyers. Thnx
 
Mar 18, 2018 at 11:36 PM Post #58 of 531
Not yet, I did the mod yesterday and haven't done any serious listening yet. I can only say that I like their sound, they are easier to drive than DT770 (even the 32 ohm version) but they distort at higher volume on certain bass notes (not like the DT770/880/990 crackling that is often caused by stray hair on the membrane, more like a fluttering sound). I will A/B them with other Beyers when I have more time. In any case, my favorite Beyerdynamic headphones so far are DT531 and DT250 (I also have DT880, DT990, various versions of DT770, DT330, DT48 and T51).

Edit: Distortion was caused by hair after all. It sounded different than the DT770/990 hair crackle (which I heard many times), but that's probably because of a slightly different driver. In any case, driver depilation took care of the problem, no more distortion!

Membrane before hair removal:

412e4ed1b14091766e5baabca7ecf051_big.jpg


That's what I removed from one membrane (plus that many smaller bits that my camera didn't catch), the other membrane was equally hairy:

4eea580e7d57e03ba0661e4030c5a56e_big.jpg
 
Last edited:
Mar 25, 2018 at 12:40 AM Post #59 of 531
FB5FDAB9-0D73-49CE-BF7B-647048ADAA5F.jpeg

This wireless upgrade is great, but the most important one I’ve done, can’t be seen.

Use two one inch pieces of number 8 wire. Place them in-between the ear pads and the housing. Locate them at that spot behind your ears near the earlobe that allows a gap between the ear pads and your head. It completely seals these erapads to your head and makes a huge difference in the qaulity of bass that you get. You may not have this problem, but if you can run your fingers around the back side of the ear pads and feel a gap, this is a must do mod!
 
Mar 25, 2018 at 8:01 AM Post #60 of 531


This wireless upgrade is great, but the most important one I’ve done, can’t be seen.

Use two one inch pieces of number 8 wire.


I do the same thing with wire under the earpads in some Beyerdynamic headphones after the eapads get flatter. And I converted a DT990 to wireless, I actually swapped drivers with 32 ohm ones to extend battery life a bit.
 

Users who are viewing this thread

Back
Top