pupDAC Step-by-Step Build Thread
Sep 26, 2014 at 9:31 AM Post #286 of 359
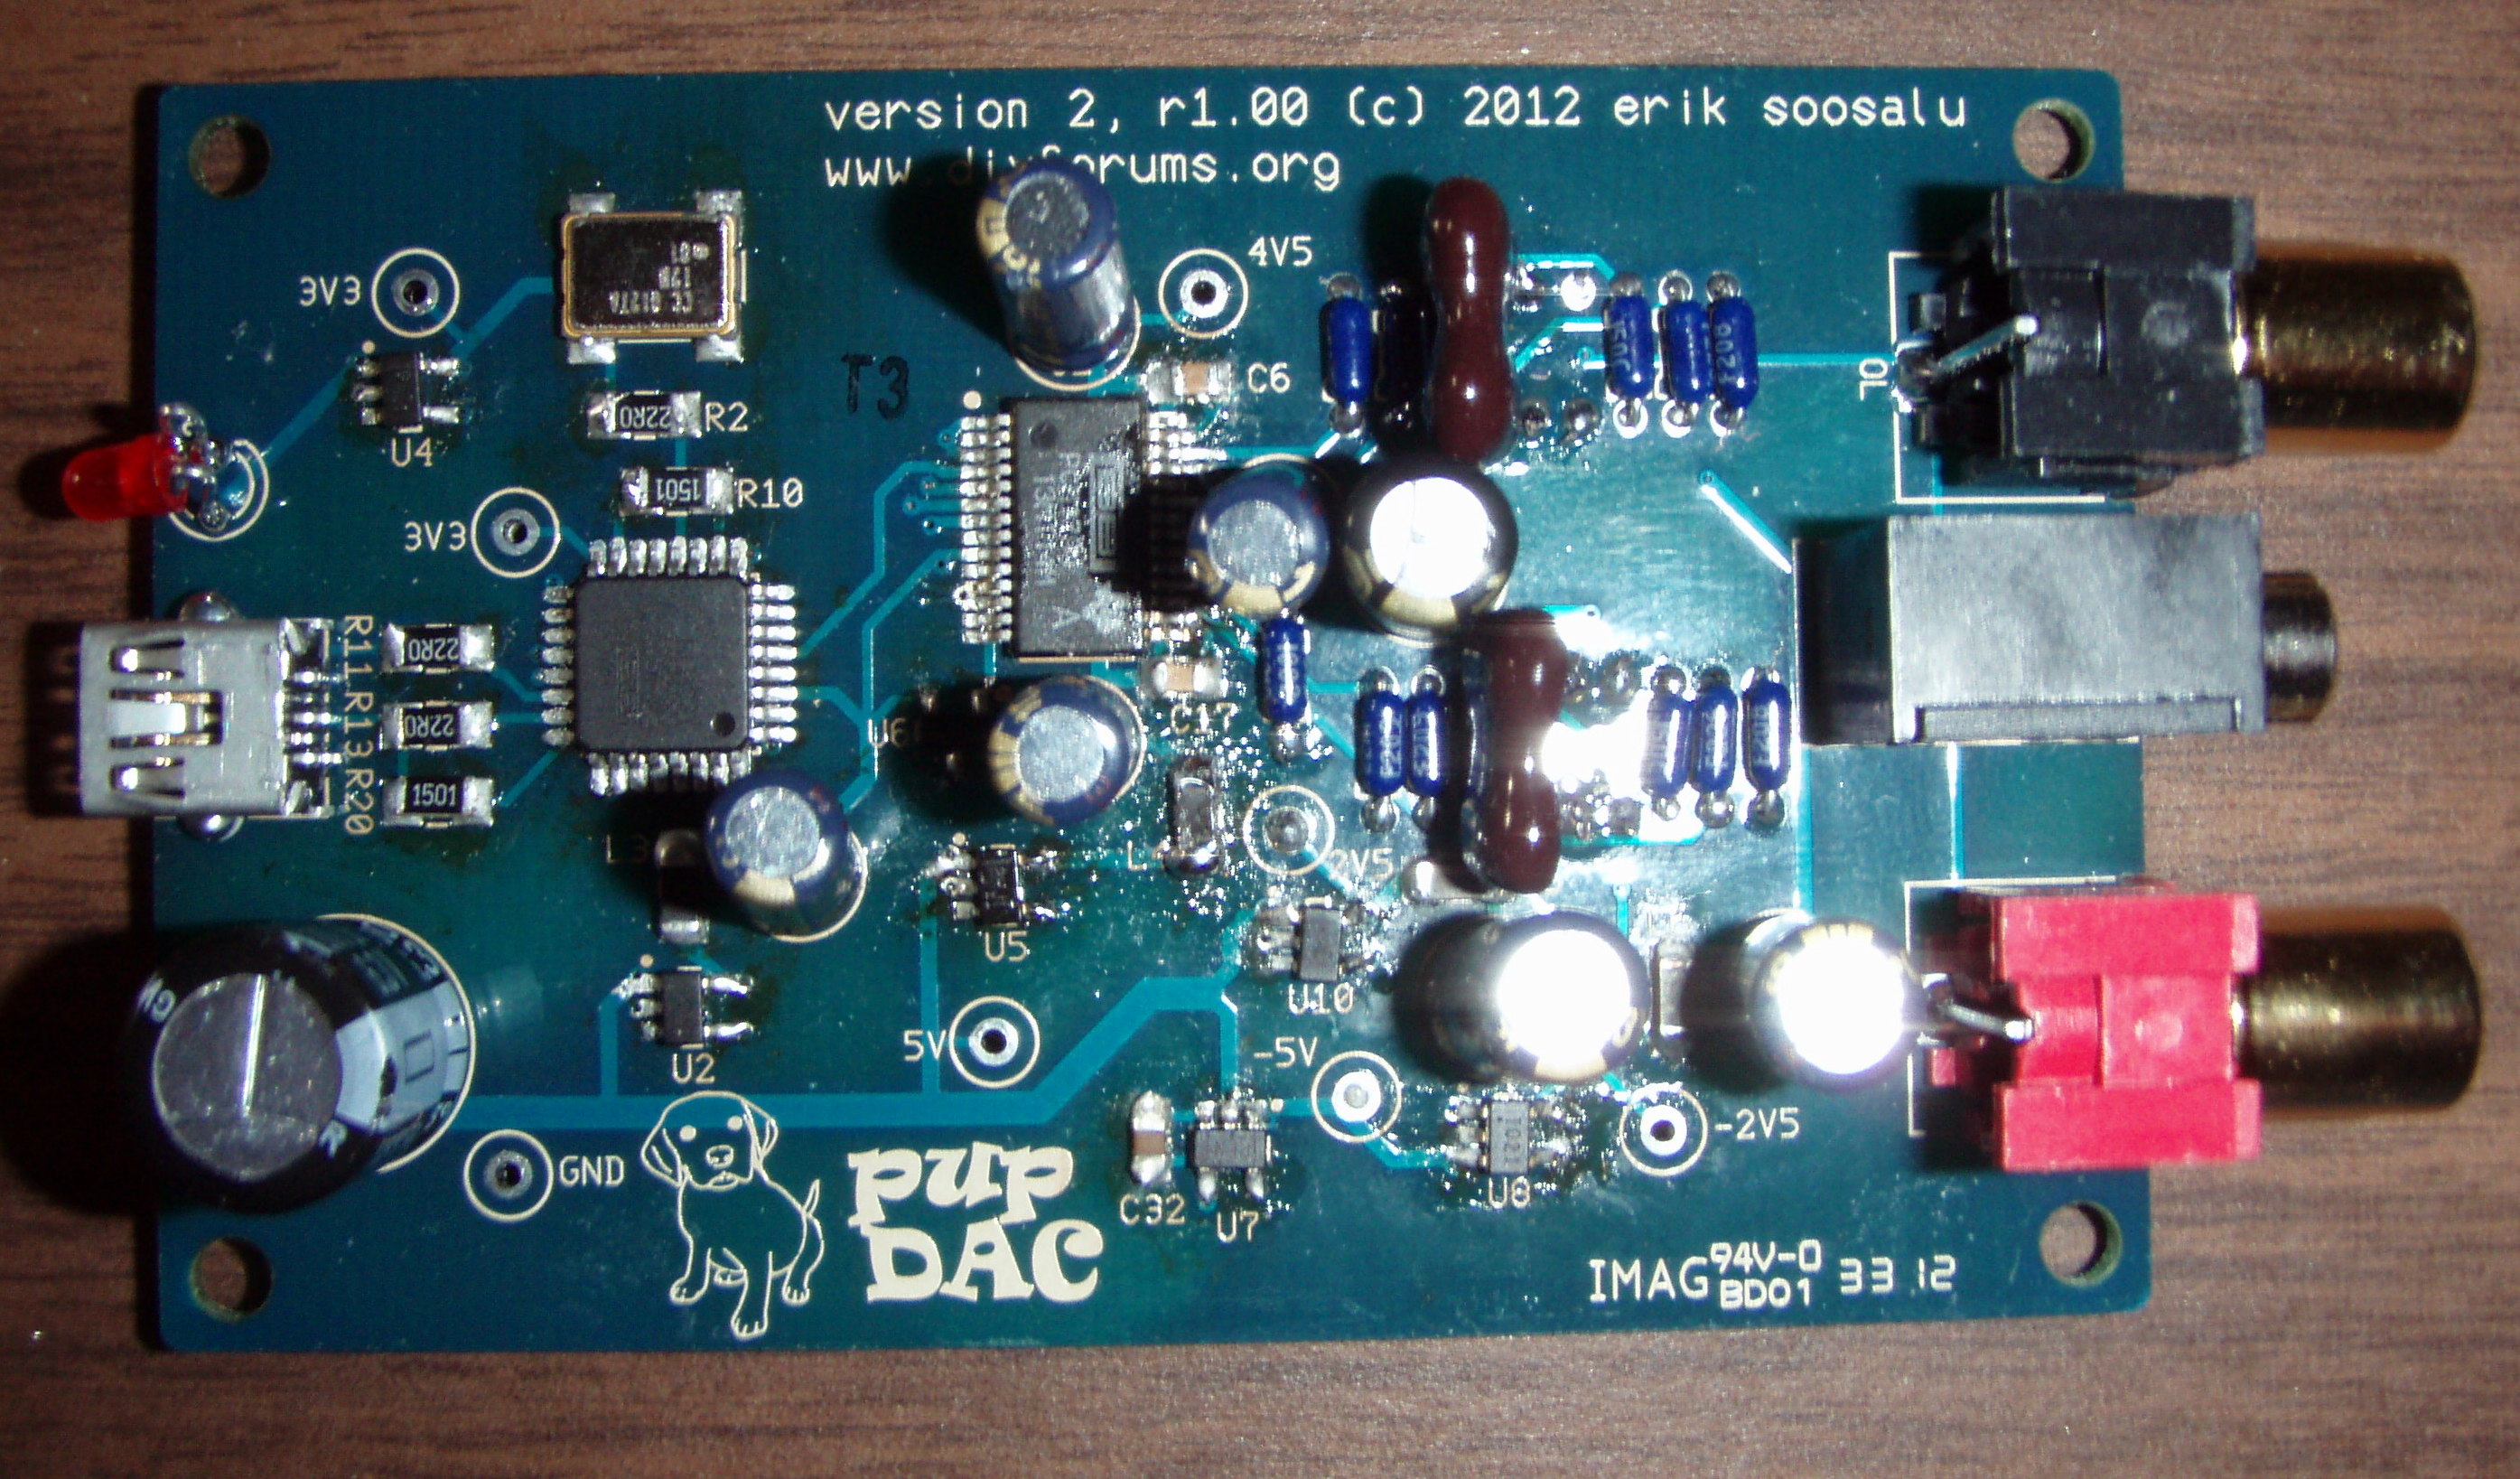
It's actually best not to use the slider in windows anyway, it's not the most accurate (in terms of bits) means of attenuating the signal. JRIVER is one great piece of software that gives volume control without loss of digital signal quality, and it works perfectly with the Pupdac. As Tom says, Foobar works fine too.
 
Oct 29, 2014 at 9:40 AM Post #287 of 359
I finished the first of my two pupDAC kits yesterday. Had an easily fixed short at first (2 pins on the PCM2707 had a tiny bridge that shorted out the 4.75V regulator) and then it seemed to work for a while, but started cutting out after a few minutes. I noticed the 3.3V supply shared by the 2707 and the 1794 was shorted out so I started looking for the bridge. It turned out to be a tiny little speck of solder (presumably) way behind the adjacent VDD and DGND pins on the 1794 that was a pain in the behind to get out - I ended up scratching pretty hard between the pins with a blade until it consistently measured as open. It was behaving really strange before, sometimes it would work for a while after I reflowed the joints or scratched a bit and then short out again after 10s-2min of being powerd on. It appears to be fixed completely now though, I'll take it to the university tomorrow and have a closer look under the microscope to be sure.
 
The moral of the story I guess is to be REALLY careful soldering those SSOP28 packages - the long pads can lead to almost un-fixable bridges way behind the actual joints. I really have to invest in a paste+microscope (+hot air, although that's not exactly optimal for ICs) setup one of these days, soldering close-pitch chips is a cakewalk with that equipment.
 
The DAC sounds really nice, by the way - thanks to cobaltmute for the design and tomB for supplying the (excellently packaged) kits at such a reasonable price! When using it together with my "The Wire" headphone amp there are no caps in the signal path whatsoever and the bass really comes through nicely.
 
Edit: Well, it just happened again. I'm going to have to remove the PCM1794 to fix this.
 
Oct 29, 2014 at 7:19 PM Post #288 of 359
Sorry to hear of your troubles ...  SSOP-28 has always been challenging.  Nevertheless, previous experience with the AlienDAC, the BantamDAC, and now the SkeletonDAC made us think it wouldn't be such an issue.  Yet, for some reason on the PupDAC, it's been a recurring problem.  I think a lot of it has to do with the fact that the PCM1794 is not an inexpensive chip.  Plus, once you get a PupDAC populated, you have $75 invested in the parts and the PCB.  That makes mistakes hurt a lot more.
frown.gif

 
We're going to try to address this in the future.
 
Oct 29, 2014 at 8:22 PM Post #289 of 359
Yeah, it's my own fault for not being careful enough while soldering it. I've soldered SSOP28 chips before and it was fine, I just screwed up and the narrow pitch makes shorts behind the pins (that don't actually touch them but are only between the pads) almost impossible to fix without removing the chip - maybe you could make the PCM1794's solder pads a bit shorter on the next redesign?
Anyway, thankfully I have access to equipment that will make desoldering and replacing the chip pretty comfortable at university. For my second DAC I'm gonna get a flux pen instead of the liquid flux I've got now, that stuff doesn't strike me as too great in comparison to the nice thick flux from the pens. Or I might just cave in and solder the 1794 with solder paste and a microscope (although it would hurt my hand soldering pride a bit, that's better than having to spend yet another $15 for a new chip) at the university.
 
Oct 29, 2014 at 9:48 PM Post #290 of 359
  Yeah, it's my own fault for not being careful enough while soldering it. I've soldered SSOP28 chips before and it was fine, I just screwed up and the narrow pitch makes shorts behind the pins (that don't actually touch them but are only between the pads) almost impossible to fix without removing the chip - maybe you could make the PCM1794's solder pads a bit shorter on the next redesign?
Anyway, thankfully I have access to equipment that will make desoldering and replacing the chip pretty comfortable at university. For my second DAC I'm gonna get a flux pen instead of the liquid flux I've got now, that stuff doesn't strike me as too great in comparison to the nice thick flux from the pens. Or I might just cave in and solder the 1794 with solder paste and a microscope (although it would hurt my hand soldering pride a bit, that's better than having to spend yet another $15 for a new chip) at the university.


I'm sold on flux pens for IC chips.
 
As for shorter solder pads, the production version you're using actually had the pads lengthened from the prototypes.  Believe me, it was harder with shorter pads.
 
The potential fix is that we're going to soon offer PupDAC PCB's with the PCM2707 and PCM1794 already "picked and placed" and soldered on the PCB.  The first manufacturing batch has been ordered from Imagineering.
 
Oct 29, 2014 at 10:22 PM Post #291 of 359
I had similar fun doing mine but i found delsoldering braid was invaluable to suck out any excess causing shorts. I did also use a flex pen which helped.
 
Oct 30, 2014 at 8:56 AM Post #292 of 359
I had similar fun doing mine but i found delsoldering braid was invaluable to suck out any excess causing shorts. I did also use a flex pen which helped.

Yeah, I tried that but the short wasn't even visible under the microscope with the chip installed so it was a pretty hopeless endeavour.


(...)
The potential fix is that we're going to soon offer PupDAC PCB's with the PCM2707 and PCM1794 already "picked and placed" and soldered on the PCB.  The first manufacturing batch has been ordered from Imagineering.


That's nice, although I don't think I'd buy it like that if I had the chance - I'm a bit stubborn when it comes to soldering my own components.
In any case, the soldering guru in the lab removed the 1794 for me (I was a bit shy about heating it up for too long with the hot air), I cleaned up the pads and soldered in a new chip with solder paste under the microscope. The board worked fine in a quick test, I'm gonna leave it plugged in longer to see if it's definitely working for good when I get home. Here's how it looks now:

ejWfg9O.jpg


Edit: I've had it plugged in for about 5 hours uninterrupted now, and it seems I managed to fix it permanently! I'm definitely not gonna solder the second one at home, the microscope just makes everything soo much easier. I definitely recommend using one when soldering the PCM1794 to everyone who has access to one.
 
Nov 14, 2014 at 4:40 AM Post #293 of 359
I finished my pupdac few days ago, but my computer can't recognized it, and then I measure the voltage for each test point, I found the voltage is low (0.01v) at 3v3 (the one beside the U1), other voltages looks fine.
 
I reflowed some parts and checked there is no bridge for each chips. I'm afraid I may damaged pcb at this point? or may be the LDO? 
 
Nov 14, 2014 at 8:11 AM Post #294 of 359
  I finished my pupdac few days ago, but my computer can't recognized it, and then I measure the voltage for each test point, I found the voltage is low (0.01v) at 3v3 (the one beside the U1), other voltages looks fine.
 
I reflowed some parts and checked there is no bridge for each chips. I'm afraid I may damaged pcb at this point? or may be the LDO? 


The LDO could be damaged, or there could be a short/bridge somewhere in the 3.3V circuit that's pulling the voltage down.  See if you can measure (power off) resistance to Ground at various points along the 3.3V traces to see if you have a zero resistance somewhere - that would be a short.  That's the trace that goes from U2 to L3, C19, and then branches off to U1 and U6.  If you can't determine a short/bridge (zero resistance), then most likely U2 has been fried or is not properly connected.  You're at least in the right area, for sure, because the PC will recognize the device even if U3 (the DAC chip) is not operating correctly.  The device that makes the USB connection is U1 and it needs the 3.3.V supply to make that happen.
 
Nov 14, 2014 at 3:33 PM Post #295 of 359
The LDO could be damaged, or there could be a short/bridge somewhere in the 3.3V circuit that's pulling the voltage down.  See if you can measure (power off) resistance to Ground at various points along the 3.3V traces to see if you have a zero resistance somewhere - that would be a short.  That's the trace that goes from U2 to L3, C19, and then branches off to U1 and U6.  If you can't determine a short/bridge (zero resistance), then most likely U2 has been fried or is not properly connected.  You're at least in the right area, for sure, because the PC will recognize the device even if U3 (the DAC chip) is not operating correctly.  The device that makes the USB connection is U1 and it needs the 3.3.V supply to make that happen.


I measured the output voltage of U2, nearly 0, and input voltage seems ok, 4.9v. And there was once I try to debug, but I plug it in for 3 mins and u2 became very hot. Is that may indicate some problems? I also will check the resistance later.
 
Nov 15, 2014 at 9:03 AM Post #296 of 359
 
The LDO could be damaged, or there could be a short/bridge somewhere in the 3.3V circuit that's pulling the voltage down.  See if you can measure (power off) resistance to Ground at various points along the 3.3V traces to see if you have a zero resistance somewhere - that would be a short.  That's the trace that goes from U2 to L3, C19, and then branches off to U1 and U6.  If you can't determine a short/bridge (zero resistance), then most likely U2 has been fried or is not properly connected.  You're at least in the right area, for sure, because the PC will recognize the device even if U3 (the DAC chip) is not operating correctly.  The device that makes the USB connection is U1 and it needs the 3.3.V supply to make that happen.


I measured the output voltage of U2, nearly 0, and input voltage seems ok, 4.9v. And there was once I try to debug, but I plug it in for 3 mins and u2 became very hot. Is that may indicate some problems? I also will check the resistance later.

 
Sounds like you should've checked that resistance, first.
wink.gif
  If U2 is getting hot, there's a short somewhere.
 
Nov 25, 2014 at 11:44 PM Post #298 of 359
I had the exact same issue - 0V at U2's 3.3V test point and U2 getting hot as hell. It turned out to be a short behind two pins on the 1794. And I mean aaaall the way back there - no chance of getting at it with a soldering iron. I had to remove the 1794, clean everything up, which I doubt I would have managed without a microscope, as I'd been trying to scratch out the bridge between the culpable 1794 pins which resulted in a still non-working DAC along with an almost ruined PCB with little solder blobs invisible to the naked eye stuck in very problematic places- can't recommend going that way, just remove the 1794 straight away once you're certain that's where the short is. I recommend first double-checking your PCM2707 pins for shorts and if you're certain that's not where the problem lies, remove the 1794 - preferrably with hot air or a pair of hot tweezers with the right tips, or if that's not an option, chip-quik or something equivalent. Clean the pads really well (you don't wanna end up lifting one off though, so be careful), get a new 1794 and install it as carefully as you can - be especially conservative on the amount of solder you use when soldering the new pin (you could try reusing the old chip, not sure whether anything could have happened to it due to these issues - I decided to play it safe and use a new one). Soldering tight-pitch ICs by hand and with traditional solder wire is always a bit of a gamble and the long pads on the pupDAC board open the possibility for shorts in places where you can't reach them with an iron. For me the short was between (or rather behind) the VDD (which is supplied by U2) and AGND pin, I think.

At the risk of repeating myself, if you have the opportunity of working under a microscope for this kind of job, do it. It's sooo much easier to see where the little solder balls are sticking and causing shorts. Also, using solder paste to solder the new IC makes a world of difference too.

By the way, I think frying the regulators isn't possible by shorting them as they have over-current protection so I'm rather sure you've got a mean little solder bridge somewhere.
 
Nov 26, 2014 at 9:22 AM Post #299 of 359
This has happened too often for my tastes and we are doing something about it.  We normally expect that an SOP-28 should be solderable by DIY-er's (as in AlienDAC, BantamDAC, and SkeletonDAC).  However, the inability to electrically confirm prior to installing the total investment in parts and the overall combination of placement/surrounding parts makes trouble-shooting extremely difficult.  The high investment in parts only makes a failure hurt more.  I've experienced this myself, having an un-workable PCB where I've removed the PCM chips (electrolytic caps, too!) a couple of times with no success.
 
Beginning sometime this weekend, ordering the PupDAC kit will have the option of selecting a machine-pick&place PCB for U1 and U3 (the PCM2706/7 and PCM1794).  These are extremely high-quality soldering jobs that were machine-made, not by some little person toiling away in a sweatshop somewhere.
wink.gif
The only difference is that the PCB edges are saw-cut instead of routed, but every single spec is still the same.


Users who are viewing this thread

Back
Top