Need help recabling K7XX & TH-X00 to balanced
Jan 19, 2016 at 3:39 PM Thread Starter Post #1 of 24

tumtuter

Head-Fier
Joined
Jul 2, 2014
Posts
87
Likes
14
So my plan is to go with the K7XX to single balanced end and the TH-X00 to dual balanced end into my Pioneer AMP/ DAC.
 
Can anyone here spec me up the parts needed to do this mod. Recommending solder paste, connectors/ terminals and the cable itself. I would like it to look like stock. nothing fancy.
 
I'm in the UK so if there is any UK stores that supply the parts would be better. But I can also import from the US if needs be. 


I would love PETREK to carry out the mods, but hes in the US and shipping and customs would just cost too much, so would like to try myself.
 
Jan 19, 2016 at 6:32 PM Post #2 of 24
Hey, I just happened to be looking through the unanswered posts and clicked on this one, coincidence? 
 
Here is some solder for you to order.
 
http://www.redco.com/Kester-83-4000-0000.html
 
TH-X00
 
Anyway, here are the XLR connectors I would use for the "Dual balanced" TH-X00, they're here in the US though (I'm not sure what country you're in) saw that a bit late, hopefully ordering from here isn't a problem. I use this site all the time, they have most of what I need. I'm assuming you're referring to a dual XLR connection when you say "Dual Balanced".
 
http://www.redco.com/Neutrik-NC3MXX-B.html
 
You'll have to get some heatshrink tubing as well for the split you'll make on the end for left and right. Get some 3/16" black (1 foot), 1/8" black (1 foot), and 1/8" red (1 foot). 1 foot is the minimum length available to order. The 3/16" will be to cover the actual split and the red and black 1/8" will be to cover the wires of the split until they enter the XLR connectors.
 
http://www.redco.com/Redco-ST221.html
 
The wires in the TH-X00 cable are brown, brown, pink, and blue. You'll have to use a multimeter to figure out which brown wire is the left ground and which is the right. The left signal is blue, the right signal is pink.
 
The pins in the 3-pin XLR connectors are:
 
Pin 1: Sleeve
Pin 2: Signal
Pin 3: Ground 
 
AKG
 
Get this to install in the AKG to replace the stock 3-pin Mini XLR connector.
 
http://www.redco.com/Redco-TB4M.html
 
You'll need this end to connect to the cable you will be wanting to use.
 
http://www.redco.com/Redco-TA4FB.html
 
Use this pinout for both connectors:
 
Pin 1: L+
Pin 2: L-
Pin 3: R+
Pin 4: R-
 
You'll probably have to make your own cable for these if you do it this way, the stock cable that the AKG comes with only has 3 wires in it, so it cannot be balanced. You need one with 4 wires.


Let me know if you have any other questions.
 
Jan 20, 2016 at 3:26 PM Post #3 of 24
Wow that is exactly what I was looking for. Much appreciated PETEREK, your work here is amazing. I'm going to source all of the parts now. and update when I start. Just trying to get my head around the work. Thank you.
 
Jan 20, 2016 at 4:14 PM Post #4 of 24
  Wow that is exactly what I was looking for. Much appreciated PETEREK, your work here is amazing. I'm going to source all of the parts now. and update when I start. Just trying to get my head around the work. Thank you.

Thanks a lot man. I'm looking forward to seeing it all come together. If you need any help or tips just message me or post here so people with similar issues get their answers too.
 
Mar 4, 2016 at 3:33 PM Post #7 of 24
Getting that 3 pin XLR out of the AKG sometimes requires some patience. Sometimes they come right out, but most of the time you have to slowly extract with a dremel.  

It's actually pretty easy if you take the part it's housed in off the headphone, warm it up with a hair dryer and just easily push it out from the inside.
 
Mar 26, 2016 at 1:45 AM Post #9 of 24
Sorry for the lack of updates, been backtracked with home decorating and things. I've managed to get all the parts needed, they have just been sat waiting. I will start next week and update how it goes! Want to get it right first time. So I'm not rushing into it.
 
Apr 6, 2016 at 12:15 PM Post #10 of 24
Im ready to start the recabling now. Been really busy... During the time I've also been thinking about my system and that I really want to experience a Planar Headphone.
 
So I Plan to keep the K7XX for dual XLR connection. Sell the TH-X00 and upgrade to a Planar (ether maybe) single XLR connection.
 
So I need help again. So sorry. How should I go about doing this recable with a Mogami 2893?

 
Apr 7, 2016 at 9:14 AM Post #11 of 24
Started work on the K7XX and leaving some notes in case anyone might find it helpful later on.
 
1. Removing the stock 3 pin connector was really tough. I tried the hairdryer method whilst pressing down with a screwdriver, but it didnt seem to move at all. So searching around on headfi. Someone mentioned using a spring loaded centre punch to force it out. Sure enough, with one strike it popped out easily.


2. Removing the new Panel Mount 4 pin Male Mini XLR from the metal casing to fit inside the cup. I used a mini hacksaw to cut a line straight through and then pull the casing apart with some pliers.

 
Apr 7, 2016 at 11:26 AM Post #12 of 24
Interesting method, but it wasn't totally necessary to do it that way. The way to push out the whole 3-pin mini XLR and install the full 4-pin mini XLR would be by pushing the mini XLR out from the other side of the connector after heating it with a hair dryer. If that worked for you, that's cool too!
 
Apr 8, 2016 at 10:02 AM Post #13 of 24
Hey PETEREK I'm glad your around, in need of some help please.
 
K7XX
I understand the wiring from the headphone to 4 pin Male Mini XLR Panel Mount.
 
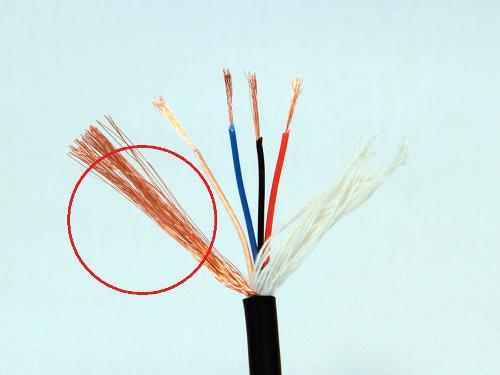
But for the actual cable itself, using a Mogmai 2893 what would be the best way to split the cable to the dual XLR connectors. Can I split the ground into two and twist, although it will make it thinner?

 
Apr 8, 2016 at 8:00 PM Post #14 of 24
  Hey PETEREK I'm glad your around, in need of some help please.
 
K7XX
I understand the wiring from the headphone to 4 pin Male Mini XLR Panel Mount.
 
But for the actual cable itself, using a Mogmai 2893 what would be the best way to split the cable to the dual XLR connectors. Can I split the ground into two and twist, although it will make it thinner?


I personally don't use the wire you have circled there, the shield. I normally use the clear for the left ground, blue for left signal, black for right ground, and red for right signal.
 
Apr 8, 2016 at 8:38 PM Post #15 of 24
Alright, this is what I was talking about when I was describing how to remove the stock 3-pin mini XLR. I just happened to have a KXX here so I better show you how while I have the opportunity.
 
Stock connector.

Heat with a hair dryer or heat gun, I used a hair dryer. Don't just heat it at this angle, this was the only way I could take a picture and show the hair dryer. It wasn't even on tbh.

After the area is hot, get a good grip on the part and push the stock connector out from this direction. 

It should slide right out if the area was warm enough. ABS plastic won't begin to melt until a little over 250 degrees F, so don't be too afraid if you're heating it with a hair dryer. The longest I would apply heat with a hair dryer on HIGH would be about 20 seconds.

The 4-pin mini XLR chassis mount connector is the same size and shape as the stock connector.


You'll have to glue the new connector to secure it after soldering the wires to the connector.


Users who are viewing this thread

Back
Top