Need help recabling K7XX & TH-X00 to balanced

Apr 9, 2016 at 10:52 AM Post #16 of 24
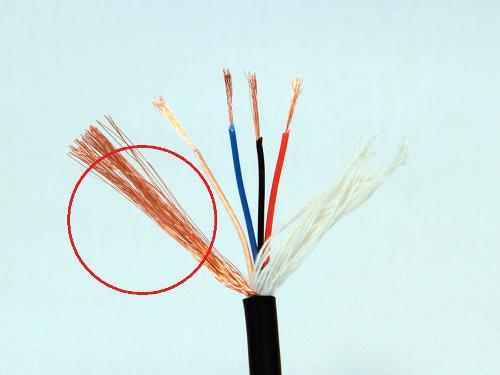
  I personally don't use the wire you have circled there, the shield. I normally use the clear for the left ground, blue for left signal, black for right ground, and red for right signal.

Is this correct that at the ends of the 3 pin XLR does not need a ground. Just hot and cold right?
L- Clear
L+ Blue
 
R- Black
R+ Red
 
Also what should I do with the 'shield' cut it off or twist it around the cable? Thank you. Sorry for all these questions. This is my first time doing cable work.
  Alright, this is what I was talking about when I was describing how to remove the stock 3-pin mini XLR. I just happened to have a KXX here so I better show you how while I have the opportunity.

 
Stock connector.

Heat with a hair dryer or heat gun, I used a hair dryer. Don't just heat it at this angle, this was the only way I could take a picture and show the hair dryer. It wasn't even on tbh.

After the area is hot, get a good grip on the part and push the stock connector out from this direction. 

It should slide right out if the area was warm enough. ABS plastic won't begin to melt until a little over 250 degrees F, so don't be too afraid if you're heating it with a hair dryer. The longest I would apply heat with a hair dryer on HIGH would be about 20 seconds.

The 4-pin mini XLR chassis mount connector is the same size and shape as the stock connector.


You'll have to glue the new connector to secure it after soldering the wires to the connector.
I understand that know. I feel like a idiot, was pushing it the otherside. Well at least the connector is out anyway with the other method.

 
Apr 9, 2016 at 12:22 PM Post #17 of 24
 
I personally don't use the wire you have circled there, the shield. I normally use the clear for the left ground, blue for left signal, black for right ground, and red for right signal.

Is this correct that at the ends of the 3 pin XLR does not need a ground. Just hot and cold right?
L- Clear
L+ Blue

R- Black
R+ Red

Also what should I do with the 'shield' cut it off or twist it around the cable? Thank you. Sorry for all these questions. This is my first time doing cable work.
 
Alright, this is what I was talking about when I was describing how to remove the stock 3-pin mini XLR. I just happened to have a KXX here so I better show you how while I have the opportunity.


Stock connector.


Heat with a hair dryer or heat gun, I used a hair dryer. Don't just heat it at this angle, this was the only way I could take a picture and show the hair dryer. It wasn't even on tbh.


After the area is hot, get a good grip on the part and push the stock connector out from this direction. 


It should slide right out if the area was warm enough. ABS plastic won't begin to melt until a little over 250 degrees F, so don't be too afraid if you're heating it with a hair dryer. The longest I would apply heat with a hair dryer on HIGH would be about 20 seconds.


The 4-pin mini XLR chassis mount connector is the same size and shape as the stock connector.


You'll have to glue the new connector to secure it after soldering the wires to the connector.

I understand that know. I feel like a idiot, was pushing it the otherside. Well at least the connector is out anyway with the other method.

Yeah that's correct man, just positive and negative, no shield is necessary. I remove it and just use the wires within a sleeve.

As long as the method you used to remove the 3-pin mini XLR worked, you're good!
 
Apr 14, 2016 at 11:15 AM Post #22 of 24
I finished the cabling yesterday. Man it was a lot more difficult than I originally thought. Could not have done it without your help PETEREK. Thank you so much.


Noticied a larger soundstage and improved sound too. So happy with it. Now still deciding whether to keep the TH-X00 or not and go balanced also.
 

Users who are viewing this thread

Back
Top