


FiiO-Shadow
Sponsor: FiiO
- Joined
- Sep 4, 2013
- Posts
- 215
- Likes
- 65
Dear respected customers,
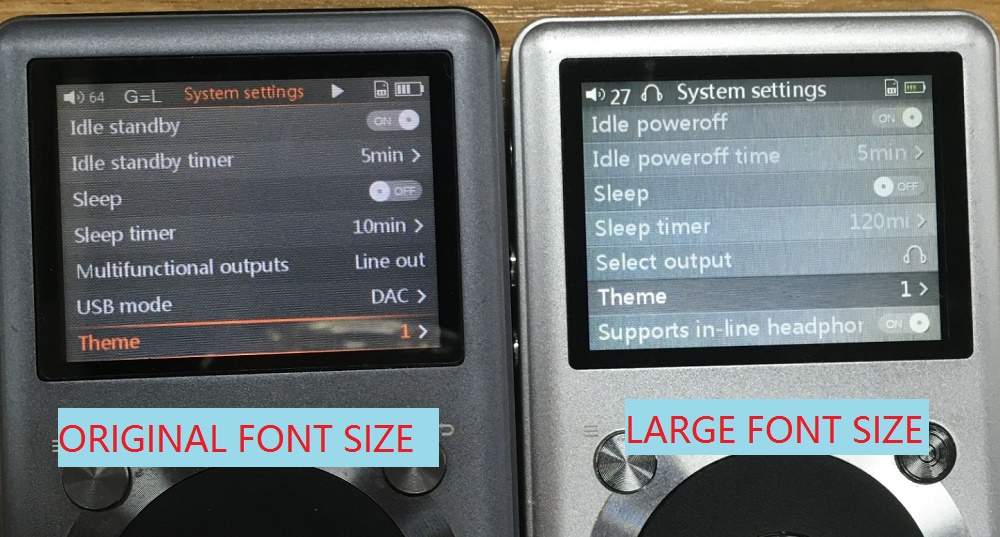
We received some feedback from customers that the font size on X1 or X3 2nd gen is too small to check.
Kindly be noted that, the reason why we do not release the large font firmware officially, is because all these languages' fonts are influencing each other. That is to say, when the fonts are enlarged, the certain language(s) may be displayed abnormally, such as incomplete letters, even though others are normal.
Yes, we have to give priority to the whole UI and all users. Any understanding will be highly appriciated.
We have ever released and DIY tool which can be used to DIY the theme on the X series DAPs. In consideration of the possibility which the DIY tutorial will be a little complicated for some users, here are some simple steps in details to guide how to enlarge the fonts on X1 and X3 2nd gen:
1) Download the firmware DIY tool (click here) then unzip it
2) Download the firmware for the X1 or X3 2nd gen (>>download link) then copy the ".fw" file into the folder of the DIY tool package
3) Use the smartPack in DIY tool package to unpack the firmware (you can check the readme file for the usage). The program will create a folder for the firmware package
4) Open the package folder, go to the directory "\litegui\theme1\" (the library folder for the theme 1). You can also go to other folders (e.g. theme2, theme3...) for different themes
5) Find the file "config.ini" then double click to open it for edit. (Or open it with notepad)
6) Change the value of the font size for different texts (e.g. if you see <topbar_volume_size>14</topbar_volume_size>, it means the font size for the topbar volume number is 14, you can change the number to a bigger one)
7) After the modifiying the font size values, press "Ctrol+S" to save the file
8) Use the smartPack to re-pack the firmware
(Note: Currently, only the font size for the X1 & X3 2nd gen firmware can be modified using this method)
For convenience, we have already created a large font version for the X1 & X3 2nd gen firmware as a sample. Here are the download links:
X1-FW1.6 (large text font): >>click to download
X1-FW1.61beta (large text font): >>click to download
X3II-FW1.6 (large text font): >>click to download
X3II-FW1.44beta (large text font): >>click to download


Of course, the above firmwares are just for reference. If you are not satisfied with them or there is a new available firmware in the future, please try to do it yourself by following the steps.

Note: Please go to check Page 5(#70) on this thread to download the large text font firmware for the X5 2nd gen.
We received some feedback from customers that the font size on X1 or X3 2nd gen is too small to check.
Kindly be noted that, the reason why we do not release the large font firmware officially, is because all these languages' fonts are influencing each other. That is to say, when the fonts are enlarged, the certain language(s) may be displayed abnormally, such as incomplete letters, even though others are normal.
Yes, we have to give priority to the whole UI and all users. Any understanding will be highly appriciated.
We have ever released and DIY tool which can be used to DIY the theme on the X series DAPs. In consideration of the possibility which the DIY tutorial will be a little complicated for some users, here are some simple steps in details to guide how to enlarge the fonts on X1 and X3 2nd gen:
1) Download the firmware DIY tool (click here) then unzip it
2) Download the firmware for the X1 or X3 2nd gen (>>download link) then copy the ".fw" file into the folder of the DIY tool package
3) Use the smartPack in DIY tool package to unpack the firmware (you can check the readme file for the usage). The program will create a folder for the firmware package
4) Open the package folder, go to the directory "\litegui\theme1\" (the library folder for the theme 1). You can also go to other folders (e.g. theme2, theme3...) for different themes
5) Find the file "config.ini" then double click to open it for edit. (Or open it with notepad)
6) Change the value of the font size for different texts (e.g. if you see <topbar_volume_size>14</topbar_volume_size>, it means the font size for the topbar volume number is 14, you can change the number to a bigger one)
7) After the modifiying the font size values, press "Ctrol+S" to save the file
8) Use the smartPack to re-pack the firmware
(Note: Currently, only the font size for the X1 & X3 2nd gen firmware can be modified using this method)
For convenience, we have already created a large font version for the X1 & X3 2nd gen firmware as a sample. Here are the download links:
X1-FW1.6 (large text font): >>click to download
X1-FW1.61beta (large text font): >>click to download
X3II-FW1.6 (large text font): >>click to download
X3II-FW1.44beta (large text font): >>click to download
Of course, the above firmwares are just for reference. If you are not satisfied with them or there is a new available firmware in the future, please try to do it yourself by following the steps.
Note: Please go to check Page 5(#70) on this thread to download the large text font firmware for the X5 2nd gen.

")

")
