bdh
500+ Head-Fier
- Joined
- Feb 17, 2004
- Posts
- 549
- Likes
- 65
For those who find the JVC HP-DX1000 headphones to be too dark and somewhat bass-heavy. Or find the soundstage to be too 'expansive' or maybe rather distant and have somewhat of an 'empty-hall'-like sound. Or want a more involving type of sound. And you don't mind playing a bit with a $900 headphone, here is a mod that may be for you. It has turned my disappointing stock DX1000 into the best headphone I have ever heard so far.
For a review of my current equipment and my biases, see this link:
http://www.head-fi.org/forums/f4/my-...foobar-380489/

The first thing to do is pull off the pads. It's can be very scary the first time, as you're not sure exactly how they come off, however they are attached by some strong leather material that's just fitted onto the plastic pad frame. If you just grab an edge and start pulling, the material will finally come clear of the pad frame. Getting them back on may be a little bit tricky at first, but after you do it once, it's quite easy.

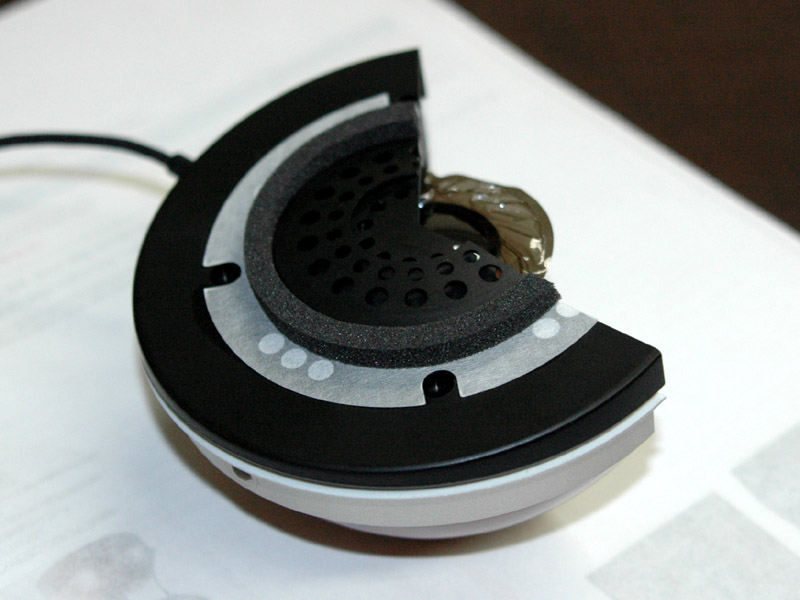
After the pads are off, note the direction the pad frame is mounted. The stock direction is with the wider wedge at the back of the ear. Note that this causes the grill on the pad frame to point slightly back towards the ear. Also note the holes in the grill. The stock configuration is for only the center ring of holes to have a direct line of sight to the driver, while the outer two circles of holes are offset so that the pad frame blocks a direct path to the driver. By aligning the driver grill and pad frame grill, all the holes will have a direct line of sight. Aligning the holes gives a more impactful and clearer sound. (See picture above.) However, I found the sound a bit too glaring with the pad frame grill angled back towards the ear, and so rather than re-mounting the driver 1/4th of a turn in order to line up the holes, leave the driver as is, and re-mount the pad-frame with the thicker outer wedge at the top of the ears, which causes the pad frame grill to be angles upwards. (See picture below.)


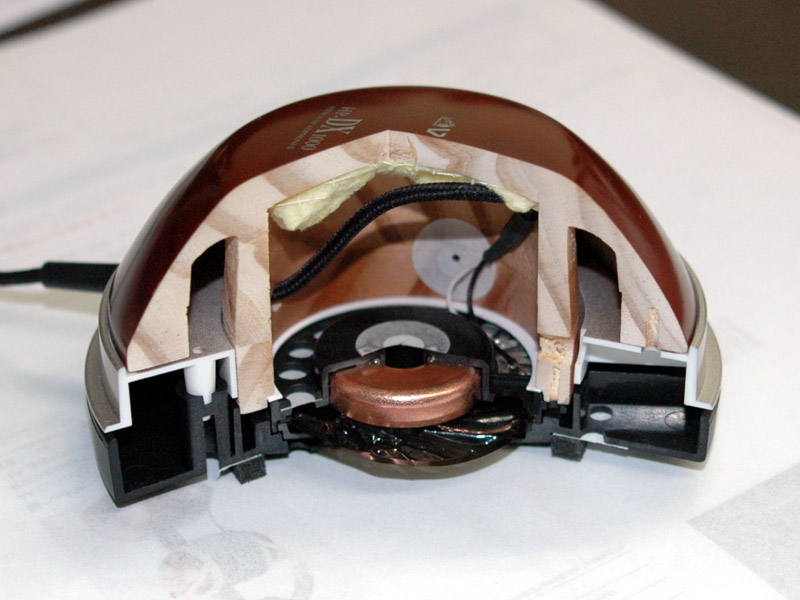
When you take the pad-frame off and the driver off, make sure you use a small Phillips screw-driver that gives a good fit in the screw - you wouldn't want to strip a screw while it's mounted. (And to prevent stripping, don't re-mount the screws too tightly.) Before taking the driver off, mark with a pencil the direction it is mounted, so that it's mounted back the same way. Also, loosen all the screws of the driver a bit first before taking them off, since those little tabs are just cheap plastic and they can break off. There is no need to take off the whitish-yellowish plastic covering. The only thing under that is the wood cavity.


After the driver is off, you'll notice that these cans only use a small wood cylinder inside the wood cups. It does not use the whole wood cup for the sound chamber. I originally used a couple of small round felt pads (self-sticking) and attached them to the insides of the cylander.
This brought down the bass to a more normal weight, but it did not brighten the sound any. So to try brightening the sound, I thought of using something to provide better reflection of the sound, and found a one dollar coin fits very snuggly with three felt pads holding it fairly tightly in place inside the cylinder. Placing the coin closer to the driver results in a more forward and more exciting sound, so place it according to your preferences. This coin does not flatten the soundstage - it is still very layered and three-dimensional, rather it reduces the distant hall-like sound and brightens up the sound some (they're still not 325i bright of course, because of the still very full and deep bass.)
Remount the driver and the pad-frame as described above and re-attach the pads. Give a spin with some music. (I never listen to it this way, as this was not the order of how I developed the mod.)

Attach the brads to widen the ear-holes. This gives a significantly bigger soundstage. Not in the hall-like way, but the image size of the music is larger. You'll notice the brads are a bit indenting of the pads, so I do not notice them at all and they do not touch my skin.
Give them a listen and slide the pads around the frame to adjust the fit and sound. Also, try pressing the headphones closer to your ears. If you like the sound better that way, then What I did was (after taking of the pads again) open a one- to two-inch seam in the pads, then using some good scissors, cut off the bottom half of the pads (the side facing the cups, not your ears). You'll have to slide the material and pads around to make a complete cut. After taking out the bottom half of the pads, sew the seam back up - it may not look as good, but I don't care too much about looks. Obviously if you get this far, it's because to really like the sound and don't plan to sell them soon. If you decide it's still not for you, you can always buy a set of replacement pads.
I figured out the brad mod only after cutting the pad down, so I don't know how the brads will fit on a full size pad.
I also cut my pad equally all around. This caused my ear to touch the pad frame grill just a bit. To provide a little more distance, I placed a small five inch length of 1/4 inch soft rope well inside the lip of the underside of the pad. (I noticed I forgot this picture.) (This also lifts the pad off the pad frame giving an even bigger ear cavity which gives an even bigger sound-stage.) Alternately, you could cut the pad with one side, (the back side), thicker than front so that you would not need the bit of rope. Whatever you feel like.

These are now very comfortable. They are now my main headphone and I only listen to the Edition 9 now if I don't bring the JVC home or to work for whatever reason. I love their imaging, full bass, great soundstaging, detail, PRAT, emotion, and many other qualities. All are better than the Edition 9 and far better than the D5000. The only things the Edition 9 still does better is its bass is a bit more impactful (but definately leaner), and it gives more upper-end air. The D5000 has a clearer, brighter top end. But neither of those outweighs all the other qualities.
Even after these mods, I find the upper-bass still a touch thicker than I like. So I provide some EQ in foobar to my liking. The picture is from my MPX3 system. It's flatter with the Extreme system, since the Extreme is a leaner sounding amp. (This EQ is significantly flatter than I had with the stock DX1000. It still sounds great with no EQ though if you have some belief that EQ is always bad. Just keep in mind that I EQ ALL my headphones with foobar 2000, to make them match my other equipment in the system and my preferences. Just changing to a different tube brand will cause me to change the EQ settings to compensate for the differences.)
I still have not got them re-cabled, but I will soon with APS v3.
Good luck and happy modding.
For a review of my current equipment and my biases, see this link:
http://www.head-fi.org/forums/f4/my-...foobar-380489/

The first thing to do is pull off the pads. It's can be very scary the first time, as you're not sure exactly how they come off, however they are attached by some strong leather material that's just fitted onto the plastic pad frame. If you just grab an edge and start pulling, the material will finally come clear of the pad frame. Getting them back on may be a little bit tricky at first, but after you do it once, it's quite easy.

After the pads are off, note the direction the pad frame is mounted. The stock direction is with the wider wedge at the back of the ear. Note that this causes the grill on the pad frame to point slightly back towards the ear. Also note the holes in the grill. The stock configuration is for only the center ring of holes to have a direct line of sight to the driver, while the outer two circles of holes are offset so that the pad frame blocks a direct path to the driver. By aligning the driver grill and pad frame grill, all the holes will have a direct line of sight. Aligning the holes gives a more impactful and clearer sound. (See picture above.) However, I found the sound a bit too glaring with the pad frame grill angled back towards the ear, and so rather than re-mounting the driver 1/4th of a turn in order to line up the holes, leave the driver as is, and re-mount the pad-frame with the thicker outer wedge at the top of the ears, which causes the pad frame grill to be angles upwards. (See picture below.)


When you take the pad-frame off and the driver off, make sure you use a small Phillips screw-driver that gives a good fit in the screw - you wouldn't want to strip a screw while it's mounted. (And to prevent stripping, don't re-mount the screws too tightly.) Before taking the driver off, mark with a pencil the direction it is mounted, so that it's mounted back the same way. Also, loosen all the screws of the driver a bit first before taking them off, since those little tabs are just cheap plastic and they can break off. There is no need to take off the whitish-yellowish plastic covering. The only thing under that is the wood cavity.


After the driver is off, you'll notice that these cans only use a small wood cylinder inside the wood cups. It does not use the whole wood cup for the sound chamber. I originally used a couple of small round felt pads (self-sticking) and attached them to the insides of the cylander.
This brought down the bass to a more normal weight, but it did not brighten the sound any. So to try brightening the sound, I thought of using something to provide better reflection of the sound, and found a one dollar coin fits very snuggly with three felt pads holding it fairly tightly in place inside the cylinder. Placing the coin closer to the driver results in a more forward and more exciting sound, so place it according to your preferences. This coin does not flatten the soundstage - it is still very layered and three-dimensional, rather it reduces the distant hall-like sound and brightens up the sound some (they're still not 325i bright of course, because of the still very full and deep bass.)
Remount the driver and the pad-frame as described above and re-attach the pads. Give a spin with some music. (I never listen to it this way, as this was not the order of how I developed the mod.)

Attach the brads to widen the ear-holes. This gives a significantly bigger soundstage. Not in the hall-like way, but the image size of the music is larger. You'll notice the brads are a bit indenting of the pads, so I do not notice them at all and they do not touch my skin.
Give them a listen and slide the pads around the frame to adjust the fit and sound. Also, try pressing the headphones closer to your ears. If you like the sound better that way, then What I did was (after taking of the pads again) open a one- to two-inch seam in the pads, then using some good scissors, cut off the bottom half of the pads (the side facing the cups, not your ears). You'll have to slide the material and pads around to make a complete cut. After taking out the bottom half of the pads, sew the seam back up - it may not look as good, but I don't care too much about looks. Obviously if you get this far, it's because to really like the sound and don't plan to sell them soon. If you decide it's still not for you, you can always buy a set of replacement pads.
I figured out the brad mod only after cutting the pad down, so I don't know how the brads will fit on a full size pad.
I also cut my pad equally all around. This caused my ear to touch the pad frame grill just a bit. To provide a little more distance, I placed a small five inch length of 1/4 inch soft rope well inside the lip of the underside of the pad. (I noticed I forgot this picture.) (This also lifts the pad off the pad frame giving an even bigger ear cavity which gives an even bigger sound-stage.) Alternately, you could cut the pad with one side, (the back side), thicker than front so that you would not need the bit of rope. Whatever you feel like.

These are now very comfortable. They are now my main headphone and I only listen to the Edition 9 now if I don't bring the JVC home or to work for whatever reason. I love their imaging, full bass, great soundstaging, detail, PRAT, emotion, and many other qualities. All are better than the Edition 9 and far better than the D5000. The only things the Edition 9 still does better is its bass is a bit more impactful (but definately leaner), and it gives more upper-end air. The D5000 has a clearer, brighter top end. But neither of those outweighs all the other qualities.
Even after these mods, I find the upper-bass still a touch thicker than I like. So I provide some EQ in foobar to my liking. The picture is from my MPX3 system. It's flatter with the Extreme system, since the Extreme is a leaner sounding amp. (This EQ is significantly flatter than I had with the stock DX1000. It still sounds great with no EQ though if you have some belief that EQ is always bad. Just keep in mind that I EQ ALL my headphones with foobar 2000, to make them match my other equipment in the system and my preferences. Just changing to a different tube brand will cause me to change the EQ settings to compensate for the differences.)
I still have not got them re-cabled, but I will soon with APS v3.
Good luck and happy modding.