Homemade Foam Ear Tips for IEMs
Apr 4, 2006 at 12:09 AM Post #16 of 244
Quote:

Originally Posted by PiccoloNamek
No, sorry. They were just some random orange earplugs, the first ones I picked up, because they looked soft and smooth, rather than coarse and hard. (I can't stand the feel of the porous, hole-filled earplugs.)

...

The edges aren't all the same thickness, but it isn't noticable.


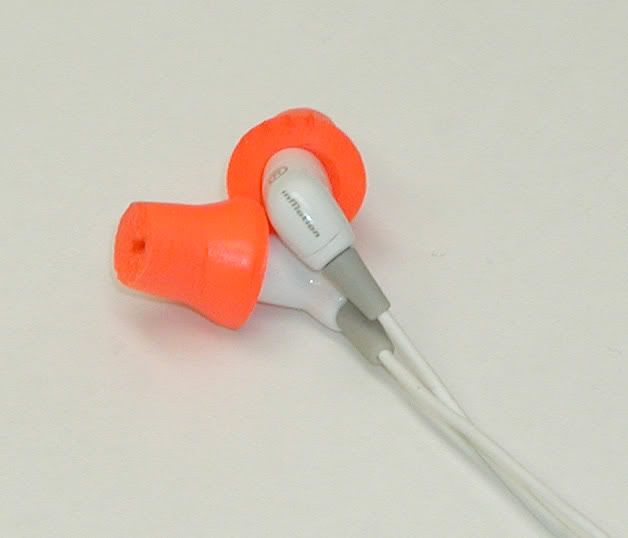
Wow, those must be the exact same foam plugs that I used on my custom foamies a few days ago! Similar cut, as well, although I left mine a bit longer.

For tubing, I used 1/8" heat-shrink tubing. It was ever so slightly too big for my shure e3's (enough to make it slide on the shaft of the e3's), so I had to resort to heating the tubing (not a fun experience, since using a lighter under the tubing resulted in irregular tubing shrinkage (you know what I mean ;P), making it a bit messy to fit onto the shaft of the e3's). The tubing is also very thin-walled, which initially worried me, but I still was able to slip it on the e3's without trouble.

For making the holes in the foam, I jabbed a hot nail through the (non-frozen, non-flattened) foam - it seemed to do the job well enough.

Then, I simply pulled the tubing through the foam with a needle. No glue was necessary, because the nail wasn't hot enough to make the hole in the foam visible all the way through, so it was nice and snug.

The finished product looked a lot more neat than I thought it would. I'll post pictures soon.

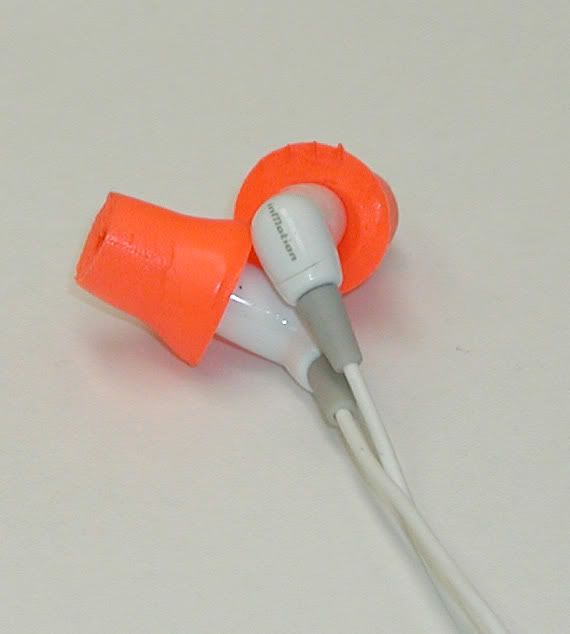
The comfort was much better than the given yellow shure foamies, and there was a lot more isolation (although my yellow foamies are very old, so maybe not the fairest of comparisons). Not surprisingly, the bass was more present, but the overall sound seemed to lack clarity (which probably can be solved by making the tips shorter).

UNFORTUNATELY, my right foamy kept getting stuck in my ear as I took out my e3's. Obviously, I didn't shrink the tubing enough, which is a big pain in the butt. Now, I'm going to try to find some regular tubing to use instead of the heat-shrink tubing - it just isn't worth the hassle to heat them up, etc, especially if they're going to fall off my IEMs all the time.

EDIT: I think I might try out GravY's mod; it looks like a pretty solid idea, and easy, because those are, once again, the same foamies as mine
wink.gif
.
http://www6.head-fi.org/forums/showp...58&postcount=9
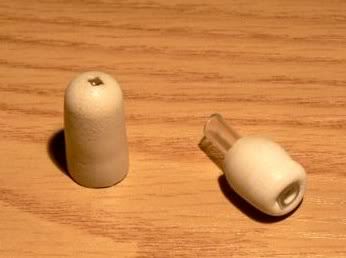
 
Apr 4, 2006 at 12:24 AM Post #17 of 244
Quote:

Originally Posted by The_Duke_Of_Eli

All the foamies here I've seen use the standard 1/8" inch tubing (which I want to find in Toronto! where can I get this?). I've been using 1/4" tubing which really opens up the sound and makes a noticeable difference over the stock yellow foamies.


Tubing: try a pet store (aquarium tubing), hardware store or a scientific supply store, eg, VWR (sorry US site, but you could probably back track to a Canadian site):

http://www.vwrsp.com/catalog/product...ight=63012-445
 
Apr 4, 2006 at 6:50 PM Post #18 of 244
Quote:

Originally Posted by Irregular Joe
For making the holes in the foam, I jabbed a hot nail through the (non-frozen, non-flattened) foam - it seemed to do the job well enough.
[/url]


Thanks for the hot-nail technique. I was wondering how that might turn out.
very_evil_smiley.gif
 
Apr 4, 2006 at 8:41 PM Post #19 of 244
Quote:

Originally Posted by jSatch
Thanks for the hot-nail technique. I was wondering how that might turn out.
very_evil_smiley.gif


No problem. Be sure to make the nail really hot though, like by fire. I used a lighter that was running out of fluid, so I didn't really heat up the nail as much as it should have been - the result was that the first half of the foam went through nice and easy, while the second half needed to be pushed a little harder through.
 
Apr 4, 2006 at 10:49 PM Post #20 of 244
This thread is a follow-up from another thread “Make Your Own Shure and UM2 Foamies!” started by noorudeenshakur.

Because the original thread had branched out well beyond Shure and UM2 foamies, there may be many Head-Fi’ers that have missed this interesting DIY project. I am hoping here to start a new thread for a wider audience; perhaps participants can join in with their particular phones and construction tips. I am using the Altec iM716 phones here, but I hope we can get feedback on Shures, Etymotics (should be comparable to Altecs tubes), Westone UMs, UE Super.Fis, etc. It would be interesting to see if this method is also applicable to ear canal phones like the Senn CX300, Creative EP630, Sony EX series, etc.

The basic concept put forth by noorudeenshakur was that foam ear tips are fundamentally earplugs with a hole in them for ‘audio’ tubing to bind the foam tip with the phone, and for sound passage. The thread then went on to explore homemade foam ear tips.

Although the original thread was an effort to DIY to save money on tips, an important outcome of this project, at least for me, was the ability to try many earplugs to see which fit my ear canal the best.

Supplies:
Earplugs: Please take a look at the Ear Plug Store. The link to this store is at the top of this page under Head-Fi Sponsers. This store will sell from single pairs to thousands of pairs of earplugs. The advantage here is that you can try many different flavors to see which you like best before proceeding to buy a bunch of your favorite.

I’ve been experimenting with 3 earplugs: (1) E-A-R Classics, the yellow ones that look similar to the Large Ety ER4 tips; (2) Hearos super soft, thought to be similar to the Westone Comply tips; and (3) the 3m 1100s, which to me appear similar to the picture of the ETY ER6i medium size foam tips.

Tubing: As per dvallere, from the aforementioned thread, try aquarium tubing from a pet store. Other options include hardware stores or laboratory supply stores (Fisher, VWR, etc). Best bet, just use the tubing from your worn out tips. The latter is especially true if you have dual driver IEMs. The tube length may, just a guess, be phase coherent.

Construction:
Making the hole: Not as easy as it sounds. These things are very soft, it’s not like drilling wood. Noorudeenshakur and others have used hole punchers (please refer to that thread for details and links). Some, including myself, have tried simply compressing the earplug into a coin-like size and drilling. I found this method did not give the best results. Maybe others fared better with hole punchers. In fact, the very soft Hearos plugs never retained their original shape and ended up looking like a piece of Juicy Fruit gum on a tube using the flatten and drill method [Update. See pictures on post #28 for this]. I believe noorudeenshakur also preferred the E-A-R Classics (stiff PVC) to the urethane, tapered plugs possibly because of undue compression on the soft urethane with his hole punching method. One could also employ a red-hot poker and push it through, but I’ll leave that for another day.

I would recomend the excellent advice of Sugarfried (from the Shure company- how cool is that!!) from the original thread, and freeze the plugs. Pretty simple- squeeze the air out of the plugs, throw them in water until they expand, then toss them into the freezer. Even the contoured tips of the soft urethane Hearos and the 3M 1100s were easy to work with like this. In a rigid, frozen state they are also easier to cut shorter, if you wish. Thank you Sugarfried!!! But please wear gloves, in case you slip.

Tubing: Always cut the final tubing so it will be shorter than the earplug. You don’t want the tube to scratch your ear canal. This could not only be irratating, but could also make it prone to infection.
To insert the tube, place it over the shaft of an appropriately sized jewelers screwdriver and twist it through the plug. I placed a longer piece into the plug while it was still frozen, that is a piece that was long enough to stick out on both sides of the plug. I pulled it out and cut it shorter later, after the plug dried. It just seemed easier to insert the tube the first time with a frozen plug- no compression as opposed to trying to jam the tube/screwdriver through a non-frozen plug.
UPDATE: Many people find the most difficult part of this DIY procedure is getting the tubing. Of course, the tubing from your old foamies can be scavenged from that set and used here.

Gluing: After they dried I tried gluing the tubes into the E-A-R Classics using Crazy Glue. Bad idea. The glue dried out and ruined the foam as well as the elasticity of the tube. I would recommend cutting a smaller, tighter hole and nixing the glue. Perhaps someone can recommend another glue that works well here. Perhaps I applied too much.

The Sound: This , of course is the critical part. The E-A-R Classics sound remarkably similar to the supplied, stock foamies of my Altec iM716s (Etymotic clones). So far, so good.
biggrin.gif


Different from the coarse, open cell PVC foam of the E-A-R Classics are the smoother, less stiff urethane derivatives. The Hearos are very soft and the most comfy. But these were just too small for my large ear canals. The 3M 1100s are denser than the Hearos, and a slightly wider diameter that I needed. Importantly, the bass and fundamentals really came out with these. They were, to my ears, better than the PVC foamies and the silicon flange tips. The urethane may also have a longer compression / expansion lifetime as it appears to be a denser and less open cell structure (smoother too) than the PVC ear plugs. But then, this is just my experience with these. Your results may vary.

Anyway, I am happy to have tried this little experiment; it worked out well for me. But then, I kinda like DIY stuff. And this was pretty simple. If you are considering this solely to save money, let me say unless you go through these tips like toilet paper, a dollar a pop for a professionally finished tip is not a bad deal.

Looking forward to other comments for other models of phones.

etysmile.gif


(I'll have to post a photo at another time. Haven't figured out how to reduce the photo to the 25kb limit yet.)
 
Apr 19, 2006 at 12:14 AM Post #21 of 244
Update-

I got some Howard Leight Max plugs.

These are Red urethane plugs and they sound Hot, Hot, HOT!

My old faves, the 3Ms, needed some fidgeting to get them to properly seal in my large ear canal to get that bass boost I mentioned. They were also a little stiff (dense) compared to other, softer urethane plugs.

The Red-Max is an interesting plug. For average ear canals, keep the tapered end and trim off the flanged back-end. For us big eared guys, chop off the tapered end and use the large flanged end. The good part about this flanged end is that you can push it forward after inserting the phone into your ear and really seal it off.

Anyway, better seal, and even better bass than what I could get out of the 3Ms.

Red-HOT!
very_evil_smiley.gif
 
Apr 19, 2006 at 12:21 AM Post #22 of 244
Anyone want to buy a big ass box of yellow E-A-R Classic foam plugs? These are the exact ones Shure uses (and if they are not, then they have the exact same texture, color, size, smell, etc)
The box originally had 200 pairs of foamies, there's probably 190 pairs now.
 
Apr 19, 2006 at 12:25 AM Post #23 of 244
Quote:

Originally Posted by jSatch
Update-

I got some Howard Leight Max plugs.

These are Red urethane plugs and they sound Hot, Hot, HOT!

My old faves, the 3Ms, needed some fidgeting to get them to properly seal in my large ear canal to get that bass boost I mentioned. They were also a little stiff (dense) compared to other, softer urethane plugs.

The Red-Max is an interesting plug. For average ear canals, keep the tapered end and trim off the flanged back-end. For us big eared guys, chop off the tapered end and use the large flanged end. The good part about this flanged end is that you can push it forward after inserting the phone into your ear and really seal it off.

Anyway, better seal, and even better bass than what I could get out of the 3Ms.

Red-HOT!
very_evil_smiley.gif


Post pictures of them! I want to see!
 
Apr 19, 2006 at 1:43 AM Post #24 of 244
jSatch, a couple posts back you made a comment about the urethane compression method not coming out right. Now that I have UM2s and not the Super.fi, I am able to use my Japanese screw punch that I formerly used for bookbinding. I am using the 3mm tip. Compressing the "Spark Plug" and punching it with the screw punch has given me these near-flawless foamies. I have already used them 3-4 times with no significant loss of compressibility.

The pics are bad, I know; with a flash I got nothing but white, and without the flash (even on macro) it comes out horribly blurry. This has been a problem ever since I got the camera; any of you camera buffs have any suggestions?

The only problem with these particular foamies is that I used the tubing from long Complys, but made the foamies the size of the short Complys since those are the ones that fit my ears better. So there is a smidgen of tubing sticking out on the 'eardrum' end of the foamie.

foamie1.jpg


foamie2.jpg
 
Apr 19, 2006 at 3:03 AM Post #25 of 244
Quote:

Originally Posted by dvallere
jSatch, a couple posts back you made a comment about the urethane compression method not coming out right. Now that I have UM2s and not the Super.fi, I am able to use my Japanese screw punch that I formerly used for bookbinding. I am using the 3mm tip. Compressing the "Spark Plug" and punching it with the screw punch has given me these near-flawless foamies. I have already used them 3-4 times with no significant loss of compressibility.


Dear dvallere,

Yes, the foamies look absolutely perfect. Congratulations! I should take a picture of the Hearos Super-Softs I made by compression then drilling, just for laughs.

I'm glad this method worked so well. Nice to have alternatives, especially those that don't require drying out for a day.
biggrin.gif


So, please tell me, what is a Japanese screw punch???

How do you like the Spark Plugs? Are they lasting as long as your stock tips? Sound as good?

They sure look cool. Almost too bad to have to hide them in your ears.

Thanks-
 
Apr 19, 2006 at 4:03 AM Post #27 of 244
Quote:

Originally Posted by jSatch
Dear dvallere,

So, please tell me, what is a Japanese screw punch???

How do you like the Spark Plugs? Are they lasting as long as your stock tips? Sound as good?


The Japanese screw punch (sounds like a karate move) is a short-handled device where you put the correct size tip on, align it vertically (perpendicular to) over the foamie - or whatever object you are punching - and press down. Inside the handle is a screw mechanism which basically rotates the punch tip a few times in order to score out the hole you're trying to make. But since it is all contained within the handle, you don't need to worry about injuring the fingers, and you don't need a mallet or a special surface to work on. It takes about as much pressure as a regular one-hole paper punch would take. It's just a bit weird getting started because your inclination is to shift the handle when the screwing action starts (it feels like your project is going to slide out from under the punch, but it won't). Just keep it steady and it will work fine.

I like the Spark Plugs a lot. They remind me of my failed UM56s (pretty colors). They have that nice soft feel, and one of the pluses is that when compressed, they stay compressed a little longer than the stock Complys do. Since I have long nails, it's always hard for me to get the UM2 into my ear (especially my right ear) before the foams uncompress. With the Spark Plugs I have a few more seconds to work it before they expand. SQ is excellent, I'd say it ranks on a par with the Complys and just above the tri-modded-biflange.

Cheers,

D.
 
Apr 19, 2006 at 5:32 AM Post #28 of 244
Quote:

Originally Posted by jSatch
Dear dvallere,

I should take a picture of the Hearos Super-Softs I made by compression then drilling, just for laughs.


P1020694.jpg


RIGHT: Early attempt to work with the Hearos Super-Soft; a.k.a. Juicy Fruit on a tube. I compressed this with my thumb until is was flat as a coin and then drilled. It spun around like a flying saucer. Then I stretched it over the tube, as shown. Pretty funny, but not very pretty.

LEFT: Freeze and drill method. Looks much more like the original earplug.

Sure wish these fit my ears. They are very soft and cushy.
 
Apr 19, 2006 at 5:58 AM Post #29 of 244
Quote:

Originally Posted by n1cx
Post pictures of them! I want to see!


P1020691.jpg


Sorry, not good pics. Funny (ugly) color rendition. See this link for a better idea what these look like: http://earplugstore.com/foam_plug_information.htm

These are Howard Leight Max plugs.

Top: Left, Tapered tip half of plug; Right, the other half. Center, Flanged back (~2/3) section of the plug.

Bottom: Flanged back (~2/3), and Tapered tip sections mounted on iM716 phones. (Note- The mounted tapered tip looks a little bloated as it was just stretched over the tube after removing the larger flanged, back end, that I routinely use- pictured top, center. I made the initial hole too small in the tapered tips, but as the seal was better for me with the flanged end, I never bothered to correct it.)

For average ears the ‘Tapered’ section should be perfect. For elephantitis ear canals, like mine, the 'Flanged', or more correctly, 'Flared', sections are nirvana. FYI- the smaller, ½ flanged back (top, right) worked just as well as the 2/3 size (mounted and center, top).

The SQ is very much improved over stock PVC foamies, as is the comfort factor, and the plugs are not seen while in-ear, so they won't clash with your 'outfit' (for those of you who prioritize such matters).

Actually, the very vivid, hot color of these tips looks really cool in person.

Black is sooo, well, boring.

And hey, they should be pretty hard to lose!
biggrin.gif
 
Apr 20, 2006 at 12:09 AM Post #30 of 244
More pics, different camera:

Howard Leight 'Max' plugs on Altec iM716.

Still some orangeish color issues, but closer to reality than the earlier drab-orange set of my last post.

Here is a link to the Howard Leight site where you can better see the color and tapered shape of these plugs: http://howardleight.com/products/products2.asp?id=4#

As you can see from the Howard Leight picture, the top 1/2 - 2/3 would be ideal for small to medium ear canals, whereas the bottom 1/2 - 2/3 for larger ear canals. Also, the length of mine in the picture can (and will, eventually) be trimmed down without loss of SQ.

I think the core, or midsection, of the plug is about the same size as most other plugs (E-A-R Classic, stock foamies, etc), if not smaller and softer, but the flange section at the end can really seal off the ear canal, even a large one. The tapered aspect, not unlike you ear canal, is probably similar to custom tips in that respect. Also because of the tapered size, it seals off without it feeling like you're jamming an ever expanding roll of tiolet paper into the smaller, deeper part of your ears. OK, OK. But I think those of us that use foamies understand that feeling.

These puppies are VERY comfy.

Increased comfort, increased seal, much improved SQ, and 99 cents for 10 pair on eBay ($3 incl shipping).

Life is good!

P4190011.jpg


P4190012.jpg
 

Users who are viewing this thread

Back
Top