You are using an out of date browser. It may not display this or other websites correctly.
You should upgrade or use an alternative browser.
You should upgrade or use an alternative browser.
Home-Made IEMs
- Thread starter Bilavideo
- Start date
Mogol
New Head-Fier
- Joined
- Oct 24, 2016
- Posts
- 32
- Likes
- 30
Anyone can help me pointing the right way to cut my impressions?
My 2 cents. (Based on the experience of communicating with an audiologist).
As you can see in your photo, the second bend is about where the red line is. Cut it there, plus a couple of millimeters towards the eardrum. The blue arrow is the direction of the last part of the ear canal. Your cut must be as perpendicular as possible to this direction. Also, I would smooth the area circled in yellow. In order to be easier to insert.
As for the rest of the impression. I messed up a lot of impressions with a knife. So now I only form them with a Dremel. Carefully, step by step, millimeter by millimeter and soon you will see the shape of your beautiful future IEM. Do not forget about the place for the connector. And constantly compare the left and right impressions.
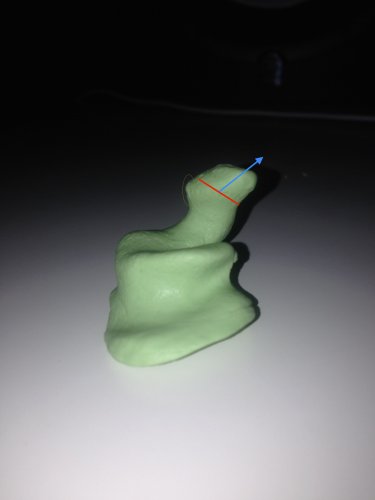
Good luck.
Last edited:
CJFreeman
New Head-Fier
Anyone here familiar with Dreve Fotosil and Klarsil-H investment materials? I've done a ton of searching but I can't seem to figure out which is better for UV curing and if the negative molds created can be stored and reused. I emailed Dreve USA and Warner Techcare a day or two ago but have not got a response. Also, which gun and mixing tips from Warner would I need to use the cartridge version of those materials?
On a side note, I would like to thank everyone who has contributed to this thread. All the work you guys have done and subsequently shared has been invaluable.
On a side note, I would like to thank everyone who has contributed to this thread. All the work you guys have done and subsequently shared has been invaluable.
I've semifinished my IEM cable for my next build. Here are some photos 


I've used a 8 core OCC plated silver of 19 strands of 0.08mm wire with a silver plated 3.5mm L-shaped jack. I used 4:1 heatshrink with glue walls to seal the jack and for the Y splitter. As for the braids, the 8 strand braid was premade (it is square shaped and not made by Acrolink!) and the 4 strand for the L and R channel is a normal round braid made by myself.
I couldn't wait more to make it all at once, so I started by the cable. Superbuy has finally sent my parcel and I'll receive it in 20 days or less. All the speakers are there :3
The speakers that I bought are:
I hope this doesn't fail miserably. What do you think of my build?


I've used a 8 core OCC plated silver of 19 strands of 0.08mm wire with a silver plated 3.5mm L-shaped jack. I used 4:1 heatshrink with glue walls to seal the jack and for the Y splitter. As for the braids, the 8 strand braid was premade (it is square shaped and not made by Acrolink!) and the 4 strand for the L and R channel is a normal round braid made by myself.
I couldn't wait more to make it all at once, so I started by the cable. Superbuy has finally sent my parcel and I'll receive it in 20 days or less. All the speakers are there :3
The speakers that I bought are:
- 2 Sonion 33AP007
- 2 Bellsing 28507 (Knowles 28507 copy)
- 4 Bellsing 30095 (Knowles 30095 copy)
- 2 unbranded 9.2mm dynamic drivers for the lower bass.
I hope this doesn't fail miserably. What do you think of my build?
Last edited:
Lucas Taboada
Head-Fier
My 2 cents. (Based on the experience of communicating with an audiologist).
As you can see in your photo, the second bend is about where the red line is. Cut it there, plus a couple of millimeters towards the eardrum. The blue arrow is the direction of the last part of the ear canal. Your cut must be as perpendicular as possible to this direction. Also, I would smooth the area circled in yellow. In order to be easier to insert.
As for the rest of the impression. I messed up a lot of impressions with a knife. So now I only form them with a Dremel. Carefully, step by step, millimeter by millimeter and soon you will see the shape of your beautiful future IEM. Do not forget about the place for the connector. And constantly compare the left and right impressions.
Good luck.
Thanks a lot!!!
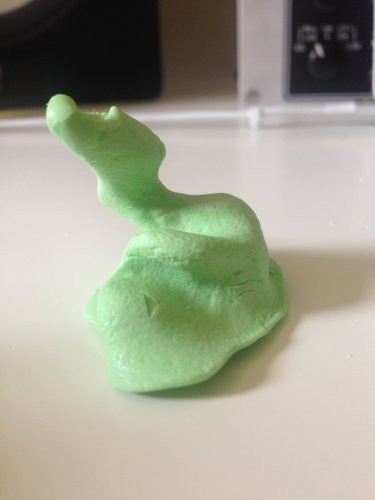
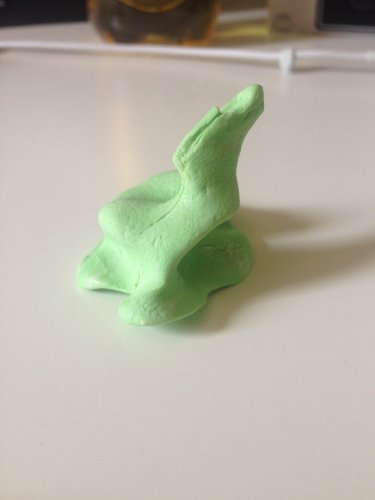
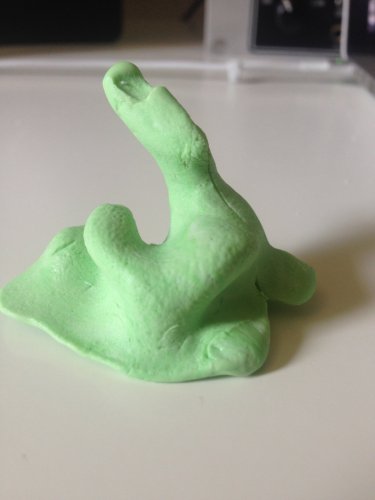
I forgot to put the photos from the other impression, that one seems more difficult to me:
alanwcruz
Head-Fier
- Joined
- Jan 29, 2016
- Posts
- 65
- Likes
- 118
What do you guys recommend to make the wax more smooth? mine is forming some drops and getting a little bit marked. Already tried different temperatures, at higher ones this happen more often


Pull them out ear canal first, with the flat side facing downward. You may have to bend the wire you're using to look like a fishing hook.
Mogol
New Head-Fier
- Joined
- Oct 24, 2016
- Posts
- 32
- Likes
- 30
What do you guys recommend to make the wax more smooth? mine is forming some drops and getting a little bit marked. Already tried different temperatures, at higher ones this happen more often
Do not try to completely avoid these drops. The ear canal must be smooth. And any drops on the rest of the impression you can grind after the shells are ready.
And yes:
Pull them out ear canal first, with the flat side facing downward.
Also, what kind of wax do you use?
alanwcruz
Head-Fier
- Joined
- Jan 29, 2016
- Posts
- 65
- Likes
- 118
cyph3r
100+ Head-Fier
- Joined
- Aug 7, 2011
- Posts
- 109
- Likes
- 46
I am planning on painting/ varnishing my IEMs with different colours. Anyone's got a hint which type of colours to use? I am particularly interested in proven skin friendly materials and where to get them.
Thanks
Philipp
Thanks
Philipp
alanwcruz
Head-Fier
- Joined
- Jan 29, 2016
- Posts
- 65
- Likes
- 118
I am planning on painting/ varnishing my IEMs with different colours. Anyone's got a hint which type of colours to use? I am particularly interested in proven skin friendly materials and where to get them.
Thanks
Philipp
Go to youtube and checkout what the girls accomplish with nail gels.
Lucas Taboada
Head-Fier
Also, what kind of wax do you use?
I'm using this wax (Pink wax 7 for dentists): https://www.dentalcremer.com.br/Assets/Produtos/SuperZoom/331875.jpg
I managed to reduce the drops by pulling the ear canal first and using the wax with a little low temperature, thanks!!
Attachments
Lucas Taboada
Head-Fier
Here's my first pair of shells! 
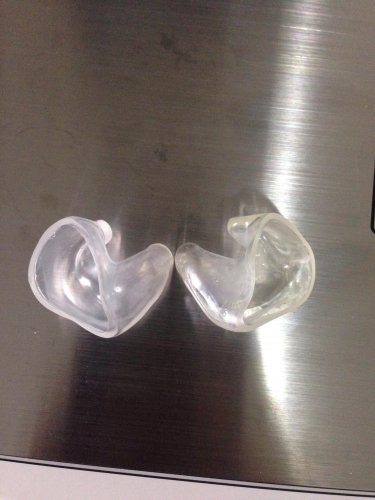
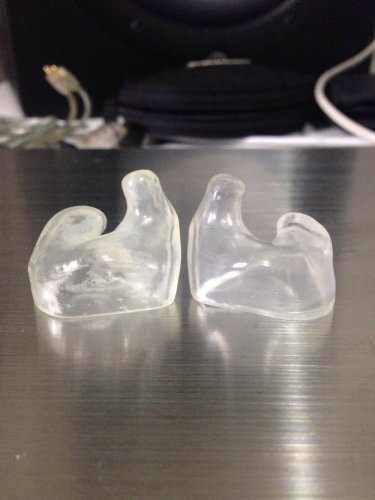
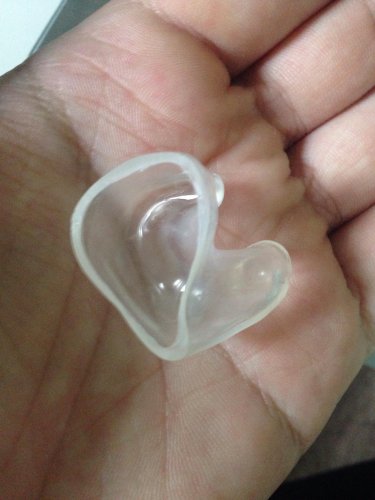
They are made with Nail Top Coat UV, I've had some problems making these shells: it took me 12 minutes to cure the first time, then i poured the excess and cured for more 10 minutes, after that I did the glycerin bath for more 10 minutes. Even with this long time at the first cure and turning yellow, my shells turn out a little bit thin I think (1,5mm) and my gelatin started to melt with the heat too. Anyone have tips on deal with this?
Other problem, even after the full cure process, the shells are a little flexible, not completely hard how I expected. This has to do with the material or thickness? To me the Nail Top Coat UV looks more like a plastic then acrylic. I'm trying to get some Fotoplast, but it's difficult to find it here. So if anyone have some thoughts on how to improve the quality with this material would be awesome. At least until I get my hands on Fotoplast.
Last question: What are the diameter you guys are using for your tubes? 1.5mm(int)/2mm(ext) for attach to the driver and damper, and then 2mm(int)/3mm(ext)? They are made from PVC, silicone or nylon?
sanekn
100+ Head-Fier
- Joined
- Mar 17, 2016
- Posts
- 111
- Likes
- 52
Here's my first pair of shells!


They are made with Nail Top Coat UV, I've had some problems making these shells: it took me 12 minutes to cure the first time, then i poured the excess and cured for more 10 minutes, after that I did the glycerin bath for more 10 minutes. Even with this long time at the first cure and turning yellow, my shells turn out a little bit thin I think (1,5mm) and my gelatin started to melt with the heat too. Anyone have tips on deal with this?
Other problem, even after the full cure process, the shells are a little flexible, not completely hard how I expected. This has to do with the material or thickness? To me the Nail Top Coat UV looks more like a plastic then acrylic. I'm trying to get some Fotoplast, but it's difficult to find it here. So if anyone have some thoughts on how to improve the quality with this material would be awesome. At least until I get my hands on Fotoplast.
Last question: What are the diameter you guys are using for your tubes? 1.5mm(int)/2mm(ext) for attach to the driver and damper, and then 2mm(int)/3mm(ext)? They are made from PVC, silicone or nylon?
It's an awesome work mate! Btw you can buy fotoplast at ali now (soundlink shop). I pmd you with the link!
Last edited:
alanwcruz
Head-Fier
- Joined
- Jan 29, 2016
- Posts
- 65
- Likes
- 118
Here's my first pair of shells!


They are made with Nail Top Coat UV, I've had some problems making these shells: it took me 12 minutes to cure the first time, then i poured the excess and cured for more 10 minutes, after that I did the glycerin bath for more 10 minutes. Even with this long time at the first cure and turning yellow, my shells turn out a little bit thin I think (1,5mm) and my gelatin started to melt with the heat too. Anyone have tips on deal with this?
Other problem, even after the full cure process, the shells are a little flexible, not completely hard how I expected. This has to do with the material or thickness? To me the Nail Top Coat UV looks more like a plastic then acrylic. I'm trying to get some Fotoplast, but it's difficult to find it here. So if anyone have some thoughts on how to improve the quality with this material would be awesome. At least until I get my hands on Fotoplast.
Last question: What are the diameter you guys are using for your tubes? 1.5mm(int)/2mm(ext) for attach to the driver and damper, and then 2mm(int)/3mm(ext)? They are made from PVC, silicone or nylon?
Get yourself a UV LED strip that's 365nm and build yourself a curing chamber, just wrap it around the inside of a small empty paint can. With this you'll be able to cure shells in around 20-30 seconds and avoid getting foggy shells.
Here's a shell I made sometime ago using nail UV gel and curing with LED light.
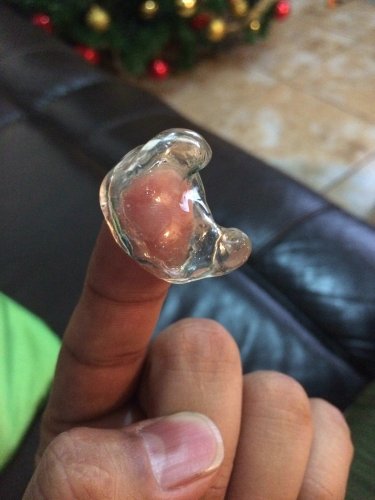
LED lights help avoid yellowing although I've found that the yellowing tends to fade away after a couple of days, it doesn't totally loose the yellow tint but it gets to a point where it no longer has that ugly golden glow.
For the dampers to fit, you need a tube with a 2mm inner diameter, aside from that it's up to personal preference, I normally use 1mm inner diameter for mid/low frequencies and 2mm inner diameter for high frequencies. Soundlink at ali also have these tubes.
Last edited:
Users who are viewing this thread
Total: 10 (members: 0, guests: 10)


