Thanks for all the interest. Drivers are going to pace88.
You are using an out of date browser. It may not display this or other websites correctly.
You should upgrade or use an alternative browser.
You should upgrade or use an alternative browser.
Home-Made IEMs
- Thread starter Bilavideo
- Start date
et.haan
100+ Head-Fier
Hopefully receiving my drivers soon, but in the mean time, anybody have a zobel for Sonion 38D1XJ or sonion 2389D
Not dedicated to series or paralel, so take that as you will
Not dedicated to series or paralel, so take that as you will
dhruvmeena96
Headphoneus Supremus
alanwcruz
Head-Fier
- Joined
- Jan 29, 2016
- Posts
- 65
- Likes
- 118
et.haan
100+ Head-Fier
nice, what printer? What resin?
I have so many questions. How did you do the scans? Photogrammetry? How is the comfort, can you feel the layer lines/pixel artifacts? What resin, what printer?
alanwcruz
Head-Fier
- Joined
- Jan 29, 2016
- Posts
- 65
- Likes
- 118
nice, what printer? What resin?
I have so many questions. How did you do the scans? Photogrammetry? How is the comfort, can you feel the layer lines/pixel artifacts? What resin, what printer?
@et.haan Elegoo Mars using Elegoo transparent blue.
@eunice yup, used photogrammetry, though I had to paint my impressions with some green and black chalk spray paint to get good results, comfort wise they are much more comfortable that my previous manually made shells, but I think this has more to do with the digital post processing on the scans since I apply a coat of lacquer after everything is printed and assembled. Assembly is a million times easier, having perfect bores and consistent shell width makes things very very easy.
et.haan
100+ Head-Fier
Here is what I am thinking - Sonion 38D1x - parallel (6 ohms DC)
zobel - 135uF cap (130uF MLCC's will be bought) + 7.625ohm resistor (7.68 will be bought
Lowpassed at 150hz - (RC components will be bought once impedance with Zobel is mapped
Sonion 2389D - series - I still need inductance values for Zobel (8 in series ohms DC) (I contacted Sonion)
Bandpass from ~300hz to 7khz
Connect these two in series for 36ohm AC resistance average
L pad or U pad (would appreciate recommendation) both 15db
Est65da01 highpassed 8khz
I read somewhere it doesnt need zobel, and besides, the Inductance looks pretty good
Connect these two, in series, for a 56ohm output at the 2pin
Anybody see any problems
Impedence will be pretty flat
Only 3b/octave, unless you guys think otherwise
Last edited:
et.haan
100+ Head-Fier
Defintely interested in this process. Did you wax and trim the impressions, or just trim them? Do they extend pass the second bend? I love the fit of past the second bend, but its a real pain to get to feel right with wax. It took me like 15-20 dip attempts for nice (even) comfort.@et.haan Elegoo Mars using Elegoo transparent blue.
@eunice yup, used photogrammetry, though I had to paint my impressions with some green and black chalk spray paint to get good results, comfort wise they are much more comfortable that my previous manually made shells, but I think this has more to do with the digital post processing on the scans since I apply a coat of lacquer after everything is printed and assembled. Assembly is a million times easier, having perfect bores and consistent shell width makes things very very easy.
Lack3 lacquer? Individual bores, or did you do multiple holes in your CAD software
alanwcruz
Head-Fier
- Joined
- Jan 29, 2016
- Posts
- 65
- Likes
- 118
Defintely interested in this process. Did you wax and trim the impressions, or just trim them? Do they extend pass the second bend? I love the fit of past the second bend, but its a real pain to get to feel right with wax. It took me like 15-20 dip attempts for nice (even) comfort.
Lack3 lacquer? Individual bores, or did you do multiple holes in your CAD software
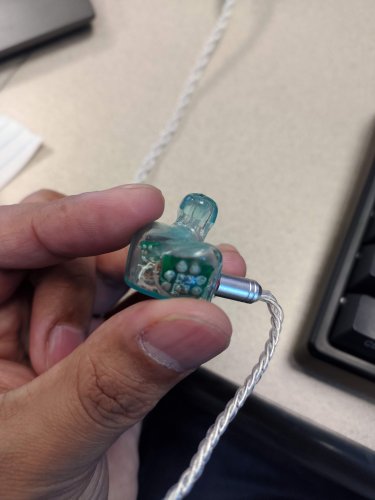
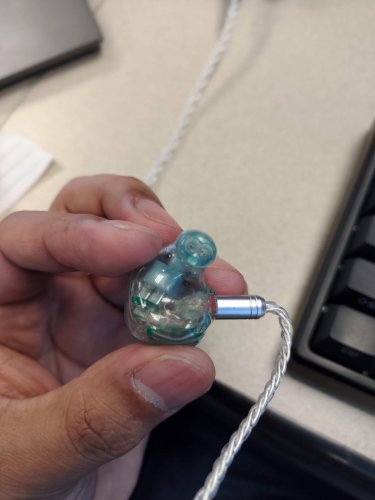
No wax and no trimming, these two steps were done on the 3D model, I made the cut on the model just above the second bend, on the 3D model I made a .6mm extrusion on the final 5-6mm of the canal and the fit is just perfect, not too tight not too loose, took me a couple of tries to get that parameter, I started with a .8mm extrusion and went down from there.
I made the MASM7 with two bores, both holes were done on the software side.
You can see both bores and the extrusion on the canal in these pictures:


et.haan
100+ Head-Fier
very interesting, very well done. I would love to try integrating tubes into the shell like a certain company does (65-1 audio)No wax and no trimming, these two steps were done on the 3D model, I made the cut on the model just above the second bend, on the 3D model I made a .6mm extrusion on the final 5-6mm of the canal and the fit is just perfect, not too tight not too loose, took me a couple of tries to get that parameter, I started with a .8mm extrusion and went down from there.
I made the MASM7 with two bores, both holes were done on the software side.
You can see both bores and the extrusion on the canal in these pictures:


Did you filet (or whatever your CAD calls it) the tip extrusion, to smooth the transfer between it and the canal?
alanwcruz
Head-Fier
- Joined
- Jan 29, 2016
- Posts
- 65
- Likes
- 118
very interesting, very well done. I would love to try integrating tubes into the shell like a certain company does (65-1 audio)
Did you filet (or whatever your CAD calls it) the tip extrusion, to smooth the transfer between it and the canal?
Sure did, it's called a smoothing deform. Any sharp corners on anything that has contact with your inner ear is very painful.
dhruvmeena96
Headphoneus Supremus
Did you like it..
Nice
Too much midrange though
sanekn
100+ Head-Fier
- Joined
- Mar 17, 2016
- Posts
- 111
- Likes
- 52
Users who are viewing this thread
Total: 11 (members: 0, guests: 11)


