TopPop
Headphoneus Supremus
This guide has been designed to provide a pictorial process for making custom silicone ear tips for your IEMs. Since I am beginning this thread before the tips have been completed, I can't say yet whether this method will actually work, but I'm going to make the guide anyway, so that people might be able to learn from my success/failure.
NB: I have tried to do the best that I can to find the safest method possible for making these tips. Be that as it may, I will not be held responsible for any harm that may come to you as a result of following this guide. Wear proper hand and eye protection, and use caulk in a well-ventilated area.
Step 1: Impressions
Since I have a friend who is an audiologist, I was fortunate enough to get a set of free impressions made (thanks, Kristen!
 ). That being the case, I thought it would be best if I started this little endeavor, so that I would be the one who would lose the least amount of money if the method fails.
Here are some pics of the (very good) impressions that were made for me late this afternoon:
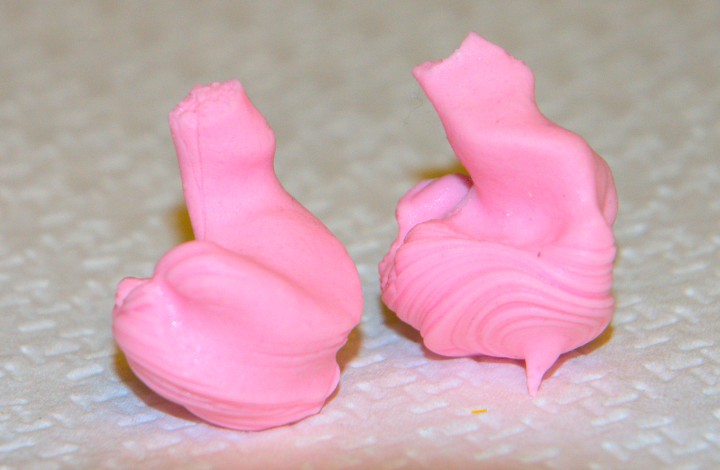
The impression in the left ear had to be done again, due to an improper seal from the first try (I think I was talking too much...).
I realized during the impression process that this is not something I would ever try to do myself. Firstly, and most importantly, it is far too dangerous to try to do what she did inside my ear. I trusted her because it's her job, but I would never trust myself to make some DIY impressions... and I wouldn't recommend any of you to do the same for yourselves. Get impressions made professionally! Secondly, I realized how difficult it would be to get a proper seal throughout the entire canal if I tried to do something like this myself. There is no way I could have done it properly, and without getting the impression done properly in the first place, I imagine that the entire tip-making process would be useless.
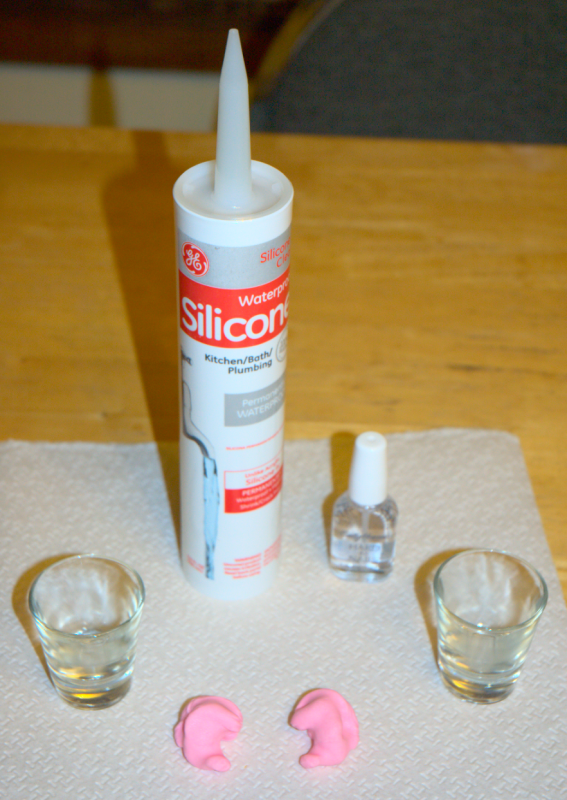
Step 2: Materials
Here is a list of materials that you will need if you want to follow the method laid out in this guide. I'm sure that some substitutions/improvements can be made, but here is what I have:
-Ear impressions (preferably, professionally made... see Step 1)
-100% silicone caulk (can be purchased at any home improvement store)
-Two shot glasses
-Acrylic nail polish
-Cooking spray
-Teflon tape
-Small tube (e.g. a drinking straw)
Step 3: Preparing impressions for the molds
For comfort reasons, my friend suggested that I round off the canal tips up to the first bend. I was able to do this with small scissors:
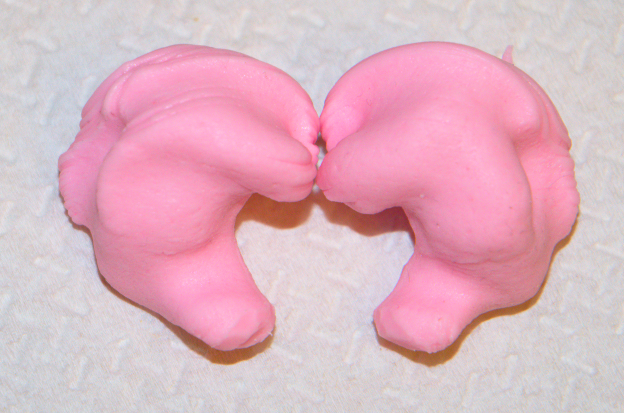
This is now the final shape that will be used for the mold. To help ensure that the impression material itself will be protected, apply a couple of layers of acrylic nail polish to the impressions (also recommended by my audiologist friend). Here are my impressions in all of their shiny glory:
The impressions are now ready for the molding process.
Step 4: Making the molds
If you haven't used caulk before, what you need to do is cut off the tip, and use a long nail to pierce the foil inside the top of the tube. If you don't have a caulking gun, a beer bottle set inside the bottom of the tube (with the neck of the bottle pressed against the tube bottom and the bottom of the bottle pressed against your chest) can also work.
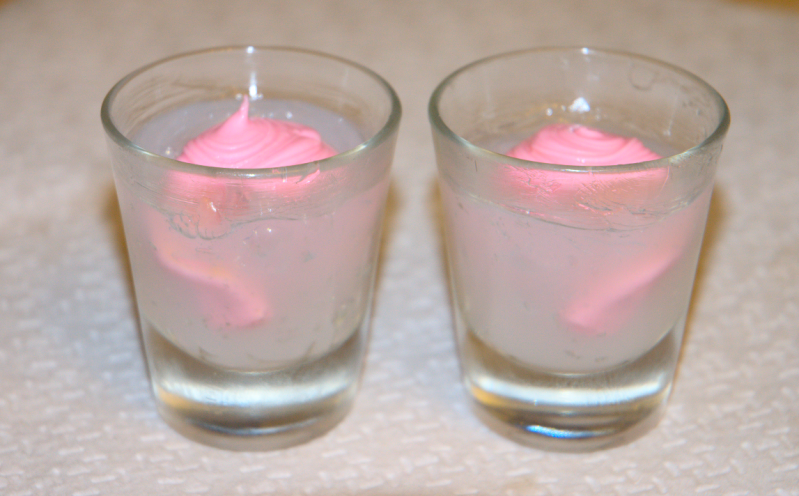
Fill a shot glass to about 2/3 with silicone caulk. Since the caulk is slightly viscous, it will retain its form and coil inside the glass. You will probably need to use your finger to make sure the caulk is filled in everywhere, leaving no air bubbles.
Once the shot glass is filled 2/3 with caulk, you are almost ready to put the impression inside. First, however, you need to spray the impression with cooking spray. This will help make sure that the silicone doesn't stick to the impression material. Now press the impression gently into the caulk, trying not to move it around too much, which might create air pockets.
Once the impression is set inside, remove the excess caulk that will have squeezed out around the sides of the top of the impression. Removing this excess caulk will help the impressions to slide out once the caulk has set, because the impressions won't be caught inside a casing of caulk.
Repeat for second shot glass and second impression.
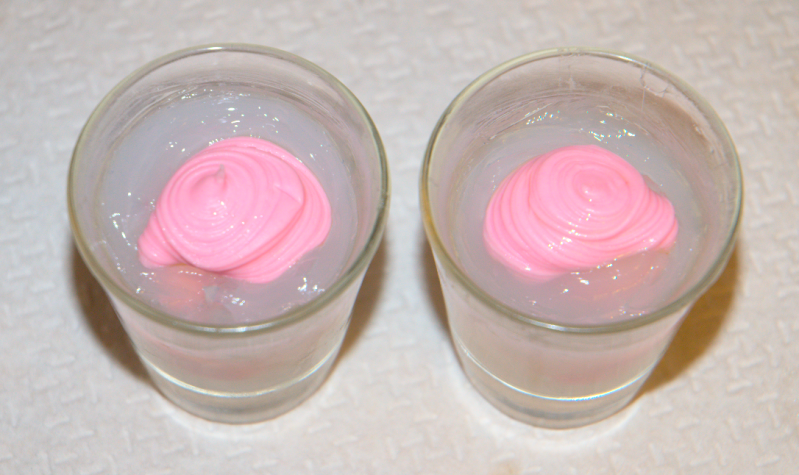
Once the molds are finished, place them in a well-ventilated area at room temperature. Let them cure for at least 24-hours. I might leave mine for longer, because I don't have a well-ventilated area to leave mine, so I'm putting them in the basement. It's colder than room temperature in my basement, which will slow the curing process.
UPDATE 1/14/10:
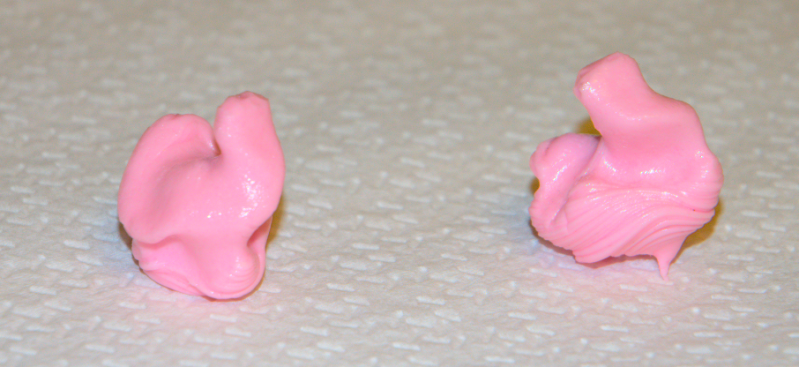
After leaving the molds to cure for 40 hours, I tried to cut them out of the shot glasses. This was when I realized that you shouldn't use shot glasses for this....
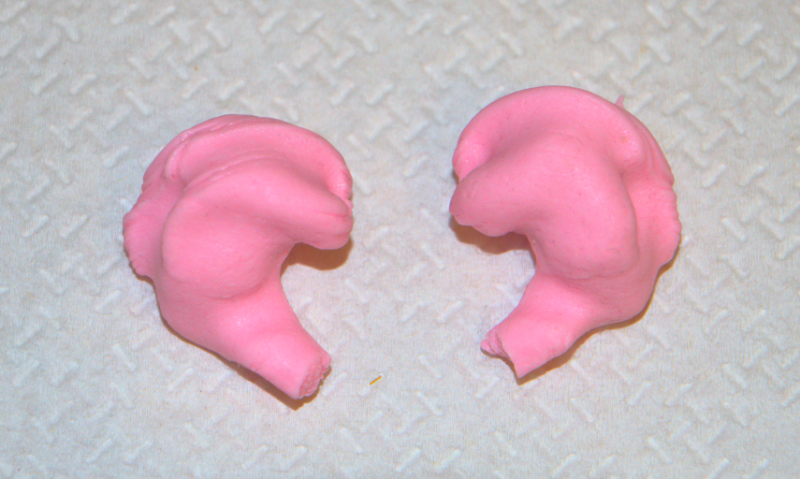
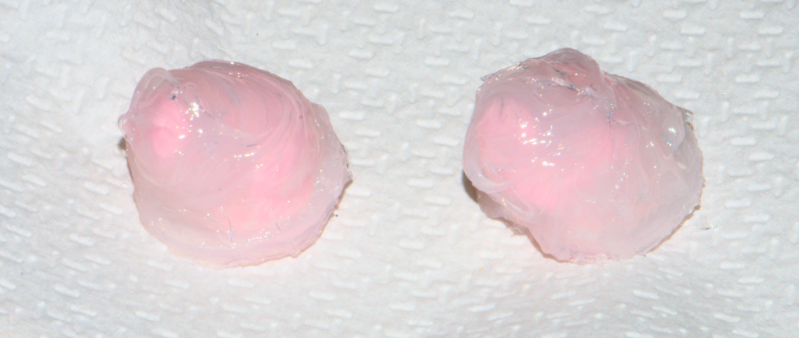
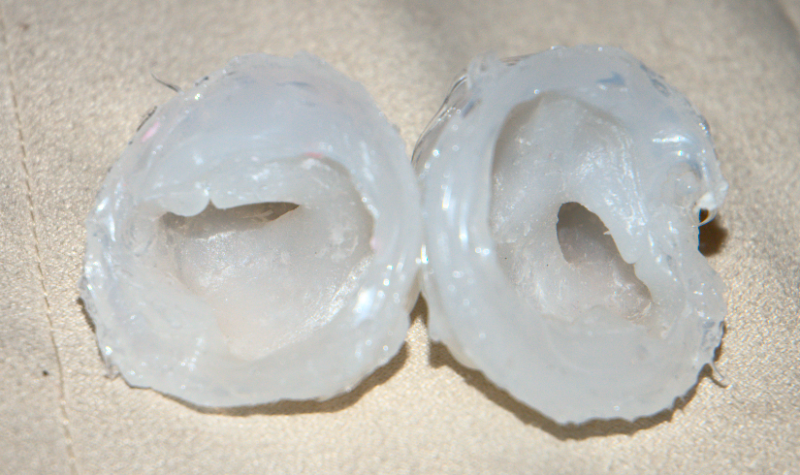
Since anything below the top skin of the silicone wasn't exposed to air (and, more specifically, moisture in the air), all of the silicone inside the mold was still in its fully uncured form. I decided to try a different route this time. I pulled out the impressions with the silicone that had cured to them, and added more silicone to the bottom of the impression with my finger, covering the whole impression. They look like this (upside down):
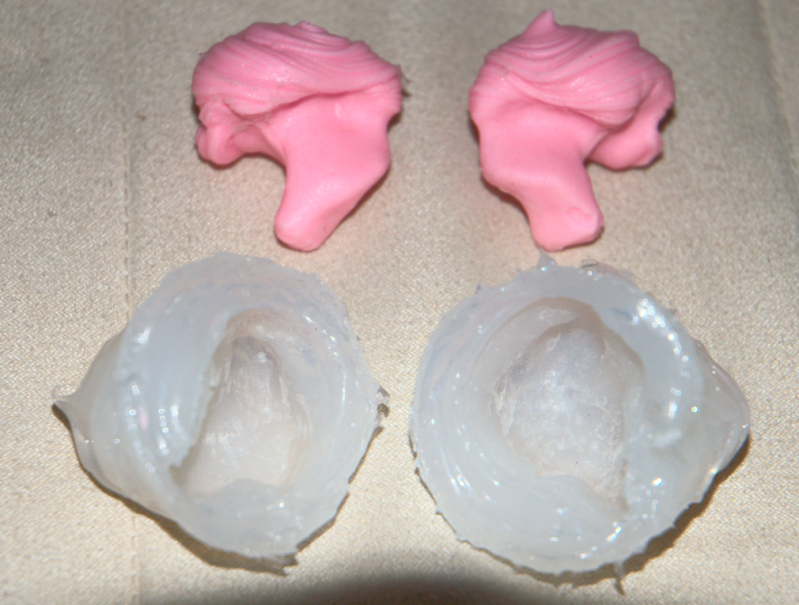
Now the result will be a sort of skin mold that goes over the impressions. I'm going to let these cure, upside down, for another 24 hours, and then try to remove the impressions.
And so it goes....
UPDATE 1/14/10 (at night):
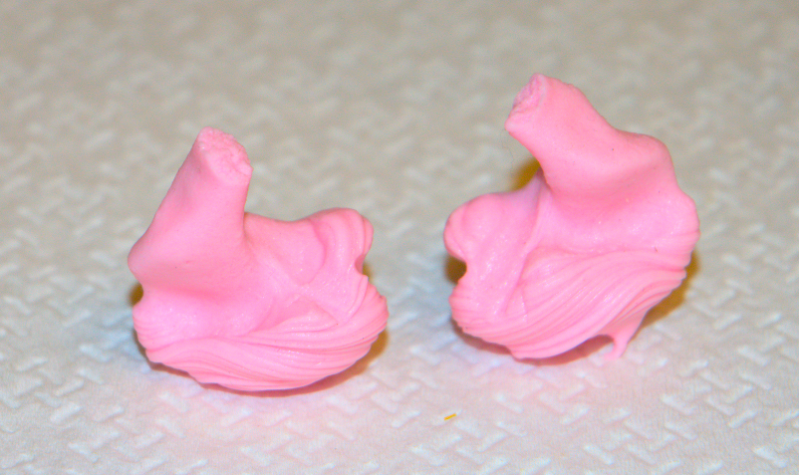
I was able to successfully remove the impressions from the molds tonight without any damage done to the molds or the impressions. Aside from a couple of tiny tears inside (and I mean tiny), it looks like the molds are pretty spot on. There was still some vinegar smell inside, which means the inside still needs to cure some more. I'm going to let them cure overnight, and then begin making the sleeves tomorrow!

Step 5: Preparing the IEMs for the sleeves
Here is where a little imagination can come in. I went over many different ways to do this in my head, and this was what I came up with. I'm sure there are better ways out there, but it's gotta start somewhere, right?

I ended up deciding to use a sound tube that would stay inside of the sleeves, instead of simply using something that would come out after the sleeves cured, leaving a negative-impression of the tube in the silicone to act as the sound tube. The main reason I decided to do this was because I thought it would help give some support to the part that went in the ear canal, instead of leaving a very thin wall of silicone caulk to provide its own support.
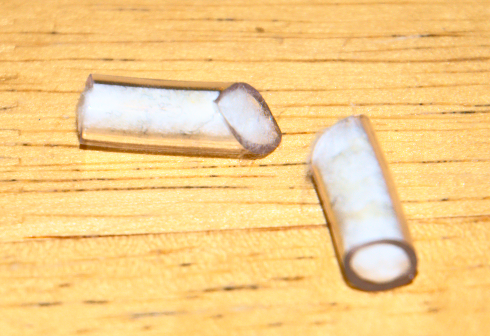
This meant that I needed to have a way of keeping the inside of the tube free from silicone, which I achieved by stuffing in cotton from q-tips (notice the angled cut on the tube, which will give a more-or-less flush fitting against the IEM sound tube):
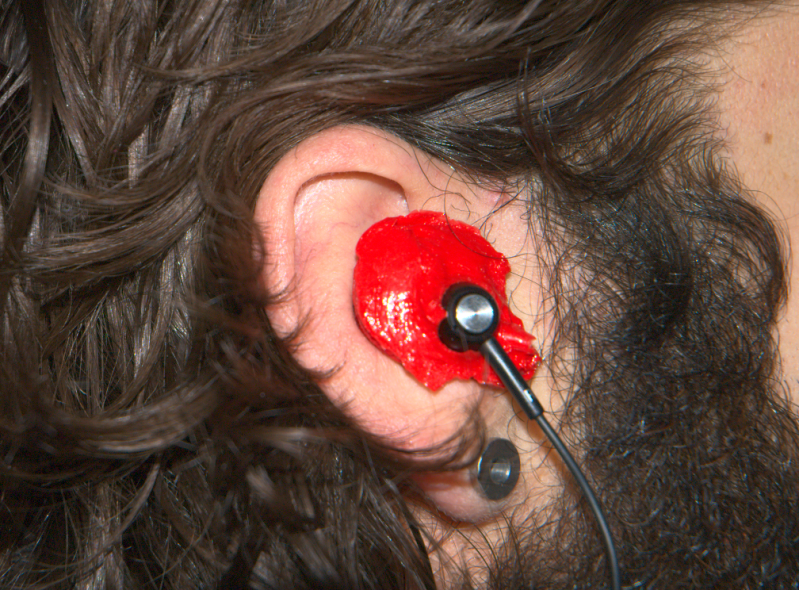
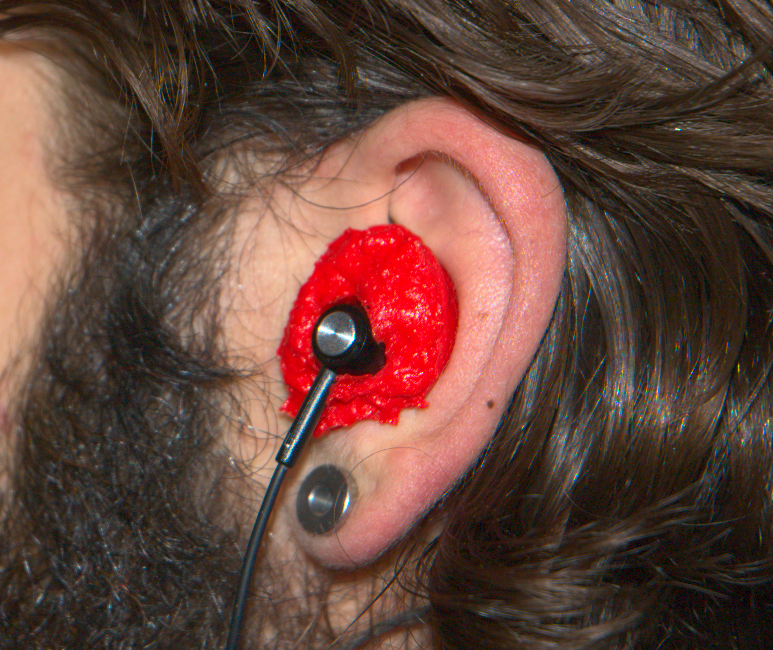
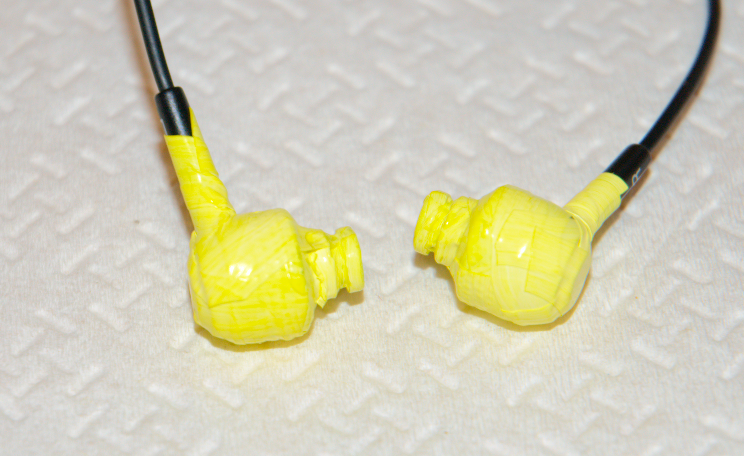
Also, I decided to keep the IEMs themselves (HiFiMan RE0, in this case) inside of the silicone while it was curing. However, I (obviously) wanted to make sure that the silicone didn't adhere to the IEM body. To do this, I chose to cover the IEM bodies with teflon tape, for two reasons: 1) it would be easy to remove afterward, and 2) it is thin enough that the lip of the IEM sound tube (the part that helps keep sleeves from falling off) would be included in the impression, as you can see in this picture:
Step 6 (optional): coloring the silicone
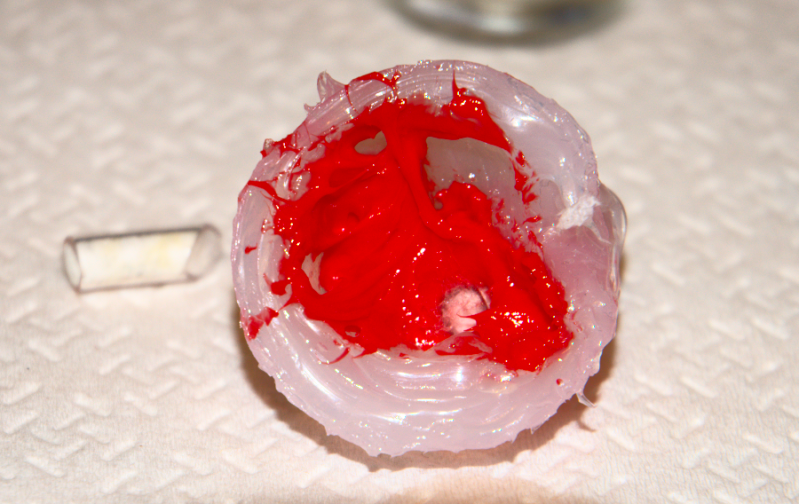
I also decided that I wanted to add a bit of flavor to my custom sleeves by adding some color. This part is really easy, although I'm not sure if I would do it again (I'll explain...). If you want to try this, just mix a small amount of acrylic paint with the silicone caulk, like so:
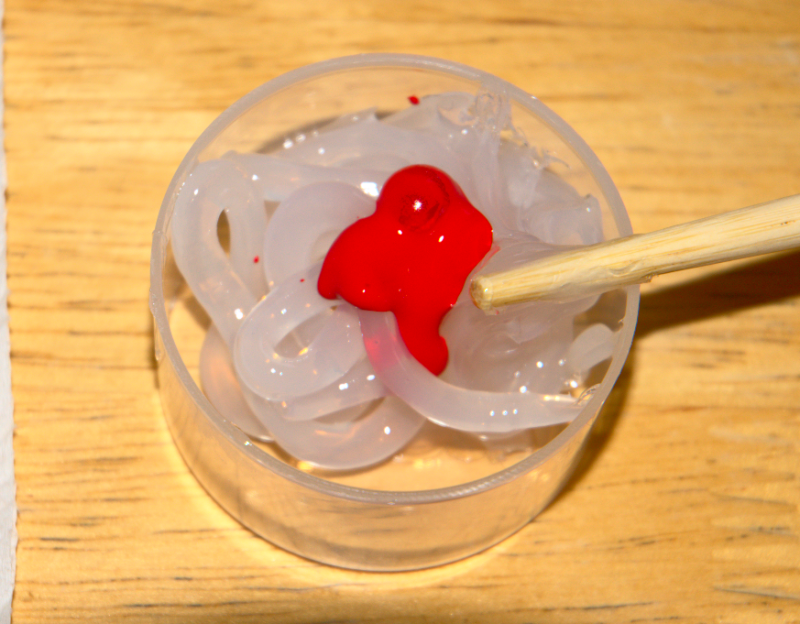
Mix together, and the whole mess becomes colored very well:
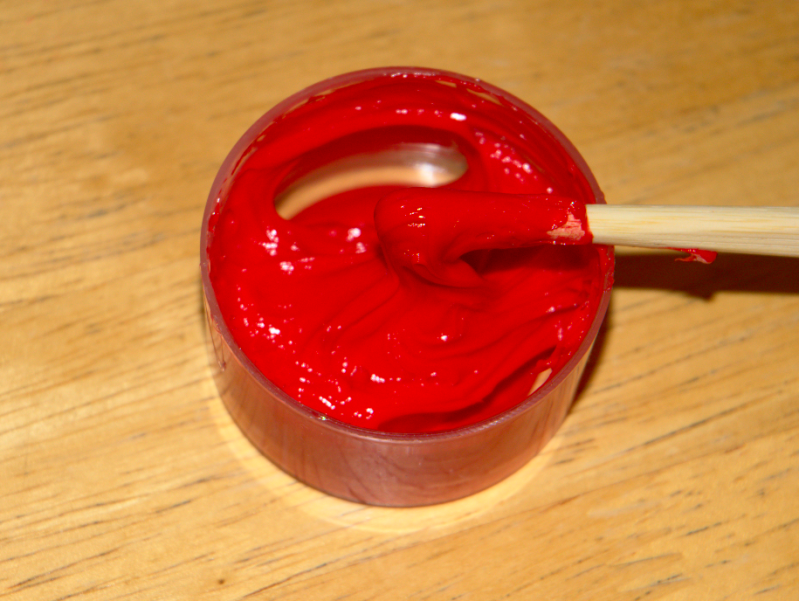
Now, the reason why I don't think I would do this again is that it made the silicone start curing quickly. I don't know if this is because of the acrylic, because of the water in the paint, or simply because it added more time to the process. Whatever the reason, I had very little time to fill the molds with the silicone before it started becoming gummy.
Which leads us to...
Step 7: Making the sleeves
Before you put any silicone in the mold, make sure you put some kind of lubricant into the mold. I initially used cooking spray on the impressions when I was making the molds. This time, however, I used baby oil (i.e. mineral oil) inside the molds. Good stuff.
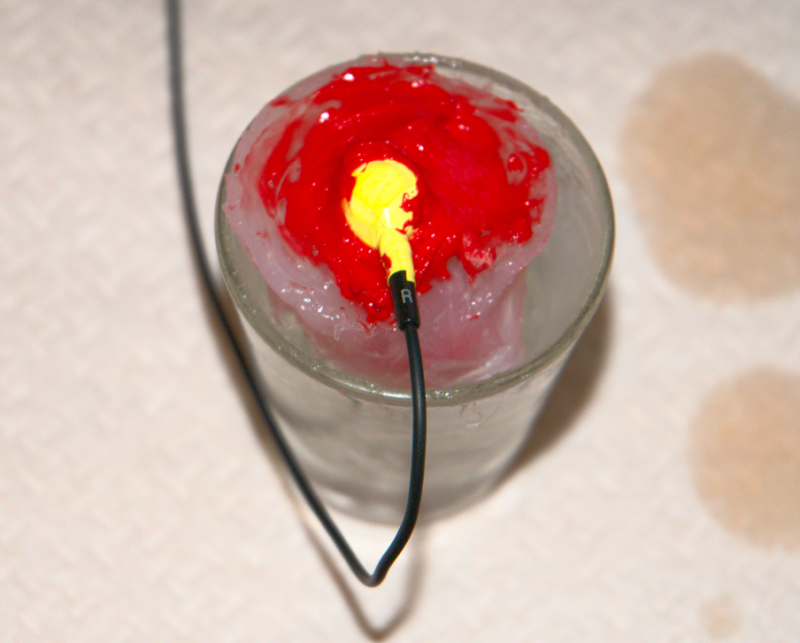
Once the molds were all lubed up and ready to go, I started off by filling the ear canal part with silicone, so that I could then insert the sound tube. Here is a pic of the sound tube inserted:
All I had left to do at this point was position the IEM, and fill the rest in. Simple, right?
NO.

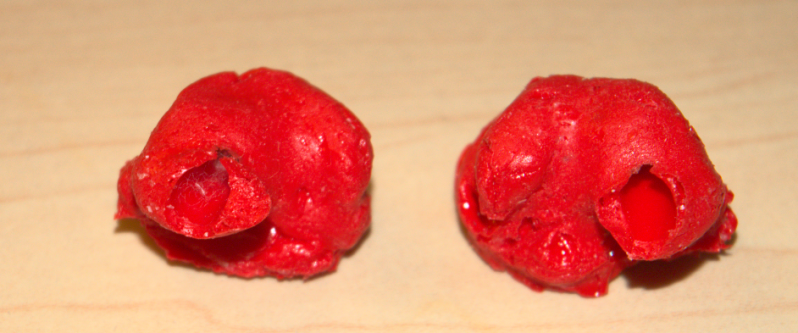
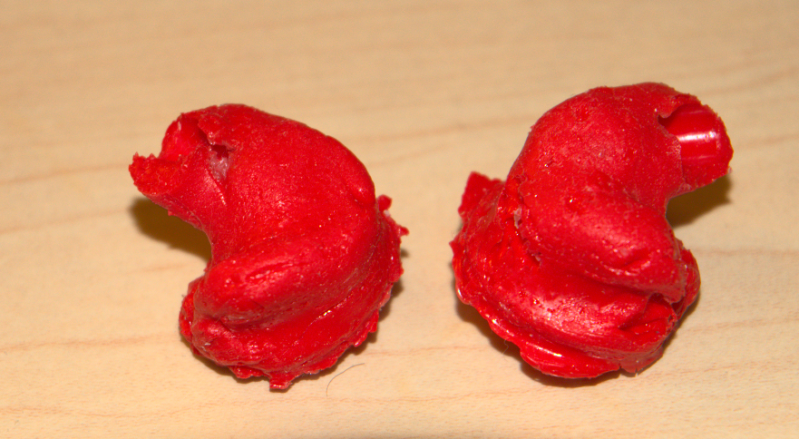
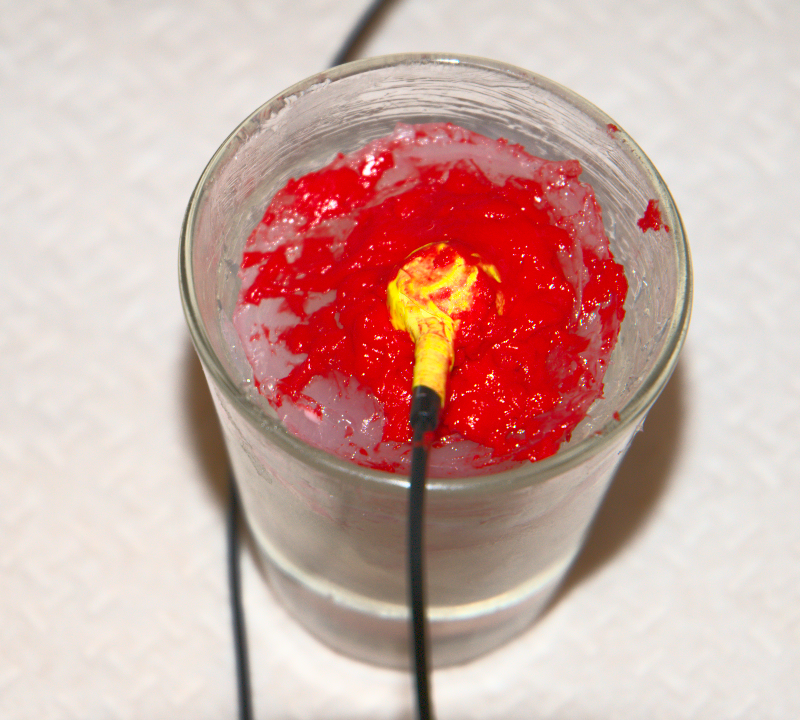
As mentioned, since the silicone started setting pretty quickly, by the time I got to filling in the second mold, I had a bit of a gummy mess on my hands.
Notice first mold with decent filling job:
Notice second mold with sh$tty filling job:
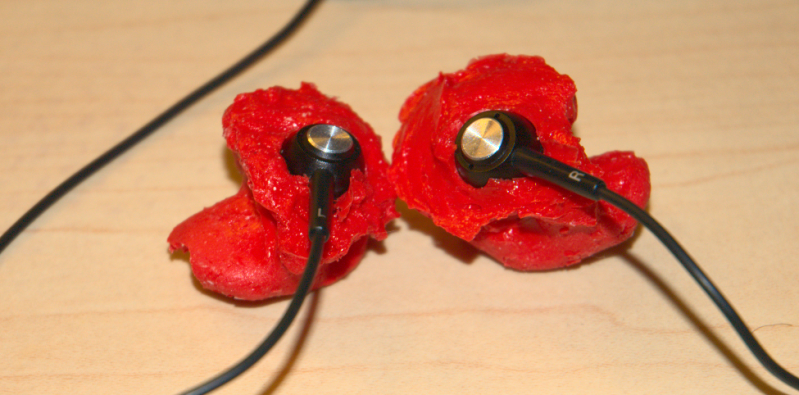
But, what's done is done, and all I can do at this point is wait and see what happens. The silicone is already feeling almost completely cured, but I'm going to give it 24 hours. Tomorrow, I will remove the sleeves, and cut off any excess. So, my next update to this thread will be with pics of the final product!

NB: I have tried to do the best that I can to find the safest method possible for making these tips. Be that as it may, I will not be held responsible for any harm that may come to you as a result of following this guide. Wear proper hand and eye protection, and use caulk in a well-ventilated area.
Step 1: Impressions
Since I have a friend who is an audiologist, I was fortunate enough to get a set of free impressions made (thanks, Kristen!
Here are some pics of the (very good) impressions that were made for me late this afternoon:
The impression in the left ear had to be done again, due to an improper seal from the first try (I think I was talking too much...).
I realized during the impression process that this is not something I would ever try to do myself. Firstly, and most importantly, it is far too dangerous to try to do what she did inside my ear. I trusted her because it's her job, but I would never trust myself to make some DIY impressions... and I wouldn't recommend any of you to do the same for yourselves. Get impressions made professionally! Secondly, I realized how difficult it would be to get a proper seal throughout the entire canal if I tried to do something like this myself. There is no way I could have done it properly, and without getting the impression done properly in the first place, I imagine that the entire tip-making process would be useless.
Step 2: Materials
Here is a list of materials that you will need if you want to follow the method laid out in this guide. I'm sure that some substitutions/improvements can be made, but here is what I have:
-Ear impressions (preferably, professionally made... see Step 1)
-100% silicone caulk (can be purchased at any home improvement store)
-Two shot glasses
-Acrylic nail polish
-Cooking spray
-Teflon tape
-Small tube (e.g. a drinking straw)
Step 3: Preparing impressions for the molds
For comfort reasons, my friend suggested that I round off the canal tips up to the first bend. I was able to do this with small scissors:
This is now the final shape that will be used for the mold. To help ensure that the impression material itself will be protected, apply a couple of layers of acrylic nail polish to the impressions (also recommended by my audiologist friend). Here are my impressions in all of their shiny glory:
The impressions are now ready for the molding process.
Step 4: Making the molds
If you haven't used caulk before, what you need to do is cut off the tip, and use a long nail to pierce the foil inside the top of the tube. If you don't have a caulking gun, a beer bottle set inside the bottom of the tube (with the neck of the bottle pressed against the tube bottom and the bottom of the bottle pressed against your chest) can also work.
Fill a shot glass to about 2/3 with silicone caulk. Since the caulk is slightly viscous, it will retain its form and coil inside the glass. You will probably need to use your finger to make sure the caulk is filled in everywhere, leaving no air bubbles.
Once the shot glass is filled 2/3 with caulk, you are almost ready to put the impression inside. First, however, you need to spray the impression with cooking spray. This will help make sure that the silicone doesn't stick to the impression material. Now press the impression gently into the caulk, trying not to move it around too much, which might create air pockets.
Once the impression is set inside, remove the excess caulk that will have squeezed out around the sides of the top of the impression. Removing this excess caulk will help the impressions to slide out once the caulk has set, because the impressions won't be caught inside a casing of caulk.
Repeat for second shot glass and second impression.
Once the molds are finished, place them in a well-ventilated area at room temperature. Let them cure for at least 24-hours. I might leave mine for longer, because I don't have a well-ventilated area to leave mine, so I'm putting them in the basement. It's colder than room temperature in my basement, which will slow the curing process.
UPDATE 1/14/10:
After leaving the molds to cure for 40 hours, I tried to cut them out of the shot glasses. This was when I realized that you shouldn't use shot glasses for this....
Since anything below the top skin of the silicone wasn't exposed to air (and, more specifically, moisture in the air), all of the silicone inside the mold was still in its fully uncured form. I decided to try a different route this time. I pulled out the impressions with the silicone that had cured to them, and added more silicone to the bottom of the impression with my finger, covering the whole impression. They look like this (upside down):
Now the result will be a sort of skin mold that goes over the impressions. I'm going to let these cure, upside down, for another 24 hours, and then try to remove the impressions.
And so it goes....
UPDATE 1/14/10 (at night):
I was able to successfully remove the impressions from the molds tonight without any damage done to the molds or the impressions. Aside from a couple of tiny tears inside (and I mean tiny), it looks like the molds are pretty spot on. There was still some vinegar smell inside, which means the inside still needs to cure some more. I'm going to let them cure overnight, and then begin making the sleeves tomorrow!
Step 5: Preparing the IEMs for the sleeves
Here is where a little imagination can come in. I went over many different ways to do this in my head, and this was what I came up with. I'm sure there are better ways out there, but it's gotta start somewhere, right?
I ended up deciding to use a sound tube that would stay inside of the sleeves, instead of simply using something that would come out after the sleeves cured, leaving a negative-impression of the tube in the silicone to act as the sound tube. The main reason I decided to do this was because I thought it would help give some support to the part that went in the ear canal, instead of leaving a very thin wall of silicone caulk to provide its own support.
This meant that I needed to have a way of keeping the inside of the tube free from silicone, which I achieved by stuffing in cotton from q-tips (notice the angled cut on the tube, which will give a more-or-less flush fitting against the IEM sound tube):
Also, I decided to keep the IEMs themselves (HiFiMan RE0, in this case) inside of the silicone while it was curing. However, I (obviously) wanted to make sure that the silicone didn't adhere to the IEM body. To do this, I chose to cover the IEM bodies with teflon tape, for two reasons: 1) it would be easy to remove afterward, and 2) it is thin enough that the lip of the IEM sound tube (the part that helps keep sleeves from falling off) would be included in the impression, as you can see in this picture:
Step 6 (optional): coloring the silicone
I also decided that I wanted to add a bit of flavor to my custom sleeves by adding some color. This part is really easy, although I'm not sure if I would do it again (I'll explain...). If you want to try this, just mix a small amount of acrylic paint with the silicone caulk, like so:
Mix together, and the whole mess becomes colored very well:
Now, the reason why I don't think I would do this again is that it made the silicone start curing quickly. I don't know if this is because of the acrylic, because of the water in the paint, or simply because it added more time to the process. Whatever the reason, I had very little time to fill the molds with the silicone before it started becoming gummy.
Which leads us to...
Step 7: Making the sleeves
Before you put any silicone in the mold, make sure you put some kind of lubricant into the mold. I initially used cooking spray on the impressions when I was making the molds. This time, however, I used baby oil (i.e. mineral oil) inside the molds. Good stuff.
Once the molds were all lubed up and ready to go, I started off by filling the ear canal part with silicone, so that I could then insert the sound tube. Here is a pic of the sound tube inserted:
All I had left to do at this point was position the IEM, and fill the rest in. Simple, right?
NO.
As mentioned, since the silicone started setting pretty quickly, by the time I got to filling in the second mold, I had a bit of a gummy mess on my hands.
Notice first mold with decent filling job:
Notice second mold with sh$tty filling job:
But, what's done is done, and all I can do at this point is wait and see what happens. The silicone is already feeling almost completely cured, but I'm going to give it 24 hours. Tomorrow, I will remove the sleeves, and cut off any excess. So, my next update to this thread will be with pics of the final product!