Beta22 Designing Idea - Need your opinion.
Jan 15, 2010 at 4:39 PM Post #31 of 70
My last [and hope final] adjustment [I play piano, which means that I am a big fan of Steinway, so...:


Does anyone know someone who makes/build enclosures with this anodized finish/texture [different from the brushed aluminum]? :
http://www.lotustalk.com/forums/atta...-20x-20480.jpg
 
Jan 15, 2010 at 5:57 PM Post #33 of 70
Quote:

Originally Posted by pila405 /img/forum/go_quote.gif
@Koyaan I. Sqatsi - If I will use clearcoat over it, will it have reflection [like glossy finished gold?]. I know a place where they do this, but I don't know if it is possible that it will have glossy finish...


I'm afraid not. The only way to get a true shiny metal finish is to use a true shiny metal, such as a foil. While some paints and inks come closer than others, because they must use metal particles, they'll never look exactly like the real thing.

Quote:

I use Photoshop CS4 for the rendering.


Thanks. Didn't know Photoshop had added true 3D features.

se
 
Jan 15, 2010 at 6:06 PM Post #34 of 70
@Koyaan I. Sqatsi - What 3D features? Where do you see any of it? It is all 2D.
biggrin.gif

I will take it as a compliment =].


I am so depressed...I have no idea how I will bring it to reality. Its all so nice and easy in Photoshop....
I must find a way to do it! [Unfortunately with a limited budget too]

TimmyMac - Maybe I will really do so. Or I will get it smaller [thinner at least].
 
Jan 15, 2010 at 6:17 PM Post #35 of 70
Quote:

Originally Posted by pila405 /img/forum/go_quote.gif
@Koyaan I. Sqatsi - What 3D features? Where do you see any of it? It is all 2D.
biggrin.gif


Oh, ok. I just assumed you were using CS4 Extended, which apparently does have true 3D capabilities.

Quote:

I will take it as a compliment =].


Yes, do. Very nicely done!

Quote:

I am so depressed...I have no idea how I will bring it to reality. Its all so nice and easy in Photoshop....
I must find a way to do it! [Unfortunately with a limited budget too]


Know exactly what you mean.

se
 
Jan 15, 2010 at 6:25 PM Post #36 of 70
I am using the extended the version but never used the 3D capabilities. I will check it out.

Thank you for the compliment.

Here is a slim version - a bit distorted since I had no power to invest in it [I guess to slim for the heat sinks...]:


I guess it looks neater by far.
 
Jan 15, 2010 at 8:45 PM Post #38 of 70
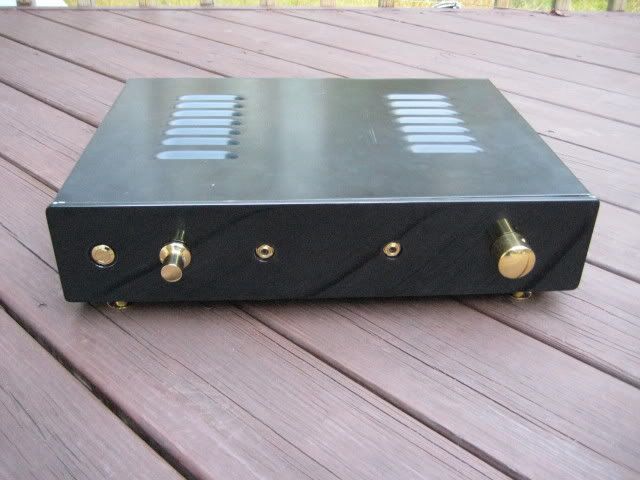
Here's what my ß22 looked like after I finished polishing the front panel. Note that the headphone jacks with hexagonal fastening nuts do, indeed, look round. The finish is fairly deep and glossy to my eyes, but is not quite comparable to a professional auto or piano finish.

I still do not have a sense of your mechanical know-how, which is pretty important if you’re going to be designing a case. The ß22 is a challenging electrical project, but the electrical work was a walk in the park compared to the mechanical work, for me. What kind of tools do you have access to? Have you ever worked with metal before? Have you made cases for other projects? Do you know any CAD programs?

This looks like a challenging project but with enough planning and elbow grease I think you can pull it off, although you will probably have to compromise in some areas.


B22_Oct015.jpg
 
Jan 15, 2010 at 8:53 PM Post #39 of 70
I guess that in the end I will have to go with silkscreen :\...
I asked somewhere about foil emboss gold and he said it is impossible. I don't want to emboss it, maybe even to paint an engraved text, but clearly not embossed. The gold colour is important.

I asked for another way to do so and know I am waiting for reply.

Thank you all guys, you are really nice and helpful.

Edit: posted without seeing you post Steve. The B22 looks AMAZING!!! How did you do it? What is the front panel made off? And what the rest of the body made off? From where did you order the chassis? Where did you get the feet?

Did you do it exactly like on the link you posted before?

I am not going to make anything by my own cause I don't have the tools for it - maybe only the polishing cause I will be able to buy all the needed stuff.
 
Jan 15, 2010 at 8:59 PM Post #40 of 70
Quote:

Originally Posted by pila405 /img/forum/go_quote.gif
I guess that in the end I will have to go with silkscreen :\...
I asked somewhere about foil emboss gold and he said it is impossible. I don't want to emboss it, maybe even to paint an engraved text, but clearly not embossed. The gold colour is important.


What can also be done is to silkscreen an adhesive on the faceplate and then hit it with some gold foil. The foil will still take on some texture so it's not going to look like a smooth, polished piece of metal. And it won't be as durable as the ink process. But if you're going to have the glass plate in front of it, durability may not be such an issue.

se
 
Jan 15, 2010 at 8:59 PM Post #41 of 70
Hey, nice work.I also designed my own b22 panels. If i were you id make the logo bit smaller, it would cost a lot more to engrave the size it is. To me it also looks a bit on the large size, but that's just my opinion. Also i think the knob looks better in the center of the panel, as you have quite a symmetrical design going on. Really like the black and gold combo, should look unique. I would center the knob and drop the b22 text under the logo and also have it in caps, everything else is in caps.

Anyway good work, can't wait to see it!
 
Jan 15, 2010 at 9:21 PM Post #42 of 70
Quote:

Originally Posted by pila405 /img/forum/go_quote.gif
How did you do it? What is the front panel made off? And what the rest of the body made off? From where did you order the chassis? Where did you get the feet?

Did you do it exactly like on the link you posted before?


Thanks for your kind words.

I made the front panel as I described in a previous post in this thread, from ¼” thick aluminum plate (probably 6061). The rest of the chassis is made from aluminum sheet metal (probably around 10 gauge, but would go thinner next time on everything but the back plate). The case was actually designed, built and finished by me back when I was working for an industrial microwave company that had machining equipment. I’ve seen similar-looking cases from Par Metal, but you’d need a different front plate for the look you’re going after.

I got the feet from somebody on eBay – you probably can’t tell from this photo but the feet are actually spikes, not cylinders. Besides random folks on eBay, the only place I’ve found gold-finished feet is this place in France (Pointes et Absorbeurs - Audiophonics - Câbles, Amplificateurs et Accessoires DIY). The smaller knob is also from eBay, the larger knob is from VT4C.com and the switch is a Bulgin MP0044, which requires AMB’s ε24 driver circuit.
 
Jan 15, 2010 at 9:22 PM Post #43 of 70
By the way, I don't know how soon you plan to start on this project, but I'll likely be having some gold plating done around March. If you decide to go with the Neutrik NRJ6HF-1-AU, I'd be happy to get some of the smooth, slotted nuts for it (NRJ-NUT-MS) and toss them in with by batch. You'd only pay for the nuts and shipping.

se
 
Jan 16, 2010 at 8:42 AM Post #44 of 70
@Steve - Thank you very much again. Helpful as always.

Can you tell me please the exact products' name YOU used for the painting [primer/flat black/clearcoat]?

And what are the beta22 dimensions?

If I paint the aluminium, should it be anodized black or natural?
Do you suggest on any other material?
What do you think about professional electrostatic painting?

Does the Beta22 you have includes the O22 inside the same chassis?

@Koyaan I. Sqatsi - It will be great! Thank you very much!
 
Jan 16, 2010 at 2:50 PM Post #45 of 70
Quote:

Originally Posted by MoodySteve /img/forum/go_quote.gif
Since my own ß22 is similar, I can perhaps be of assistance.

First, rather than using glass, considering giving your front panel a poor man’s auto paint job – thorough cleaning, several layers of primer, several layers of flat black (sanded flat after drying) and then many, many layers of high quality clearcoat (sanded up to 2000 grit or higher with rubbing compound). You can get gorgeous finishes using spray paint and elbow grease, and it will avoid the daunting mechanical task of securing the glass panel to the amp in both a functional and attractive manner.

It looks like part of your design is not to have visible screws on the front panel (I nearly always incorporate this into my designs) which, while looking attractive, does make the mechanical aspect more difficult. What I did was to clamp the front panel to the frame exactly where I wanted it, and then drilled 4 guide holes that go through the front frame and end up as blind holes in the back of the front panel (this was to ensure that all 4 holes lined up). Then I un-clamped the front panel and enlarged the guide holes in the frame for 8-32 clearance. Next, I carefully enlarged the blind holes to the 8-32 tap size, and tapped the holes. Be very careful at this stage – don’t accidentally convert your blind holes to through holes and use plenty of oil when making the taps. Now you can sturdily fasten the front panel to the frame without any visible screws. You do have to take care in your internal layout so that you can fit a screwdriver into the appropriate places to fasten/unfasten the front plate, but it looks like your chassis is roomy.

Also, out of curiosity, do you know of an organization that engraves gold lettering? I’d looked in the past but never found anywhere ‘hobbyist-friendly’ that did.


cool idea
 

Users who are viewing this thread

Back
Top