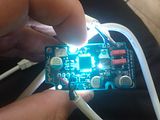
The GrubDAC
Jul 11, 2012 at 10:41 AM Post #901 of 1,079
A small problem I've encountered: Since last weekend, the GrubDAC that I use at work doens't show up on my Mac at startup. When i put on some music it comes out through the built in speakers (very annoying). I have to disconnect the USB cable from the Grub and put it back - everything works as it should.
 
Any ideas on what could be wrong?
 
Been using it for three - four months now, been working flawlessly until now.
 
Jul 11, 2012 at 10:58 AM Post #902 of 1,079
Quote:
A small problem I've encountered: Since last weekend, the GrubDAC that I use at work doens't show up on my Mac at startup. When i put on some music it comes out through the built in speakers (very annoying). I have to disconnect the USB cable from the Grub and put it back - everything works as it should.
 
Any ideas on what could be wrong?
 
Been using it for three - four months now, been working flawlessly until now.


It sounds silly and really intuitive, but I have found that to happen if the plug isn't seated very well. USB makes the ground connection first, followed by power, then signal. I have found that the plug sits in the jack very well with just power and ground connected (so the LED lights) but loose enough that there is no signal. In short, see if instead of unplugging and replugging, just pushing the plug in further helps.
 
Jul 11, 2012 at 2:26 PM Post #903 of 1,079
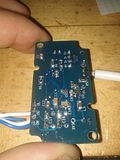
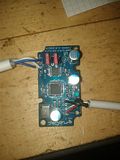
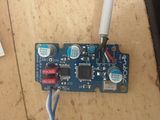
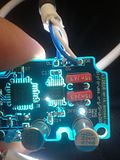
Man, I can't believe this. I've already botched 2 GrubDAC PCB's and successfully finished one and now I'm making one for a friend and who would have known it, it doesn't work. When I plug it in (it's a cableDAC btw) the LED flickers and nothing works, although I got it to get recognized by the PC before (I had the LED mounted the wrong way, so I don't know how it looked but I'm assuming it would have lit up normally) and it even played some music twice (which would indicate that not all hope is lost?). It quickly stopped working though and I tried reflowing all the pins of the DAC chips, and I replaced the VRM twice, to no avail. The 3.3V measuring point gives me 0.2-0.4V, resistance from 3.3V to ground is around 0. At this point I'm thinking there's a short in U1 caused by excessive soldering heat since I've had the exact same problem before and that turned out to be the issue, plus I find it difficult to believe that I managed to kill 3 VRMs with my crappy soldering skills. I'm just looking for some confirmation before I submit the order for a new PCM chip (which is absolutely pants-on-head stupid since I only today received a Farnell order with replacement VRMs among other things, now I'll have to shell out another $15 for shipping). Here's some pics for good measure, although I've already triple-checked for solder bridges (there is one, but it's between the AGNDL and ZGND pins which are connected anyway) and bad joints.
 
Edit: Am I correct in assuming that the only way to figure out whether U1 has an internal short would be to remove U1 and then see whether the LED still flickers/the 3.3V supply is up? Or would the LED not be lit at all if the short was in U2?

 
Jul 11, 2012 at 3:39 PM Post #904 of 1,079
Quote:
It sounds silly and really intuitive, but I have found that to happen if the plug isn't seated very well. USB makes the ground connection first, followed by power, then signal. I have found that the plug sits in the jack very well with just power and ground connected (so the LED lights) but loose enough that there is no signal. In short, see if instead of unplugging and replugging, just pushing the plug in further helps.

I see the same thing with the USB cable I use to download video from a DVR...finally had to build a new cable.
 
Jul 11, 2012 at 5:12 PM Post #905 of 1,079
Remove L3. If the regulator returns to normal, check for solder bridges under the bypass caps connected to the 3.3 volt line.
Namely C2, 4, 6, 10 and 11.
 
The LED just indicates that you have power coming from the computer.
 
Jul 13, 2012 at 7:53 AM Post #906 of 1,079
Quote:
Remove L3. If the regulator returns to normal, check for solder bridges under the bypass caps connected to the 3.3 volt line.
Namely C2, 4, 6, 10 and 11.
 
The LED just indicates that you have power coming from the computer.

Removing L3 fixes the short, however I couldn't find any bridges under the capacitors, I desoldered and re-soldered them all and it didn't fix the issue. Either one of the caps is burnt and shorts the 3.3V line (is that possible/probable with those ceramic caps? I would have thought they should be quite heat resistant) or it's U1. U1 also gets pretty warm after a while of leaving it on, which I guess points toward an internal short too.
 
Jul 13, 2012 at 8:33 AM Post #907 of 1,079
That is probably the next step...remove U1.
Once it is out, check the power and make sure it
is good before soldering in a new U1.
 
If you pull U1 and the voltage is still bad, 
then you might have to take a closer look at U3.
 
You can check the ceramic caps for short with your meter
while they are removed from the board.
 
Jul 13, 2012 at 2:02 PM Post #908 of 1,079
I did as you suggested, and the short seems to be within U1, without it power works fine and U2 doesn't get as hot anymore either. I'll order a new U1, I sure hope I don't break it this time (maybe I should order 2, lol). These chips seem to be really sensitive to heat/ESD, this is the second time this has happened to me.
 
Jul 16, 2012 at 4:06 PM Post #909 of 1,079
I (finally) finished my first GrubDAC build, and I am extremely happy with it.  This is a great entry into an improved DAC (from my laptop sound card, anyway) as well as a good way to start into SMD work.  I swear I've never heard my music library before - it's made that much of a difference for me.  Thanks Cobaltmute for the great design, and to TomB for the kits!
 
I experienced one issue as I was constructing mine, and I thought I'd record it here in case someone else runs into the same issue.  After getting the board populated and the RCA and USB cables attached, I was getting the "USB device not recognized" under Windows 7, usually followed by "Device driver failed to install correctly."  I followed the advice in some of the other GrubDAC threads, checking and double-checking my soldering on U1 and U3, primarily.  After much time spent reflowing those chips and carefully determining that I had no bridges or bad joints, I moved on to reflowing the other components.  Finally, I redid the soldering on X1, and bingo - it did the trick!  I was concerned that I had somehow damaged U1, but no, I just had not done a good enough job with the oscillator.  Everything is working like a charm now, and sounding fantastic.
 
Jul 17, 2012 at 7:28 AM Post #910 of 1,079
The thing about X1, which is a little different that a lot of other components that you will solder down, is that you can create a bridge to the top of the part. It appears that the top case of the part is connected to ground, so any solder that gets up the sides and touches the ground will create a short.

Nice to hear that you are enjoying it.
 
Jul 19, 2012 at 7:45 PM Post #911 of 1,079
Just built my grubDAC with my new (but used) Hakko 936. Worked the first time without incident! My only beef is that the Hammond case is too thick and I can't get the Mini USB very close to the outside. Thus my USB connection is finicky. :/
 
I'm probably going to wire a grubDAC to a cMoy if I get fed up with the Hammond case.
 
Jul 19, 2012 at 9:02 PM Post #912 of 1,079
Quote:
Just built my grubDAC with my new (but used) Hakko 936. Worked the first time without incident! My only beef is that the Hammond case is too thick and I can't get the Mini USB very close to the outside. Thus my USB connection is finicky. :/
 
I'm probably going to wire a grubDAC to a cMoy if I get fed up with the Hammond case.

 
I think you pretty much have to cut a rectangular slot equal to the plastic housing around the metal portion of the USB connector.  This can vary somewhat, depending on the cable you're using.  However, it's the connector housing that's key - not the metal connector itself.  That's what I've done in the past and it works well.
 
Jul 19, 2012 at 9:09 PM Post #913 of 1,079
Quote:
 
I think you pretty much have to cut a rectangular slot equal to the plastic housing around the metal portion of the USB connector.  This can vary somewhat, depending on the cable you're using.  However, it's the connector housing that's key - not the metal connector itself.  That's what I've done in the past and it works well.

 
Yeah, I was thinking that too, but it seems like too much work for now. I just did my first SMD soldering!! Maybe later...
 
Nov 4, 2012 at 6:11 AM Post #914 of 1,079
I just soldered the GrubDAC and having some problems with voltages. The regulator gets very hot immediately when connecting USB. The 3,3V test point does not show any voltage, it seems to be connected to ground (checked with voltage meter). USB supplies 4,9V and voltage at led is 3,3V. Where to start sort this out?
 
Nov 4, 2012 at 8:06 AM Post #915 of 1,079
Quote:
I just soldered the GrubDAC and having some problems with voltages. The regulator gets very hot immediately when connecting USB. The 3,3V test point does not show any voltage, it seems to be connected to ground (checked with voltage meter). USB supplies 4,9V and voltage at led is 3,3V. Where to start sort this out?

Post some detailed pics.  You've got a bridge/short somewhere - could be in the PCM pins or the regulator itself or something else.
 
Votage of 3.3V at the LED is not good, because it pulls it's voltage almost directly from the USB connection.
 

Users who are viewing this thread

Back
Top