The Apple diyMod: My Take on the Famous iMod [56k killer] Featuring 3G, 4G, 5G and nano 1G!
Jun 8, 2009 at 5:52 AM Post #1,936 of 3,220
Quote:

Originally Posted by Ubijza /img/forum/go_quote.gif
Ok, I 've tried the iPod Video 5G diyMod - what a an amazing adventure! I have never even tried soldering before, and to be at the stage where I am now - ie one step away from having made this thing with my own hands feels pretty terrific!
smily_headphones1.gif


gutsy effort!! kudos for that
beerchug.gif


Quote:

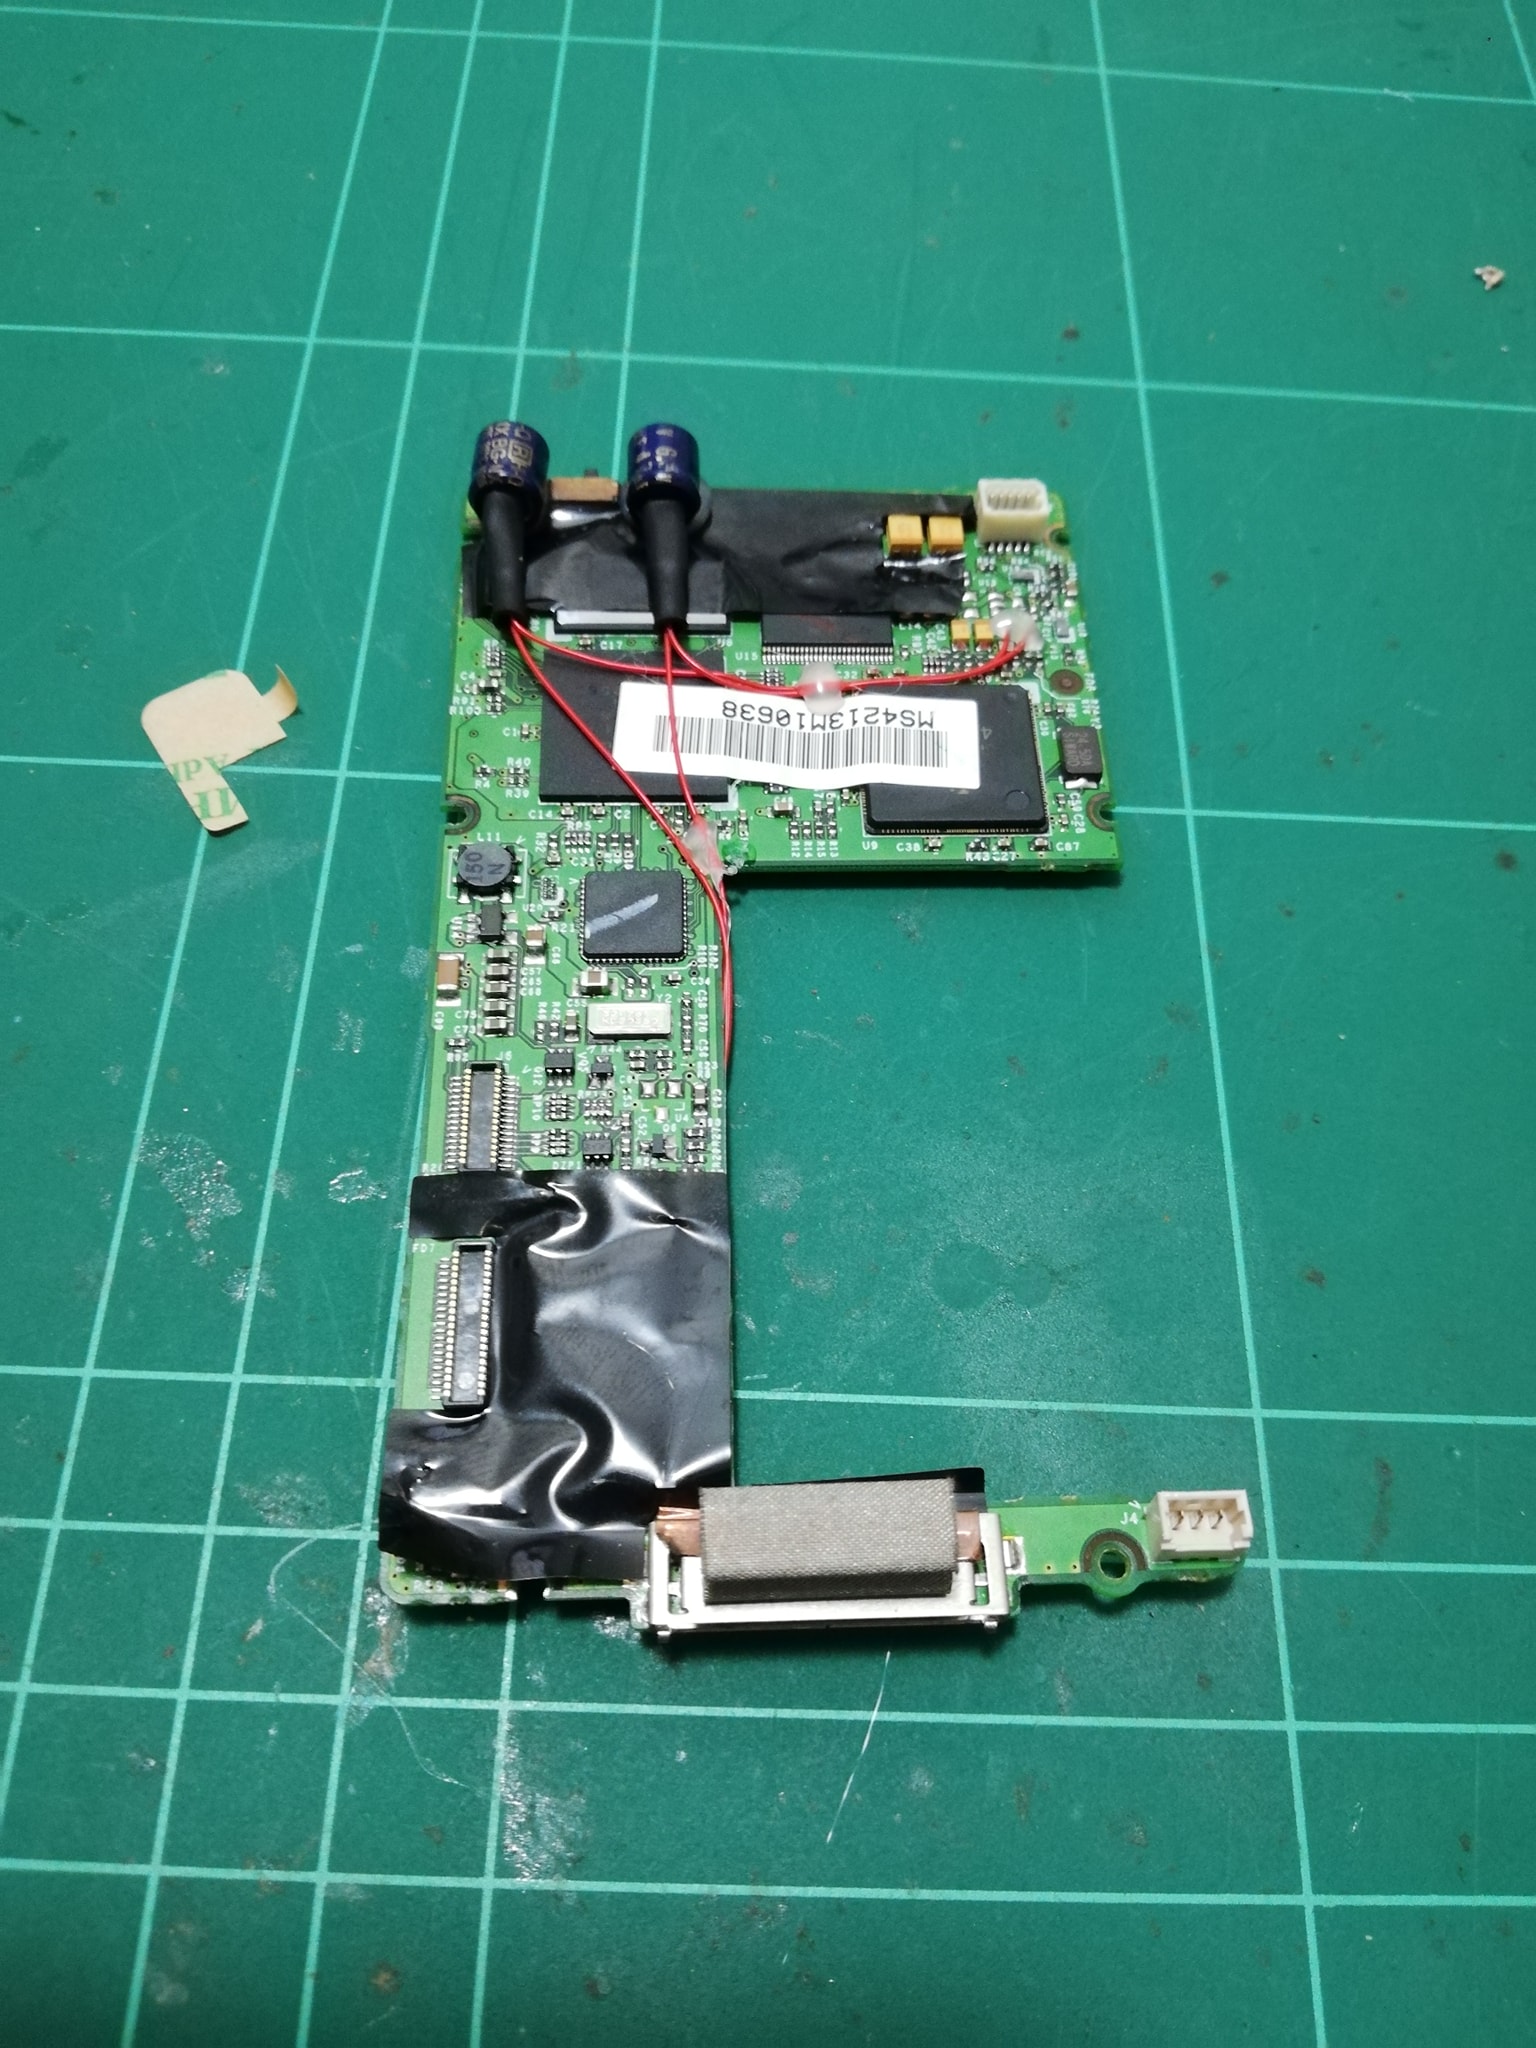
I am "one step away" because my diyMod has no sound in left earphone when playing through capped LOD. The LOD itself is fine (I tested it with another Ipod and it sounds great - a relief after having spent something like 7 hours on its design/construction. My take home message is :" pull out the dock pins, solder them to wires/caps, THEN reinsert- do not solder onto already inserted pins as solder seeps down, makes bridges, melts into plastic and irreversibly ruins the dock").


wow, melting plastic on the dock, you must be using an insanely hot soldering iron and leaving the tip on there WAY TOO LONG fopr that to happen. myself I leave all the pins in and simply bend them away from each other a bit. never have any problems with solder bridges at all. plus I like to start at the mini with LODs anyway as it makes it easier to thread the barrel on and get a neat braid that goes all the way into the barrel.

Quote:

I have successfully desoldered both Zs near DAC, L2 and L3; and also tiny capacitors directly under L2 and L3 (c64 and c65?). Then secured the wires (33AWG Cardas tone arm) and soldered them like in instructions of AWSOME Aaron Lee (» page five)...


how many times do me and others on here have to post that

[size=large]YOU DONT HAVE TO REMOVE THE CAPS OR ANYTHING!!![/size]
just leave everything on the board and solder to the parts. I can understand the want to do it, just to be complete and I do it still every bnow and then. but its not at all necessary; the signal will take the path of least resistance and that path will be your wires. much less chance of something like a lifted pad that way.

Quote:

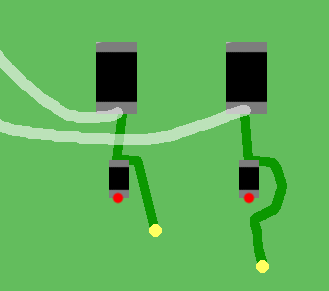
I think there are two possible reasons on why I only get audio in right channel -both of them are directly related to the wire that connects left Z and L3 (it is the left channel path isnt it?). One - possible bridge with nearby L4. Another possible reason is that I possibly lifted a pad when desoldering the tiny cap that was directly underneath L3...


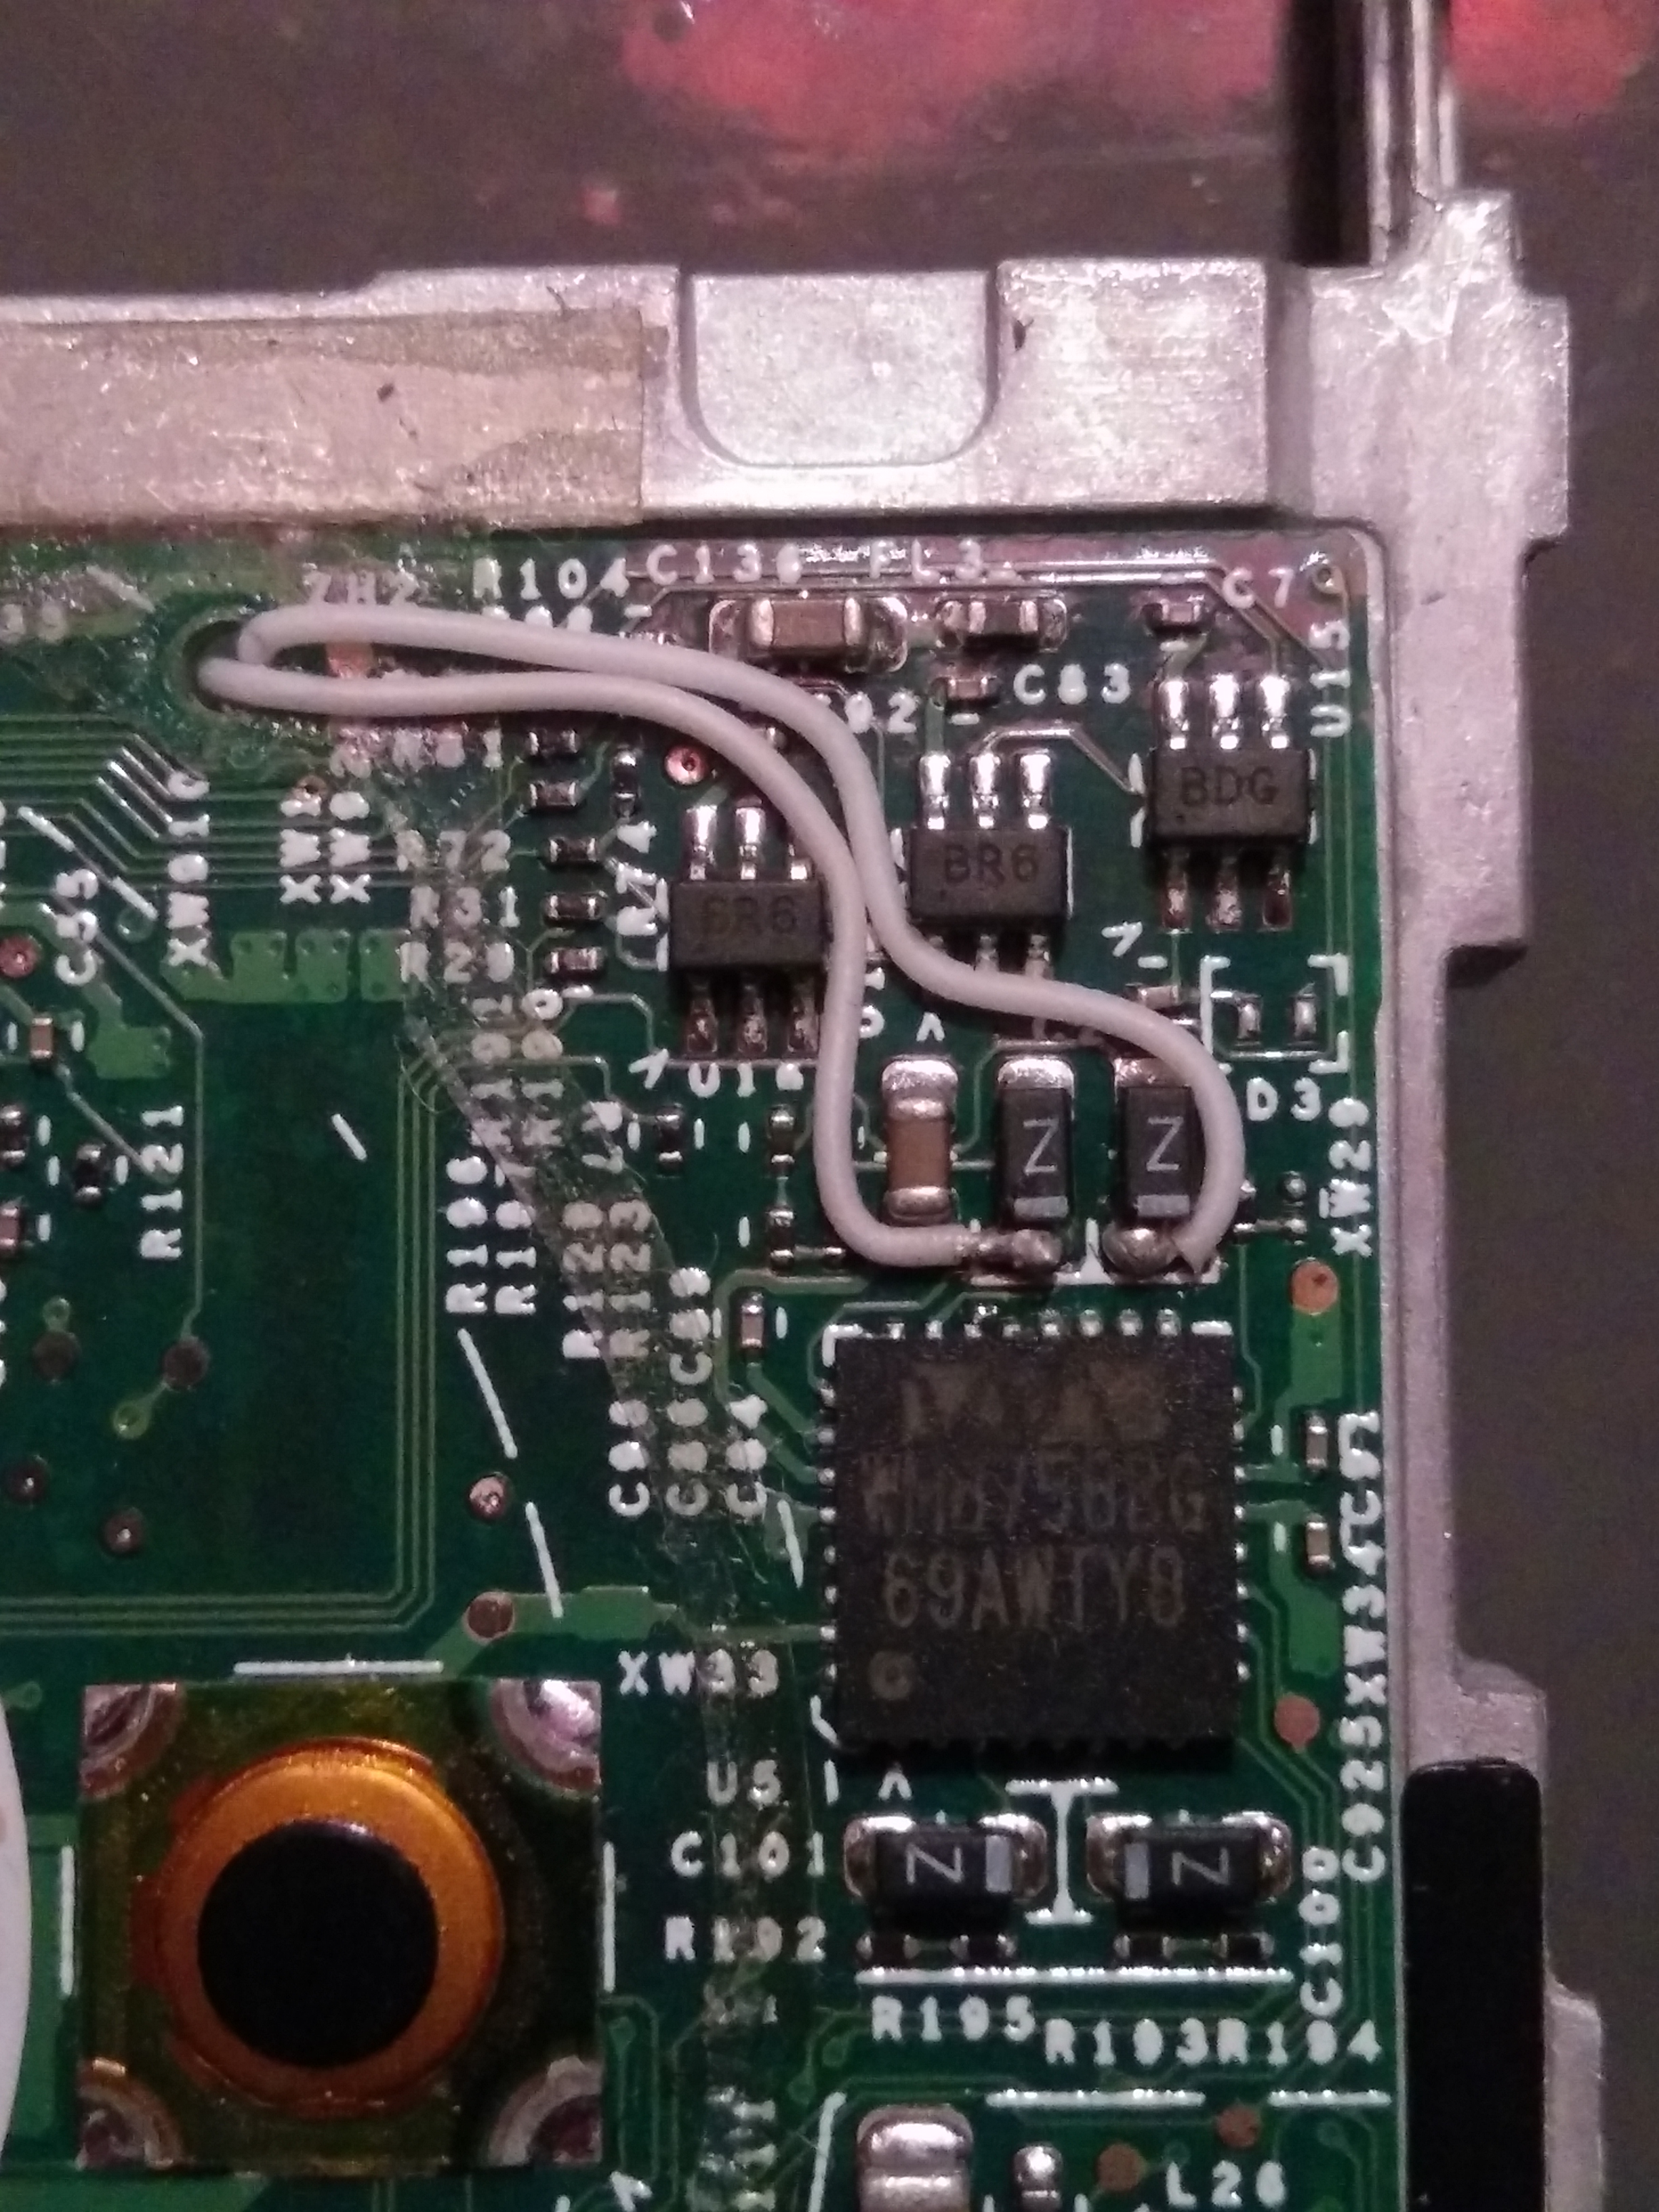
yes a short to L4 could result in no audio. my suggestion now that you dont have a great deal to loose (just being honest here) is to try and clean up the area a little with a desoldering braid and maybe take a pic as close as you can for us to have a look at. the next thing you can do is to use some other pins for output and remake your LOD using the corresponding pins. if you are sure the connections at the dac are sound, then you could use the firewire data pins (can remember which ones they are, but look it up) they dont get used with ipods after the 4G anyway.

Quote:

I would like some advice- is it possible that lifted pad under cap that is under L3 breaks the circuit of left channel audio (even though my wires are not connected to this pad)? What does a lifted pad look like? would a bridge with L4 cause complete absence of audio?


a lifted pad looks like nothing; there will be nothing there where there is supposed to be a little silver pad, if solder will not stick to the area there is supposed to be a pad, chances are you lifted it, but not all is lost ^^ see above.

Quote:

COuld I now leave my right channel wire were it is and resolder my left channel wire to top pad under L3? Or do I have to resolder both wires to pads under L3?


huh
confused.gif
yoiu mean the pads under L3 and L4?? sure you can leave the right channel where it is, but I would suggest first checking for shorts and then if you have lifted a pad, move on and find another unused dock pin to send the left channel to. soldering to the pads underneath wont work.

Quote:

Lastly- I have a Digital Multimeter, what kind of reading could i take to check everything (where to take them and what numbers to expect)?


well to check for a short, just put it on either ohms setting or continuity and test for continuity across L3-L4. using ohms, you should get close to zero if there is a circuit (you dont want there to be a circuit normally, but this will at least tell you where the problem is, so maybe you do want it
wink.gif
as a bridge is easier to deal with than a lifted pad), using continuity it will depend on your meter what you get, some will just give a simple yes or no type answer and some will give you a reading of close to zero, like 0.01; either way it will be obvious if you dont have a circuit. look at the instruction that came with your meter.

Quote:

Many thanks again to Joneeboi and everybody else here - this thread is truly amazing!!!


yeah its a great resource, hope I was able to help, i'm sure jon will drop in and help out as well. I havent been here for a bit as i've been really busy, but i'll pop back in to see how you went, if you need clarification i'll help where I can.
 
Jun 8, 2009 at 4:33 PM Post #1,937 of 3,220
eek.gif
eek.gif
eek.gif
eek.gif
eek.gif
I D I D I T !!!!!!! omg
biggrin.gif


Many thanks for your detailed and encouraging answer Qusp, it really helped (especially the multimeter tip- I found the culprit bridge because of it!)!!!

I finally have an iMod...
smily_headphones1.gif
I'm long past being a teenager, but somehow I feel like a child who found a super present under a Xmas tree. Psychology is right - unexpected rewards are the more gratifying ones, I 've not been this pleased with some material "good" for a long-long while. Feel great!
biggrin.gif
ABSOLUTELY love the sound too- even through Corda Move>iBuds I was spellbound by the purity-clarity-authority and light effortlessness of the new signal- I'm in love with my baby!!
smily_headphones1.gif


Here is the picture:

[size=medium]Regarding the removal of capacitors/inductors[/size] - I've changed course after 1st year of my Physics degree and forgot everything I've learnt there from it (felt much better after doing so too), but the "path of least resistance" argument did not sound convincing to me when applied to diyMod... Indeed, I did a quick look on wiki and quote: "the amount of current through each path is inversely proportional to its electrical resistance." This of course means that, while MOST of the current would go through the newly soldered wires due to their relatively lower resistance, SOME (10%? 20%? 30? 40? who knows) crap -ie stock iPod LO sound- WILL mix with the pure DAC sound. I did not want that- even 10% of sound quality is worthwhile a few minutes of desoldering/few dead nerve cells
smily_headphones1.gif
Especially after I went out and bought cryo wires, silver solder and Silmic2 caps to put into the thing
wink.gif


[size=large]Ubi's tips for diy soldering noobs[/size]
smily_headphones1.gif
(This was my first ever soldering project, I've never even tried soldering two piecies of wire beforehand). This IS doable, dont get discoraged if you've never soldered before. A bit of patience, a bit of self belief and a good night of sleep beforehand is all thats needed. I suggest the following routine:

1. Watch "tangent soldering tutorials"- especially tute 1 -soldering equipment, tute 2 -soldering and tute 3- desoldering. They are only about 6-7 minutes long. Google them.

2. Buy pretty much everything what Tangent says - soldering iron (cheap one, but not THE cheapest. I got exactly the same $9 iron as Tangent was advising in his tute), Eutactic solder (Take Five audio Cardas Eutactic Rosin Core Silver Solder for $3 for 10g - plenty for several diyMods. Eutactic means solder goes from liquid to solid extremely quickly which makes the whole process MUCH easier. I was given some cheap non-eutactic (60/40) solder with my iron and the difference is pretty huge - cold solder joints ahoy! with that one);
Ipod dock or 2, a few mini connectors, some quality wire (why save pennies an then wonder if your diyMod is as good as it could have been?) Take Five sell 99.9999% pure cryo silver and copper wires for less then $7 a foot (1 foot is enough for one LOD connector), also buy quality 30+AWG wire for inside iPod), "helping hands with magnifying glass" ($5), cellulose kitchen sponge for the iron, capacitors for the lod (I got ELNA SILMIC2 47uf 6.3V from beezar.com - following advice from EFN who likened them to full size film caps sound wise). I also found solvent free "liquid Nails" glue to be useful at some stages too.

3. Dont start with desoldering ipod's insides! I made a mini-mini interconnect with single molecule 99.9999% pure copper wires ($3-4 per foot) to start my soldering career. It was easy, but still a challenge +I needed a mini-mini anyway. Immediate saving of 30-40$
smily_headphones1.gif


2. Then, having seen first hand how solder flows, step up to harder challenge - capped LOD. First, lay all wires, caps, dock, mini plug. Cut wires to length (ground should be longer as it's not capped). LOD layout is simple:
iPod Right output -> capacitor -> Right output
iPod Left output -> capacitor2 -> Left output
Ground -> Ground

NB: +ve terminal of capacitor (longer leg) soldered to ipod output pin of the dock, -ve leg (striped side of capacitor) soldered to your wire.

I still maintain that it is easier to solder to pulled out pins - I did not mean that I melted the plastic around the pins, but rather that liquid solder seeped flowed into the slits in which these pins sit. After ruining my first dock in such a manner I pulled out all the pins and soldered the three needed ones (R,L,Ground) separately. Altogether I spent at least 5 hours on the damn LOD, it was a steep learning curve, but manageable and unlike with ipod insides there is no "game over"- you CAN "hit continue" and carry on with your learning. After you are able to solder tiny dock pins to caps /wires, you're ready to tackle the iPod's insides...

3. Actually after the pains with the LOD connector, the insides work was a bit an anticlimax- its not that hard. If not for silly mistakes - due to impatient rushing to finish the mod before day's end- I would have saved myself a few nerve cells and a few hours too. This guide is perfect for info on how to open the iPod - iPod Original -good hi res photos and explanations.
Tangent's desoldering tute needs to applied to a letter - solder the tip of the iron, clean, quickly move from one side of the component to the other.
Then lay out the wire - VERY finicky and VERY important. I would suggest using tape very generously to secure the wire before soldering. Best way is to shape the cables so that they lie EXACTLY on the pads you are to solder it to, so that you only have to briefly TOUCH them with clean slightly soldered iron and wires stick immediately. If I was to do another mod, I would also [size=small]use a thin sewing needle to thinly spread "liquid nails" paste onto the parts that your wire connections MIGHT bridge to (ie as an insulator)[/size] - I ended up doing this after I found the shorting points- but it would be infinitely easier to do so in advance.
Then check that everything sounds wonderful, and apply liquid nails paste to replace the abundance of sticky tape. Liquid nails is perfect as it is immediately thick enough to "trap" the wires and stop them from moving and yet does not set instantly (like hot glue).

PS Dont skimp on quality materials, I didn't and I cant see how one could not notice the sound quality class shift when compared to stock iPod LO!

Sorry for repeating what was said hundred times over in this brilliant, amazing thread, but maybe someone will find my personal little overview to be useful!
 
Jun 9, 2009 at 6:10 PM Post #1,938 of 3,220
Thanks a lot for sharing your experience, Ubjiza. We're all celebrating with you.
o2smile.gif
Congrats on your first soldering experience. Thanks to qusp as well for covering support for me.
normal_smile .gif


Also, thanks a lot for your tips on soldering, Ubijza. I think it really empowers other beginners to try their hand at the iron when they see posts like yours. I'm definitely going to use your post for others. Thanks for paying it forward.

Also, I just wanted to keep you all updated: I hammered out a lot of gallery work this past weekend for the new website. I uploaded most of the guides (pretty much verbatim to the OP), but at least they're stowed away and neatly organized in a way that doesn't bombard ISPs' bandwidth for those that are sensitive to verbose forum posts. Now my largest task is collecting all the images in this thread, filing them by model and modder, adding them to their respective galleries, and adding comments. Meanwhile, I'm learning about this CSS programming language, and I usually shy away from programming. Not the worst thing in the world, but it is the start of something new (no, I've never watched HSM
redface.gif
). That's a huge task especially when I'm juggling work, church, youth group, teaching guitar (I've been playing since January, teaching since March; go figure), and a girlfriend. Slow progress, but it'll be magnificent when complete. As usual, the website is a perpetual work in progress.

Also, thanks to all those following this thread that have helped push it past 200k views. I'm vain, and I'm constantly checking the stats. Cheers, readers.
 
Jun 9, 2009 at 10:14 PM Post #1,939 of 3,220
Thanks for your kind words, Joneeboi!
Looking forward to your new guide, please feel free to use my above post in any way you feel fit. For the most part its a simple reiteration of other people's words, apart from (I think so anyway) my idea to insulate potential shorting points with liquid nails glue...

Oh, and I also disputed your advice on not desoldering the components haha (sorry), perhaps my above reasoning is wrong of course...

MANY-MANY thanks again for starting and looking after this amazing thread!
Cheers!
 
Jun 10, 2009 at 6:08 AM Post #1,940 of 3,220
Quote:

Originally Posted by Ubijza /img/forum/go_quote.gif
Thanks for your kind words, Joneeboi!
Looking forward to your new guide, please feel free to use my above post in any way you feel fit. For the most part its a simple reiteration of other people's words, apart from (I think so anyway) my idea to insulate potential shorting points with liquid nails glue...


errrmm no sorry, your idea to use glue to insulate the wires is not new i'm afraid. anyone who has some electronics experience and some that dont will do that. I use 5 minute epoxy.

Quote:

Oh, and I also disputed your advice on not desoldering the components haha (sorry), perhaps my above reasoning is wrong of course...


thats why you short the caps on the board as well if you want to be that finicky. all the same I still do remove them for completeness most of the time I guess, but I must've done about 50+ of these, I wouldnt really recommend it to someone with no experience though, as the difference is not really audible to me.

Jon: no worries man
biggrin.gif
looking forward to the new site being fully operational. i'll have some new pics for you shortly of docks and a couple of mods.
 
Jun 12, 2009 at 2:32 PM Post #1,941 of 3,220
Hi, I just wanted to report another success on the Nano 2G.

I followed the pics and shorted the path to the pins, made myself a lod with two BG 47uf caps inside and there is sound via my mini3.

Two things I'd like to note:

the soldering is pretty hard as most said, but I happened to have a very small tip for my soldering station, so that made things much easier.

Sound quality is probably a bit better at the moment. The path is: diymod nano 2g -> BG 47uf LOD -> mini3 -> Grado SR80

I noticed that the mini3 can amplify the sound a lot! However maybe only 1/3 of it is usable as there is a high pitched hiss that comes with the signal. Even if no music is playing, when the mini3 is at max the noise/hiss is horrendous.

I doubt this is due to BG burn-in period, rather something is not perfect with my work on the mini3, lod and/or diymod (which is the easiest/fastest to do part imo).

Now in order to hear that hiss, I have to up the volume to more than what the nano can amplify from its headphone out, but still it doesn't sound right that there is hiss/noise in the headphones in a world where the caps matter for sound quality
smily_headphones1.gif


Oh yes, the mini3 is default high-performance configuration.

If you have any suggestions for me, please post. I will do all kinds of tests just to make this perfect, because my friends now mock me, that I do all this work and in the end I end up with a bulky mp3 player, and hiss in the headphones...

joneeboi, great work on the diymod!
 
Jun 14, 2009 at 5:46 AM Post #1,942 of 3,220
G'day,
I have 3 iPod 5.5g and 2 4g iPods that im going to DiyMod, I have 8 47uf Blackgates and two 22uf's (just to compare the difference). Whats the personal preferences of the caps? whats the favourite?
I have an 80gb 5.5g ipod video im modding, im putting in a cf adapter and have plenty of room. Will putting 4 caps instead of 2 make a difference?
 
Jun 14, 2009 at 2:45 PM Post #1,943 of 3,220
TeraHz:

Check your solder points. See if there are any bridges anywhere, and take pictures if you can. I've found that taking super hi-res, super sharp macro pictures can help you identify problems if you take the photo right. Consider it a weak microscope without the orientation difference. This goes for both the diyMod wiring and the LOD.

Kaydes:

In my diyMod 4G, I could hear a pretty clear difference between 22uF and 47uF. The bass is better with the 47, but it ultimately comes down to how much you like what you're hearing. You get more bass with the 47, but maybe you don't want all that bass. Your call.

Also, paralleling Black Gates is supposed to make them really good. I can't say you'll hear the improvement, so do what you like. With large electrolytic caps, some like to bypass with small film caps for better higher frequency performance. That's another grey area, but something you can try. In general, films are faster than electrolytics, but Black Gates seem to be the exception depending on who you talk to. Do what sounds good to you.
 
Jun 15, 2009 at 2:23 AM Post #1,945 of 3,220
Quote:

Originally Posted by joneeboi /img/forum/go_quote.gif
TeraHz:

Check your solder points. See if there are any bridges anywhere, and take pictures if you can. I've found that taking super hi-res, super sharp macro pictures can help you identify problems if you take the photo right. Consider it a weak microscope without the orientation difference. This goes for both the diyMod wiring and the LOD.
<snip>


Checked for bridges doesn't seem like there are any. Checked with the loupe and with the fluke
smily_headphones1.gif


Does it matter which ground I use in the LOD? I used the big metal part of the connector for ground, maybe I need to use pin 2?

I'm waiting for my camera to come so I can take some pics...
 
Jun 15, 2009 at 8:01 AM Post #1,946 of 3,220
Quote:

Originally Posted by joneeboi /img/forum/go_quote.gif
TeraHz:

Kaydes:

In my diyMod 4G, I could hear a pretty clear difference between 22uF and 47uF. The bass is better with the 47, but it ultimately comes down to how much you like what you're hearing. You get more bass with the 47, but maybe you don't want all that bass. Your call.

Also, paralleling Black Gates is supposed to make them really good. I can't say you'll hear the improvement, so do what you like. With large electrolytic caps, some like to bypass with small film caps for better higher frequency performance. That's another grey area, but something you can try. In general, films are faster than electrolytics, but Black Gates seem to be the exception depending on who you talk to. Do what sounds good to you.


Thank you!
I'm actually not all that good with 'understanding' the whole theoretical side of this, I just wanna solder it in and try it. How would you run the circuit through two caps on each signal?
Ohh... and I do indeed like my bass
smily_headphones1.gif
 
Jun 16, 2009 at 12:28 AM Post #1,947 of 3,220
TeraHz:

I recommend using any of pins 15, 16, 29 and 30. I recommend against using pins 1 and 2, but a lot of people seem to insist on it. It makes for a much riskier, less reliable operation, so I don't know why everyone uses it. Also of note, pins 1, 2, 15, 16, 29 and 30 are all the same ground signal.

Kaydes:

Google "bypass capacitors" and "parallel signals." It's tough to explain in a single post.
 
Jun 16, 2009 at 12:38 AM Post #1,948 of 3,220
to use a bypass cap, you would solder cable to one leg of cap, other leg to signal pin of the dock and then use your bypass cap by connecting one of its legs to one side of the cap already soldered into place, and the free leg to the other one.

ill try and knock up a pic in paint as my technical language is not exactly where it should be lol

infact, after knocking up a picture in paint, my schematic drawing skills are non existant too lmao but hey, for a layman it should tell ya exactly what ya need to know:

same principle for axial's and bare in mind the pic just shows one signal cable, for both left and right you would just repeat.

edit, ignore the bottom picture altogether, it is irrelevant and shows caps in series, not parallel, the top picture is what ya want
 
Jun 16, 2009 at 6:32 AM Post #1,949 of 3,220
Quote:

Originally Posted by joneeboi /img/forum/go_quote.gif
TeraHz:

Check your solder points. See if there are any bridges anywhere, and take pictures if you can. I've found that taking super hi-res, super sharp macro pictures can help you identify problems if you take the photo right. Consider it a weak microscope without the orientation difference. This goes for both the diyMod wiring and the LOD.

Kaydes:

In my diyMod 4G, I could hear a pretty clear difference between 22uF and 47uF. The bass is better with the 47, but it ultimately comes down to how much you like what you're hearing. You get more bass with the 47, but maybe you don't want all that bass. Your call.

Also, paralleling Black Gates is supposed to make them really good. I can't say you'll hear the improvement, so do what you like. With large electrolytic caps, some like to bypass with small film caps for better higher frequency performance. That's another grey area, but something you can try. In general, films are faster than electrolytics, but Black Gates seem to be the exception depending on who you talk to. Do what sounds good to you.


jon: I think i'm going to have to go back and test again. I didnt find any difference between 22uf and 47uf, although I didnt really A/B them at all, I just havent noticed anything lacking with 22uf since I started using them most of the time because they are smaller. the science says they shouldnt sound any different either.

22uf into a 50k pot, gives a corner frequency of 0.144686312hz with phase distortion up to 1.446863121hz 47uf gives 0.067725508hz and 0.67725508hz respectively. errrm my calc actually just gives zero as I guess the value is too low, but just move the decimal one over to the right. now I guess you can say that is more bass LOL, but both are so far below the frequencies produced in recorded media to be effectively the same. I regularly use as low as 2.2uf with film caps (usually with a parallel cap) with no lack of bass into 50k (Lisa III, pico) so I think perhaps there is some psycho-accoustics going on with your hearing
tongue.gif
all the same i'll knock up another 47uf LOD just to check.
 
Jun 16, 2009 at 8:38 AM Post #1,950 of 3,220
Quote:

Originally Posted by dazzer1975 /img/forum/go_quote.gif
if you were to parallel caps in the lod, all youd do is solder your wire to one leg of the cap, solder the free leg to a leg of the second cap and then solder the remaining free leg to the signal pin on the dock.


Hi dazzer1975.
What you have shown is Series capacitance (reduced capacitance), parallel capacitance is identical to bypass i.e. the sum of the two capacitors.
This is the reverse effect you get with resistors.
See here for a better explanation.

Cheers
Lee
 

Users who are viewing this thread

Back
Top